Why Leave VMware Right Now
The trigger rarely has anything to do with ESXi itself being unstable or outdated. The technology still works fine, what changed is the contract: perpetual licenses are gone, subscription tiers are now mandatory, and renewal quotes no longer fit the budget many teams had planned around.
Organizations are increasingly adopting Proxmox VE as a cost-efficient alternative with strong KVM-based virtualization capabilities and built-in management tools.
At the same time, Proxmox has significantly improved its migration tooling, especially with the introduction of the VM Import Wizard in newer releases.
Method 1: The Built-in ESXi Import Wizard (Recommended for Most Teams)
This is now the path Proxmox itself recommends. Proxmox VE 8.2 introduced a built-in ESXi Import Wizard, and by the 9.x series, it has become the recommended first-choice method for most migrations. Functionally, it’s an integrated VM importer that uses Proxmox’s storage plugin system to import the VM as a whole, mapping most of its configuration directly into Proxmox VE’s config with reduced downtime compared to manual conversion.
Step 1. Confirm version and patch level
Make sure your Proxmox VE installation is on version 8 or higher, with the latest available system updates applied.
Step 2. Add the ESXi host as an import source
In the Proxmox web UI, go to Datacenter > Storage > Add > ESXi, and enter the domain or IP address along with admin credentials.
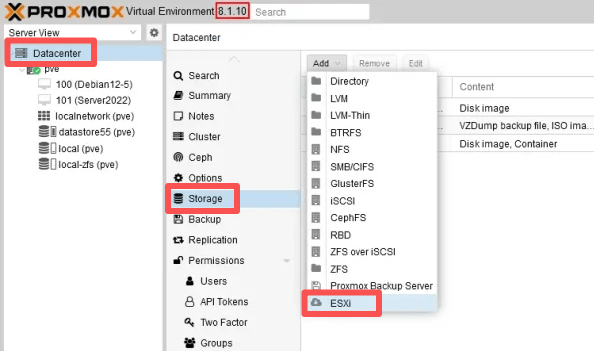
If the ESXi instance uses a self-signed certificate, either add the CA to your system trust store or check the Skip Certificate Verification box.
Step 3. Browse, select, and import
The wizard connects to your VMware environment and lists available VMs along with their configurations.
You select the VM, review the mapped settings, and start the import.
Power down the source VM before importing.
Method 2: Manual Export and Disk Conversion (OVF/OVA + qemu-img)
For older ESXi versions, vSAN-backed storage, or situations where you simply want more granular control, the manual route is the reliable fallback. The OVF/OVA method works as a fallback regardless of ESXi version.
Step 1. Export from vSphere
In the vSphere Client, right-click the VM and select Export OVF Template, choosing OVA for a single-file export or OVF for a folder of separate files.
Alternatively, the VMDK files can be accessed directly on the ESXi datastore over SSH or SCP.
Step 2. Transfer files to the Proxmox host
Use SCP, rsync, or a shared NFS mount to move the exported files to the Proxmox host.
Step 3. Convert the disk format
VMware’s VMDK format isn’t natively used by Proxmox storage backends, so it needs to be converted:
Convert to qcow2 (most common, supports snapshots)
qemu-img convert -f vmdk -O qcow2 MyVM-disk1.vmdk MyVM-disk1.qcow2
Or convert to raw for ZFS / LVM-backed storage
qemu-img convert -f vmdk -O raw MyVM-disk1.vmdk MyVM-disk1.raw
These two qemu-img invocations cover the two most common Proxmox storage scenarios: qcow2 for general use, raw for ZFS or LVM storage.
Step 4. Create the VM shell and import the disk
qm importdisk 200 MyVM-disk1.qcow2 local-lvm
qm set 200 --scsi0 local-lvm:vm-200-disk-0
After conversion, create a new VM in Proxmox with the desired configuration, import the converted disk, then attach it, checking the importdisk output for the exact disk name it assigns.
Step 5. Match the original configuration exactly
Create the new VM with the same parameters as the original, CPU, memory, network cards, and virtual disk.
At the OS step, select the same guest OS that was set for the original VMware VM.
Match BIOS or UEFI to whatever boot mode the source VM used, getting this wrong is one of the most common reasons a migrated VM won’t boot.
Method 3. The Easiest Migration with Vinchin Backup & Recovery
In enterprise environments, manual migration is often not enough, especially when multiple VMs, production workloads, or backup consistency are required.
In this case, Vinchin Backup & Recovery provides a V2V workflow layered on top of its core backup engine:
Agentless, cross-platform V2V migration. Vinchin's V2V migration allows agentless, seamless VM migration between any two virtualizations among the platforms it supports, useful whether you're replacing your virtual environment outright or running a hybrid setup during the transition.
Backup-driven migration, not a one-shot script. Rather than converting disks, Vinchin lets you migrate data from one Proxmox host to another virtual platform or back again, whether you're switching workloads for more agile operations or performing a quick recovery in a hybrid environment. This means the same backup you'd take for protection purposes doubles as your migration source.
Built-in data protection during the move. Vinchin's incremental backup support means only data that has changed since the last backup needs to be transferred during migration, which meaningfully reduces bandwidth consumption and storage requirements compared to re-copying full disks every time.
Here is how to migrate VMware to Proxmox:
Tip: Make sure you already have a VMware backup in Vinchin.
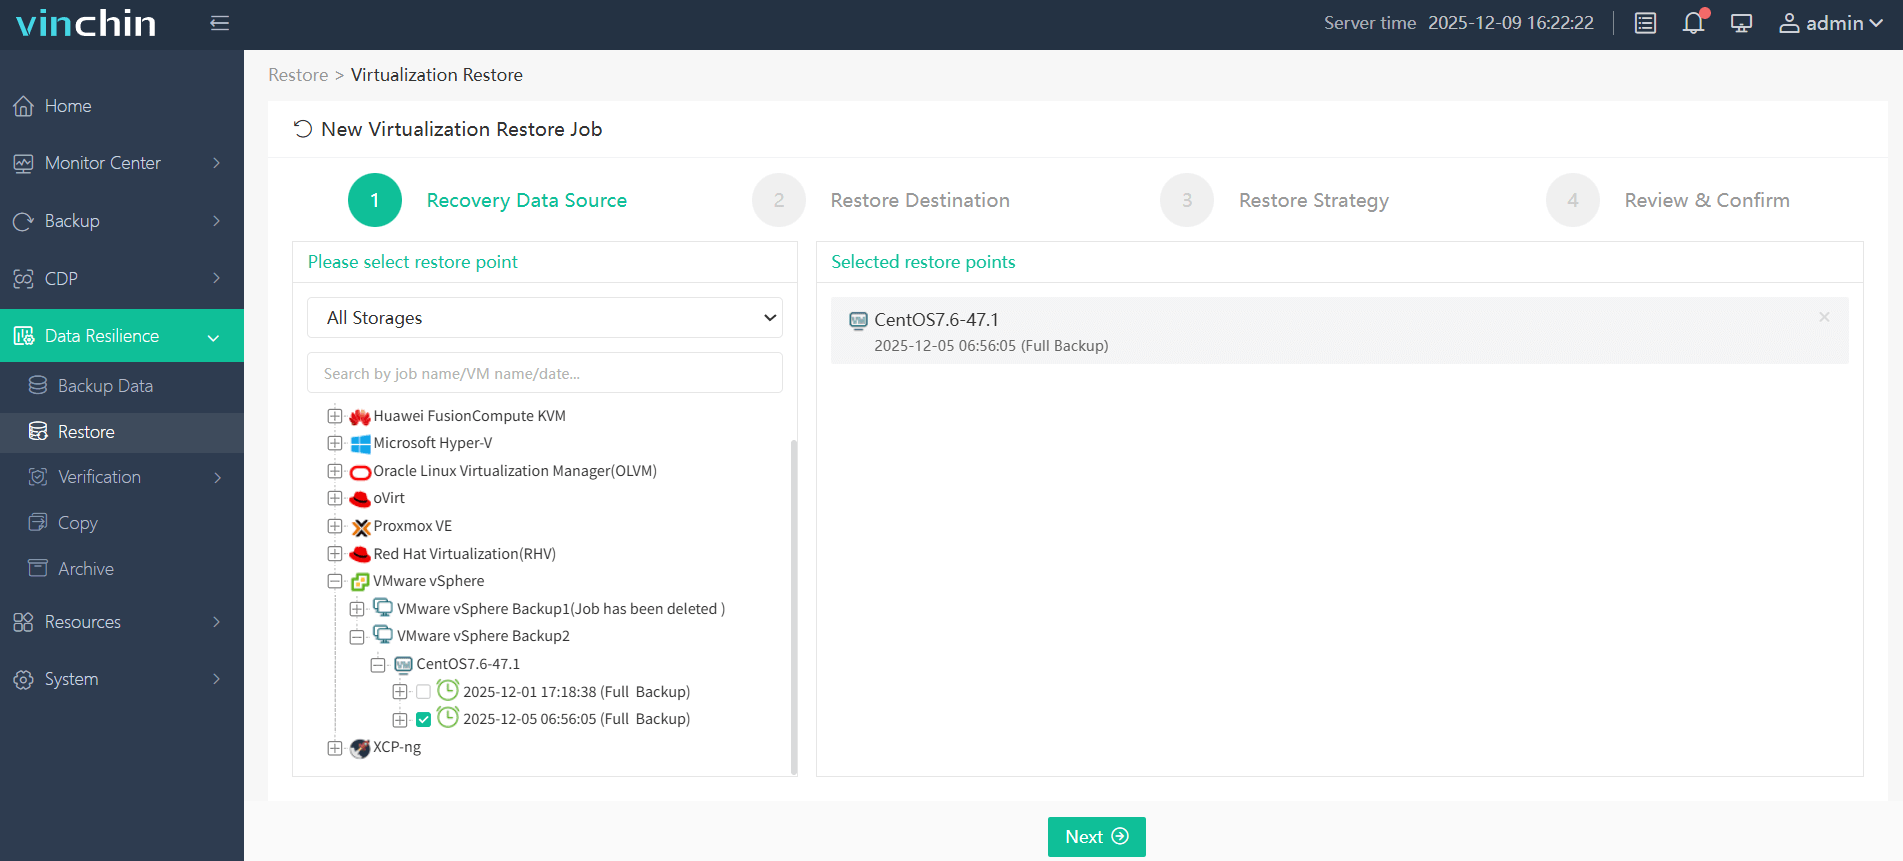
Step 1. Go to Data Resilience > Restore and choose VMware VM as the recovery data source.
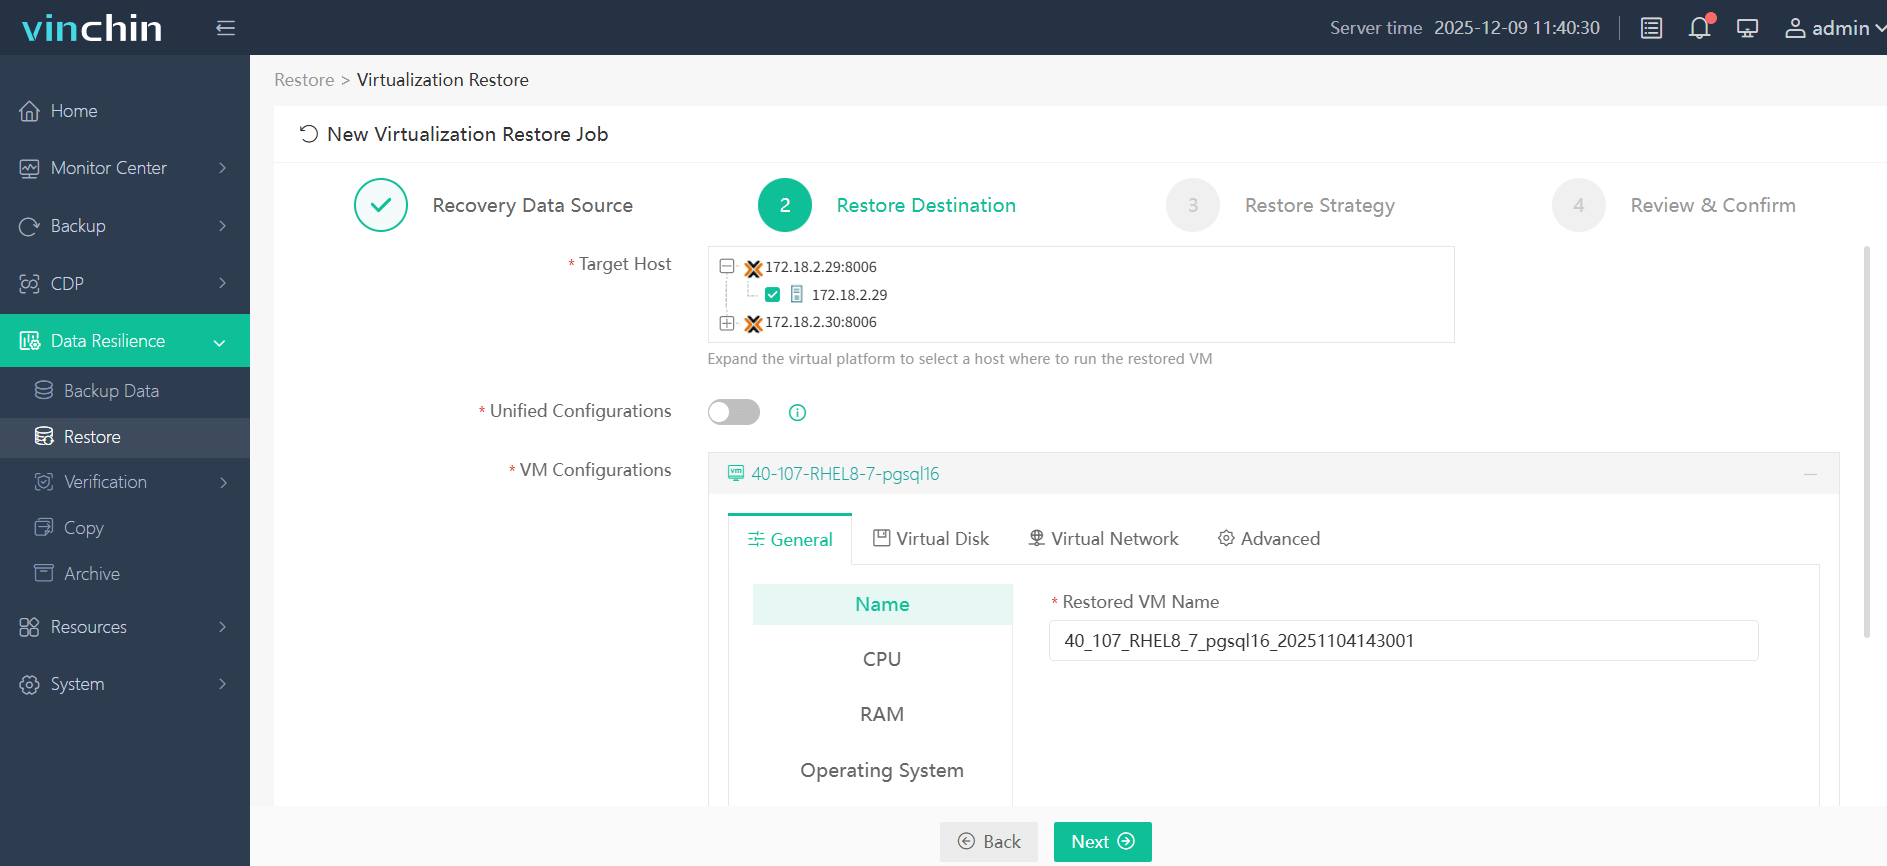
Step 2. Select Proxmox as the restore destination.
Step 3. Configure the restore strategies as you want.
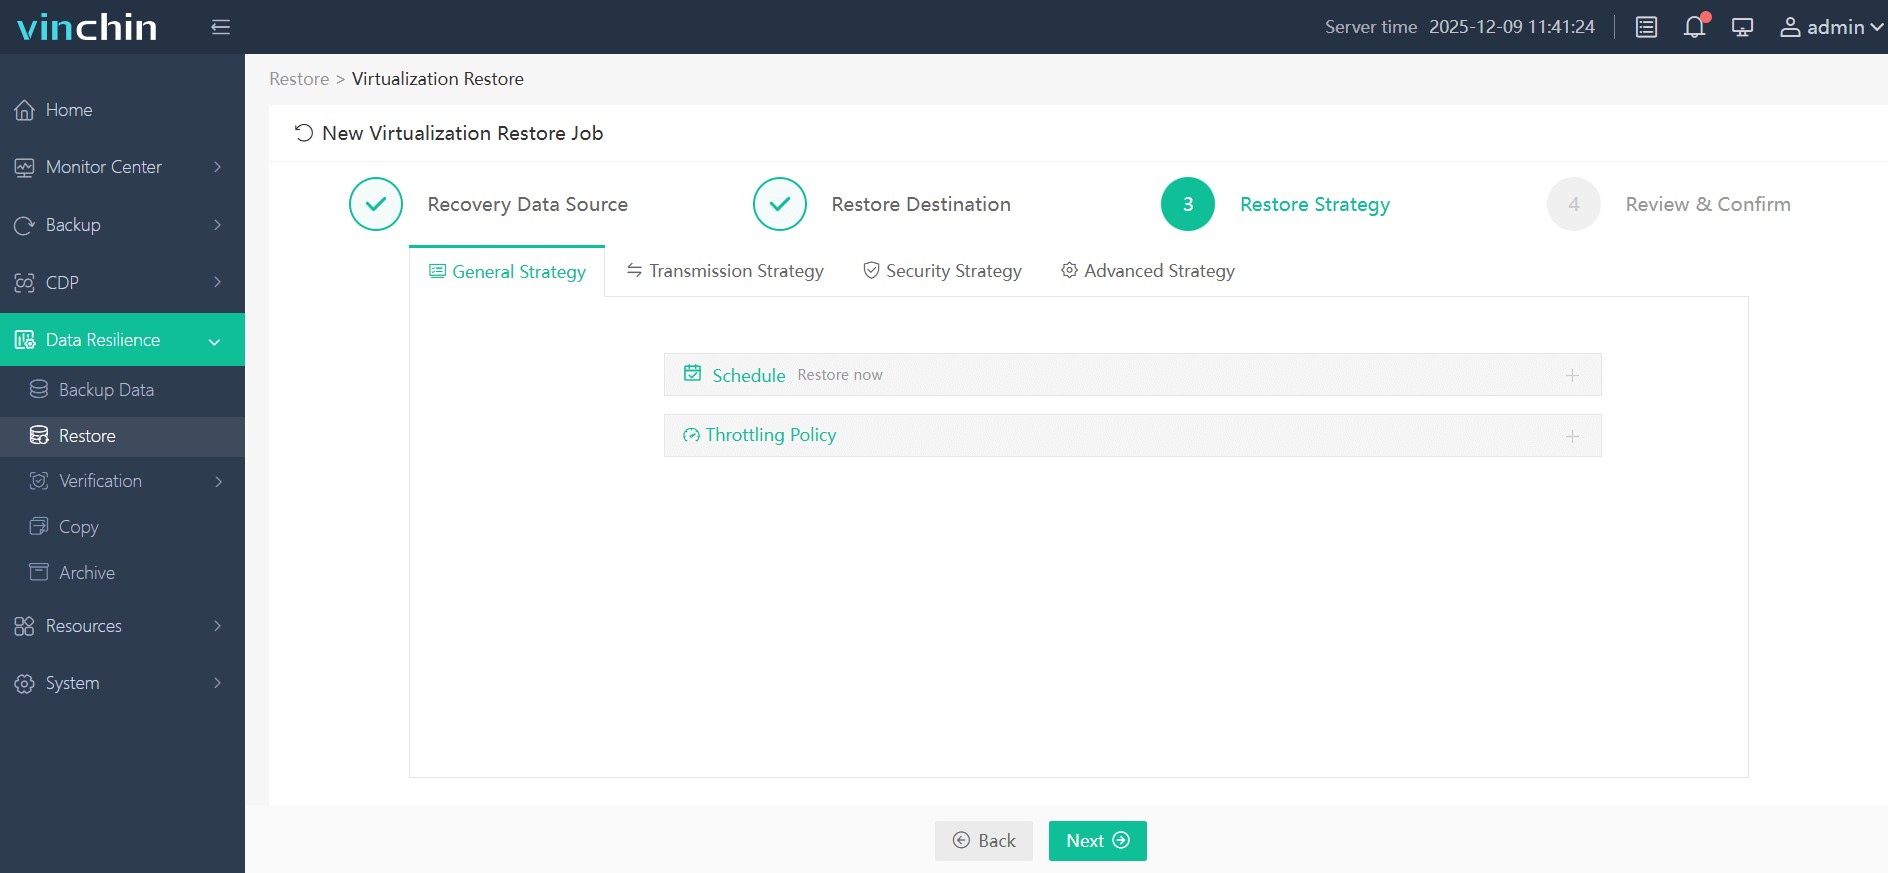
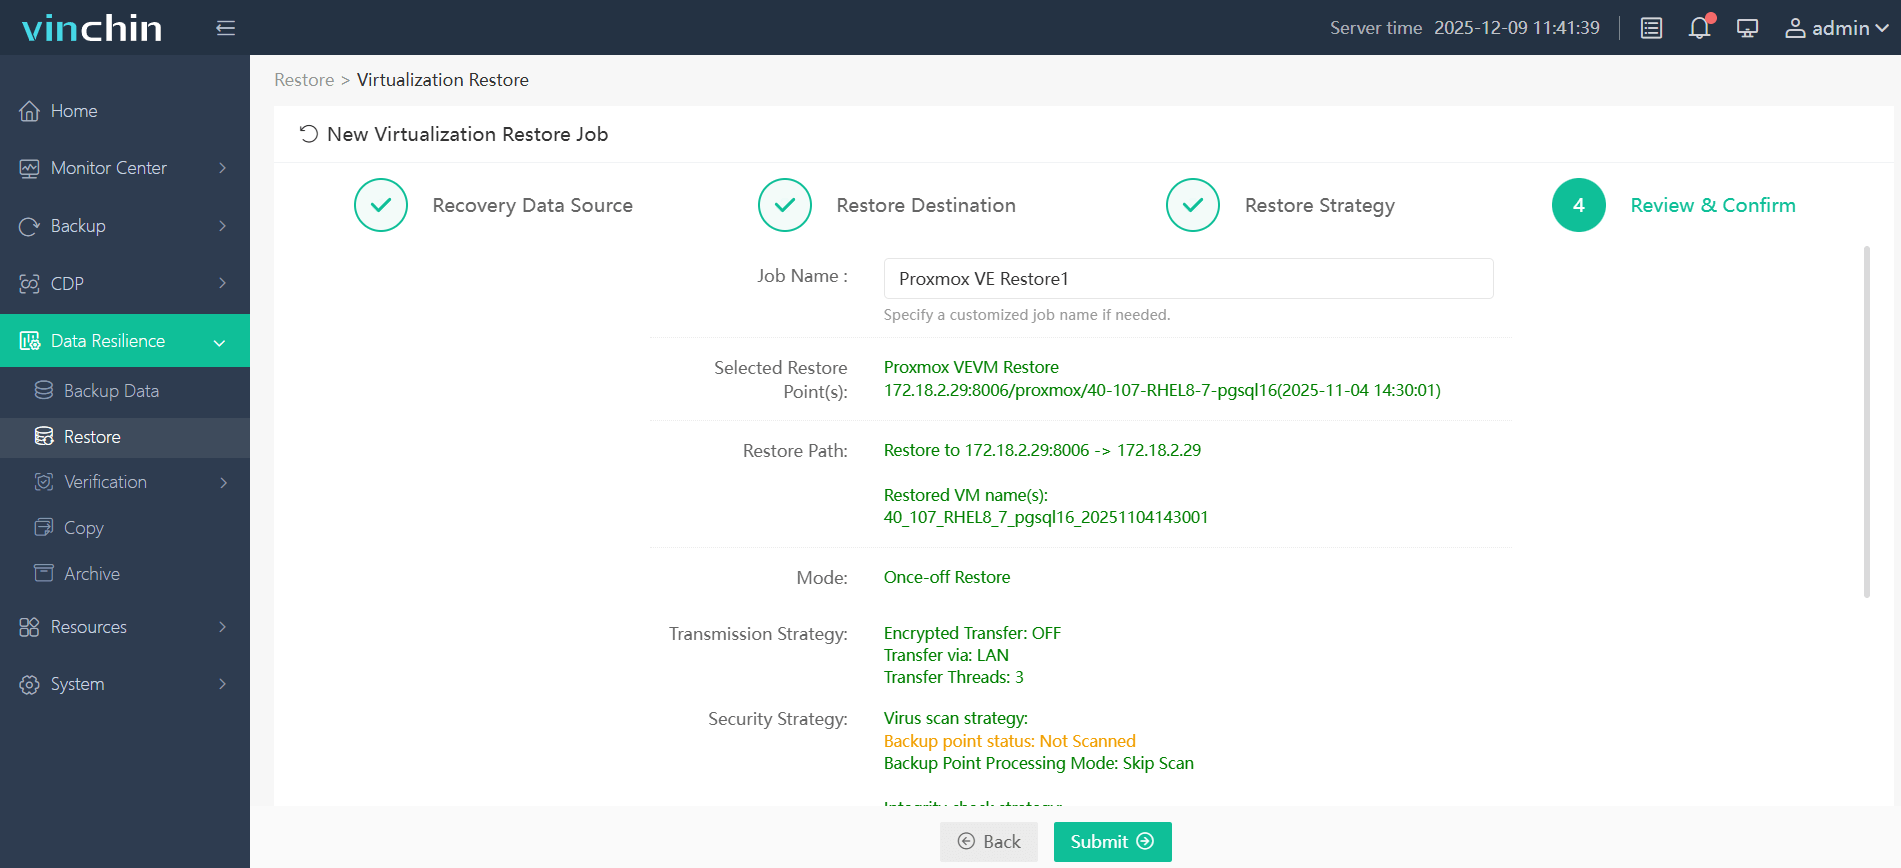
Step 4. Review and confirm the set is correct, then click Submit.
For teams that want to test the workflow before committing, Vinchin offers a 60-day full-featured free trial, with engineers available to support testing and help troubleshoot the migration directly.
Common Issues After Migration
1. Windows Boot Failure (0x7B)
Usually caused by missing VirtIO drivers.
Fix:
2. Linux Fails to Boot
Cause: missing storage drivers in initramfs
Fix:
Rebuild initramfs (update-initramfs -u or dracut -f)
3. Network Not Working
Cause: NIC mismatch (VMXNET3 → VirtIO)
Fix:
Reconfigure the network adapter in Proxmox
Performance Tips After Migration
Once VMware VMs are running on Proxmox:
Install QEMU Guest Agent for better integration
Switch to VirtIO SCSI for disk performance
Enable CPU type: host for performance parity
Test network throughput after migration
Remove VMware Tools safely
FAQs for VMware to Proxmox
Q1: Can I migrate both Windows and Linux VMs from VMware to Proxmox?
Yes, Proxmox supports migration of both Windows and Linux VMware virtual machines, Windows guests need an explicit VirtIO driver step that Linux guests generally don’t.
Q2: Does the Import Wizard preserve old VMware snapshots?
No, the Import Wizard primarily imports the current VM state, old VMware snapshots should be consolidated before migration rather than relied upon to carry over.
Q3: Do I need to uninstall VMware Tools before migration?
Not required before migration, but strongly recommended after switching to Proxmox.
Conclusion
Migrating from VMware to Proxmox is no longer a complex or risky process. Whether you choose Proxmox's built-in Import Wizard for simplicity, manual conversion for greater control, or Vinchin Backup & Recovery for enterprise-scale, backup-driven migration, careful planning is the key to a smooth transition.