User Case
"I recently installed PM on to a 120 GB SSD on a NUC7 and set up 3 containers. Now I want to move that setup onto a 1.8 TB SSD and have tried to copy the partition structure in the new drive with a view to using dd to write a complete copy of the Proxmox instance onto the bigger drive."
Running out of storage is a common challenge for Proxmox administrators. As virtual machines, containers, and backups grow over time, many users eventually need to migrate Proxmox to a new disk with greater capacity. In the case above, a user wanted to upgrade from a 120GB SSD to a 1.8TB SSD without rebuilding the environment from scratch.
While cloning tools such as dd may seem like a straightforward solution, they are not always the most efficient or reliable approach. Depending on your infrastructure, downtime tolerance, and data protection requirements, different Proxmox disk replacement methods may be more suitable for different environments. In this guide, we'll explore four proven methods and help you choose the best option for your needs.
Benefits of Migrating Proxmox to a New Disk
It offers several advantages below:
Improve performance: New storage devices, especially SSDs and NVMe drives, can significantly enhance VM responsiveness and overall storage I/O performance.
Expand capacity: A larger disk helps eliminate storage bottlenecks and provides more space for virtual machines, containers, and data growth.
Greater reliability: Replacing aging or failing disks reduces the risk of hardware-related failures and data loss.
Optimize storage architecture: Separating production workloads from backup storage can reduce I/O contention and improve system efficiency.
Faster recovery and operations: Improved storage performance can accelerate VM startup, data access, backup operations, and recovery tasks.
Preparations Before the Migration
Before migrating Proxmox to a new disk, proper preparation is crucial to ensure a smooth process and avoid data loss. Just follow these steps:
1. Back up your Proxmox configuration and important data, including VM definitions, storage configurations, and network settings. Even if the migration seems straightforward, a full backup provides a safety net in case anything goes wrong.
2. Check your current disk layout using commands like lsblk or zfs list. This helps you understand which disks are used for the system, VMs, and storage pools.
3. Identify the boot disk from the data disks, so you know exactly which disk you are replacing or migrating.
4. Verify that the new disk is properly detected by your system before starting the migration. Ensuring the disk is recognized by the BIOS/UEFI and visible in Proxmox will prevent unexpected errors during cloning or installation.
By completing these preparatory steps, you can proceed with confidence and minimize downtime while performing a Proxmox disk replacement.
4 Methods to Migrate Proxmox to a New Disk
Review the comparison table below to evaluate the downtime, complexity, and configuration retention of each method, and choose the most suitable approach for your Proxmox disk migration needs.
| Method | Downtime | Difficulty | Preserve Settings | Best For |
| Clone Disk | Low | Meidum | Yes | Basic disk replacement |
| Reinstall | Medium | Easy | Partial | Clean system depolyment, small environments |
| VM Storage Migration | Low | Medium | Yes | manual storage optimization |
| Vinchin Backup & recovery | Very low | Very Easy (automated) | Yes | enterprise-grade migration, large-scale environments |
Method 1: Clone Proxmox to a New Disk
Cloning the existing Proxmox installation to a new disk is one of the most common ways to migrate without reinstalling the system. This method is ideal if you want to keep all your configurations, VMs, and storage settings intact while upgrading to a larger or faster disk.
Step1. Prepare the new disk
Ensure the new disk is installed and detected by the system. Verify it using lsblk or fdisk -l, and remove any existing partitions if necessary.
lsblk
fdisk -l
Step2. Select a cloning method
Choose a suitable tool based on your needs:
Example using dd:
dd if=/dev/sdX of=/dev/sdY bs=64K conv=noerror,sync
Step3. Perform the cloning process
Clone the existing Proxmox system disk to the new disk using your selected tool. Make sure all partitions, permissions, and system files are correctly copied.
grub-install /dev/sdY
update-grub
Step4. Fix the boot configuration
After cloning, reinstall or update GRUB if needed. Ensure the BIOS/UEFI is set to boot from the new disk.
Step5. Verify the system
Boot from the new disk and check that VMs, storage pools, and network settings are functioning properly.
qm list
pct list
lsblk
Method 2: Reinstall Proxmox on New Disk
Reinstalling Proxmox on a new disk is a clean and reliable approach when you want to upgrade storage, resolve system issues, or start with a fresh configuration. Unlike cloning, this method involves installing a new system and restoring configurations or VMs afterward.
Step1. Install Proxmox on the new disk
Boot from the Proxmox installation ISO and install the system onto the new disk. Make sure the correct target disk is selected during installation.
Step2. Complete initial system setup
After installation, configure basic settings such as network, hostname, and IP address to ensure the node is accessible.
ip a
ping google.com
Step3. Restore configuration backup
If you previously backed up Proxmox configuration files, restore them to recover cluster settings, storage configuration, and system preferences.
scp root@old-node:/etc/pve/* /etc/pve/
systemctl restart pve-cluster
Step4. Reattach storage and VM data
Reconnect any external storage or import existing ZFS/LVM pools if applicable. Verify that VM disk files are properly detected.
lsblk
zpool status
lvs
Step5. Validate system functionality
Start virtual machines and check network connectivity, storage status, and system logs to ensure everything is working correctly.
qm list
pct list
journalctl -xe
Method 3: Migrating VM Storage (if using ZFS/LVM)
This method focuses on migrating only VM storage between disks or pools, without reinstalling Proxmox. It is commonly used when performing a Proxmox disk replacement, optimizing storage performance, or moving from one ZFS/LVM setup to another.
Step1. Identify the current storage configuration
First, check your existing storage setup to understand where VM disks are located.
zfs list
lvs
lsblk
Step2. Stop running VMs or containers
Before moving disks, ensure all related workloads are safely stopped to avoid data corruption.
qm shutdown <VMID>
pct shutdown <CTID>
Step3. ZFS pool migration (Proxmox ZFS migration)
If you are using ZFS, you can migrate data using snapshot replication.
zfs snapshot pool1/vm-100-disk-1@move
zfs send pool1/vm-100-disk-1@move | zfs receive pool2/vm-100-disk-1
Step4. LVM or manual disk migration (move VM storage to Proxmox)
If using LVM or non-ZFS storage, you can manually copy VM disks.
dd if=/dev/pool1/vm-100-disk-1 of=/dev/pool2/vm-100-disk-1 bs=64K conv=noerror,sync
Step5. Update Proxmox storage configuration
After migration, update VM configuration files so Proxmox points to the new disk location.
nano /etc/pve/qemu-server/<VMID>.conf
Step 6. Start VM and verify storage migration
Finally, start the VM and verify that the system boots correctly and storage is accessible.
qm start <VMID>
qm list
Method 4: Easiest Solution for Proxmox Disk Migration-Vinchin
The three methods above require command-line knowledge and careful configuration, which can be complex and time-consuming, especially in multi-node environments. For a simpler and safer alternative, an enterprise-grade migration solution - Vinchin Backup & Recovery is recommended.
With the intuitive web interface of Vinchin, migrating Proxmox to a new disk needs just a few steps. Before the migration, remember to create a Proxmox backup in advance, and then follow the restoration guide:
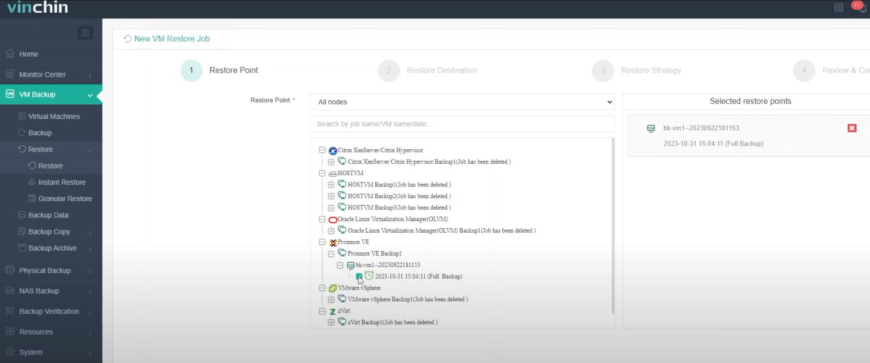
1. Navigate to Data Resilience > Restore, and select the Proxmox backup storage as the data source.
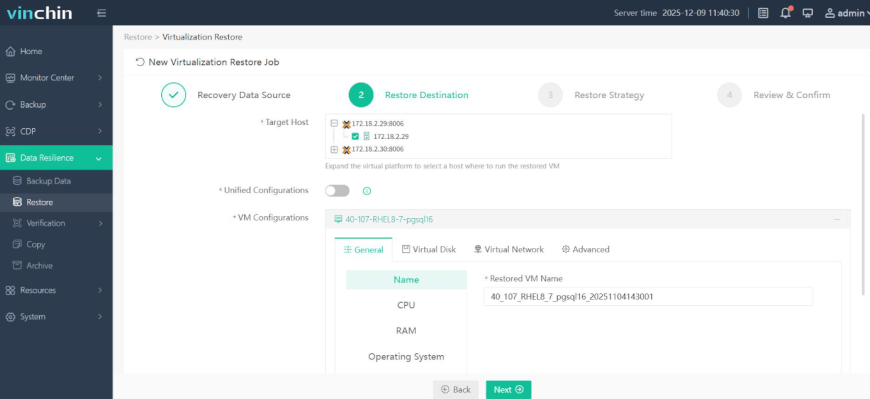
2. Choose the Proxmox target node with the new disk mounted as the restore destination, keep the default format (qcow2/raw) with automatic driver adaptation, and optionally adjust the VM name and hardware resources.
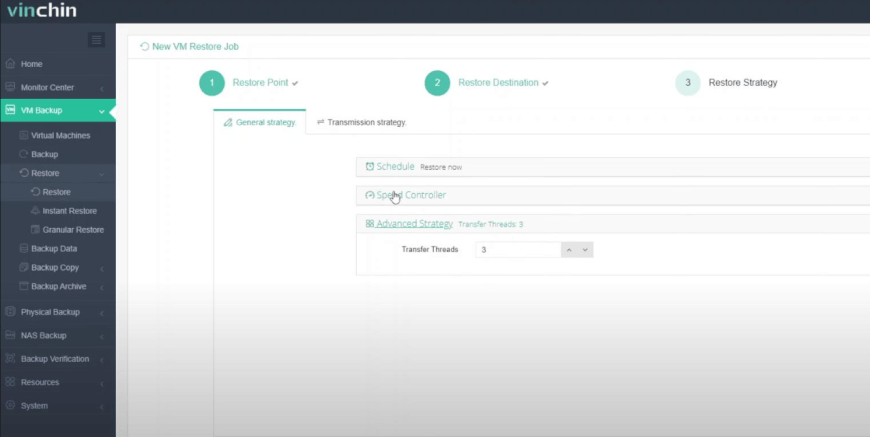
3. Configure the restore strategies. Either start the migration immediately or schedule it at a specific time, and set the throttling policy if needed.
4. Review the restore settings, name the task, and submit it.

Vinchin Backup & Recovery has gained trust from thousands of organizations worldwide and helped them build robust VM data protection. It offers a fully-featured free trial for 60 days; click the download button below to unlock advanced features!
Performance Optimization Tips After Migration
After migration, you can apply several Proxmox optimization practices to improve storage efficiency and performance. They include:
Enable Proxmox ZFS Compression: Turn on LZ4 compression on ZFS pools to reduce disk usage and improve I/O efficiency for compressible data.
Tune SSD scheduler: Use SSD-optimized I/O schedulers (e.g., none or mq-deadline) to reduce latency and improve throughput.
Enable TRIM (discard): Allow the system to pass discard commands to SSDs to maintain long-term write performance and extend drive lifespan.
Adjust caching settings: Configure cache mode (write-back/write-through) based on workload needs to balance performance and data safety.
FAQs on Migrating Proxmox to a New Disk
Q1: Can I migrate Proxmox to a larger disk?
Yes. You can do this by cloning the existing system disk or reinstalling Proxmox and restoring backups. After migration, expand the partition, LVM volume, or ZFS pool to use the additional space. Always back up your data before starting the process.
Q2: How does storage type (ZFS, LVM, directory) affect migration to a new disk?
Storage backend significantly impacts migration behavior:
ZFS supports snapshots and efficient incremental transfer
LVM offers fast block-level operations but less flexibility
Directory-based storage relies on file-level copying, which is slower for large disks
Q3: Can migration cause disk alignment or performance issues on the new disk?
Yes, improper alignment or suboptimal partitioning on SSDs can reduce I/O efficiency. It is recommended to ensure proper 4K alignment and enable SSD-optimized settings after migration.
Q4: What post-migration storage tuning is recommended for performance stability?
After migration, it is recommended to enable TRIM for SSDs, tune I/O schedulers, enable ZFS compression where applicable, and validate caching policies to match workload characteristics.
Conclusion
Migrating Proxmox storage is a key step for upgrades, performance improvements, or disk replacement. This article lists four ways to migrate Proxmox to a new disk, including system cloning, clean reinstallation, VM storage migration with ZFS/LVM, or using enterprise tools like Vinchin Backup & Recovery for automated migration.
Each method varies in complexity and downtime, so the best choice depends on your setup and goals. With proper planning, Proxmox disk migration can be completed safely and with minimal disruption.