Users often run into issues when trying to move virtual machines from VMware Workstation to Proxmox VE. Because the two platforms use different virtualization architectures, migrations can lead to problems such as disk incompatibility, boot failures, or broken network settings. This makes the process far from straightforward for many users. In this article, we explore practical methods to simplify the migration from VMware Workstation to Proxmox and help ensure a smooth transition.
What You Need to Know Before Migration
Before migrating VMware Workstation to Proxmox VE, it is important to understand several key technical differences that may affect compatibility and migration success:
VMware Workstation runs on a host OS, while Proxmox VE is a bare-metal (Type 1) hypervisor. This affects performance and compatibility.
VMware uses VMDK, whereas Proxmox uses QCOW2/RAW, and disk conversion is often required.
The network models of VMware and Proxmox are different, so manual configuration is often needed after migration.
The boot mode of these two platforms must match, or the VM may fail to start.
Always shut down the VM before migration to avoid corruption and errors.
Preparation Checklist
Ensure the virtual machine is fully shut down (not suspended) to avoid snapshot or state inconsistency during migration.
Find the VM directory and identify configuration files (.vmx) and virtual disks (.vmdk), which are required for migration and conversion.
Verify whether the virtual disk is a single file or split into multiple parts, and check if snapshots exist, as chained snapshots must be consolidated before migration.
Make sure Proxmox is properly installed and storage is ready. Choose an appropriate backend based on performance and capacity needs, such as local-lvm for simplicity or ZFS for advanced features.
Prepare a way to transfer VM files to the Proxmox host, such as enabling SSH, SCP, or configuring a shared storage/NFS/SMB upload path for efficient file transfer.
Method 1: Convert VMDK to Proxmox VM
This method converts a VMware Workstation disk (VMDK) into a Proxmox-compatible format and attaches it to a new VM.
Step 1: Shut down the VM and locate files
Power off the VM and find the .vmdk file in the VMware directory.
Step 2: Transfer the disk to Proxmox
Upload the VMDK file to your Proxmox host via SCP or shared storage.
Step 3: Convert VMDK to QCOW2
Run the conversion command on Proxmox:
qemu-img convert -f vmdk source.vmdk -O qcow2 disk.qcow2
Step 4: Create a VM and attach the disk
Create a new VM in Proxmox, then import or attach the converted disk.
qm create 100 --name migrated-vm --memory 4096 --cores 2 --net0 virtio,bridge=vmbr0
qm importdisk 100 disk.qcow2 local-lvm
qm set 100 --scsihw virtio-scsi-pci --scsi0 local-lvm:vm-100-disk-0
qm set 100 --boot order=scsi0
Step 5: Start the VM
Boot the VM and install VirtIO drivers if required (for Windows systems).
Method 2: Import VMware VM to Proxmox
This method uses Proxmox’s built-in import tools to directly bring a VMware Workstation VM into Proxmox without manually converting the disk beforehand.
Step 1: Shut down the VMware VM
Ensure the VM is fully powered off to avoid inconsistent disk states.
Step 2: Locate and transfer VM files
Copy the .vmdk file (and optionally .vmx) to the Proxmox host.
Step 3: Create an empty VM in Proxmox
Set basic parameters such as VM ID, CPU, memory, and firmware (BIOS/UEFI).
qm create 101 --name vm-import --memory 4096 --cores 2 --net0 virtio,bridge=vmbr0
Step 4: Import the VMDK disk into Proxmox storage
Use qm importdisk to attach and convert the disk automatically.
qm importdisk 101 source.vmdk local-lvm
Step 5: Attach the imported disk to the VM
qm set 101 --scsihw virtio-scsi-pci --scsi0 local-lvm:vm-101-disk-0
qm set 101 --boot order=scsi0
Step 6: Start the VM and verify boot
Boot the VM and confirm the system loads correctly. Install VirtIO drivers if required for Windows guests.
Method 3: Use Proxmox CLI Migration Workflow
This method uses Proxmox CLI commands to streamline the migration process from VMware Workstation to Proxmox, especially useful for automation or repeatable deployments.
Step 1: Shut down the VMware VM and locate the disk file
Ensure the VM is powered off and identify the .vmdk file to be migrated.
Step 2: Transfer VMDK to Proxmox host
Upload the disk file to Proxmox using SCP, SFTP, or shared storage.
Step 3: Create a VM shell in Proxmox (without a disk)
qm create 102 --name cli-migrated-vm --memory 4096 --cores 2 --net0 virtio,bridge=vmbr0
Step 4: Import and attach the disk via CLI
qm importdisk 102 source.vmdk local-lvm
qm set 102 --scsihw virtio-scsi-pci --scsi0 local-lvm:vm-102-disk-0
Step 5: Configure boot settings and start VM
qm set 102 --boot order=scsi0
qm start 102
Step 6: Post-migration adjustments
Install VirtIO drivers (for Windows VMs), verify network configuration, and remove VMware Tools if previously installed.
Seamlessly Migrate VMware Workstation to Proxmox via Vinchin Backup & Recovery
While the above three methods can effectively complete a VMware Workstation to Proxmox migration, they all require significant manual effort and technical handling, especially in scenarios involving multiple VMs or complex configurations.
To simplify the process and improve efficiency, many organizations turn to professional migration tools. Vinchin Backup & Recovery provides an automated and agentless solution that streamlines VMware Workstation to Proxmox migration, reduces operational complexity, and helps ensure faster, more reliable VM transitions with minimal downtime.
Vinchin supports over 15 virtualization platforms, including VMware, Proxmox, OpenStack, Xenserver, Red Hat, etc., and it utilizes encryption technologies to ensure the data is immutable and integrated, and delivers a fast recovery speed to enable near-zero RTO and minimal production loss. The centralized web console makes it easy to manage and monitor VM states and the current progress.
To migrate VMware to Proxmox VE, you need to create a backup first and then restore it to the Proxmox VM.
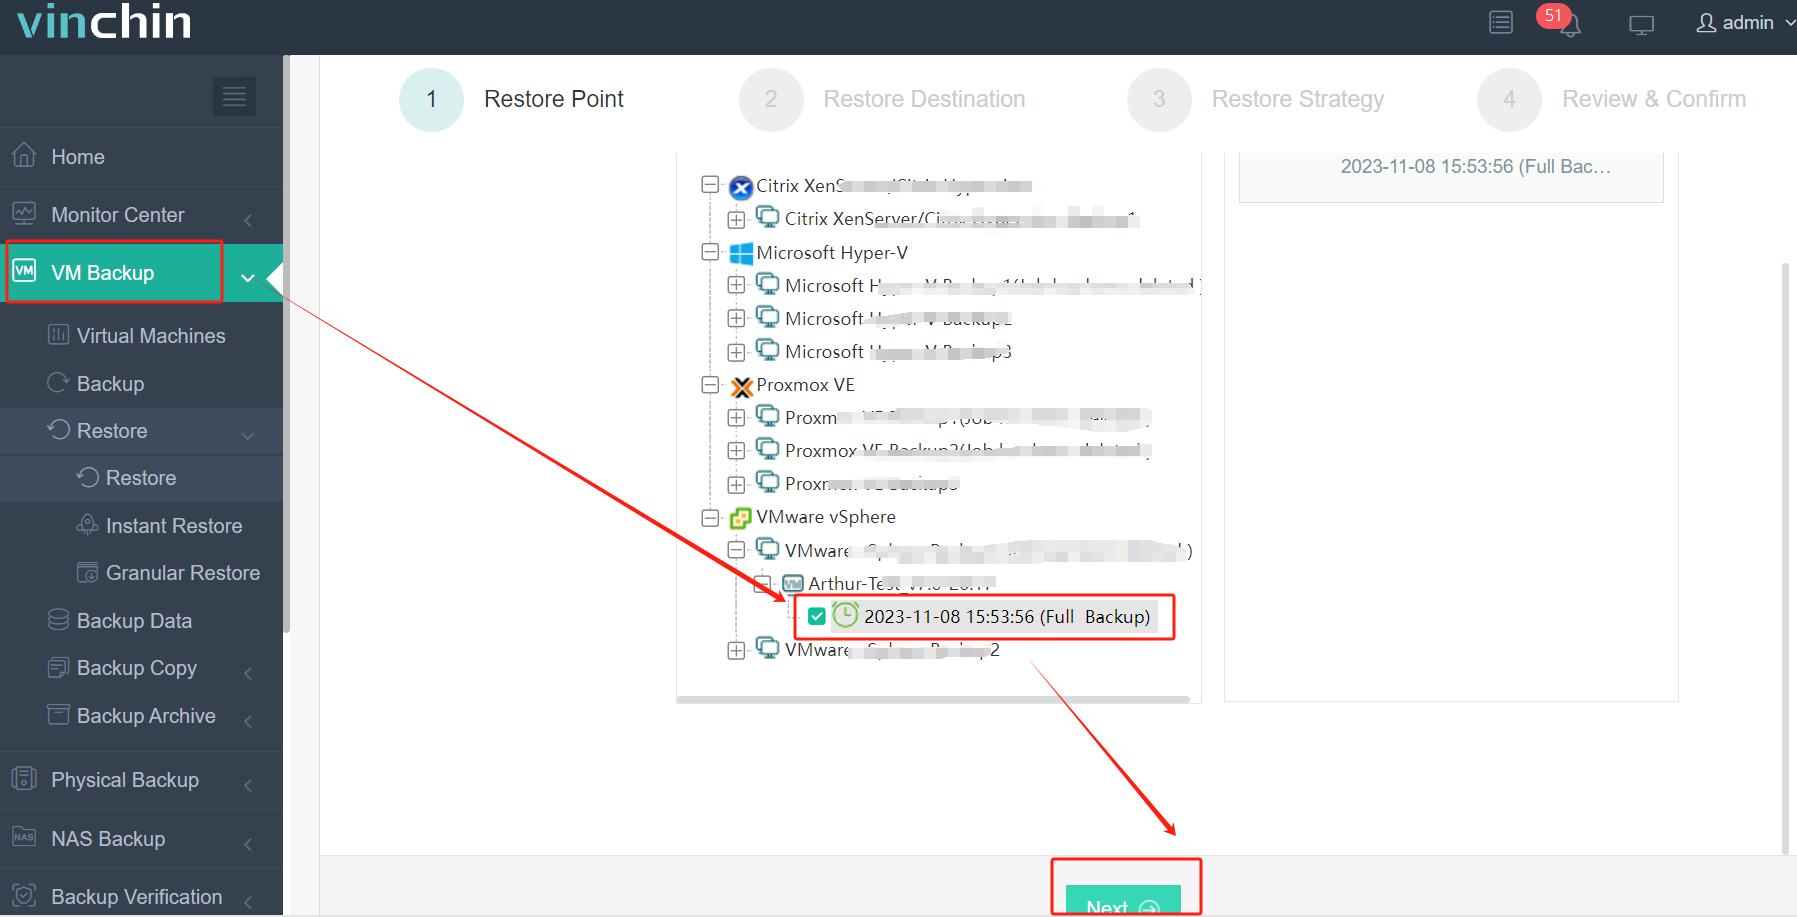
1. Go to VM Backup > Restore and select the VMware backup storage you created as the restore point.
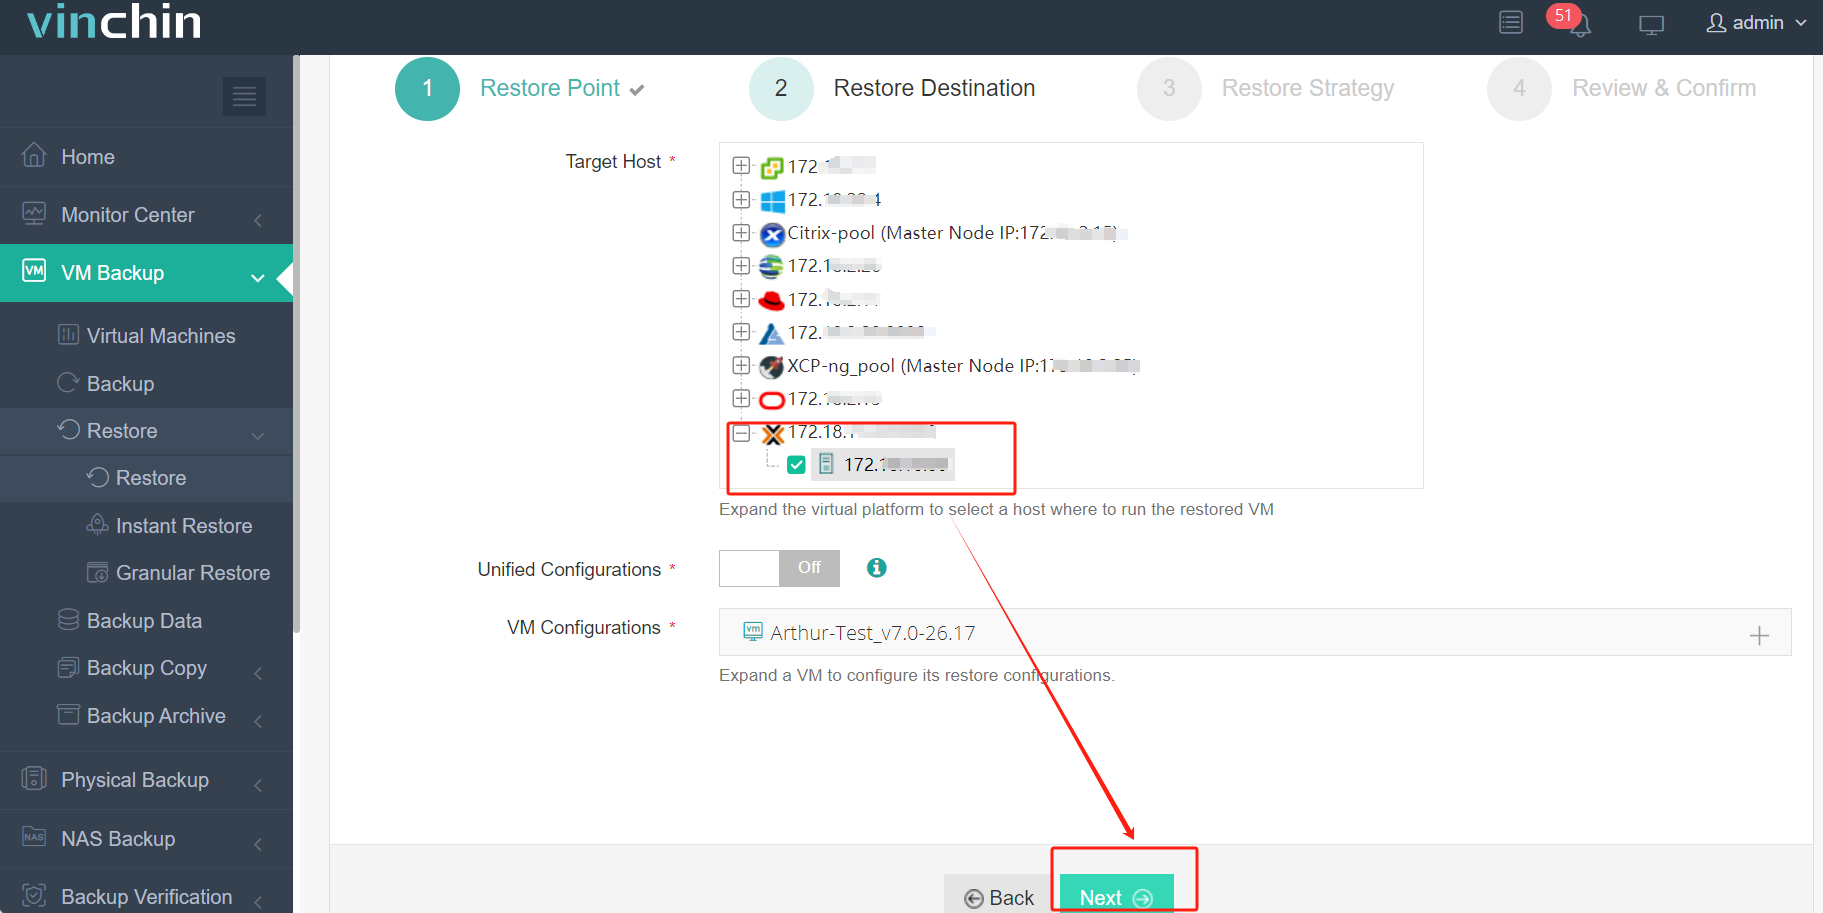
2. Then, select the Proxmox host as the target host and finish related configurations.
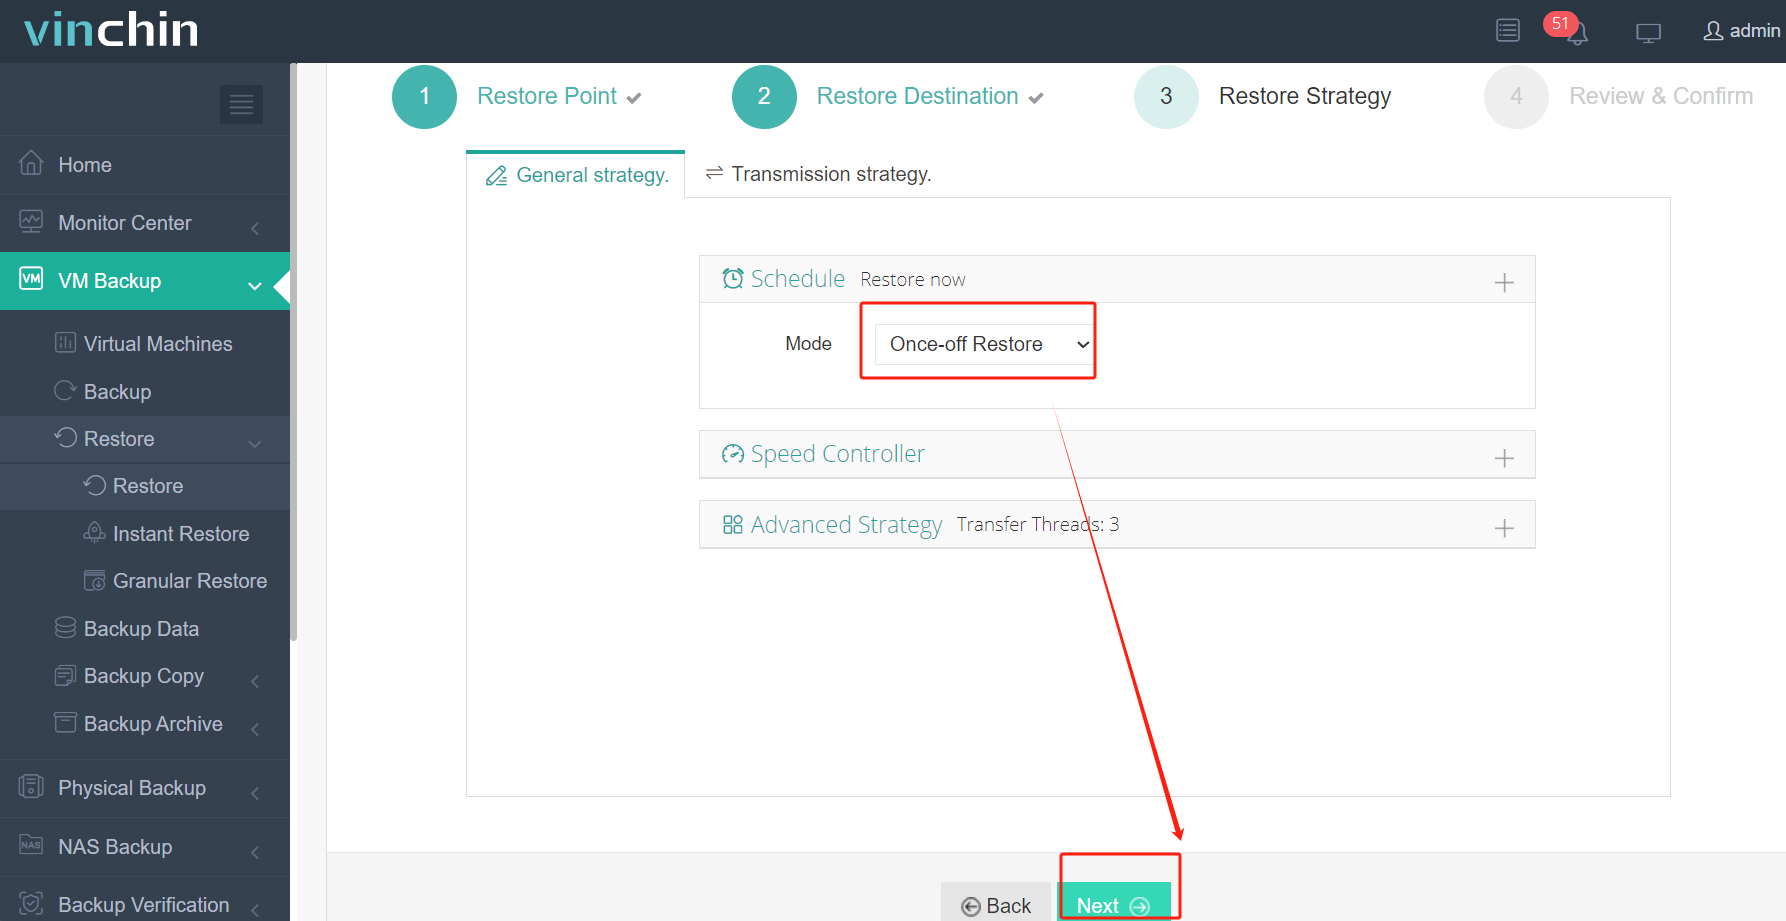
3. Customize the restore strategies; either start the restoration immediately or schedule it at a specific time, and finish other settings if necessary.
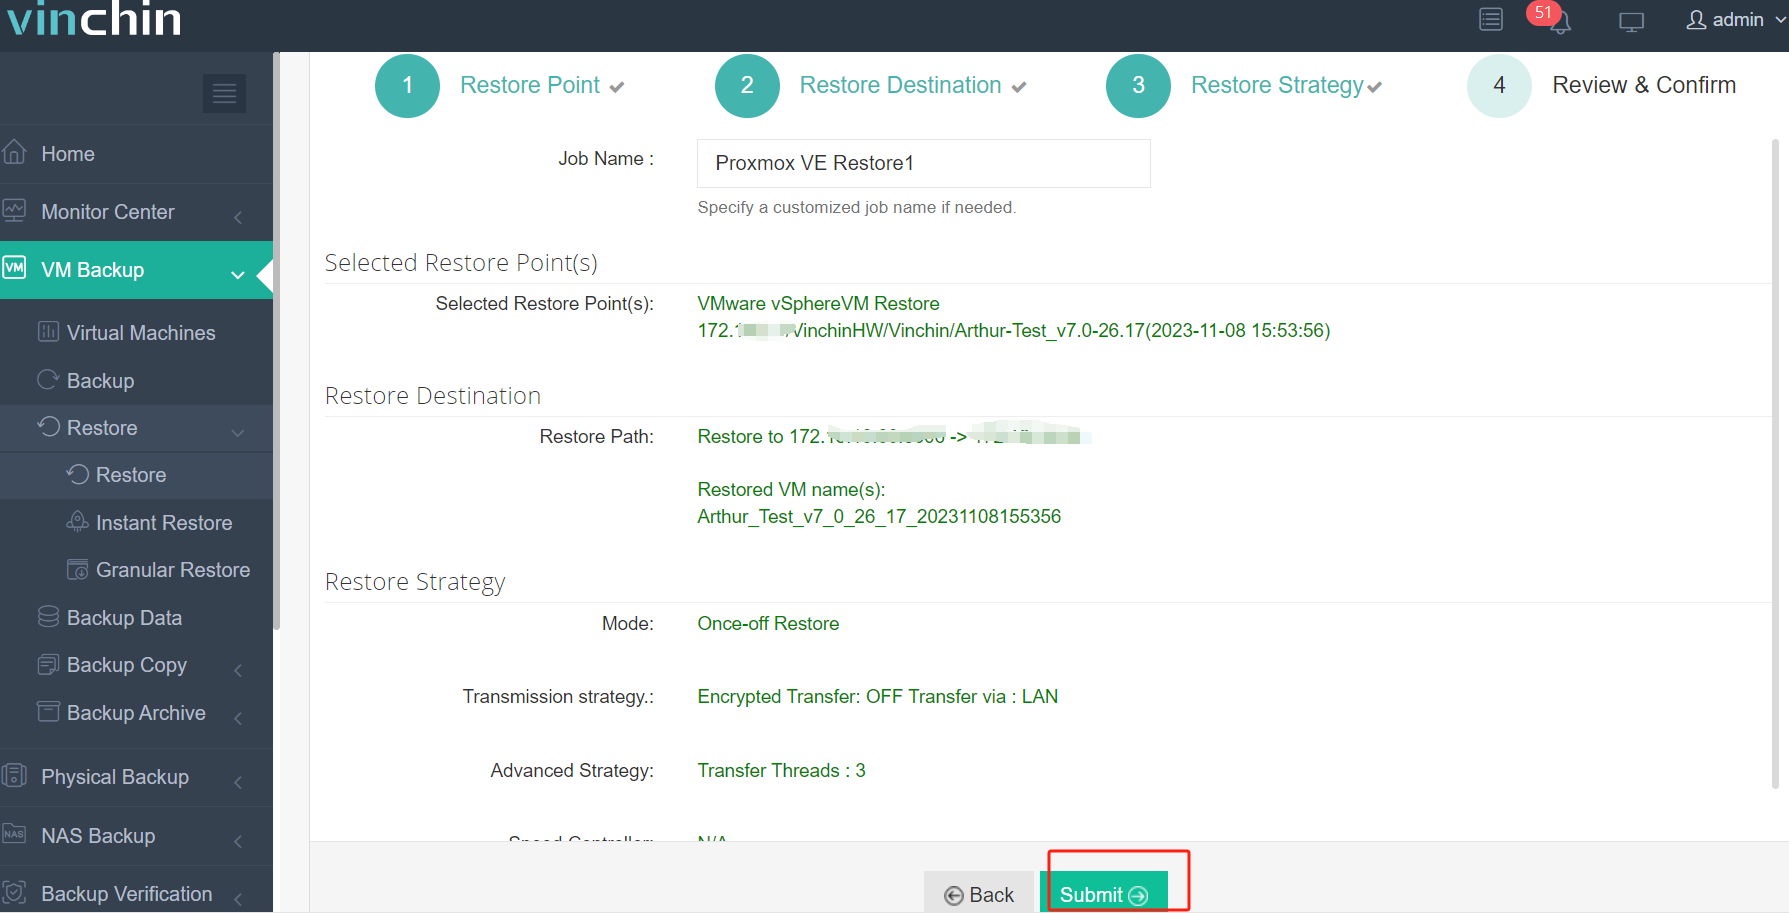
4. Check the options you chose, and once you confirm, click Submit to run the task.
Vinchin Backup & Recovery always prioritizes customer needs and provides convenient services for enterprise environments. Click the Download button to experience its 60-day free trial and embrace full features unlocked.
Migrate VMware Workstation to Proxmox FAQs
Q1: Can I directly migrate VMware Workstation to Proxmox?
Yes, but not in a single click. You need to manually convert the VM disk (VMDK) or import it into Proxmox using tools like qemu-img or qm importdisk.
Q2: Do I need to convert VMDK to QCOW2 before migration?
Not always. Proxmox can import VMDK directly. However, converting to QCOW2 using qemu-img can improve compatibility and flexibility in some cases.
Q3: Is VMware Tools required in Proxmox?
No. VMware Tools should be removed after migration because Proxmox uses QEMU Guest Agent and VirtIO drivers instead.
Q4: Can I migrate multiple VMware Workstation VMs at once?
Yes, but there is no built-in batch tool. You typically need scripting or a dedicated migration solution like Vinchin Backup & Recovery to automate bulk migration.
Closing Thoughts
Migrating VMware Workstation to Promox originally is troublesome due to their different architecture, disk formats, and network configurations. However, this post introduced three main ways to simplify the cumbersome migration process: convert VMDK to Proxmox VE, import VMware VM to Proxmox, or use Proxmox CLI migration commands. For large-scale VM migration and flexible workloads mobility, an enterprise solution like Vinchin Backup & Recovery is worth trying.