Why Covert VMDK to QCOW2?
Because VMware and Proxmox use different virtualization technologies, administrators often need to convert VMDK files into QCOW2 before importing workloads into Proxmox.
About VMDK
VMDK (Virtual Machine Disk) is the native virtual disk format used by VMware products such as:
VMware ESXi
VMware vSphere
VMware Workstation
VMware Fusion
A VMDK file contains the virtual hard disk data used by a VMware virtual machine.
About QCOW2
QCOW2 (QEMU Copy-On-Write Version 2) is a virtual disk format commonly used by:
Proxmox VE
KVM
QEMU
OpenStack
Things to Prepare Before Converting VMDK to QCOW2
A successful conversion begins with proper planning:
1. A working Proxmox VE (7.2 ~ 8.x recommended; Proxmox 8 includes updated QEMU for better VMDK support).
2. qemu-img tool: Pre-installed on Proxmox. For other Linux machines, install via apt install qemu-utils.
3. Exported VMDK files: For split ESXi VMDKs, keep the descriptor file and -flat.vmdk data files in the same folder. Always use the descriptor file for conversion.
4. Sufficient disk space: You need temporary storage for both the original VMDK and new QCOW2 files.
5. Snapshot-free VMDK: Delete or consolidate all VMware snapshots before export (delta snapshot files break conversion).
Always back up your original VMDK file first. Disk conversion creates a new file and will not modify the source, but insufficient disk space or unexpected errors may cause failures.
Step-by-Step Guide to VMDK to QCOW2 Conversion
Configure the following steps:
Step 1. Transfer VMDK to Proxmox Host
Use scp to copy files from a local machine to Proxmox:
scp /path/to/your-vm.vmdk root@proxmox-host:/var/lib/vz/images/
For large files, mount an NFS share to avoid duplicate transfers:
mkdir /mnt/nfsshare mount 192.168.1.100:/exports/vms /mnt/nfsshare
Step 2. Verify VMDK File
Check if qemu-img can read the VMDK normally:
qemu-img info /path/to/your-vm.vmdk
If the output shows vmdk as the format, the file is valid. Errors mean file corruption or using the wrong -flat.vmdk file.
Step 3. Run Basic Conversion
Core conversion command:
qemu-img convert -f vmdk -O qcow2 /path/to/source.vmdk /path/to/output.qcow2
-f vmdk: Specify input disk format
-O qcow2: Specify output disk format
Add -p to view real-time conversion progress:
qemu-img convert -p -f vmdk -O qcow2 /path/to/source.vmdk /path/to/output.qcow2
Conversion time depends on disk size, storage speed and hardware (minutes to over an hour for large disks).
Step 4: Enable Compression (Optional)
Add -c to compress the QCOW2 file and save storage space:
qemu-img convert -p -f vmdk -O qcow2 -c /path/to/source.vmdk /path/to/output.qcow2
Note:Compression reduces storage usage but increase CPU load during VM running. Disable it for performance-critical production VMs.
Step 5: Verify Converted QCOW2
Check file integrity after conversion:
qemu-img check /path/to/output.qcow2
A successful result shows: No error were found on the image.
Import QCOW2 Disk into Proxmox VE
The disk is now recognized by Proxmox but remains detached. Continue with the following steps to mount it to your VM and complete the configuration.
Step 1. Create a New Empty VM
1. Open the Proxmox web interface and create a new VM
2. On the Disk configuration page, select Do not use any media (create a VM without a default disk).

3. Note down the generated VM ID.
Step 2. Import Disk via Command Line
Use qm importdisk to import the QCOW2 file:
# Syntax: qm importdisk [VMID] [disk file] [storage name] qm importdisk 101 /path/to/output.qcow2 local
After execution, the disk will appear as Unused Disk 0 in the VM's Hardware tab.
Step 3. Attach and Configure the Disk
1. Double-click the unused disk in the Hardware tab.

2. Select disk controller:
Linux VMs: VirtIO SCSI (best performance)
Windows VMs: Use SATA first (no built-in VirtIO drivers)
3. Click Add, then go to Options > Boot Order and set the imported disk as the first boot device.

Windows Tip: Windows will be blue-screen if using VirtIO directly. Boot the VM SATA first, install VirtIO drivers, then switch to VirtIO SCSI for better performance.
Common Errors & Fixes
During the process of convert VMDK to QCOW2 Proxmox you may encounter some error, but don't worry, here are the fixes.
1. No bootable device after import
Cause: Wrong format flag or mismatched disk controller.
Fix: Confirm -f vmdk is used during conversion; use SATA for Windows VMs.
2. Unable to parse lvm volume name
Cause: QCOW2 files cannot be stored on local-lvm (LVM-thin uses raw disks).
Fix: Use default local directory storage, or let Proxmox auto-convert formats via qm importdisk
3. Confusion between descriptor VMDK and flat VMDK
Cause: Using -flat.vmdk for conversion.
Fix: Always select the small descriptor .vmdk file, keep both files in the same folder.
4. Windows BSOD after migration
Cause: Missing VirtIO disk drivers.
Fix: Use SATA controller initially, install VirtIO drivers, then switch to VirtIO.
5. ZFS storage rejects QCOW2
Cause: ZFS uses ZVOL raw volumes instead of QCOW2 files.
Fix: Run qm importdisk targeting ZFS storage; Proxmox will auto-convert:
qm importdisk 101 /path/to/output.qcow2 rpool-data
Vinchin Backup & Recovery Simplify Migration
While the above VMware to Proxmox method remains common approach, it can become time-consuming and error-prone when migration multiple VMs. Administrators must handle disk conversion, VM recreation, driver adjustments, and post-migration validation individually.
Vinchin Backup & Recovery offers a more streamlined alternative through its cross-platform recovery technology.
Key Benefits of Using Vinchin for VMware-to-Proxmox Migration:
No manual VMDK-to-QCOW2 conversion required
Agentless VMware backup and recovery
Direct recovery from VMware to Proxmox VE (seamless migration)
Reduced migration time and operational effort
Support for large-scale migration projects
Instant recovery options for critical workloads
Easy VMware-to-Proxmox migration workflow with Vinchin:
Step 1. Add the VMware vCenter ot ESXi host as a backup source
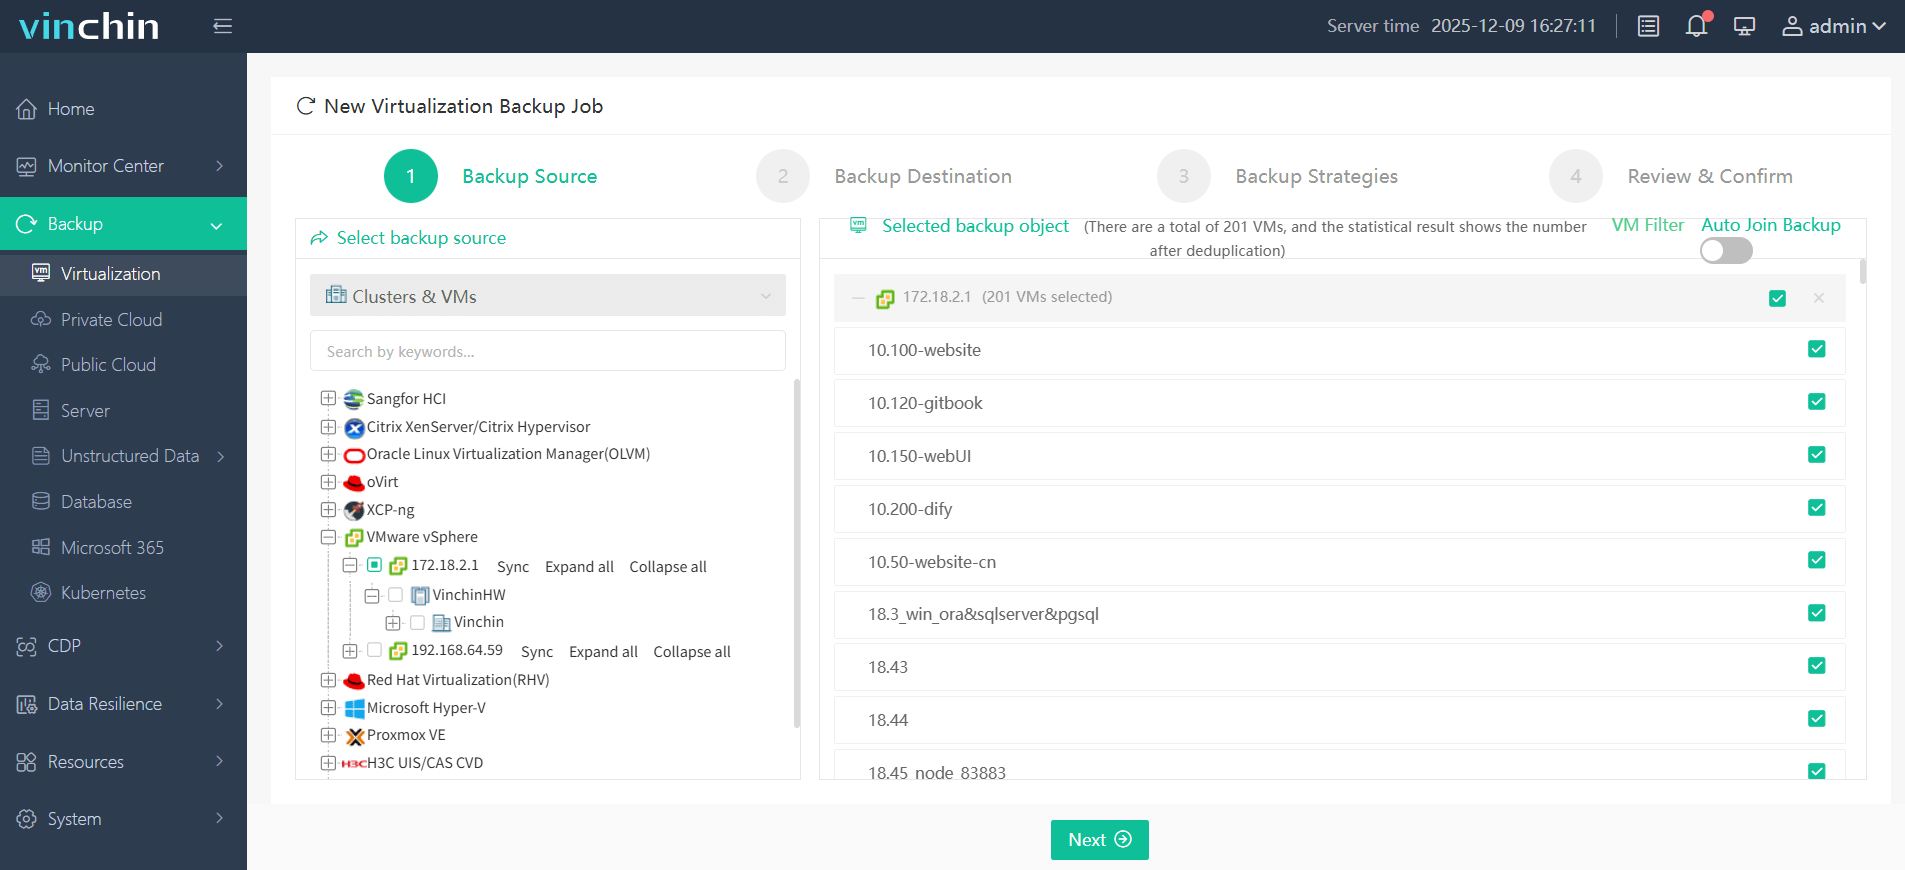
Step 2. Go to Backup > Virtualization to choose the VMware VM for backup
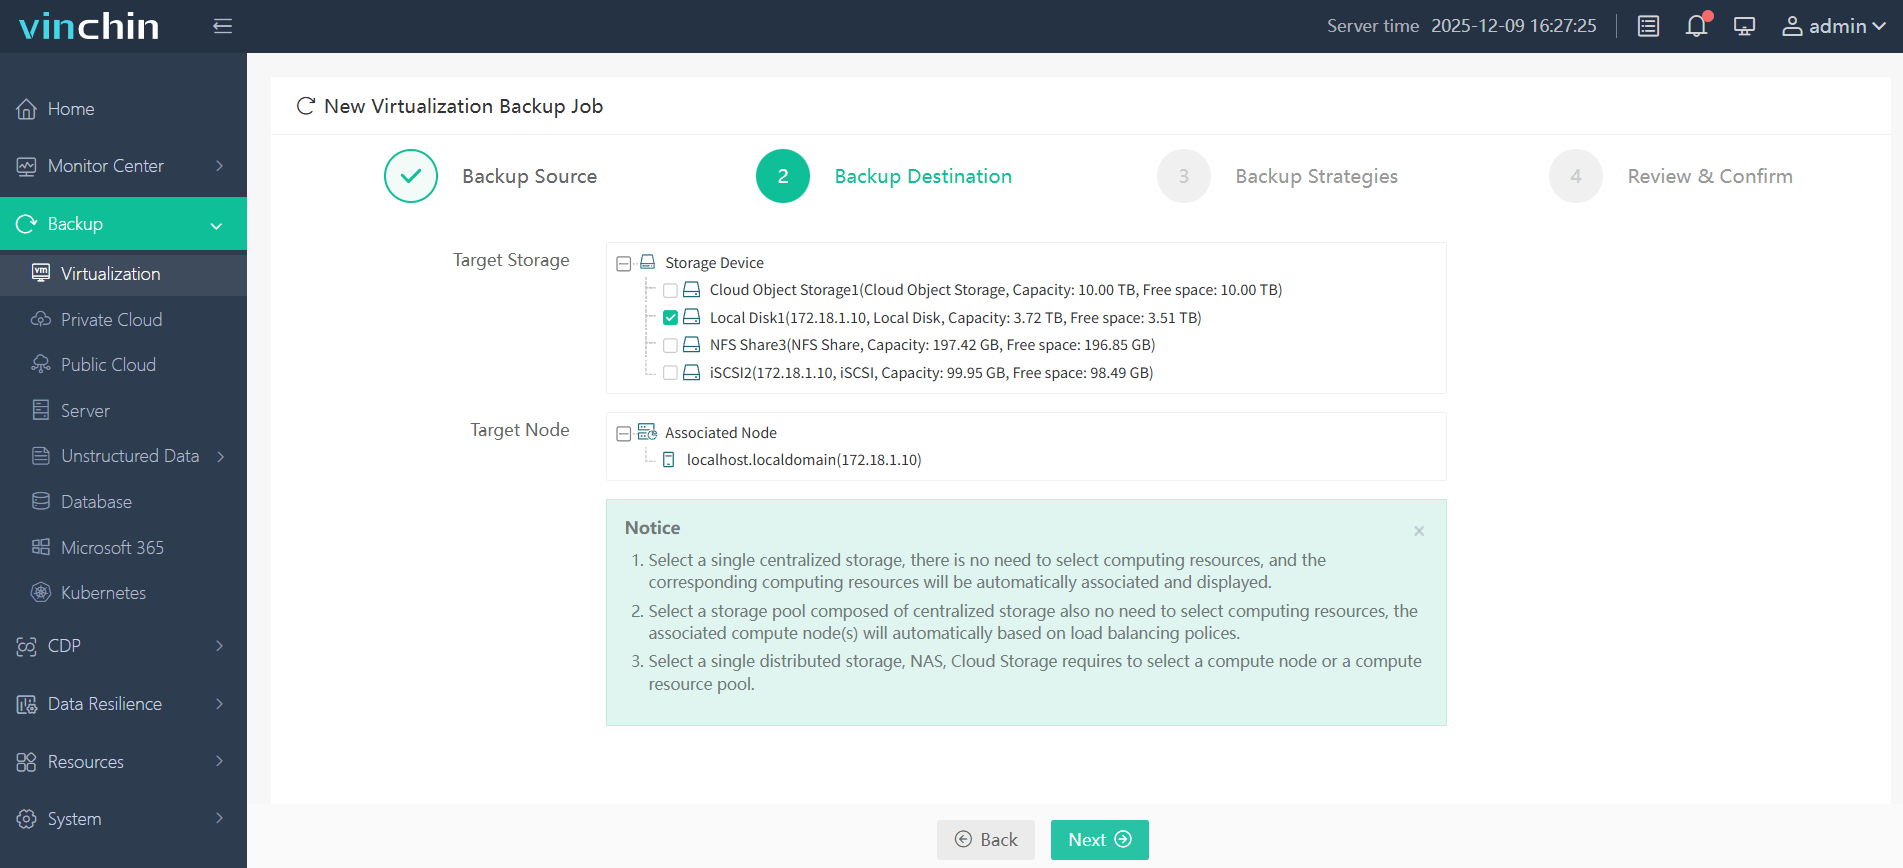
Step 3. Then configure the backup destination (target storage and target node)
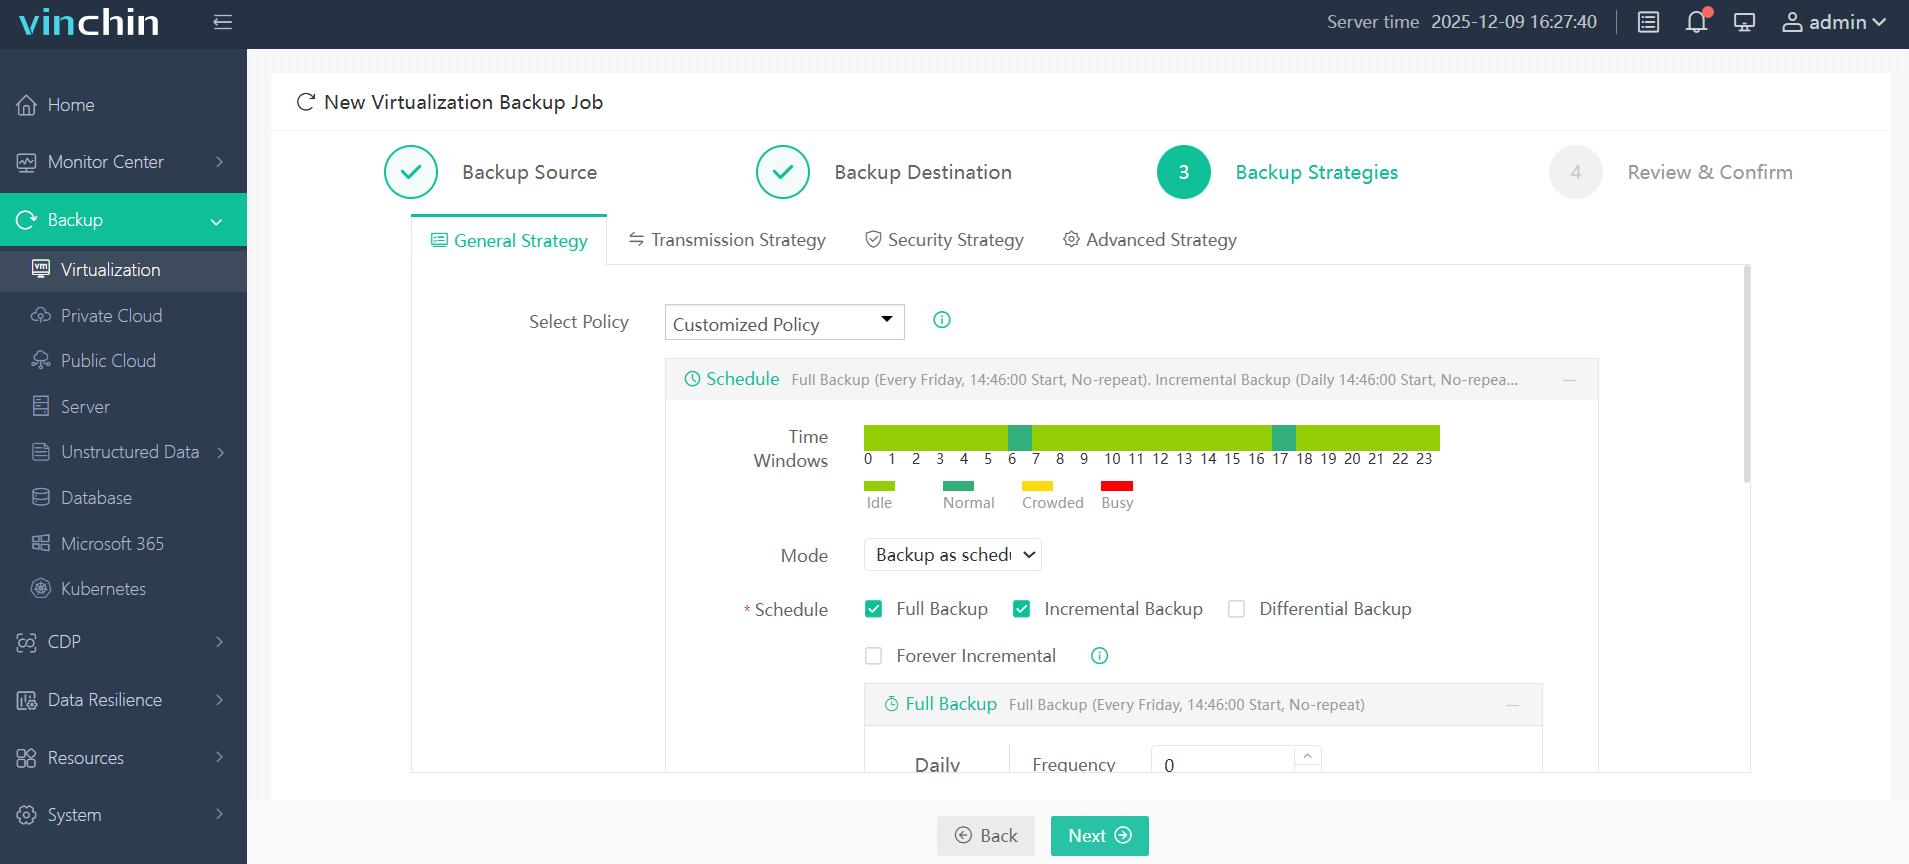
Step 4. Set up your backup strategies, like backup mode and backup schedule
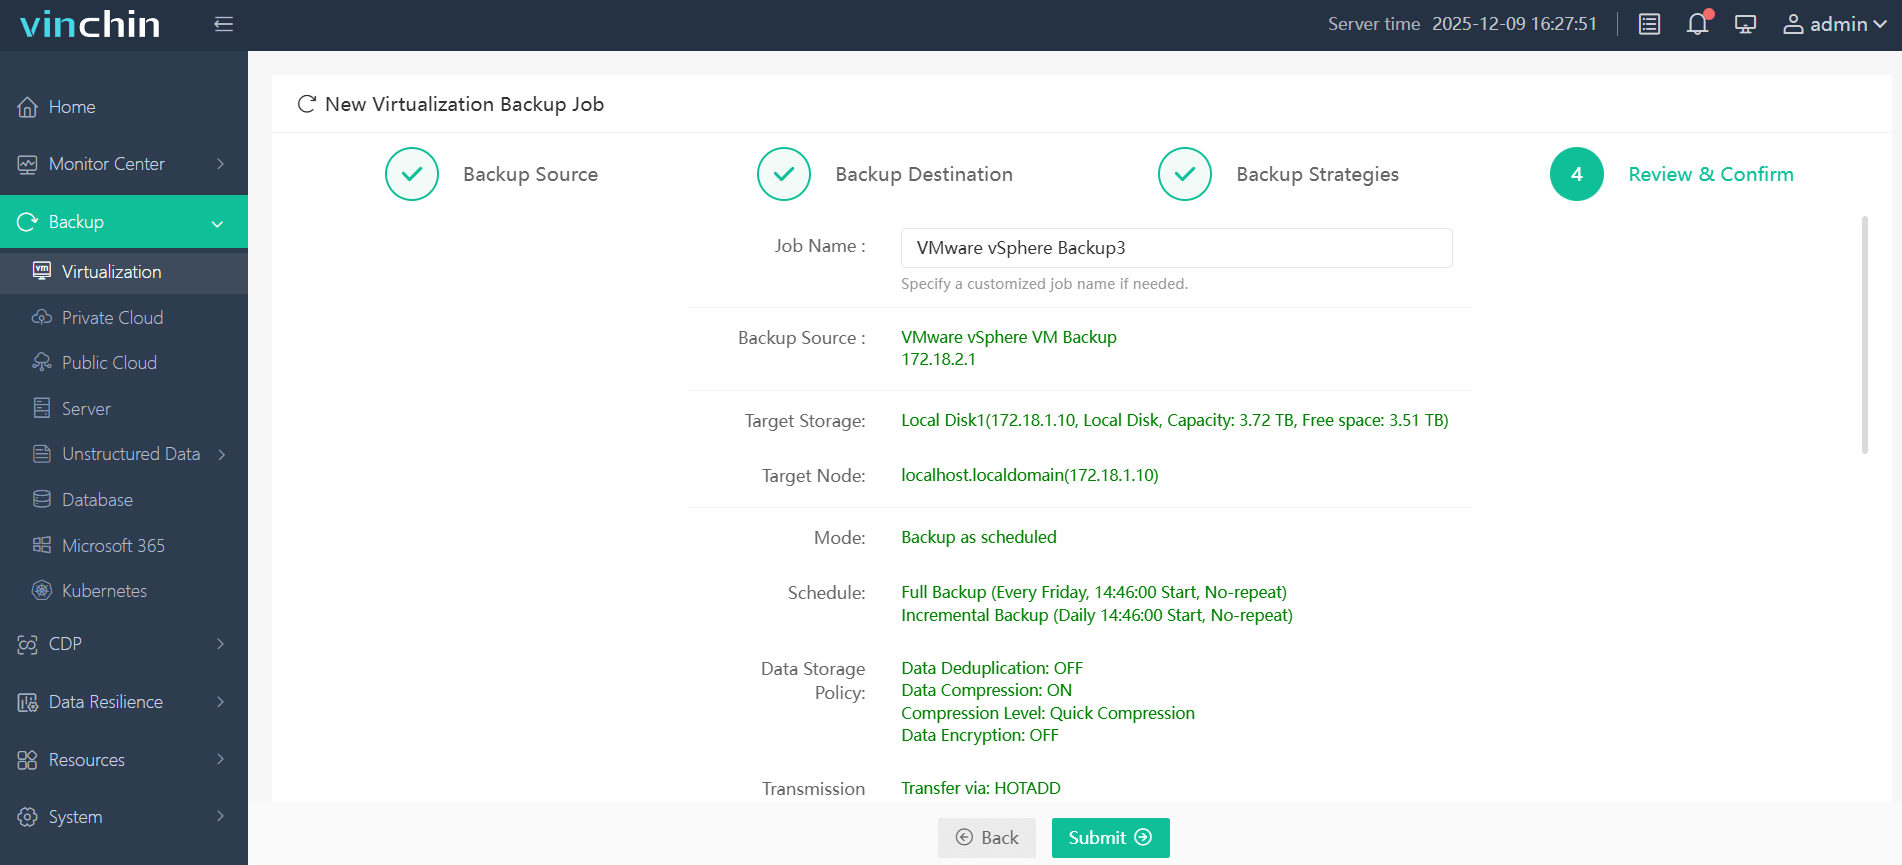
Step 5. Preview and confirm the backup settings, click Submit
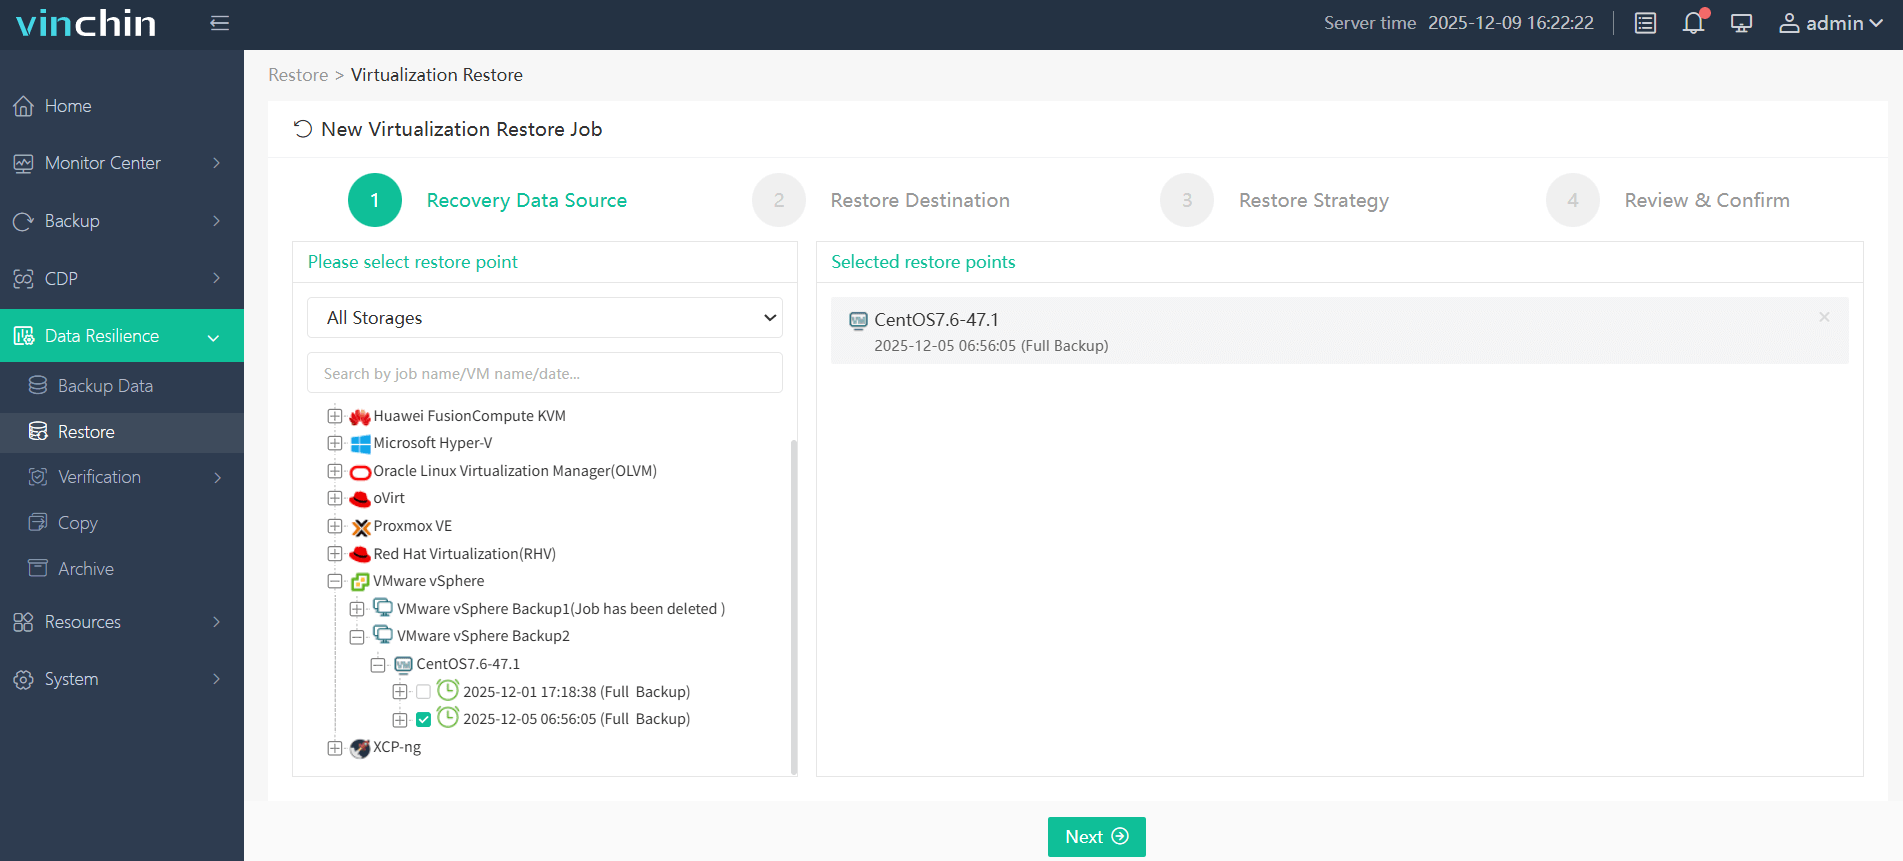
Step 6. After the backup process is completed, go to Data Resilience > Restore
Step 7. Select the VMware VM backup as the recovery data source
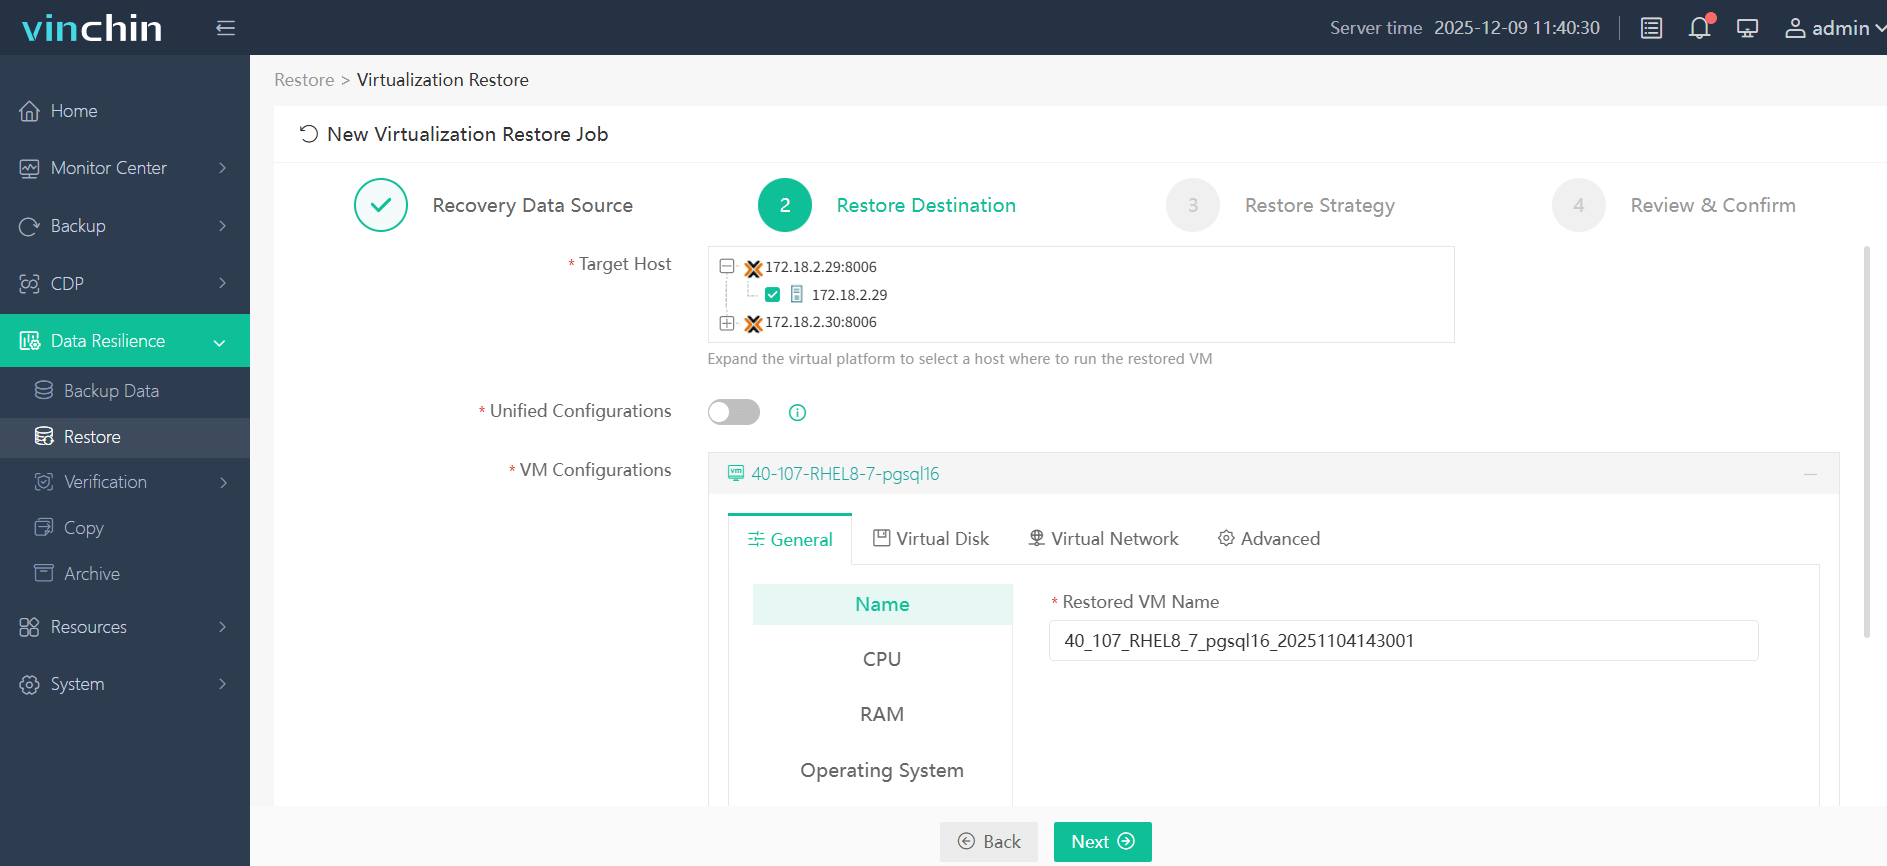
Step 8. Then select the Proxmox VE as the target host
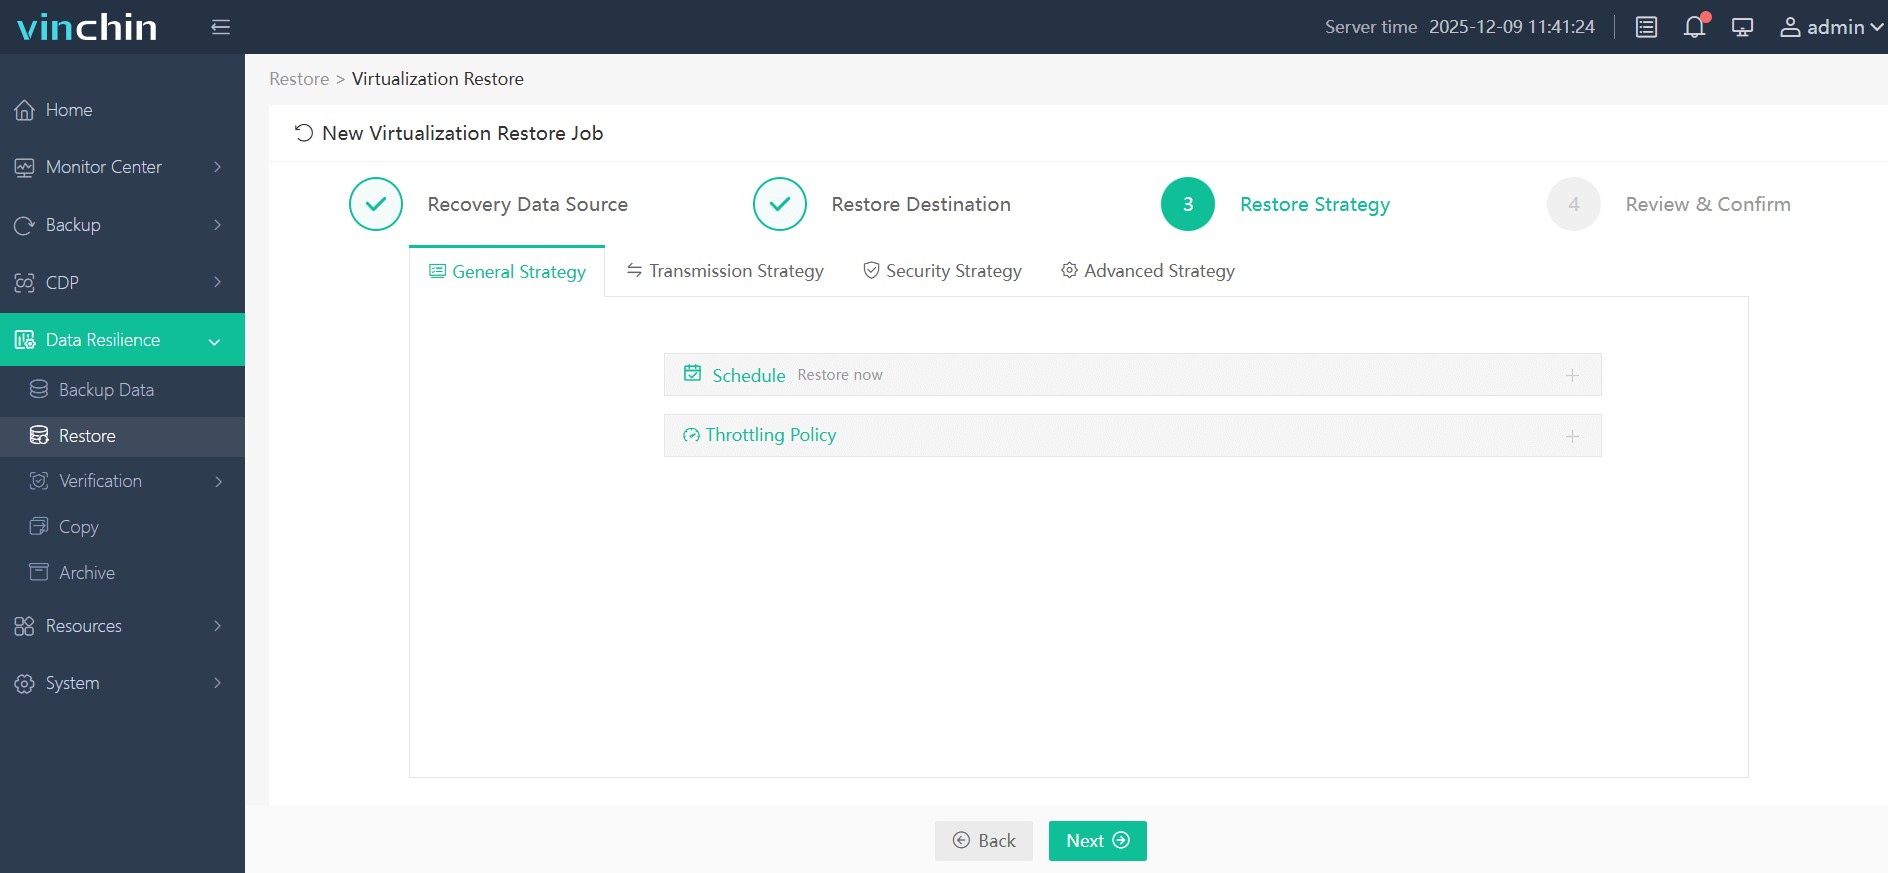
Step 9. Configure the restore strategy
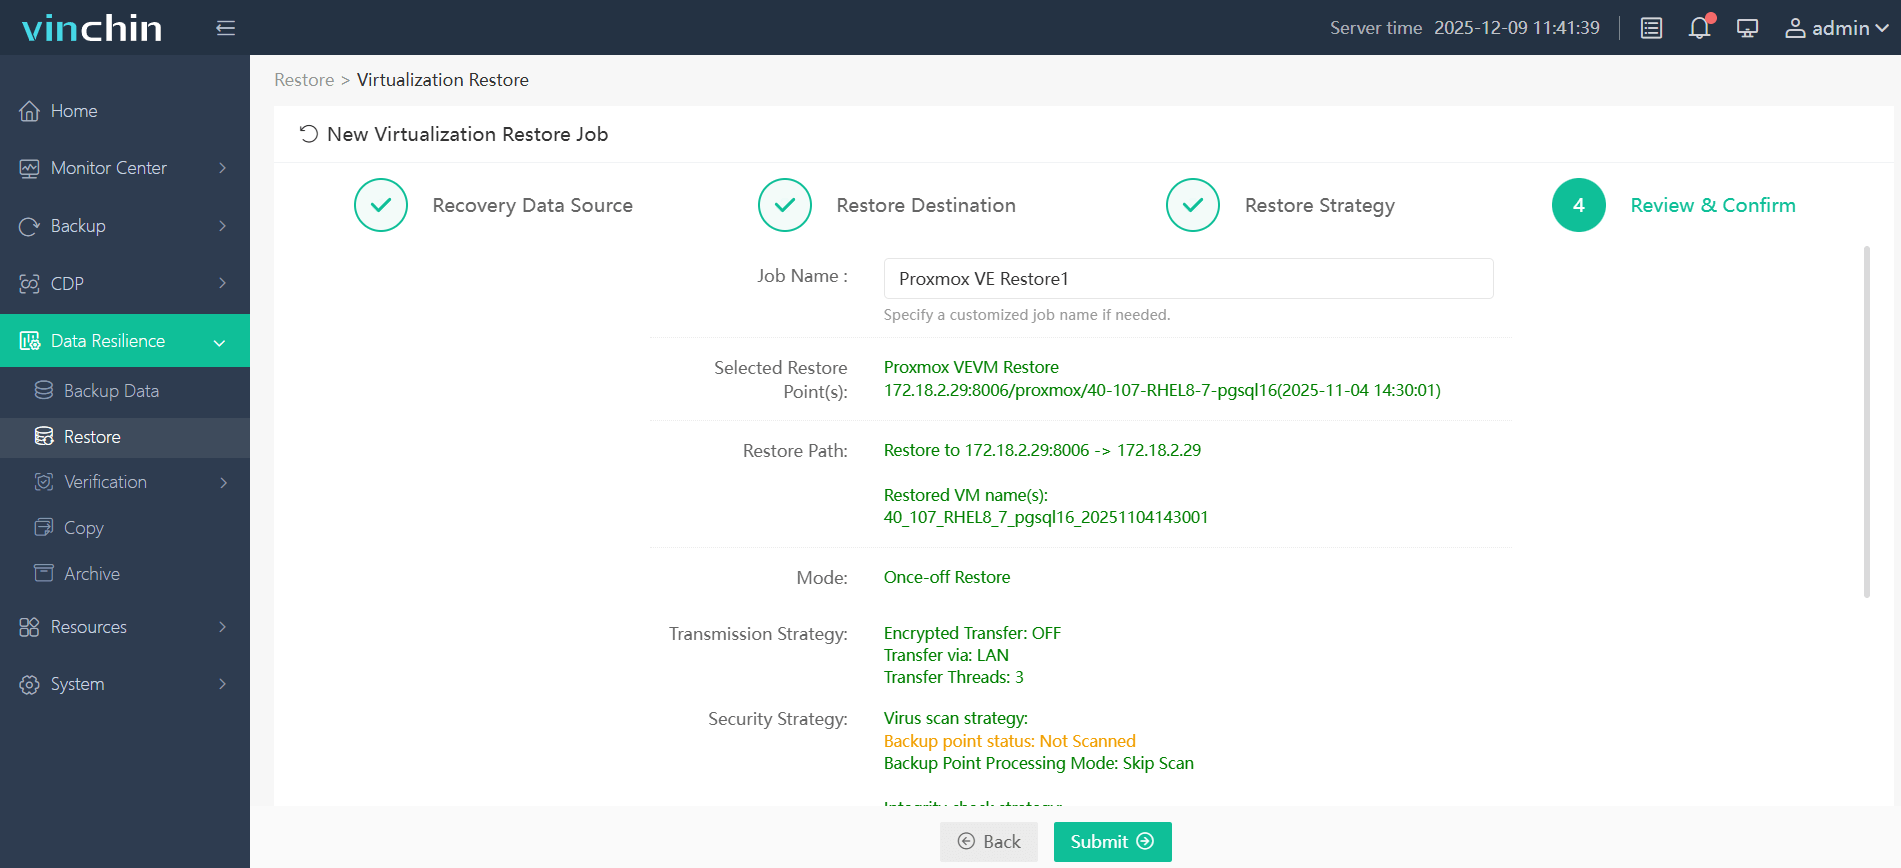
Step 10. Review all the restore setting, and click Submit to begin the VMware to Proxmox migration
If you are converting VMDK to QCOW2 Proxmox, try Vinchin Backup & Recovery and enjoy the full featured 60-day free trial! And if you have any questions during the process contact us, we'll provide solution!
Convert VMDK to QCOW2 Proxmox FAQs
Q1: Can Proxmox run VMDK directly without conversion?
A1: No, qm importdisk can import VMDK directly, but running un-converted VMDK is unsupported. You will lose QCOW2 snapshots and CBT incremental backup features.
Q2: Can I store QCOW2 on local-lvm?
A2: NO, local-lvm uses LVM-thin raw volumes. Use directory-based local storage instead.
Q3: How long does conversion take?
A3: A 100GB thin-provisioned VMDK (60GB actual data) takes 5–20 minutes on HDD, 2–5 minutes on SSD. Compression increases time due to CPU usage.
Conclusion
Converting VMDK to QCOW2 in Proxmox is a key step when migrating virtual machines from VMware to a KVM-based environment. By following the proper conversion and import procedures, you can ensure a smooth transition with minimal downtime.
For organizations looking to simplify large-scale VMware-to-Proxmox migrations, Vinchin Backup & Recovery offers an efficient alternative through cross-platform recovery, eliminating manual disk conversion while ensuring continuous data protection.


