About Proxmox Backup Server
Proxmox Backup Server is a dedicated, standalone system for backing up virtual machines, containers, and even physical hosts in a Proxmox environment.
PBS delivers several capabilities that distinguish it from simply copying VM disk files:
Client-side deduplication
Incremental backups after the initial full backup
AES-256-GCM encryption
Built-in integrity verification
Remote sync and tape support
PBS integrates into Proxmox VE by appearing as a storage target under Datacenter > Storage > Add > Proxmox Backup Server. Once registered, every node on a PVE cluster can immediately use it for scheduled or on-demand backups.
Prerequisites: What You Need Before You Start
Before walking through the connection steps, make sure the following prerequisites are in place:
Hardware Requirements for PBS:
CPU: A 64-bit AMD or Intel processor with at least four cores (more cores improve parallel backup performance).
RAM: At least 4 GB for the OS and Proxmox services, plus approximately 1 GB of RAM per terabyte of datastore capacity.
Storage: A separate disk (or ZFS pool) dedicated to the PBS datastore, using the OS disk for backup storage is not recommended in production.
Network: A stable connection between the PBS host and all Proxmox VE nodes. TCP port 8007 must be open.
Deployment Options: Dedicated vs. Co-located
Proxmox supports two deployment approaches for PBS. The recommended production approach is to install PBS on dedicated physical hardware (separate from PVE nodes). For homelabs or resource-constrained environments, PBS can be installed alongside PVE on the same machine at the OS level, not inside a container, by adding the pbs-no-subscription repository and installing the proxmox-backup-server package directly on the host.
Step-by-Step: Connect Proxmox Backup Server to Proxmox VE
Follow this guide to connect and set up Proxmox Backup Server:
Step 1. Install Proxmox Backup Server
Download the official PBS ISO from pbs.proxmox.com, write it to a USB drive using Rufus or balenaEtcher, and boot your target server.
Step 2. Configure a Datastore on PBS
Log in to the PBS web interface, navigate to Administration > Storage/Disks
Select the unused disk, click Initialize Disk with GPT, then create a directory (or a ZFS pool if you need RAID protection).
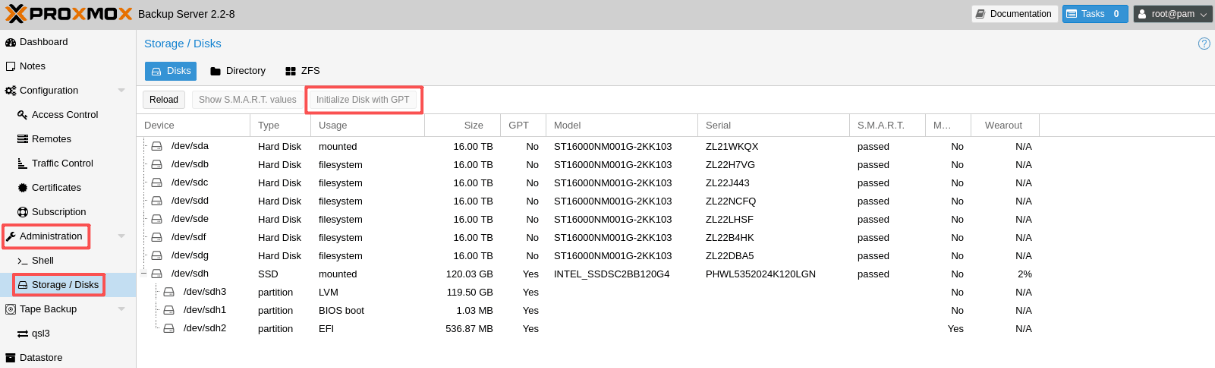
Once the filesystem or ZFS pool is ready, navigate to Datastore > Create Datastore
Step 3. Create a Dedicated Backup User and API Token
Rather than using the root account, it is best practice to create a dedicated user with limited privileges. On the PBS host, run:
proxmox-backup-manager user create backup@pbs --password 'StrongPassword'
proxmox-backup-manager token create backup@pbs backup-token \
  --privileges DatastoreBackup,DatastoreAudit
This creates an API token named backup-token with exactly the permissions needed: DatastoreBackup for writing backups and DatastoreAudit for reading and verifying them.
Step 4. Retrieve the PBS Server Fingerprint
When PBS uses its default self-signed certificate, Proxmox VE needs the server’s TLS fingerprint to authenticate the connection and prevent man-in-the-middle attacks.
On the PBS dashboard, look for the Show Fingerprint button in the summary pane. Alternatively, run:
proxmox-backup-client login --repository <PBS-IP>:8007:<datastore-name>
Step 5. Add PBS as a Storage Target in Proxmox VE (GUI Method)
Log in to the Proxmox VE web interface at https://<PVE-IP>:8006. Ensure the Datacenter node is selected in the left-hand sidebar.
Navigate to Storage > Add > Proxmox Backup Server, then fill in the following:
ID - A unique name for this PBS storage
Server - IP address or hostname of the PBS host
Username - backup@pbs!backup-token (token-based) or root@pam (root login)
Password/Token - The API token value or root password
Datastore - The datastore name created in Step 2
Fingerprint - Paste the SHA-256 fingerprint from Step 4 (omit if using a trusted cert)
Encryption (optional) - Enable client-side encryption for at-rest data protection
Click Add, Proxmox VE will attempt to connect to PBS, fetch available datastores, and register the storage.
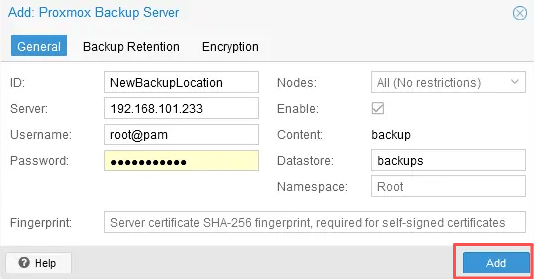
If the connection succeeds, the new PBS storage will appear under every node in your cluster automatically, it does not need to be added per node.
Step 6. Schedule and Run Your First Backup Job
In the Proxmox VE GUI, select Datacenter in the left panel, then navigate to the Backup tab and click Add.
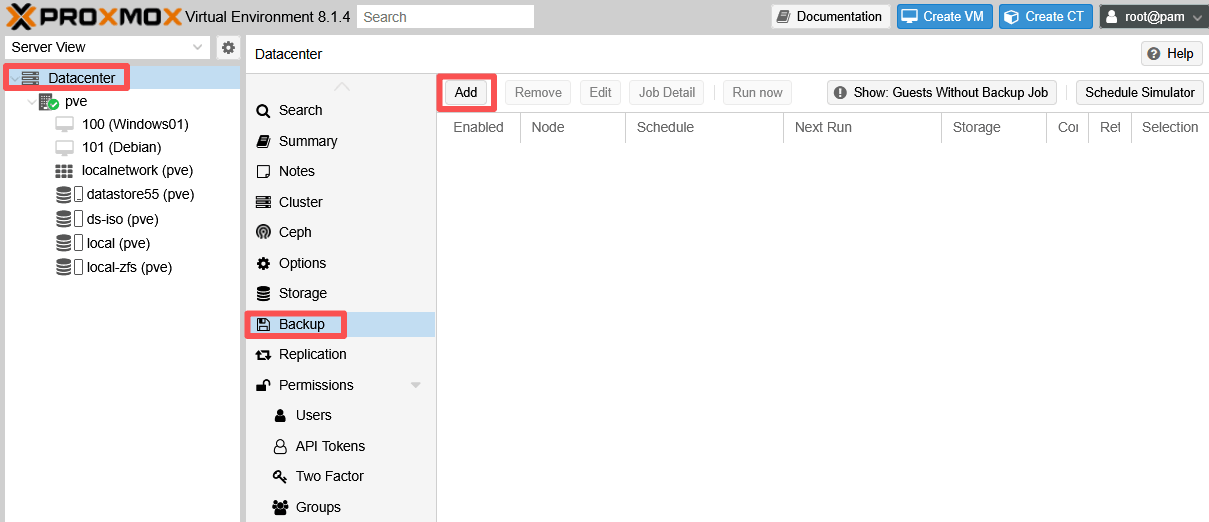
Then configure:
Node: Choose All to cover every node in the cluster, or restrict to specific hosts
Storage: Select the PBS storage ID you just created
Schedule: Set a cron-style schedule (e.g., daily at 23:59, weekly on Sunday)
Mode: Snapshot mode is the most common choice for live VMs — it creates a temporary snapshot for consistency without shutting down the VM
Retention: Set per-job retention policies (keep-last, keep-daily, keep-weekly, keep-monthly) to control how many versions PBS retains
For an immediate test, right-click any VM or container in the sidebar and select Backup > Backup now.
Bonus: Restoring a Virtual Machine
Recovery is just as important as backup.
To restore:
Open Storage > PBS, select Backup > Restore
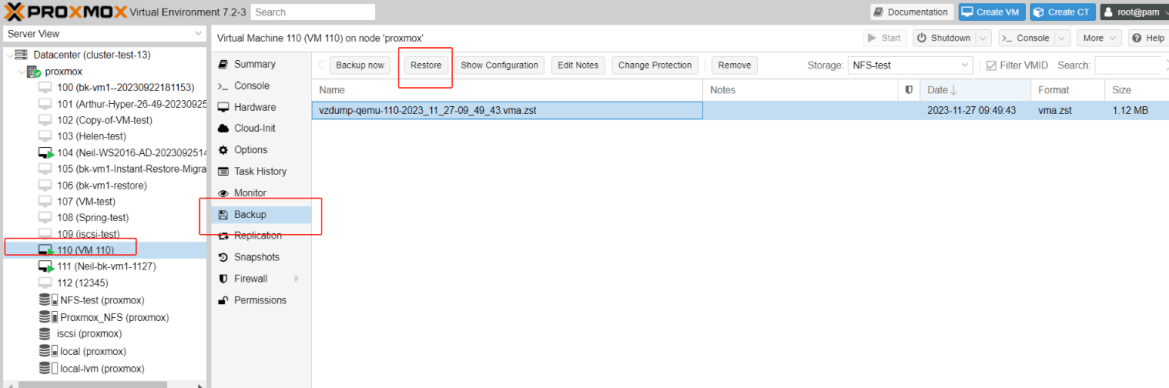
Select destination node
Configure VM ID
Start restoration
Recovery speed depends primarily on storage performance and network bandwidth.
When Native PBS Is Not Enough: Introduce Vinchin Backup & Recovery
Proxmox is an excellent native solution for protecting Proxmox VE workloads. But organizations operating mixed virtualization environments manage multiple administrative overheads, creating blind spots in recovery coverage.
Vinchin Backup & Recovery comes to the rescue, it’s an enterprise-grade data protection platform supporting 15+ virtualization platforms from a single web-based console.
Key Features for Proxmox Environments:
Agentless backup via hypervisor API: No software installed inside guest VMs.
Instant VM recovery: Restore a VM and bring it online in as little as a few seconds by running it directly from the backup data.
Ransomware protection: Real-time I/O monitoring blocks unauthorized write operations directly to backup storage.
Cross-platform VM migration (V2V): Move VMs bidirectionally between any two supported platforms, including from VMware or Hyper-V to Proxmox.
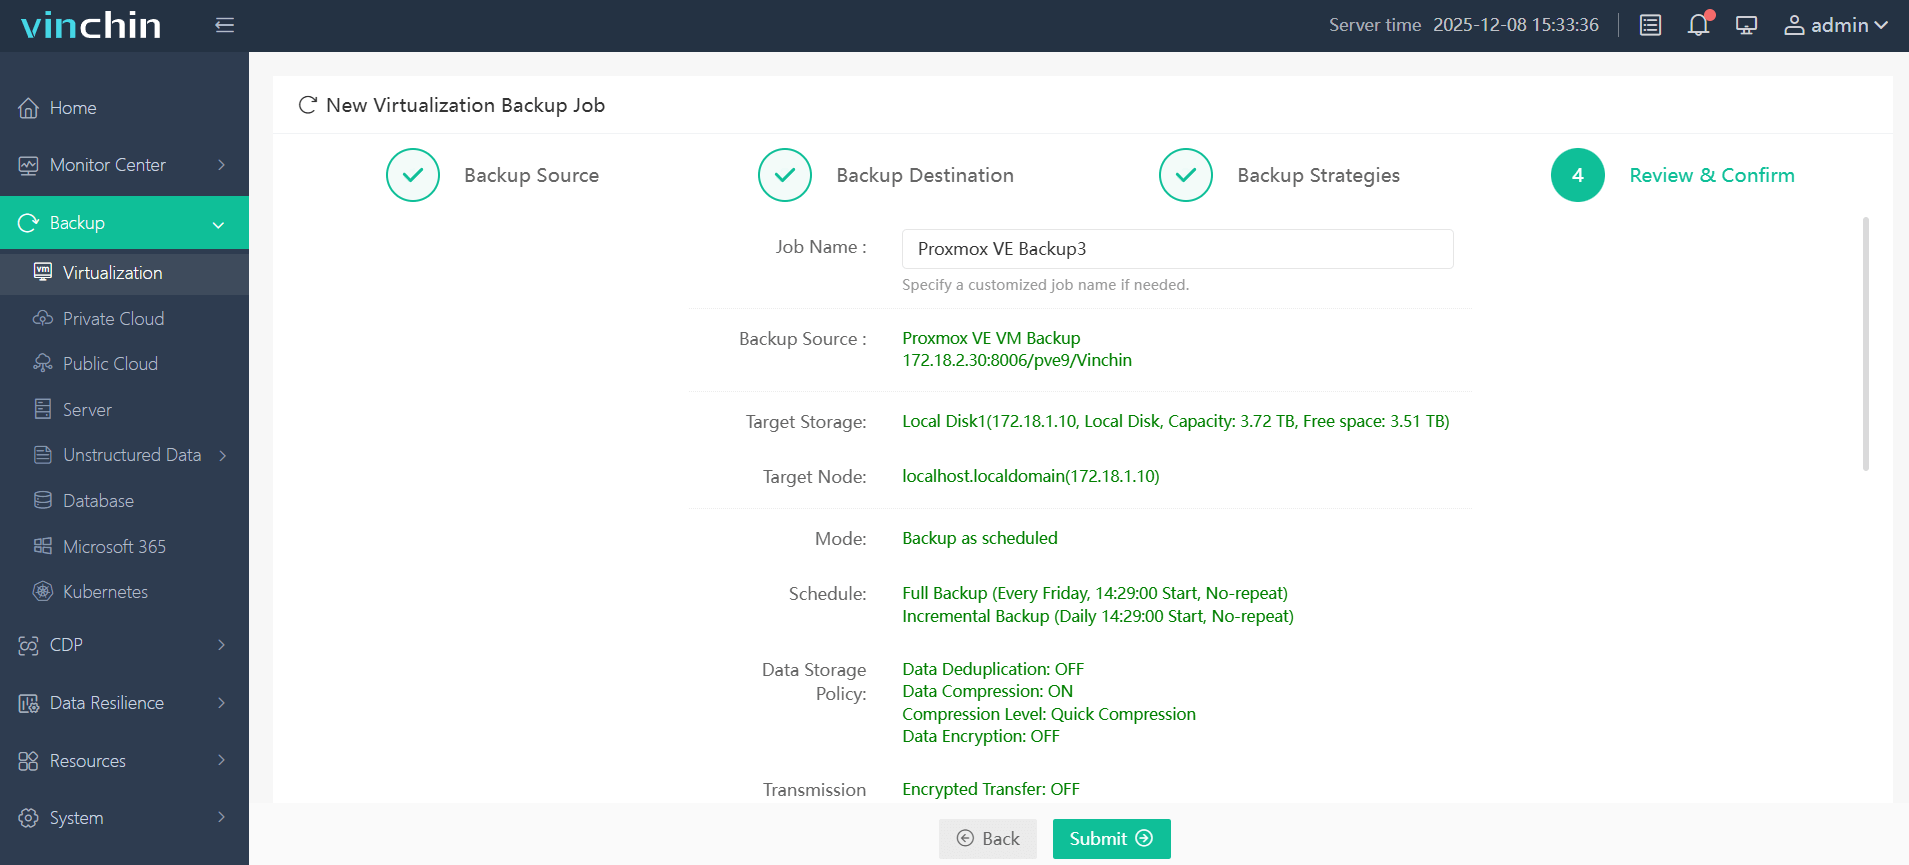
Backup Proxmox environment with Vinchin:
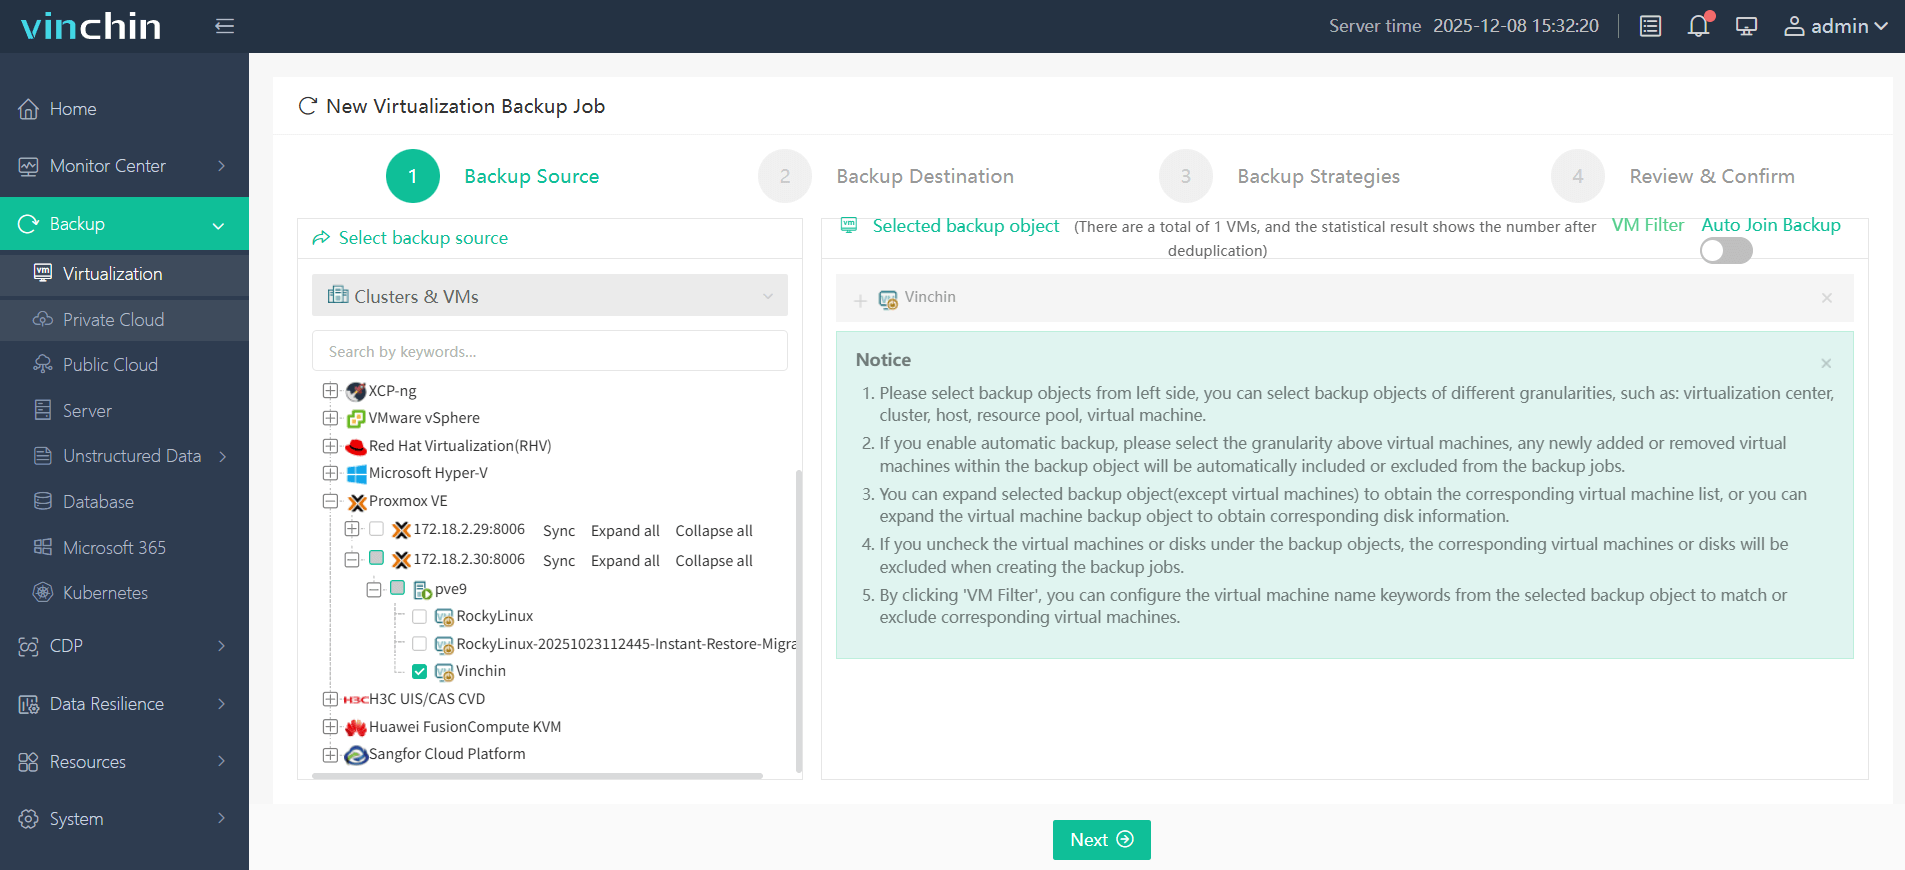
Step 1. In Backup > Virtualization, choose your Proxmox VM to back up
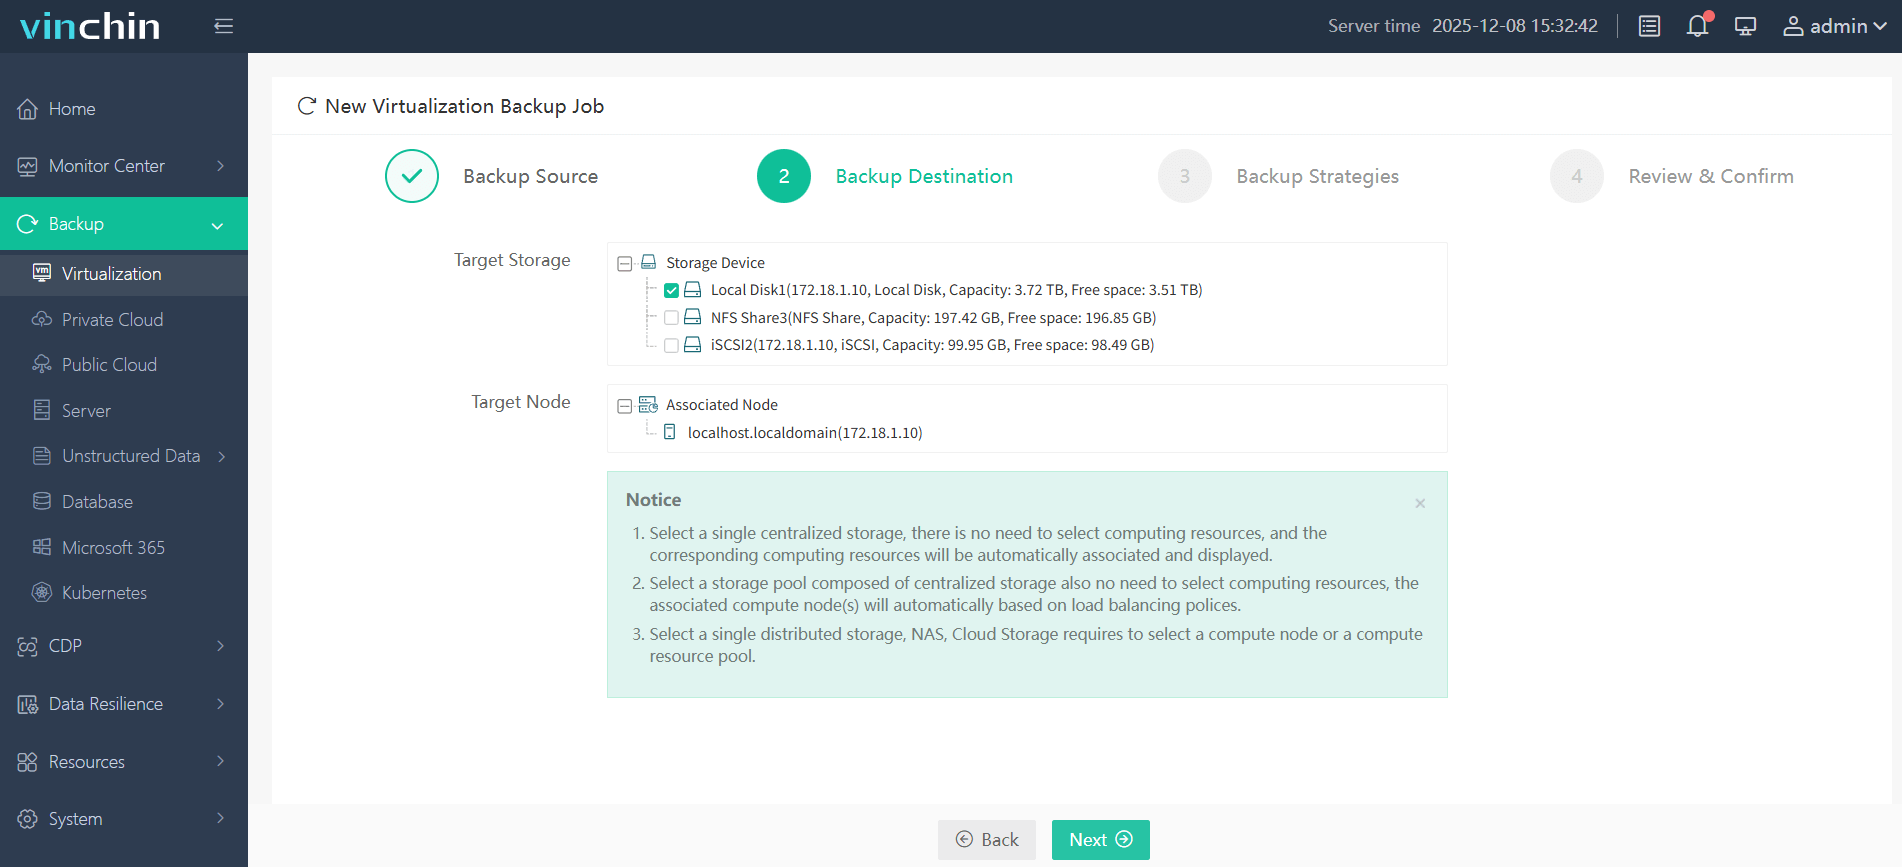
Step 2. Choose the backup destination
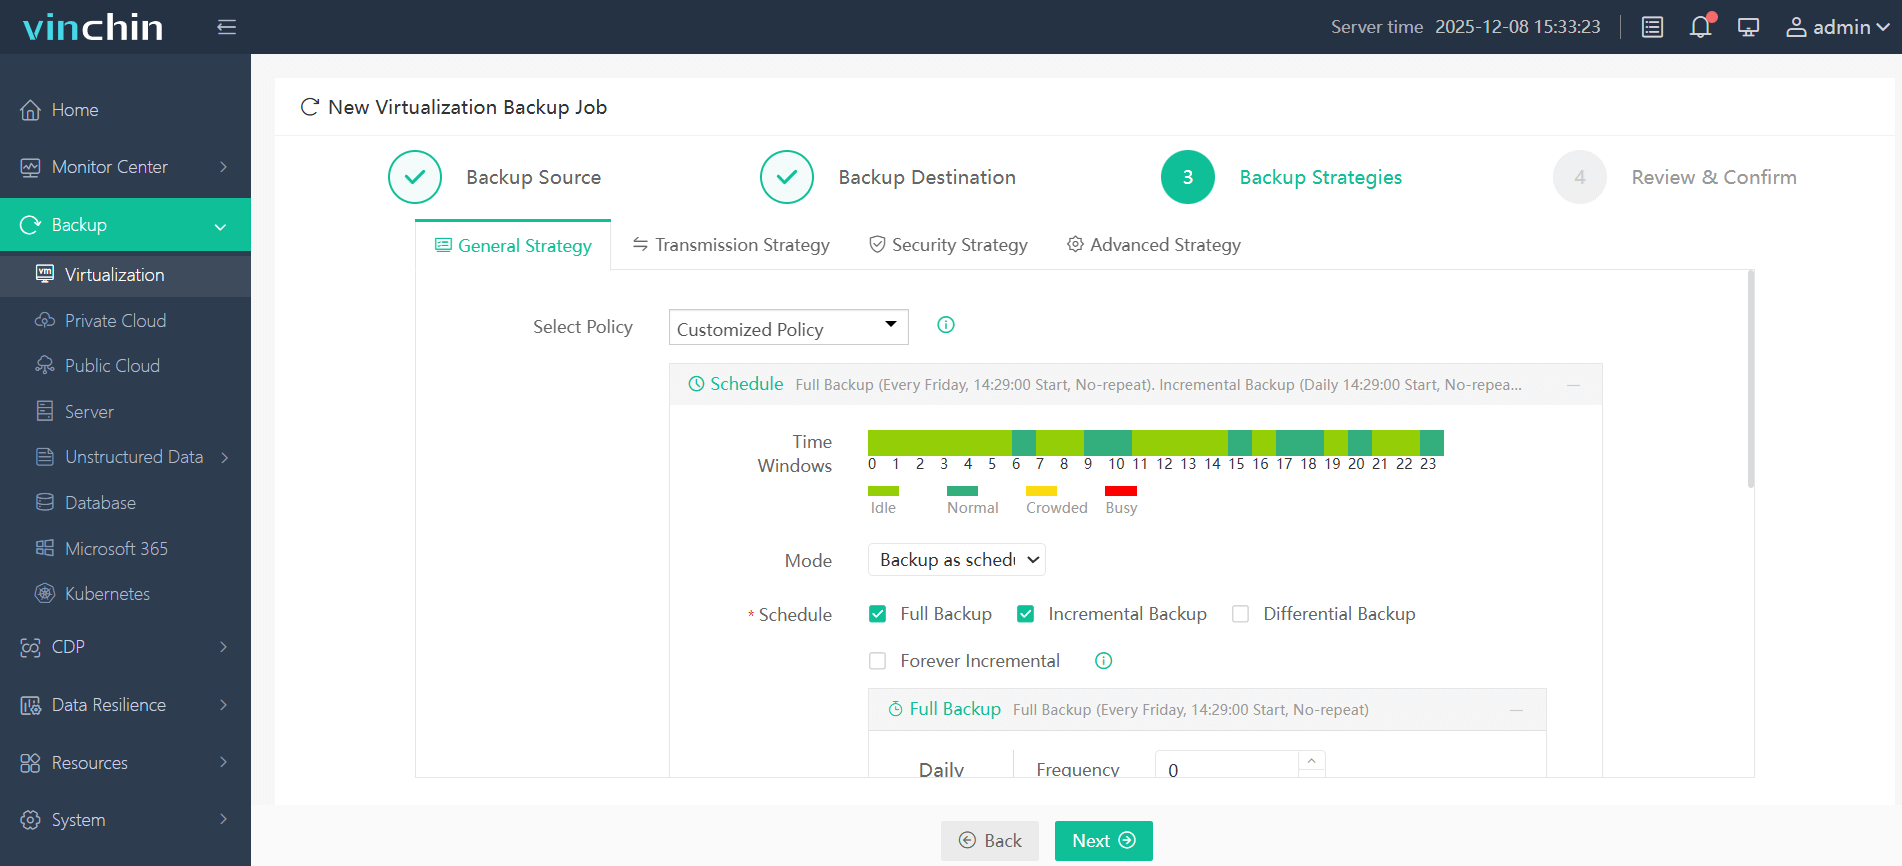
Step 3. Configure the desired backup strategies (mode, schedule, retention policy, etc.)
Step 4. Confirm your backup setting, and click Submit
A 60-day full-featured free trial is available via the download button below, allowing teams to evaluate the platform on real workloads before committing.
FAQs
Q1: Do I need the fingerprint if I use a Let’s Encrypt certificate on PBS?
No, when PBS uses a certificate signed by a public CA, Proxmox VE can verify the connection through the system VA trust chain without a fingerprint.
Q2: Can I connect multiple Proxmox VE clusters to one Proxmox Backup Server?
Yes, multiple Proxmox VE nodes and clusters can use the same PBS instance, provided adequate storage capacity and network bandwidth are available.
Q3: Can I use local storage instead of PBS?
Yes, Proxmox VE supports backups to local directories, NFS, SMB, and other storage types. However, PBS provides deduplication, incremental backups, integrity verification, and optimized storage efficiency that general-purpose storage lacks.
Conclusion
A successful backup strategy starts with a reliable backup platform. By connecting Proxmox Backup Server to Proxmox VE, you gain efficient, secure, and scalable protection for your virtual workloads. As your infrastructure grows, solutions like Vinchin Backup & Recovery can provide centralized management and advanced recovery capabilities to keep your business running with confidence.