Introduction
Physical to virtual conversion (P2V) copies a physical server's operating system, applications and data into a virtual machine. Hardware refreshes, data center consolidation and platform changes keep it on enterprise roadmaps year after year.
The best P2V migration tool depends on three things: how many servers you move, how many platforms you target, and how much downtime you can accept. Free tools handle a few servers well. Enterprise migrations usually need more.
Use this table for a quick answer, then read on for the details:
| Your situation | Best-fit approach |
|---|
| 1–3 servers, downtime is acceptable | Open-source or free tools |
| Moving to a single platform only | Hypervisor vendor converter |
| Dozens of servers, several platforms, short windows | Backup-based migration |
What to Look for in an Enterprise P2V Migration Tool
Any physical to virtual converter can copy a disk. What separates enterprise-grade tools is how they handle risk at scale. Score every option against these six criteria:
Downtime: Can it capture the server while it runs? Does it sync only the changes before cutover?
Driver and boot repair: Does it replace physical drivers and fix boot settings automatically? Manual fixes are the main cause of blue screens and failed first boots.
Platform coverage: Can one workflow reach every hypervisor you run, or plan to adopt?
Scale: Does it offer batch jobs, scheduling and central management?
Verification and rollback: Can you test the VM before cutover, and return to the physical server if needed?
Support and cost: Is vendor support available, and does the licensing fit a project budget?
These criteria matter more as server count grows. A manual fix that takes 30 minutes on one server takes days across fifty. We use the same six criteria in the comparison below.
Questions to ask any vendor
Before you commit to a tool, get clear answers to these questions:
Does it support both Windows and Linux source servers, including UEFI and GPT disks?
Which hypervisors can it restore to, and does each one use the same workflow?
Can I boot the converted VM in an isolated network before going live?
What happens if a job fails halfway through? Can I resume or roll back?
Is the source server affected during capture, and for how long?
Types of P2V Tools Compared
P2V tools fall into four groups. Each group trades license cost against manual effort, scale and risk.
Method 1: Open-source command-line tools
How it works: You boot the physical server from a live image or copy its disks, then convert and import them yourself. This is the most hands-on answer to how to convert a physical machine to a virtual machine.
Three commands show the typical flow:
# virt-v2v: convert a disk image for KVM-based platforms
virt-v2v -i disk disk.img -o local -os /var/tmp -of qcow2
# qemu-img: convert a raw image to qcow2, vmdk or vhdx
qemu-img convert -p -f raw -O qcow2 server01.img server01.qcow2
# Proxmox VE: import the converted disk into a new VM
qm importdisk 100 server01.qcow2 local-lvm
virt-p2v is the bootable front end that sends a physical server's disks to virt-v2v. The Proxmox migration guide covers the import side.
Pros: free, flexible, any target format
Limits: the source is usually offline, drivers and boot fixes are manual, and there is no batch control
Best for: a few servers and Linux-savvy admins
For Windows-specific steps, see our guide to converting a physical Windows server to a VM.
For a Linux server, a file-level copy with rsync is another common option. You pull the system into a freshly built VM, then repair the bootloader from a chroot:
# Copy the system into the new VM mounted at /mnt/target
rsync -aAXH --numeric-ids --exclude=
{"/dev/*","/proc/*","/sys/*","/run/*","/tmp/*","/mnt/*"} root@old-server:/
/mnt/target/
# Reinstall the bootloader from a chroot
for d in dev proc sys; do mount --bind /$d /mnt/target/$d; done
chroot /mnt/target grub-install /dev/vda
The new disk has new UUIDs, so you also need to update /etc/fstab before the first boot.
Method 2: Free graphical tools
How it works: Disk2vhd is a free Microsoft Sysinternals tool. It captures a live Windows system into VHD files using volume snapshots.
Pros: runs online and is simple to use
Limits: no BitLocker support, you build the VM and install drivers yourself, and it fits Hyper-V best
Best for: one or two Windows servers going to Hyper-V
Run this from an elevated prompt. Write the VHD to a different disk than the one you are copying:
disk2vhd * D:\vhd\server.vhd
For KVM or Proxmox targets, convert the file afterward with qemu-img convert -p -f vpc -O qcow2 server.vhd server.qcow2. For Hyper-V, use the PowerShell Convert-VHD command to get a VHDX file.
Method 3: Hypervisor vendor converters
How it works: A converter supplied by a hypervisor vendor turns a running server into that vendor's VM format through a guided wizard.
Example: VMware vCenter Converter Standalone
VMware's converter is the best-known tool in this group. It converts a powered-on physical machine into a VMware VM, so the source keeps running during the copy. Broadcom distributes it through its support portal, which requires a login.
A typical conversion looks like this:
Prepare the server: make sure the destination has free space at least equal to the server's used disk space, temporarily disable antivirus software, and uninstall non-Microsoft drivers and disable third-party services, except the converter's own.
Install and start: install Converter Standalone on the server, then choose File > New > Convert Machine.
Choose source and destination: select a powered-on machine and "This local machine", then pick the VMware VM type that matches your product and a destination with enough space.
Adjust the data (optional): click Edit to choose which partitions to copy, and keep the system partition.
Finish and boot: click Finish, wait for the conversion, then attach the converted disks to a VM on your VMware platform and boot it.
The command line covers installation options, such as silent install with /qn, while the conversion itself runs through the wizard.
What to watch for with this converter:
It is designed for VMware destinations. Moving to Hyper-V, Proxmox or another platform means using a different tool.
OEM Windows licenses may fail to migrate because of Microsoft licensing terms.
The server keeps running during the copy, so plan a short window at the end to capture the final changes.
Conversions are set up per server through the wizard, so large batches still mean repeated manual setup.
Other vendors follow the same pattern. Citrix's XenConvert, for example, is deprecated and only covered Windows servers.
Pros: easy to follow and well integrated with the vendor's own platform
Limits: tied to one platform; moving to another platform means learning another tool
Best for: single-platform moves
Method 4: Backup-based migration
How it works: You back up the physical server with enterprise backup software, then restore that backup onto a hypervisor as a VM. The restore engine handles disk format, drivers and boot settings, so the same job works across many servers and platforms.
Pros: automatic driver and boot repair in leading products, incremental sync for a short cutover, testing before go-live, and the same software keeps protecting the server afterward
Limits: you need a backup platform deployed, and it costs more than free tools
Best for: batch moves, several platforms and short maintenance windows
How the four compare
| Criteria | Open-source CLI | Free graphical | Vendor converter | Backup-based |
|---|
| Downtime | Usually an offline copy | Live capture, final sync needed | Live conversion, final sync needed | Incremental sync, short cutover |
| Driver and boot repair | Manual | Manual | Handled for its own platform | Automatic in leading products |
| Platform coverage | Any, with extra steps | Mainly Hyper-V | One vendor's platform | Many platforms, one workflow |
| Scale | Scripts you write | One server at a time | Basic job management | Batch jobs, central console |
| Verification and rollback | Manual | Manual | Manual | Test boot before cutover |
| Support and cost | Community, free | No formal support, free | Varies by vendor | Paid, with vendor support |
The pattern is clear: the more manual the tool, the lower the license cost and the harder it is to scale.
Which Approach Fits Your Situation?
Answer three questions in order, and the right approach usually becomes obvious.
How many servers are you moving? Up to three, and free tools are usually enough. Beyond a handful, manual steps multiply and a backup-based P2V migration tool starts to pay for itself.
How many target platforms? If everything goes to one platform, a vendor converter may do. If you run several platforms, or have not picked the final one yet, choose a tool that can restore to many.
How much downtime can you accept? If you can take a server offline for hours, an offline copy works. If you need minutes, you need incremental sync and a test boot before cutover.
Then match your answers to a scenario:
A few test or edge servers: open-source or free tools
Everything goes to the same platform: the hypervisor vendor converter
Batch migration, several platforms, short windows: backup-based migration
If your answers point to the last scenario, the next section shows how we handle it.
How We Handle P2V with Vinchin Backup & Recovery
Vinchin Backup & Recovery treats P2V as a backup and restore job. We back up the physical server, then restore that backup directly onto a hypervisor as a virtual machine. There is no separate converter and no manual disk surgery.
Supported platforms and source systems
Any virtualization platform that Vinchin Backup & Recovery supports can be a P2V target, including:
VMware, Hyper-V, Proxmox, XenServer and XCP-ng
oVirt, Red Hat Virtualization, Oracle OLVM and OpenStack
ZStack, Sangfor HCI, Huawei FusionCompute, FusionOne Compute, H3C CAS/UIS, Arcfra, KayGrid and InCloud Sphere
On the source side, we back up physical servers running Windows, Oracle Linux, Ubuntu, Red Hat Enterprise Linux, Rocky Linux, Debian, SUSE, openSUSE, CentOS and CentOS Stream.
How backup-based P2V works end to end
Our workflow has three stages:
Capture: a lightweight agent on the physical server takes application-consistent backups without interrupting services. After the first full backup, only changed blocks are copied.
Convert: when you restore to a target host, our restore engine converts the disk format, replaces physical drivers with virtual ones, and repairs boot and network settings.
Verify and cut over: you boot the VM in an isolated network, check your applications, run a final incremental sync and switch production over.
Because every stage works from the backup, the physical server keeps running until you choose to cut over.
Key capabilities
Here is how our P2V workflow answers the six criteria from earlier:
Short downtime: we take application-consistent backups without interrupting services, then sync only changed blocks, so the final cutover window stays short.
Automatic driver and boot repair: during restore we strip physical OEM drivers, inject the right virtual drivers such as VirtIO or VMware Tools, and repair boot and network settings.
One workflow for many platforms: the same restore job works for every supported target, and disk formats such as VMDK, QCOW2 and VHDX are converted on the fly.
Less manual setup: we create the VM through the hypervisor API and configure CPU, memory and network mapping. The target needs no agent.
Verification before cutover: you can boot the converted VM in an isolated sandbox network and check your applications before going live.
Instant VM recovery: you can boot a VM straight from the physical server's backup in minutes, then move its data to production storage afterward.
P2V with Vinchin in four steps
First, install a lightweight agent on the physical server and create a backup of it in Vinchin Backup & Recovery. Then:
Step 1: Back Up the Physical Server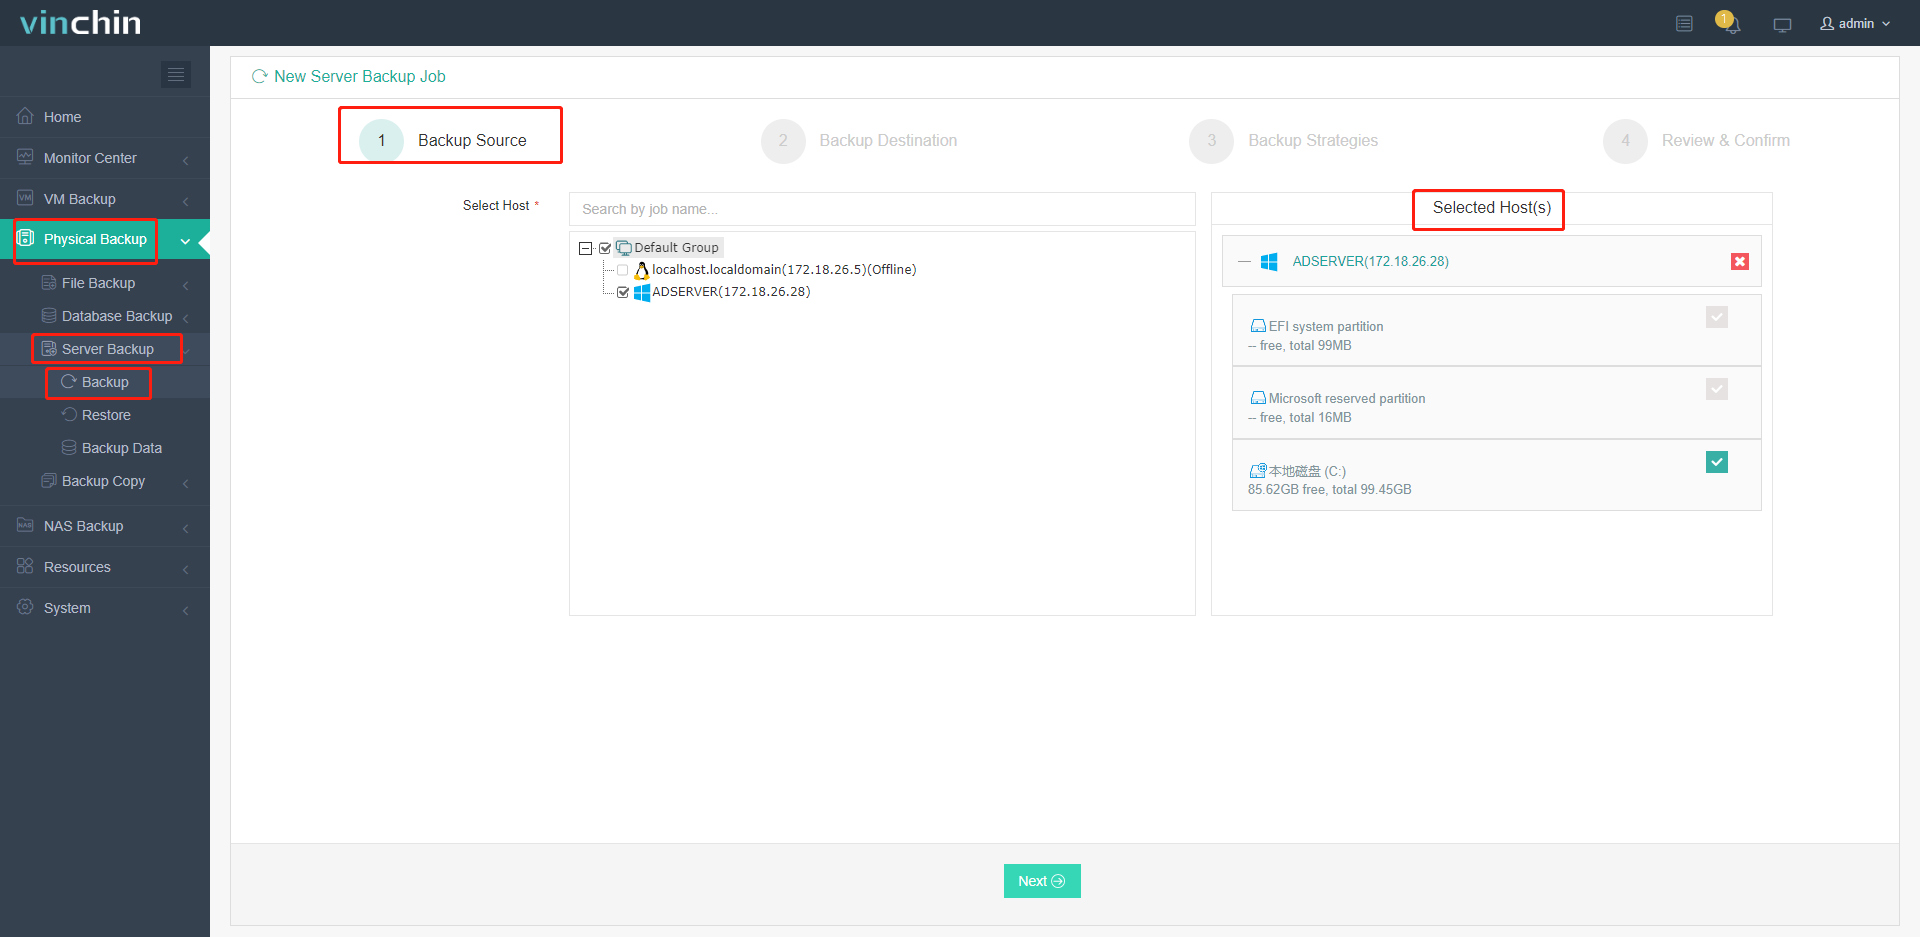
Step 2: Click Data Resilience > Restore and select the backup data.
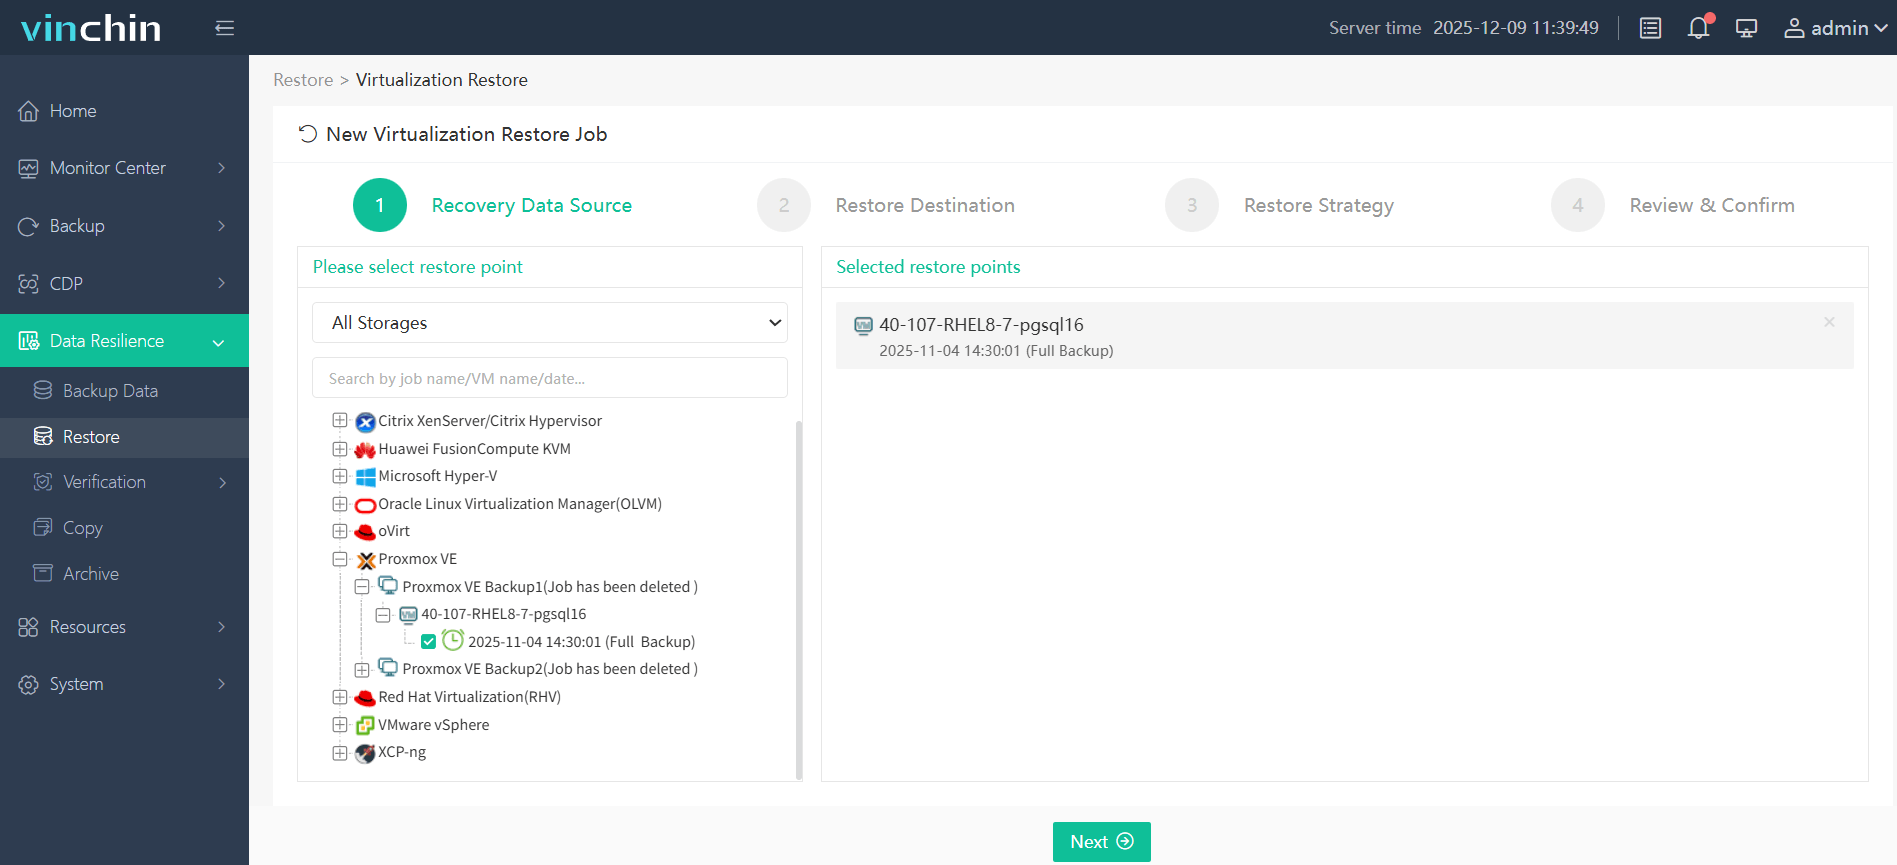
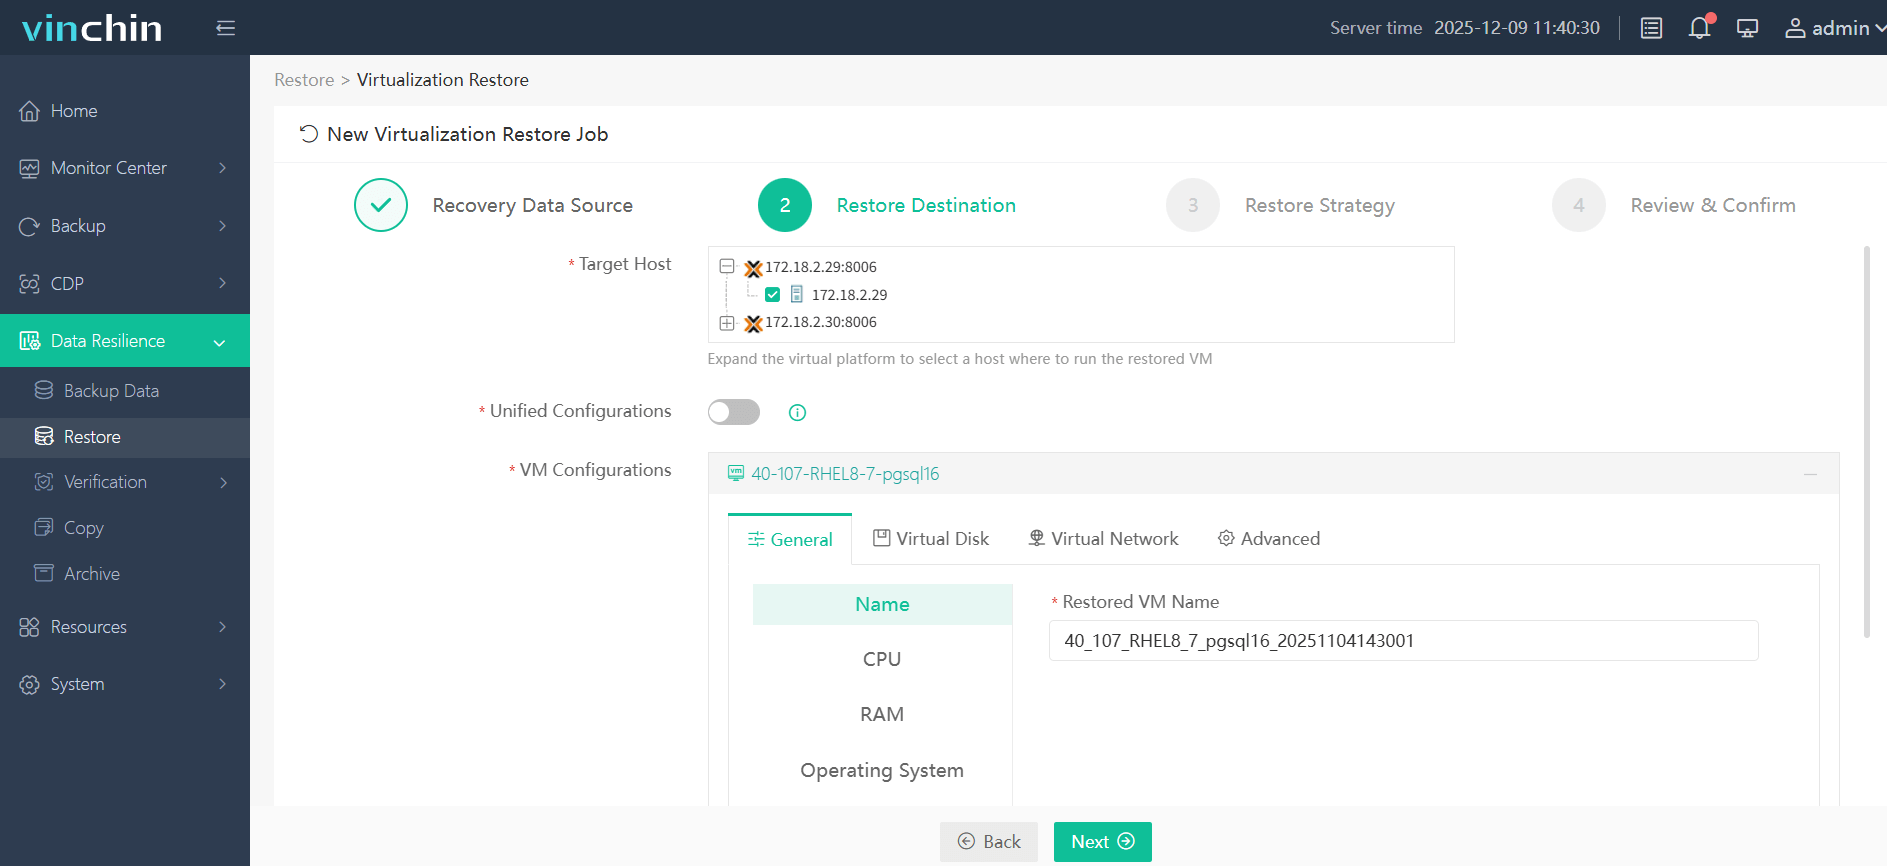
Step 3: Select the target host that you want to convert the physical machine to.
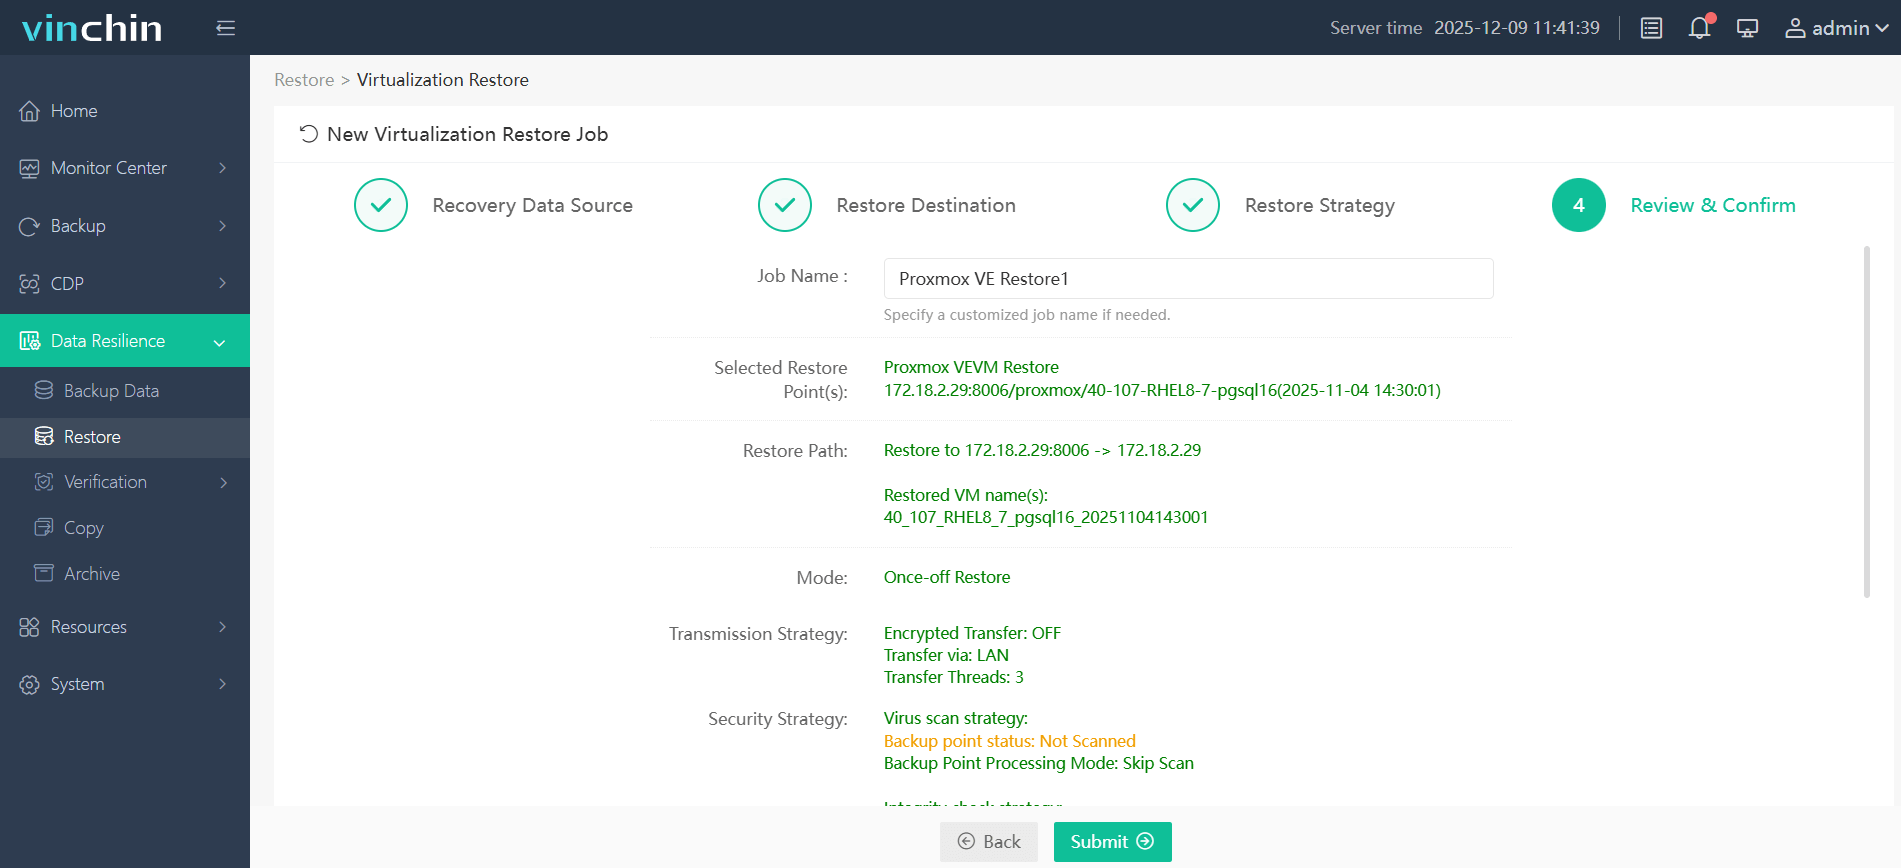
Step 4: Submit the job.
When the VM is ready, power it on in the sandbox network, test your applications, then switch production traffic over. Keep the physical server until you are satisfied.
Looking for an enterprise-grade P2V migration tool? Vinchin's backup-powered P2V supports cross-platform migration, automated driver injection and pre-cutover verification. Get your 60-day free trial to evaluate it for your server migration projects.
P2V Best Practices Before and After Migration
The right tool helps, but good preparation prevents most failures.
Before you migrate
Inventory the server: record the OS, boot mode (BIOS or UEFI), disk layout, static IPs and any hardware-bound licenses.
Check Windows licensing: confirm your license allows virtualization, since OEM copies may not transfer.
Back up and test a restore: keep the physical server untouched until the VM is verified.
Run a pilot: migrate one non-critical server first to test drivers, networking and timing.
Plan the cutover: book a maintenance window and set a clear rollback decision point.
After you migrate
Verify the applications, not just the boot. Check services, databases and network access.
Clean up: remove leftover vendor hardware utilities and install the hypervisor's guest tools.
Right-size the VM: watch CPU and memory for a week or two, then adjust.
Protect the new VM: add it to your backup schedule right away.
Retire the physical server only after the VM has run cleanly for an agreed period.
FAQ
Q1: Can P2V be done with zero downtime?
A1: Not completely, but you can get close. Offline tools keep the source down for the whole copy. With incremental sync, you only need a short window for the final switchover.
Q2: How long does a P2V migration take?
A2: It depends on used capacity and network speed. As a rough guide, 500 GB over a 1 Gbps link at about 110 MB/s needs roughly 75 minutes of transfer time, plus conversion and boot checks.
Q3: How should I migrate a server with an encrypted disk, such as BitLocker?
A3: First, check your migration tool’s BitLocker support. Unsupported tools require decryption before capture. TPM-bound keys may not transfer to VMs, so save the recovery key upfront and re-encrypt after validation.
Q4: Does my Windows license or activation change after P2V?
A4: It can. Moving to virtual hardware counts as a hardware change, so Windows may ask for reactivation. OEM licenses may not be transferable to a VM under Microsoft’s licensing terms, and Microsoft’s own Disk2vhd page warns about this. Confirm your license type with Microsoft or your reseller before you migrate, and keep the license keys on record.
Conclusion
The best P2V migration tool is the one that matches your scale. For a few servers you can take offline, free tools such as virt-v2v, qemu-img and Disk2vhd do the job. For enterprise migrations with many servers, several platforms and short windows, a backup-based approach removes most of the manual work and risk.
With Vinchin Backup & Recovery, driver and boot repair are automatic, downtime stays short, and you can test the VM before cutover. Whichever route you choose, keep the physical server until the VM is verified.