-
What is XCP-ng?
-
What is KVM?
-
XCP-ng kvm: Key Differences & Use Cases
-
Manual Migration Between xcp ng kvm Environments
-
How to Migrate Virtual Machines With Vinchin Backup & Recovery
-
XCP-ng kvm FAQs
-
Conclusion
Virtualization powers today’s IT infrastructure by making servers flexible and efficient. Many organizations rely on open-source platforms like XCP-ng or KVM to run virtual machines (VMs). But what happens when you need to move workloads between these two systems? For operations administrators managing hybrid environments or planning migrations, this task can seem daunting due to differences in architecture and management tools. In this article, we break down what makes XCP-ng and KVM unique, compare their strengths side by side, and walk you through both manual VM migration steps and an easier alternative using Vinchin’s solution.
What is XCP-ng?
XCP-ng is an open-source virtualization platform built on the Xen Project hypervisor. It started as a community-driven fork of Citrix XenServer but now stands alone with unrestricted features and active development from contributors worldwide. As a Type 1 (bare-metal) hypervisor, XCP-ng installs directly onto hardware rather than running inside another operating system. This design gives it strong performance isolation—a key reason many enterprises trust it for critical workloads.
You manage XCP-ng using tools like Xen Orchestra or XCP-ng Center—both offer web-based interfaces that simplify VM creation, backup tasks, live migration between hosts, storage management, networking setup, snapshots, high availability settings—and more—all from your browser window.
XCP-ng supports advanced features such as high availability clusters (so VMs restart automatically if hardware fails), live migration (move running VMs between hosts without downtime), multiple storage backends (local disks or shared SAN/NAS), role-based access control for security compliance needs—and robust community support channels if you get stuck along the way.
What is KVM?
KVM stands for Kernel-based Virtual Machine—a Linux kernel module that turns any compatible Linux distribution into a full-featured hypervisor. Depending on how you deploy it—with or without a host OS GUI—it acts as either a Type 1 or Type 2 hypervisor.
KVM uses hardware virtualization extensions like Intel VT-x or AMD-V to run multiple isolated VMs on one physical server efficiently. Its tight integration with Linux means regular security updates arrive quickly via standard package managers—a big plus for admins who value patching speed and stability.
You can manage KVM using command-line tools (virsh, qemu-img), graphical utilities like virt-manager—or automation frameworks such as libvirt APIs used by cloud platforms including OpenStack or oVirt. KVM supports almost any guest OS: Windows Server editions; major Linux distributions; even BSD variants work well here thanks to broad driver support baked into upstream kernels.
Because KVM leverages native Linux capabilities—like cgroups for resource control—it scales easily across everything from single-node labs up to massive cloud deployments spanning thousands of VMs per cluster node if needed.
XCP-ng kvm: Key Differences & Use Cases
When comparing xcp-ng kvm solutions side by side, several factors stand out: architecture style; management approach; ecosystem fit; performance characteristics; ease of use at scale—and typical deployment scenarios seen in production environments today.
Architecture
XCP-ng runs atop the Xen microkernel hypervisor directly on bare metal hardware—giving each VM strong isolation from others on the same host (ideal for multi-tenant setups). By contrast, KVM operates within the mainline Linux kernel itself—so every VM shares some core resources managed by Linux process scheduling mechanisms instead of an external microkernel layer.
Management Tools
With XCP-ng you get unified web consoles like Xen Orchestra that centralize all cluster operations—from provisioning new VMs to monitoring health metrics across dozens of nodes at once—even handling backups natively through plugins if desired. In contrast KVM relies mostly on command-line utilities (virsh, qemu-img) plus optional GUIs such as virt-manager—which may require deeper familiarity with underlying Linux concepts during day-to-day administration tasks especially at larger scale deployments where automation becomes essential via scripts or Ansible modules leveraging libvirt APIs directly.
Performance & Security
Both platforms deliver near-native performance thanks to hardware acceleration—but their approaches differ slightly: XCP-ng’s microkernel model offers stronger workload separation while KVM’s deep integration with Linux ensures rapid feature adoption whenever new CPU instructions appear upstream (think nested virtualization support). Security-wise both benefit from regular patches but some organizations prefer Xen’s stricter boundaries when hosting sensitive data alongside less trusted tenants under one roof—a common scenario in service provider clouds or regulated industries needing compliance guarantees.
Typical Use Cases
Choose XCP-ng if you want easy centralized management out-of-the-box plus robust clustering/high availability features suited for enterprise datacenters—or home labs seeking similar reliability at smaller scale without licensing fees getting in your way later down the road! Opt for KVM when flexibility matters most: integrating tightly with existing Linux workflows; automating everything via scripts/APIs; supporting diverse guest OS types across mixed-use clusters ranging from dev/test sandboxes up through mission-critical production stacks powering public/private clouds alike!
Manual Migration Between xcp ng kvm Environments
Migrating virtual machines manually between xcp-ng kvm platforms involves several distinct phases—from prepping source systems all the way through validating successful boots post-import! Let’s break things down step-by-step so nothing gets missed along journey:
Phase 1: Prepare Source VM on KVM Host
Before exporting anything take time ensuring your guest OS has right drivers loaded so it can boot smoothly under Xen after transfer completes:
For most modern Linux guests update initramfs image using:
dracut --add-drivers "xen-blkfront xen-netfront" --force
If your system uses BIOS boot mode regenerate GRUB config:
dracut --regenerate-all -f && grub2-mkconfig -o /boot/grub2/grub.cfg
For UEFI setups adjust path accordingly:
dracut --regenerate-all -f && grub2-mkconfig -o /boot/efi/EFI/<your distribution>/grub.cfg
Once done shut down VM cleanly via SHUTDOWN button inside virt-manager console—or issue virsh shutdown <domain> command line equivalent—to avoid filesystem inconsistencies during next steps!
Phase 2: Export & Convert Disk Image
Locate main disk file associated with chosen guest—usually found somewhere beneath /var/lib/libvirt/images directory tree unless custom paths were specified earlier during initial provisioning phase.
Convert QCOW2 format over into something natively supported by XCP-ng such as VHD using qemu-img utility:
qemu-img convert -O vpc myvm.qcow2 myvm.vhd
This process reads entire source image sector-by-sector then writes compatible output ready-to-import downstream later…
After conversion finishes verify resulting file size matches expectations based upon original allocation values noted previously just-in-case truncation errors occurred silently mid-way due unexpected interruptions etc…
Phase 3: Transfer & Import Disk Into XCP-ng
Copy finished .vhd file over onto destination server using secure transfer method like SCP, RSYNC, SFTP client—or even USB drive sneakernet approach if networks aren’t interconnected yet physically/logically…
Once present locally repair/check integrity using built-in toolset provided by platform itself:
vhd-util repair -n myvm.vhd
vhd-util check -n myvm.vhd
Expect output confirming validity (“myvm.vhd is valid”) before proceeding further otherwise revisit previous export/conversion stages looking closely at logs/errors reported therein!
Now create blank virtual disk object sized slightly larger than imported file within chosen Storage Repository via web interface—or CLI commands if preferred workflow dictates so… Note UUID assigned here since next operation references it explicitly:
xe vdi-import filename=myvm.vhd format=vhd --progress uuid=<VDI UUID>
Phase 4: Create New VM & Attach Imported Disk
Inside either Xen Orchestra dashboard OR legacy XCP-ng Center app build fresh virtual machine matching specs recorded earlier—including number CPUs allocated per socket/thread count visible originally RAM assigned total capacity provisioned upfront etc.—plus correct firmware type selected appropriately based upon prior BIOS vs UEFI determination made above already!
How to Migrate Virtual Machines With Vinchin Backup & Recovery
To streamline complex migrations between xcp ng kvm environments while minimizing operational risk and downtime, businesses can leverage Vinchin Backup & Recovery—a professional-grade solution designed not only for comprehensive backup but also agentless virtual machine migration. This enables seamless transitions to new virtual infrastructures without disrupting production systems. Vinchin Backup & Recovery supports a wide array of virtualization platforms including VMware vSphere/ESXi, Microsoft Hyper-V, Proxmox VE, oVirt/RHV/OLVM, Citrix XenServer/XCP-ng, and OpenStack among others.
The migration process is extremely straightforward: simply back up the source VM and restore it onto the target host—all managed through Vinchin Backup & Recovery's intuitive web console.
Migration steps from VMware to Proxmox include:
Step 1. Select Restore Point

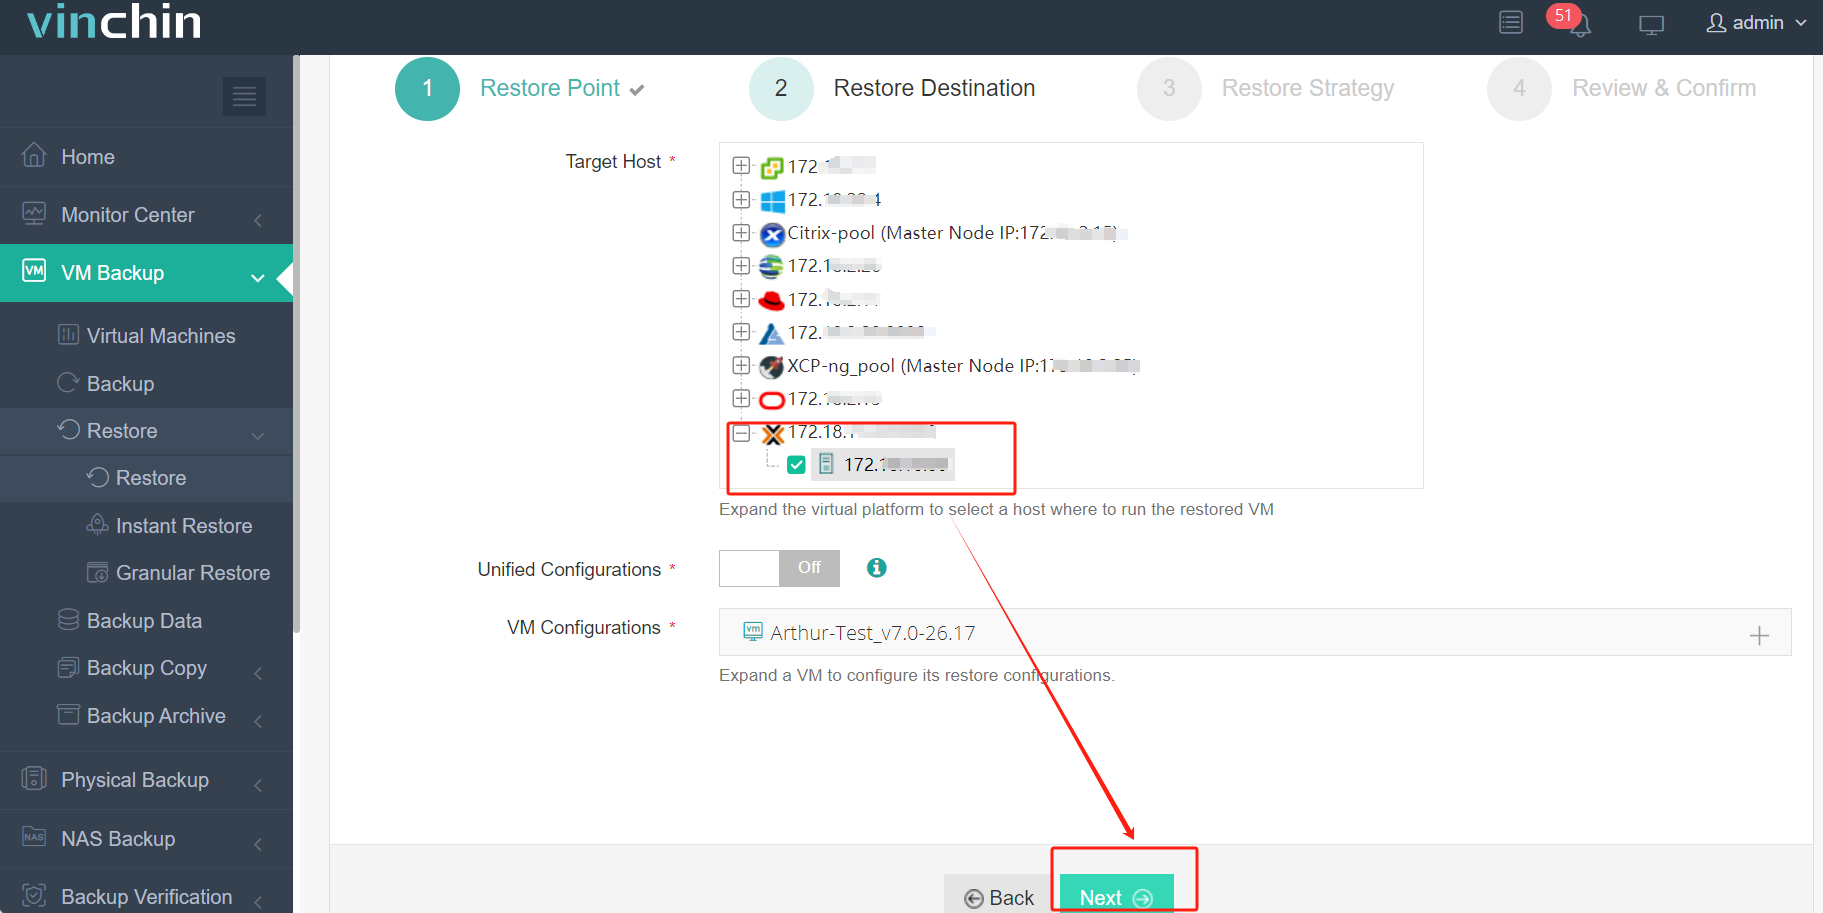
Step 2. Select Restore Destination

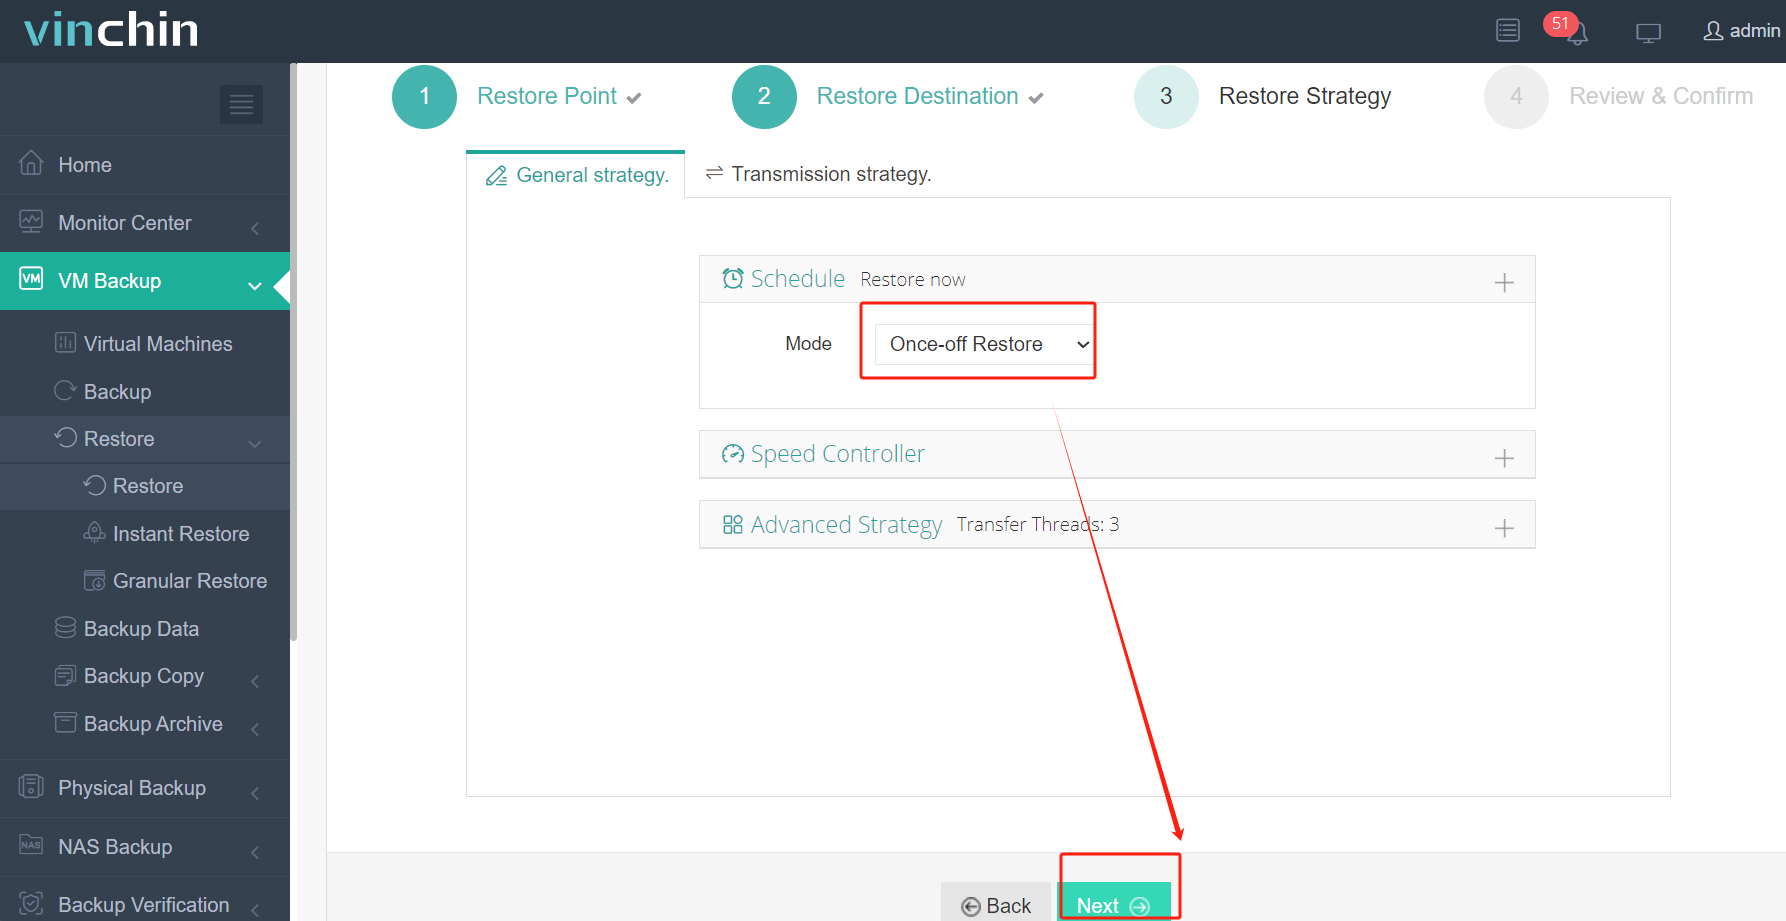
Step 3. Select Restore Strategies

After configuring all recovery policies, click Next.
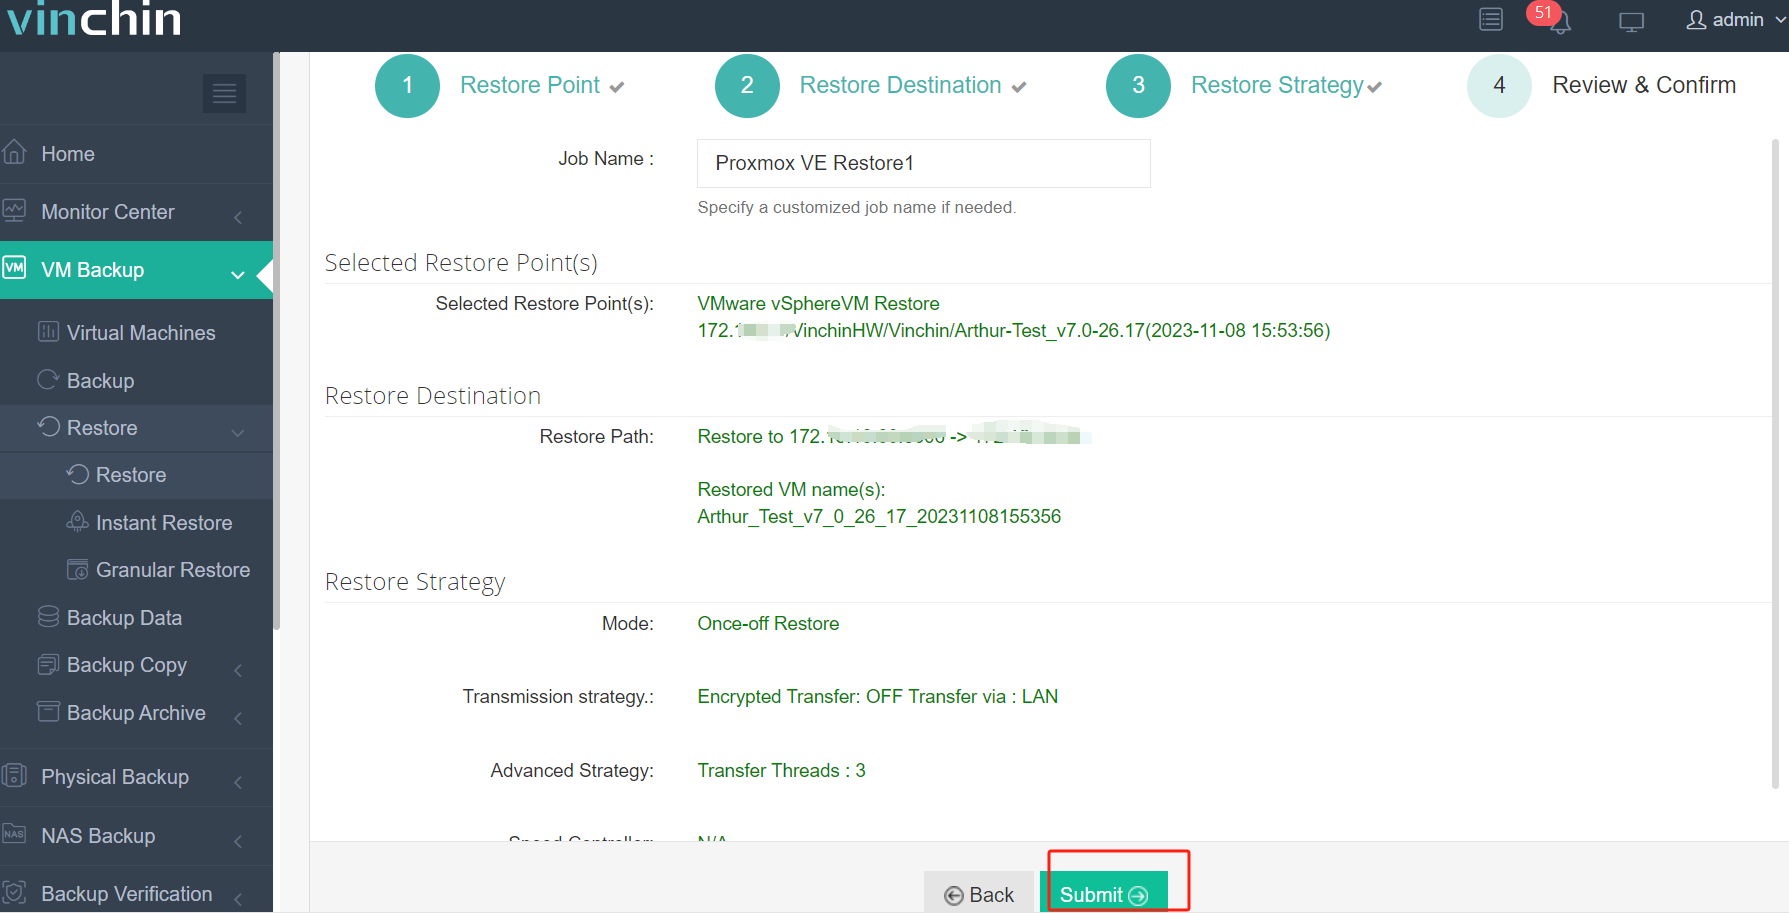
Step 4. Review and submit the job

Join thousands of global customers who trust Vinchin Backup & Recovery—with its industry-leading ratings—for secure data protection and effortless migration projects. Experience every feature free for 60 days—download the installer now for rapid deployment!
XCP-ng kvm FAQs
Q1: Can I test migrating only part of a large multi-disk VM from KVM to XCP-ng?
No—you must migrate all attached disks together because splitting them risks breaking application dependencies inside the guest OS environment.
Q2: Will migrating from xcp ng kvm affect software licenses tied to hardware IDs?
Yes—it may trigger license checks since MAC addresses/hardware fingerprints often change during cross-hypervisor moves.
Q3: Is there any way to automate driver injection before migrating hundreds of VMs?
Yes—with scripting tools you can batch-update initramfs images across many guests prior to export—but always validate results individually afterward.
Conclusion
Migrating virtual machines between xcp-ng kvm platforms takes careful planning—but brings flexibility once complete! If you want faster results without manual headaches try Vinchin’s automated solution today—it saves time while keeping critical services online seamlessly every step along journey ahead!
Share on:


