-
What Is XenServer Conversion Manager?
-
Why Use XenServer Conversion Manager?
-
Prerequisites Before Migration
-
How to Migrate VMs with XenServer Conversion Manager?
-
How to Migrate Virtual Machines with Vinchin?
-
XenServer Conversion Manager FAQs
-
Conclusion
Migrating virtual machines (VMs) between platforms is a routine task for IT administrators managing dynamic data centers. If you are moving from VMware to XenServer, you may have heard of XenServer Conversion Manager. This tool helps make VM migration smoother by automating many complex steps. In this article, we will explain what XenServer Conversion Manager is, why it matters for your environment, how to use it step by step—including prerequisites—and cover an alternative method using the XenCenter Import Wizard. We will also discuss common migration challenges and performance tips before introducing a modern approach with Vinchin.
What Is XenServer Conversion Manager?
XenServer Conversion Manager is a dedicated virtual appliance provided by Citrix for its XenServer platform. Its main job is to copy VMs from VMware ESXi or vCenter environments into a format that runs natively on XenServer hosts or pools. The tool supports batch processing—up to 10 VMs in parallel—which saves time when migrating large workloads.
Conversion Manager works by connecting directly to your VMware infrastructure over the network. It reads VM configurations and disks from VMware storage and writes them into compatible storage repositories on your target XenServer environment. During conversion, it can uninstall VMware Tools from guest operating systems and install XenServer VM Tools where possible for better compatibility.
Why Use XenServer Conversion Manager?
Why choose this tool over manual methods? First, XenServer Conversion Manager automates many tasks that would otherwise require careful manual work—such as disk format conversion or network mapping—which reduces human error risk during critical migrations.
Second, because it integrates with XenCenter, you do not need to learn new software interfaces; everything happens within familiar menus like Pool > Conversion Manager. Third, its ability to process multiple VMs at once makes it ideal for larger projects or tight maintenance windows.
Finally, the tool manages important details: mapping source networks to destination networks in XenServer; handling storage repository selection; removing legacy drivers; even installing new tools automatically if desired—all of which help ensure migrated VMs boot cleanly on their new platform without surprises.
Prerequisites Before Migration
Before starting any migration project with XenServer Conversion Manager, preparation is key:
Ensure your source VMware environment uses supported versions (ESXi 6.x or later recommended).
Your target must be running Citrix Hypervisor/XenServer 7.x or newer.
Each VM should have no more than three attached disks.
Power off all VMs before migration—do not leave them suspended or snapshotted.
Confirm enough free space exists in your target storage repositories.
Make sure both environments can communicate over required ports (typically TCP 443/902/903).
Check that VLAN tagging or firewall rules allow traffic between source vSphere hosts/vCenter Server and target XenServer pool members.
Remove unnecessary snapshots from source VMs—they are not migrated.
Back up critical data before proceeding in case rollback is needed.
Taking these steps helps avoid failed conversions due to unsupported configurations or resource shortages.
How to Migrate VMs with XenServer Conversion Manager?
For most migrations from VMware ESXi/vCenter into Citrix Hypervisor/XenServer pools or standalone hosts, this method offers automation plus flexibility.
First review all prerequisites above—especially powering off source VMs—and then follow these steps:
1. Download the latest Conversion Manager virtual appliance from the official downloads page.
2. In XenCenter, import the downloaded appliance using File > Import.
3. Configure basic settings (networking/storage) for the appliance within XenCenter after deployment.
4. Open Pool > Conversion Manager in your main navigation pane.
5. Click New Conversion in the toolbar to launch its wizard interface.
6. Enter credentials for your VMware vCenter Server or ESXi host when prompted; click Next once connected successfully.
7. On the Virtual Machines screen select one or more powered-off VMs eligible for conversion; click Next again.
8. On the next screen choose which storage repository will hold converted VM disks on your target system.
9. Map each source network adapter shown under Networking—for example “VM Network”—to an appropriate destination network available in your pool/host; decide whether you want MAC addresses preserved across platforms here as well.
10. Review all selections carefully then click Finish to begin conversion jobs immediately.
During processing:
The tool copies each selected VM’s configuration/disks over secure channels,
Uninstalls old drivers/tools,
Installs new ones where possible (Linux guests auto-install; Windows guests require configuration).
After completion:
Your original VMware VMs remain untouched,
New copies appear ready-to-run inside your chosen pool/host,
You may need minor tweaks such as reassigning static IPs if DHCP was not used originally,
Always test boot order/settings before putting migrated workloads into production!
How to Migrate Virtual Machines with Vinchin?
For organizations seeking a streamlined agentless migration solution that minimizes disruption during virtualization transitions, Vinchin Backup & Recovery delivers enterprise-grade backup capabilities combined with seamless virtual machine migration support—even across heterogeneous environments and without agents installed on each system.
Vinchin Backup & Recovery enables businesses to migrate virtual machines efficiently among major virtualization platforms including VMware, Hyper-V, Proxmox VE, oVirt, Oracle Linux Virtualization Manager (OLVM), Red Hat Virtualization (RHV), XCP-ng, Citrix XenServer, and OpenStack—with additional support for other compatible hypervisors beyond those listed here as well.
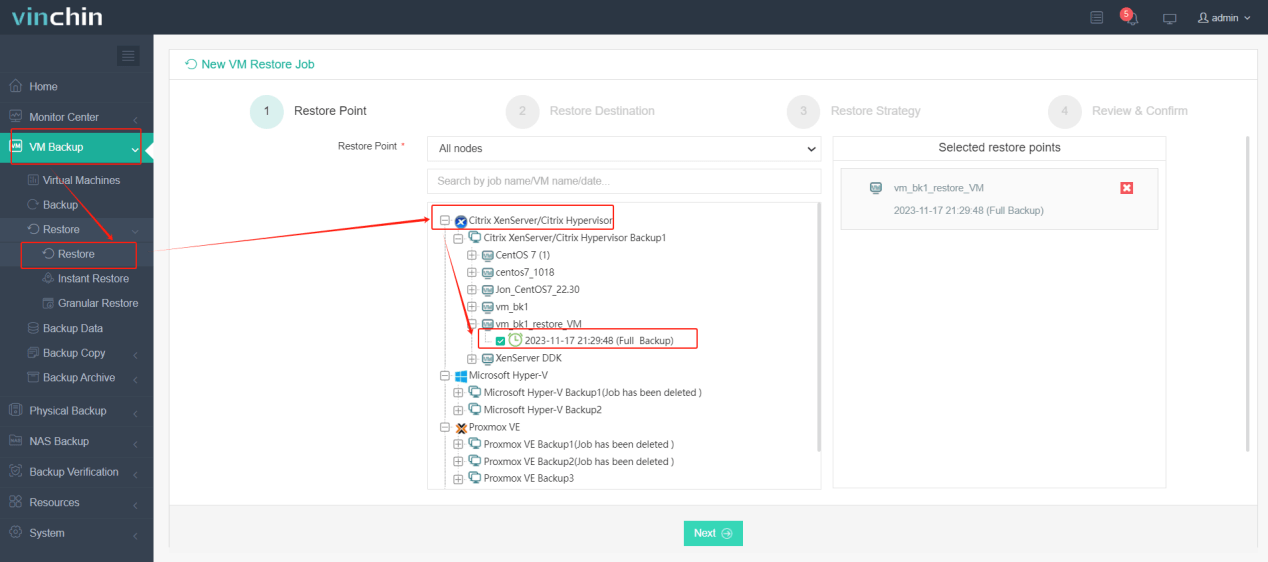
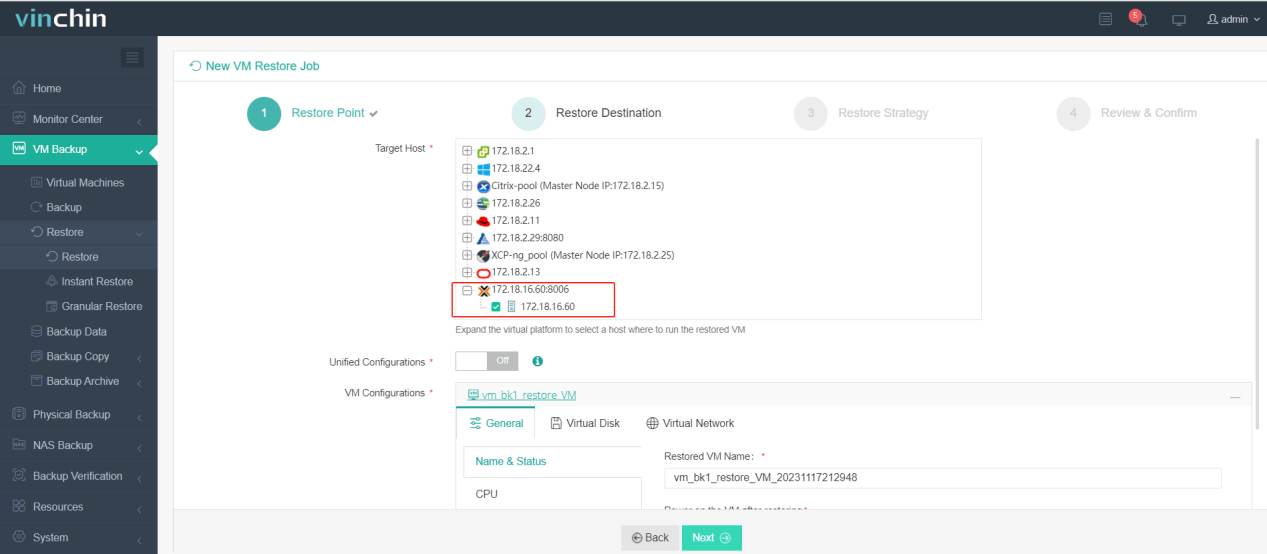
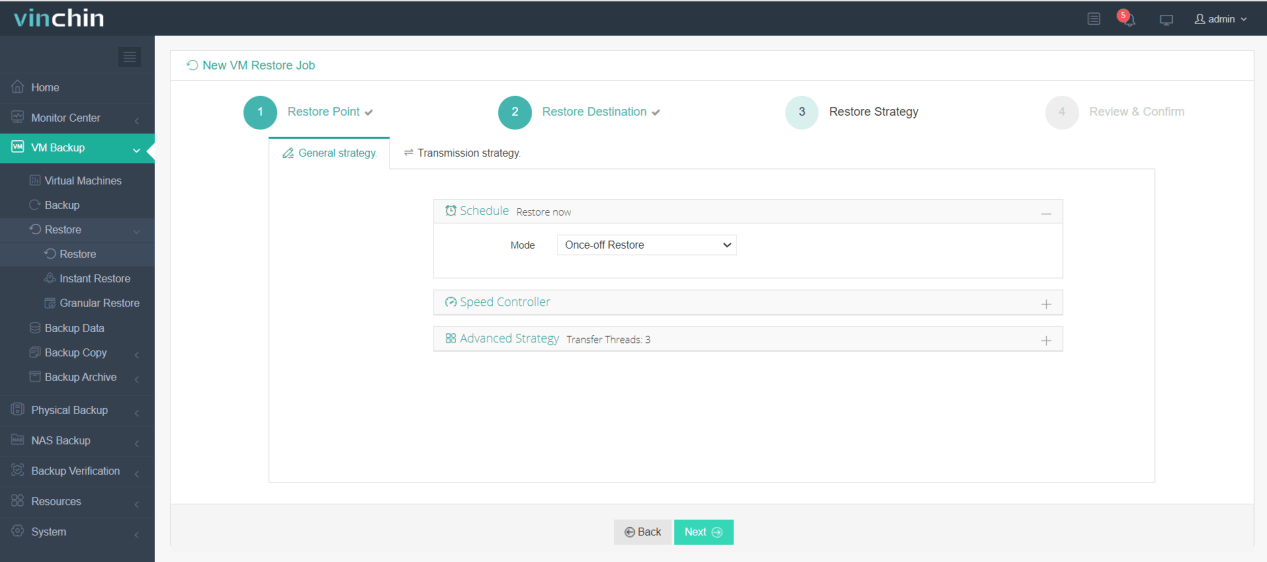
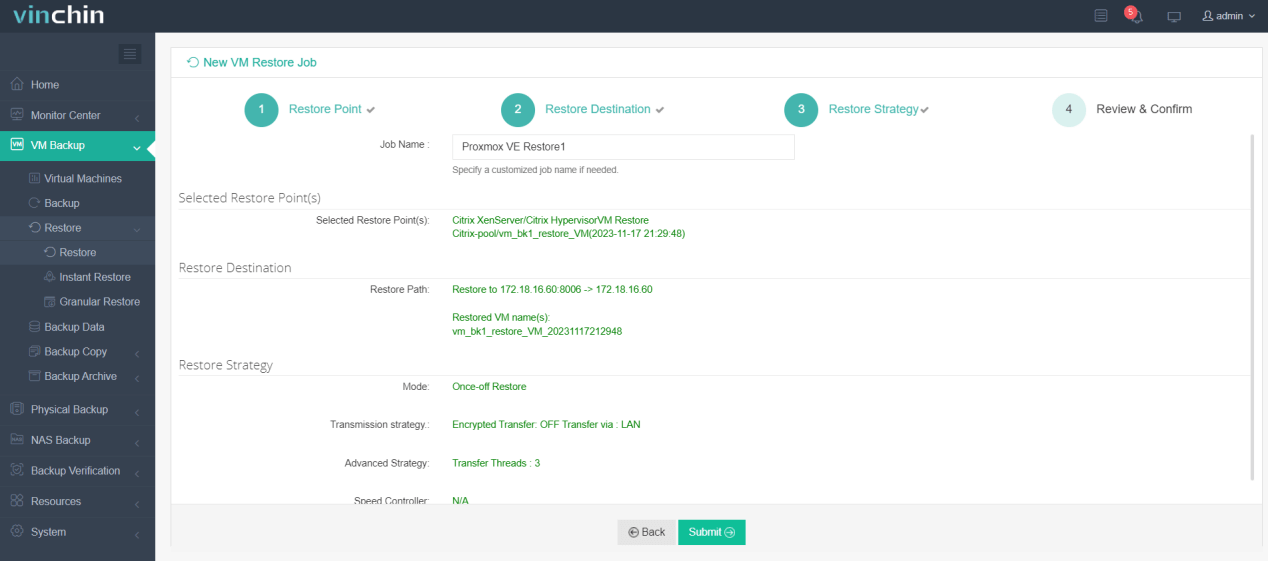
The migration workflow is extremely straightforward: simply back up the source virtual machine using Vinchin Backup & Recovery's intuitive web console and restore it directly onto any supported target host where you wish it to run next—all through a few guided clicks without complex scripting or downtime risks.
To migrate a specific VM type—for example from Citrix XenServer—to another platform such as Proxmox VE:
1. Select the backed-up Citrix XenServer virtual machine within Vinchin Backup & Recovery;

2. Choose Proxmox VE as the target host;

3. Define preferred migration strategies;

4. Submit the job for execution.

Thousands of global customers rely on Vinchin Backup & Recovery’s high-rated solutions every day—now you can experience its full power risk-free with a comprehensive 60-day free trial license covering all features and supported platforms worldwide! Download the installer today for rapid deployment in any environment.
XenServer Conversion Manager FAQs
Q1: Can I migrate encrypted virtual machines using XenServer Conversion Manager?
No; encrypted disks are not supported—you must decrypt them before attempting conversion between platforms.
Q2: How does network adapter mapping work during migration?
You map each source NIC manually within wizard screens so they connect correctly upon first boot under new hypervisor environment after cutover completes successfully!
Q3: Where can I find detailed logs if something goes wrong?
Open Fetch All Logs button in UI OR access /var/log/conversion directory directly via SSH session into appliance shell prompt anytime troubleshooting deeper issues beyond surface-level errors reported onscreen initially…
Conclusion
Migrating virtual machines into Citrix Hypervisor/XenServer becomes straightforward when armed with proper tools like Conversion Manager plus best practices outlined above—from planning through troubleshooting stages alike! For seamless agentless migrations across diverse virtualization stacks consider trying Vinchin today—it delivers simplicity alongside enterprise-grade reliability every step along way.
Share on:


