Hyper-V is a popular virtualization solution. After Hyper-V feature is enabled on Windows operating system, this machine will become a host. IT administrators can create VM on the host via Hyper-V Manager.
Sometimes data transfer between host and guest is needed. To quickly transfer files, helpful methods will be given to you in this post. Also, if you would like to transfer files in other ways, you can follow another post to copy file from host to guest or between VMs.
P.S. If you would like to protect VM data, there are 4 ways to backup Hyper-V VM.
Method 1. Copy File from Hyper-V Host to Guest via Enhanced Session Mode
To use Enhanced Sesstion Mode related configuration on Hyper-V host should be enabled.
The benefits of enabling Enhanced Session Mode:
● Sharing Clipboard with the Windows host
● Visit the resources on local hard disk of Windows host on VM
● Adjust the resolution ratio of VM window
Enhanced Session Mode is automatically enabled on Windows 10 and Windows 8.1 but needs to be manually enabled on the other operating systems.
Requirements
Enhanced Session Mode requires:
Windows 8.1 / Windows Server 2012 R2 or later
Hyper-V Integration Services enabled
Remote Desktop enabled in the guest OS
Supported guest operating systems (Windows Pro/Enterprise editions work best)
How to Enable Enhanced Session Mode?
Enhanced Session Mode needs to be enabled via Hyper-V Manager
1. Open Hyper-V Manager > right-click a Hyper-V host > select Hyper-V Settings
2. Under Server tab, select Enhanced Session Mode Policy > check Allow enhanced session mode
3. Under User tab, select Enhanced Session Mode > check Use enhanced session mode > click OK

4. Right-click a guest on the host > select Settings > select Integration Services > check Guest services > click OK
5. Right-click the guest > select Connect
6. A pop-up will appear to let you modify display configuration > select Show Options

7. Check Save my settings for future connections to this virtual machine
8. Expand Local Resources > expand More > Select the drive that you want to use on the virtual machine > click OK
Now, you can open File Explorer on the host to copy files to VM.
Method 2. Shared Folders via SMB
Another straightforward approach is using shared folders from the Hyper-V host.
1. Create a shared folder on the host
2. Right-click the folder > Properties > Sharing > Advanced Share > Share this folder to configure NTFS and share permssions
3. Map the share:
net use Z: \\HOSTNAME\SharedFolder
This remains one of the simplest methods for environments with stable networking.
Method 3. Use PowerShell Copy-VMFile (Best for Automation)
The Copy-VMFile cmdlet is one of the most powerful Hyper-V-native methods.
1. Enable guest services first:
Enable-VMIntegrationService -Name "Guest Service Interface" -VMName "VM01"
2. Basic Example:
Copy-VMFile "VM01" `
-SourcePath "D:\Installers\App.exe" `
-DestinationPath "C:\Temp\App.exe" `
-CreateFullPath `
-FileSource Host
This copies a file from the Hyper-V host directly into the guest VM.
3. Copy files to multiple VMs
$VMs = Get-Content "C:\Temp\vmlist.txt"
foreach ($vm in $VMs) {
    Copy-VMFile $vm `
    -SourcePath "D:\Patch\update.msu" `
    -DestinationPath "C:\Updates\update.msu" `
    -CreateFullPath `
    -FileSource Host
}
This approach is commonly used in enterprise patch deployment workflows.
Method 4. Use PowerShell Direct
PowerShell Direct allows administrators to run PowerShell commands inside Windows guest VMs without network access.
$session = New-PSSession -VMName VM01 -Credential (Get-Credential)
Copy-Item -ToSession $session `
-Path "D:\Scripts\deploy.ps1" `
-Destination "C:\Scripts"
This method is especially useful for automation engineers and DevOps administrators.
Method 5. RDP File Transfer
Because Enhanced Session Mode itself relies heavily on RDP technologies, standard Remote Desktop can also handle file transfers.
1. Enable Remote Desktop on the Guest VM
Go to Start > Settings > System > Remote Desktop to enable Remote Desktop.
2. Find the VM IP Address
Inside the VM:
ipconfig
Look for the IPv4 address.
3. Open Remote Desktop Connection on the Host
Press Win + R, type: mstsc
Enter the VM IP address, click Show Options
4. Enable Clipboard Sharing
Before connecting, go to Local Resources to check Clipboard

5. Transfer Files
After connecting:
Method 6. Mount an ISO Image to Hyper-V VM
1. Prepare an ISO File
Download an existing ISO or create a custom ISO containing files you want to transfer
Common ISO creation tools include: Windows ADK, ImgBurn, PowerISO, and oscdimg
Example folder: D:\TransferFiles\
Content:
setup.exe
patch.msu
scripts\
2. Open Hyper-V Manager
Open Hyper-V Manager, select the target VM
Ensure the VM is powered off (recommended for Gen1 VMs) or supports hot-add (Gen2/SCSI controller)
3. Attach the ISO File
Right-click the VM, select Settings and navigate to IDE Controller > DVD Drive or SCSI Controller > DVD Drive
Choose Image file to browse the ISO location and click Apply
4. Access the ISO Inside the Guest VM
Inside the VM, open File Explorer and locate the mounted DVD drive
5. Remove the ISO After Transfer
After finishing, return to Hyper-V Manager
Open VM Setting to remove or unmount the ISO
Enterprise Consideration: Protecting Hyper-V VMs Beyond File Transfer
Copying files into VMs is useful for operational tasks, but it is not a substitute for backup and disaster recovery.
Many enterprises today combine Hyper-V management workflows with centralized VM protection platforms such as Vinchin Backup & Recovery, which has helped thousands of companies build highly effective disaster recovery system for virtual environment and get compliments from them for simple operations and powerful performance.

Agentless Backup is supported in Vinchin Backup & Recovery. It means you just need to add Hyper-V host to the backup system and then you can select the guest machines to make backup. Compared with tranditional agent backup, Vinchin Backup & Recovery helps you save much time.
Granular Restore will make it easy to extract the selected files from VM backup and them you can transfer the files to another machine.
It will be easy to start using this software because there is a user-friendly web console to let you easily finish every step with wizards.
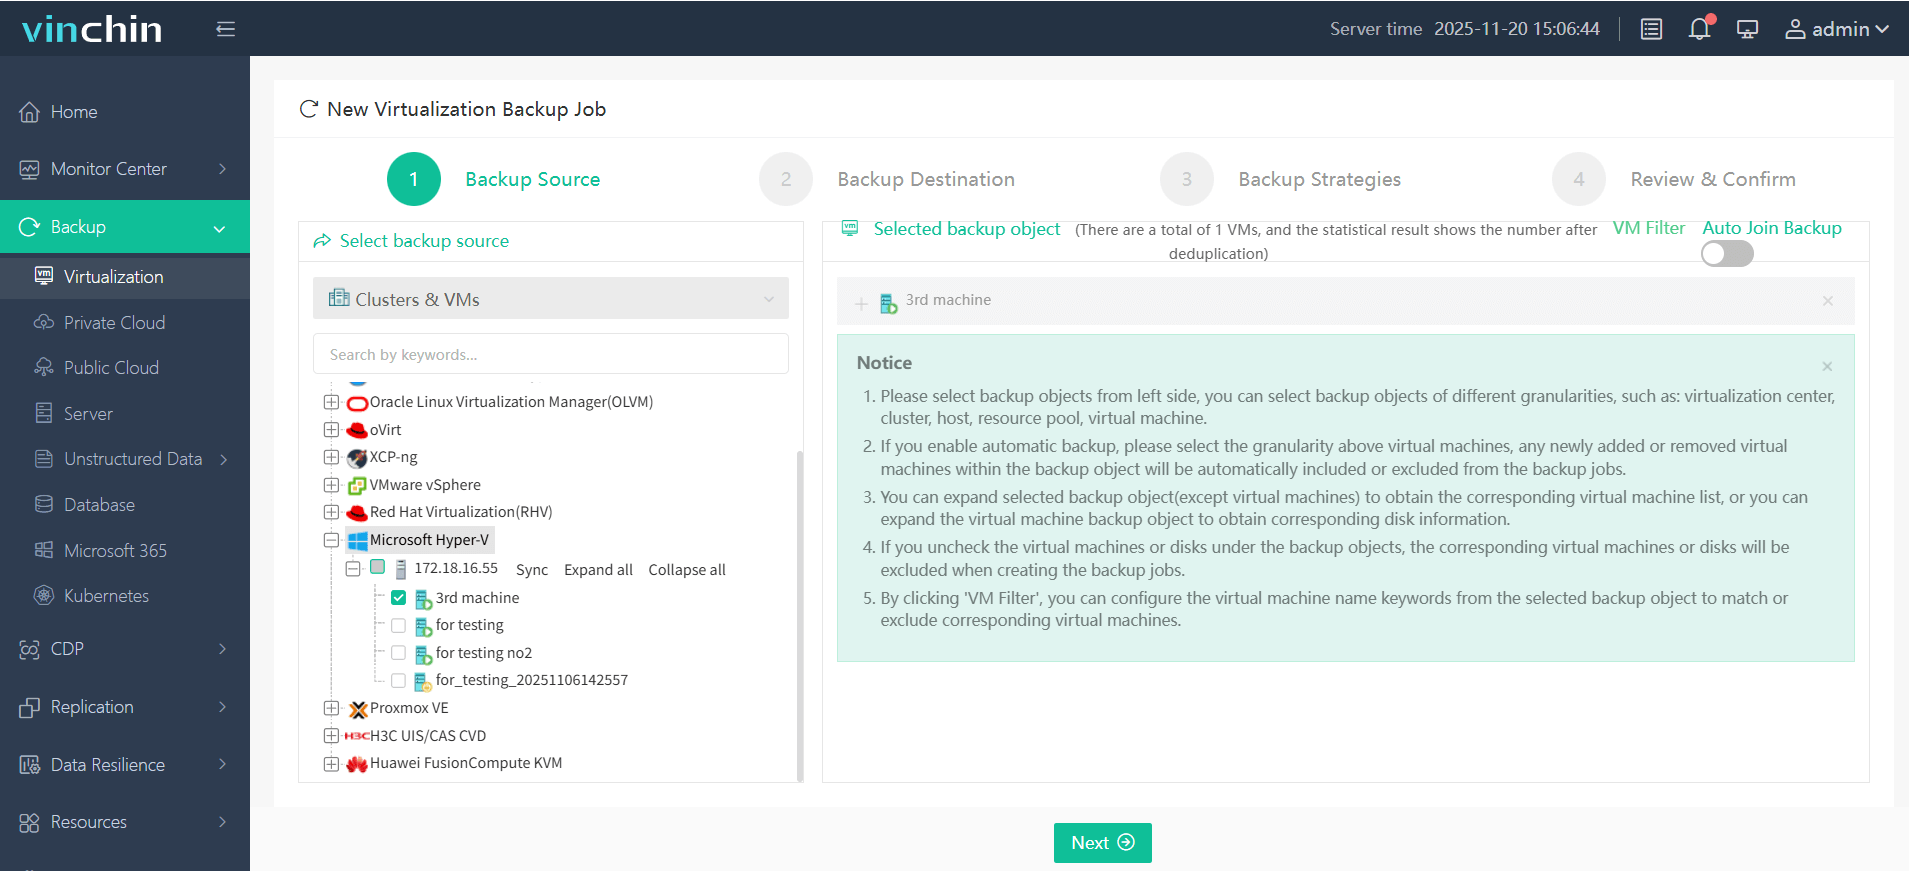
Step 1. Choose the Hyper-V VM you want to backup
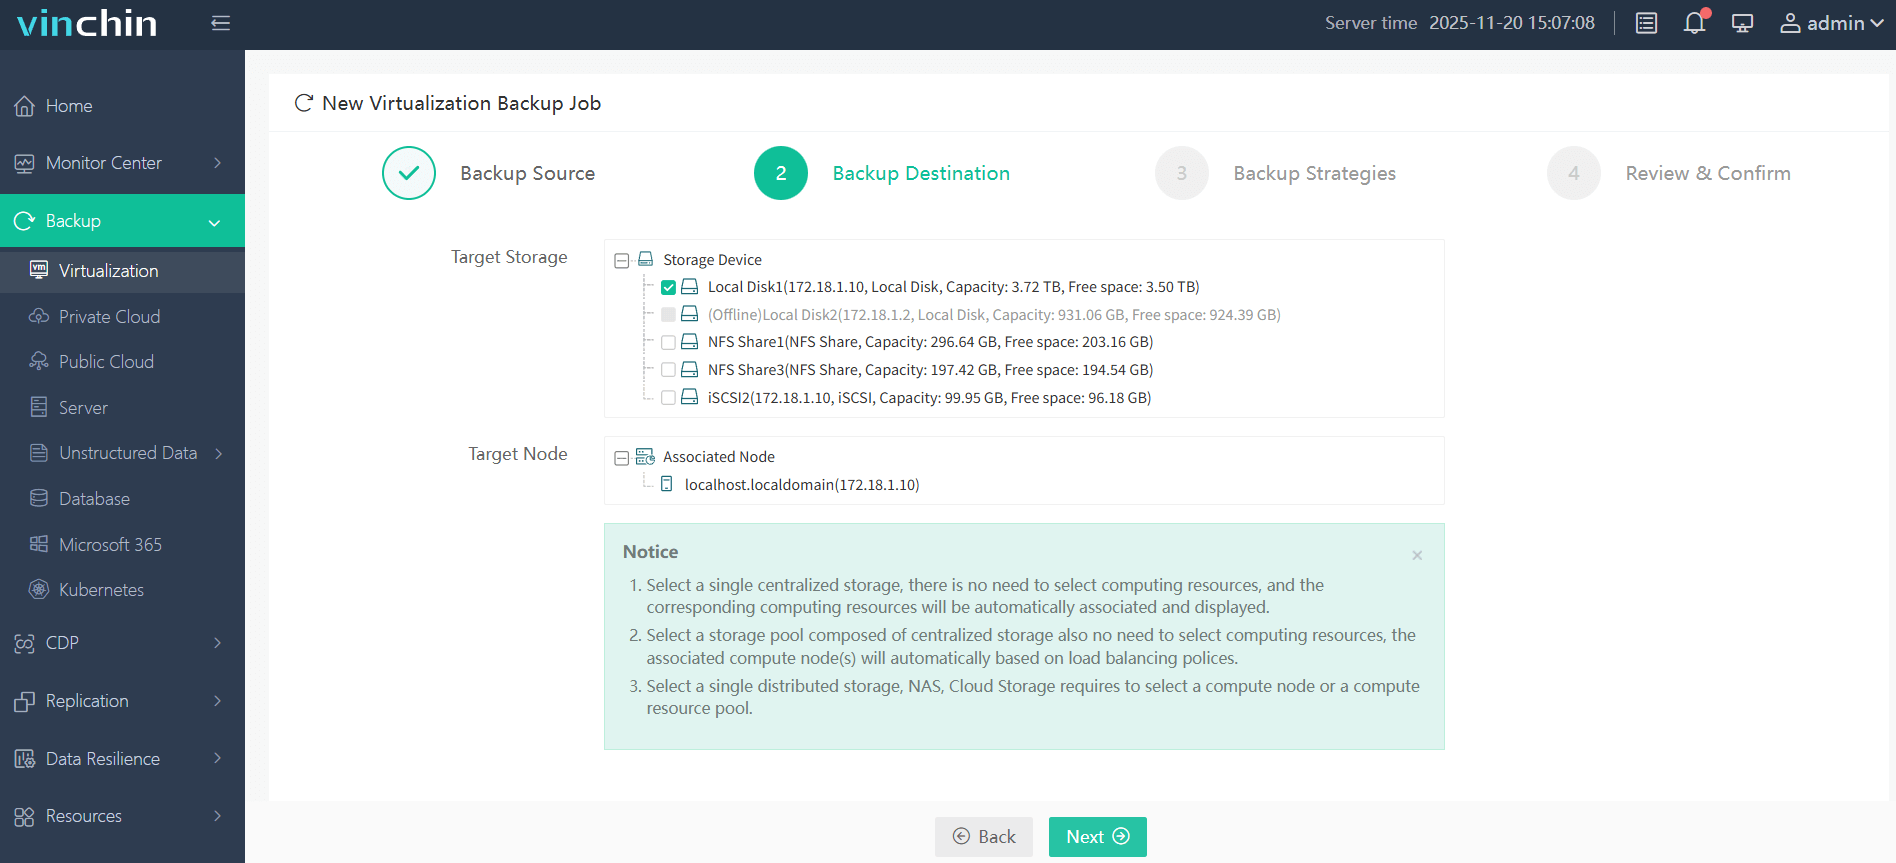
Step 2. Select the Backup Storage, like Target Node and Target Storage
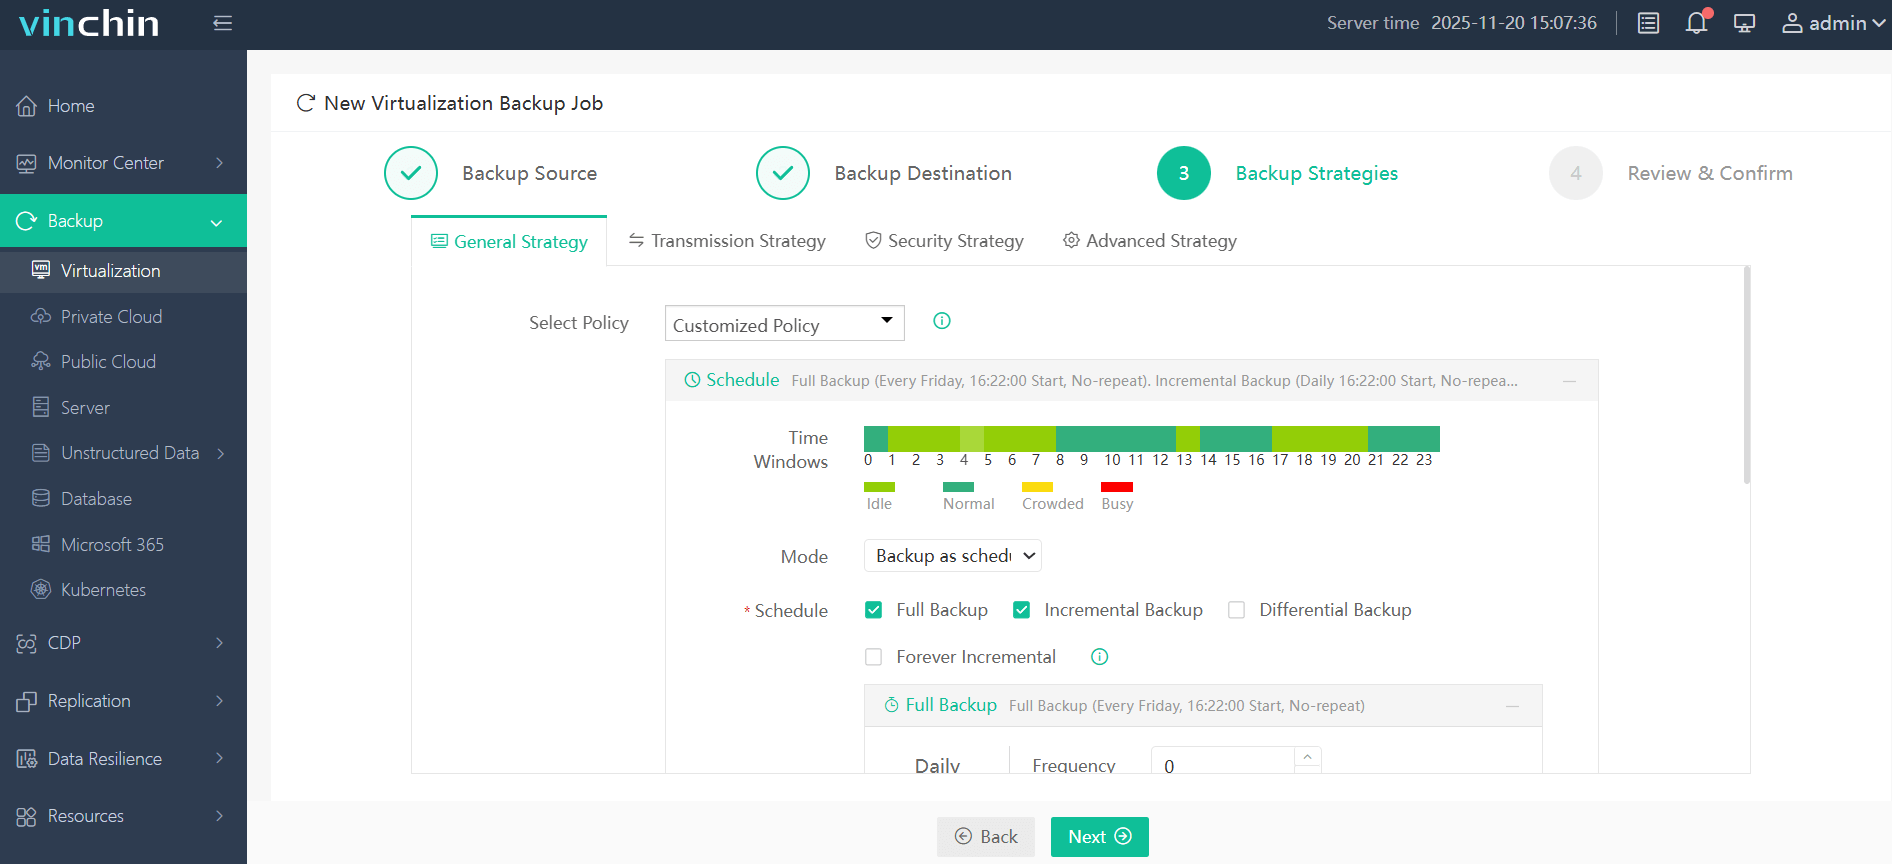
Step 3. Select Schdule, Data Storage Policy, Retention Policy, and other Advanced Strategy to configure Backup Strategy
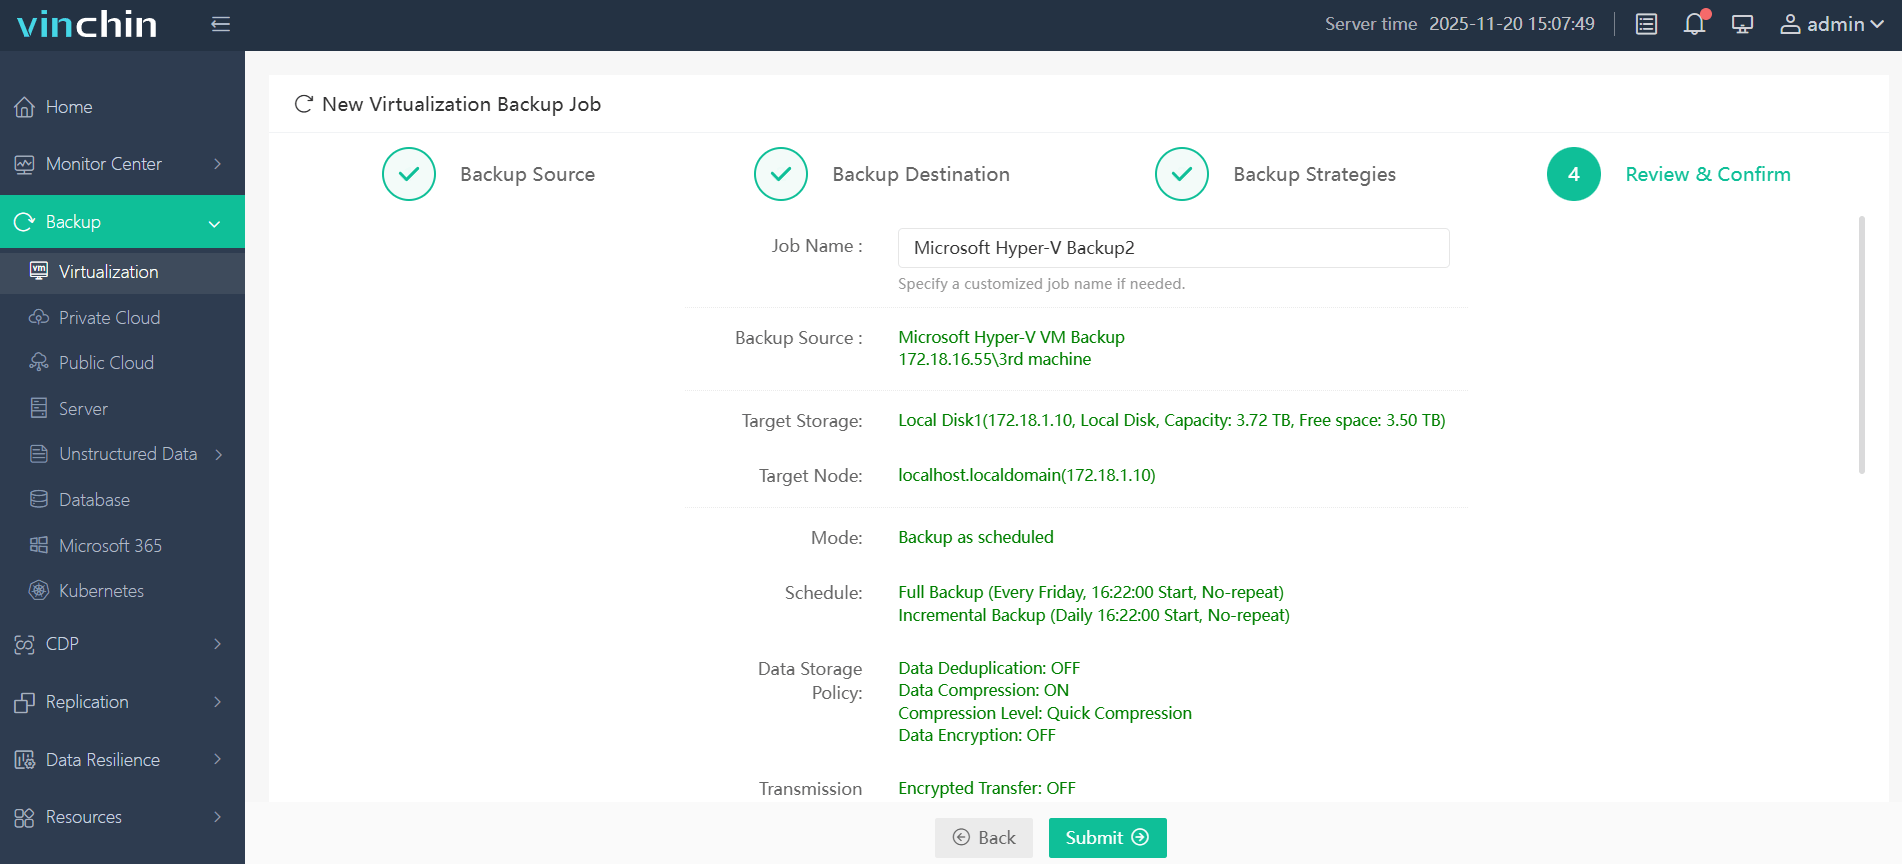
Step 4. Review your backup settings and submit the backup task
You can have a 60-day full-featured free trial to experience how convenient and powerful Vinchin Backup & Recovery is. Just click the button to get the installation package.
FAQs about Hyper-V Copy File from Host to Guest
Q1: Can Hyper-V copy files without network access?
Yes, methods like Copy-VMFile, Enhanced Session Mode, and PowerShell Direct can transfer files without traditional network connectivity.
Q2: Is drag-and-drop supported in Hyper-V?
Partially, Enhanced Session Mode enables clipboard and drive sharing, but drag-and-drop behavior may vary depending on guest OS and RDP configuration.
Q3: Does Copy-VMFile work with Linux guests?
Support is more limited compared to Windows guests. Linux VM compatibility depends heavily on Hyper-V integration components and guest configuration.
Sum Up
Hyper-V offers several mature and flexible methods for copying files from a host to guest VM. Modern enterprise environments increasingly combine these operational methods with centralized backup platforms to improve resilience and recovery readiness. Vinchin Backup & Recovery is a good choice to easily protect Hyper-V environment, don't miss the free trial now!