Why Choose Hyper-V as the Target Platform?
As an alternative to VMware Workstation, Microsoft Hyper-V provides a reliable virtualization platform with strong integration with Windows ecosystem. Migrating VMs from VMware Workstation to Hyper-V can help users reduce licensing costs, simplify management, and improve scalability.
Key advantages of Hyper-V include:
Built-in Windows integration: Hyper-V is included in Windows Server and supported Windows editions, allowing seamless integration with Windows environments, Active Directory, PowerShell, and Microsoft management tools.
Cost efficiency: Organizations can reduce virtualization costs because Hyper-V is included with Windows Server licenses without requiring separate hypervisor licensing.
Enterprise scalability: Hyper-V supports advanced features such as Live Migration, Failover Clustering, Hyper-V Replica, and System Center Virtual Machine Manager (SCVMM) for large-scale VM management.
High availability and disaster recovery: Features like VM replication, clustering, and integration with backup solutions help improve workload availability and data protection.
Flexible management and automation: Administrators can manage Hyper-V environments through Hyper-V Manager, Windows Admin Center, and PowerShell automation.
Broad backup and migration support: Hyper-V is supported by many backup and recovery solutions, making VM protection and cross-platform migration easier.
Before migration, note that VMware Workstation uses VMDK disks, while Hyper-V uses VHD/VHDX formats. Therefore, the VM disk and configuration need to be converted before running on Hyper-V.
VMware Workstation vs Hyper-V: Key Comparison
Feature | VMware Workstation | Hyper-V |
Platform | Desktop virtualization | Enterprise virtualization |
Disk Format | VMDK | VHD/VHDX |
Management tools | Workstation | Hyper-V Manager, PowerShell |
Live migration | ❌ | ✅ |
clustering | Limited | ✅ |
Method 1: Convert VMDK to VHDX Using qemu-img
qemu-img is a practical tool for users who’s familiar with command lines. As part of the QEMU project, qemu-img supports various virtual disk formats, including VMDK, VHD/ VHDX, qcow2, Raw, and VDI.
Unlike MVMC, this tool only converts virtual disk file and does not automatically create a Hyper-V VM. Therefore, you need to manually create a Hyper-V VM and attach the converted VHDX file after conversion.
Step 1: download and install qemu-img on a Windows machine. Make sure the tool can access the Vmware Workstation VM files, especially the .VMDK virtual disk.
Step 2: Convert VMDK to VHDX
Open Command Prompt and run the following commands:
Qemu.img convert -f vmdk -o vhdx source.vmdk destination.vhdx
Replace:
Source.vmdk with the path of the VMware virtual disk
Destination.vhdx with the target location for the converted Hyper-V disk
Step 3: After conversion, create a Hyper-V virtual machine:
1. Open Hyper-V Manager;
2. Create a new virtual machine;
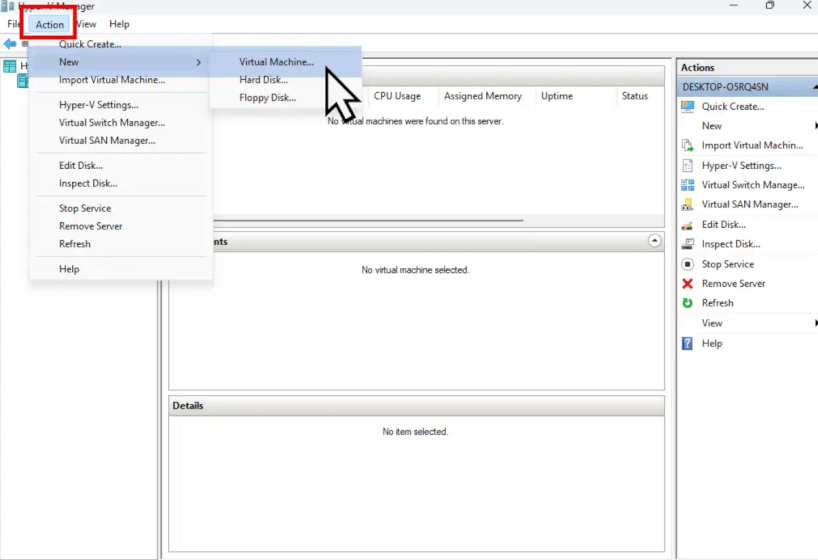
3. Configure VM settings, including generation, CPU, memory, and network adapter.
4. Select Use an existing virtual hard disk and attach the converted VHDX file.
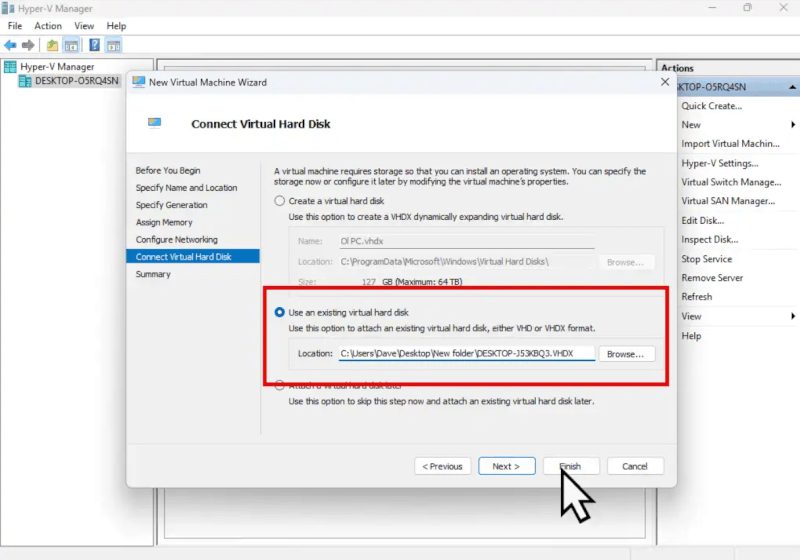
Step 4: start the Hyper-V VM and check whether the Operating system boots correctly.
Method 2: Migrate VMware Workstation to Hyper-V with Vinchin Backup & Recovery
Another efficient approach is to use an enterprise backup solution, such as Vinchin Backup & Recovery. Unlike manual conversion methods, it provides an image-based migration workflow that enables VM migration across different virtualization platforms, including VMware, Proxmox, Hyper-V, and XenServer.
Vinchin ensures reliable V2V migration with features such as immutable backup for data protection, instant recovery, and granular restore capabilities. It also supports bulk VM migration without manually converting virtual disks. With automated migration workflows and a centralized management console, administrators can simplify migration tasks, reduce downtime, and monitor the entire process more efficiently.
To convert a VMware VM to Hyper-V, follow:
1. Navigate to Backup > Virtualization to create a backup for the source VMware VM.
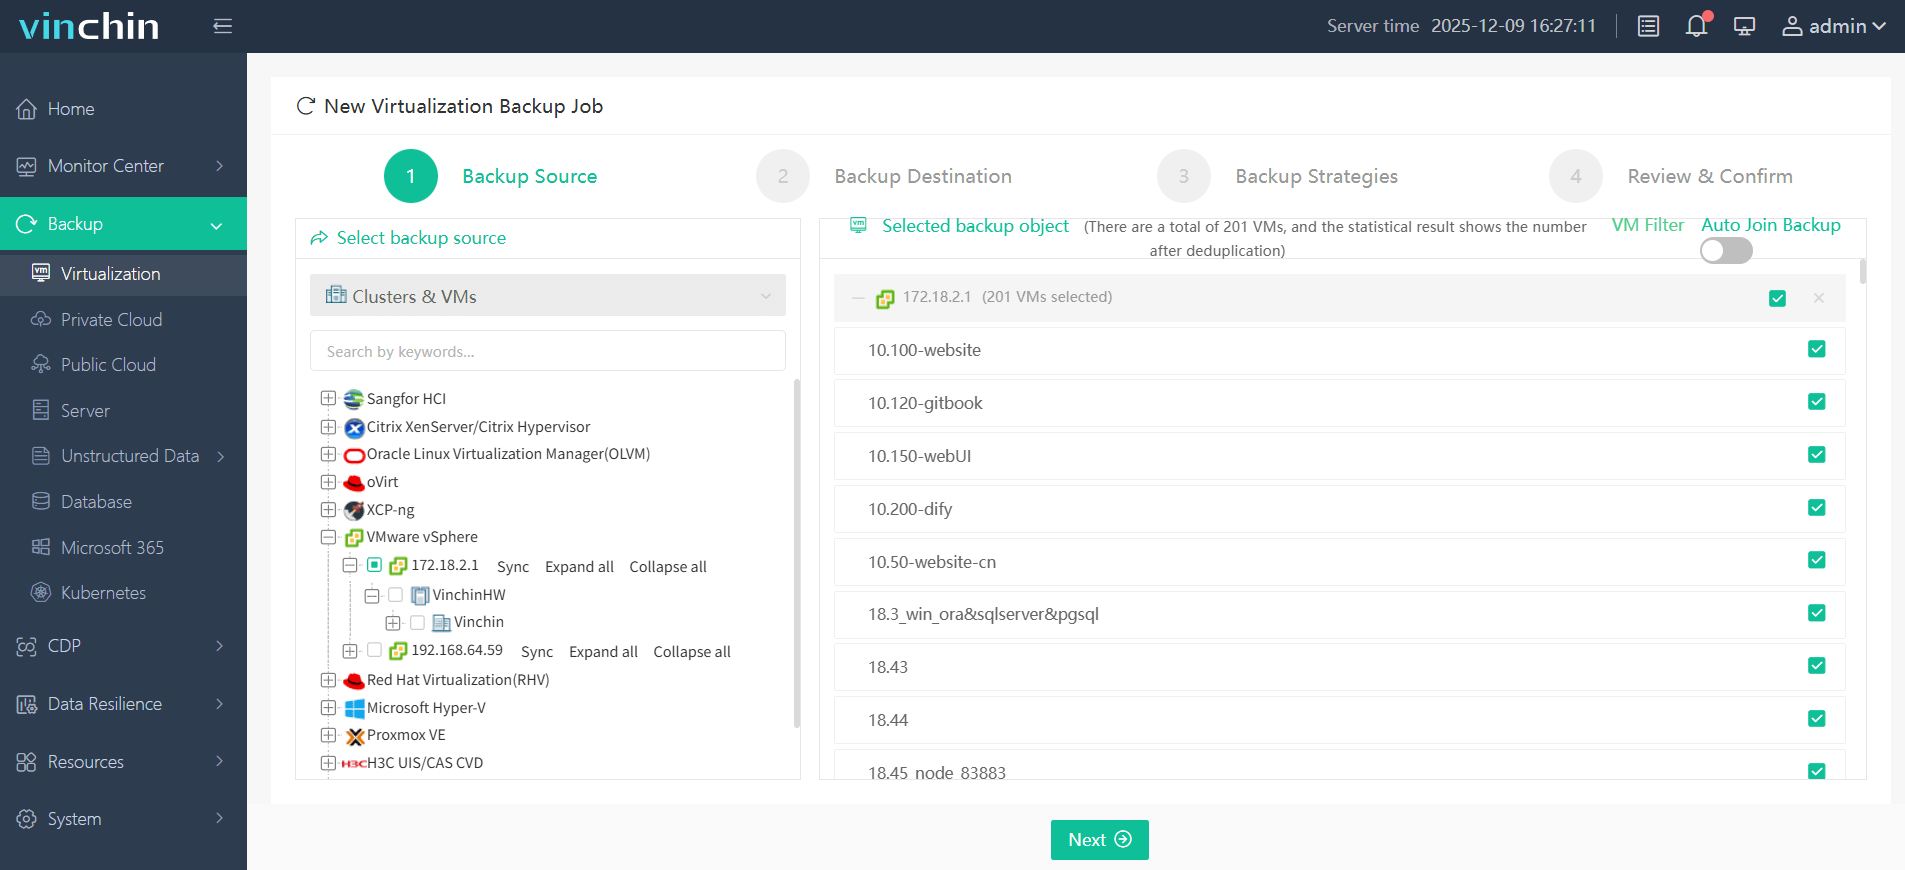
2. Then, go to Data Resilience > Restore and choose the VMware backup storage as the data recovery source.
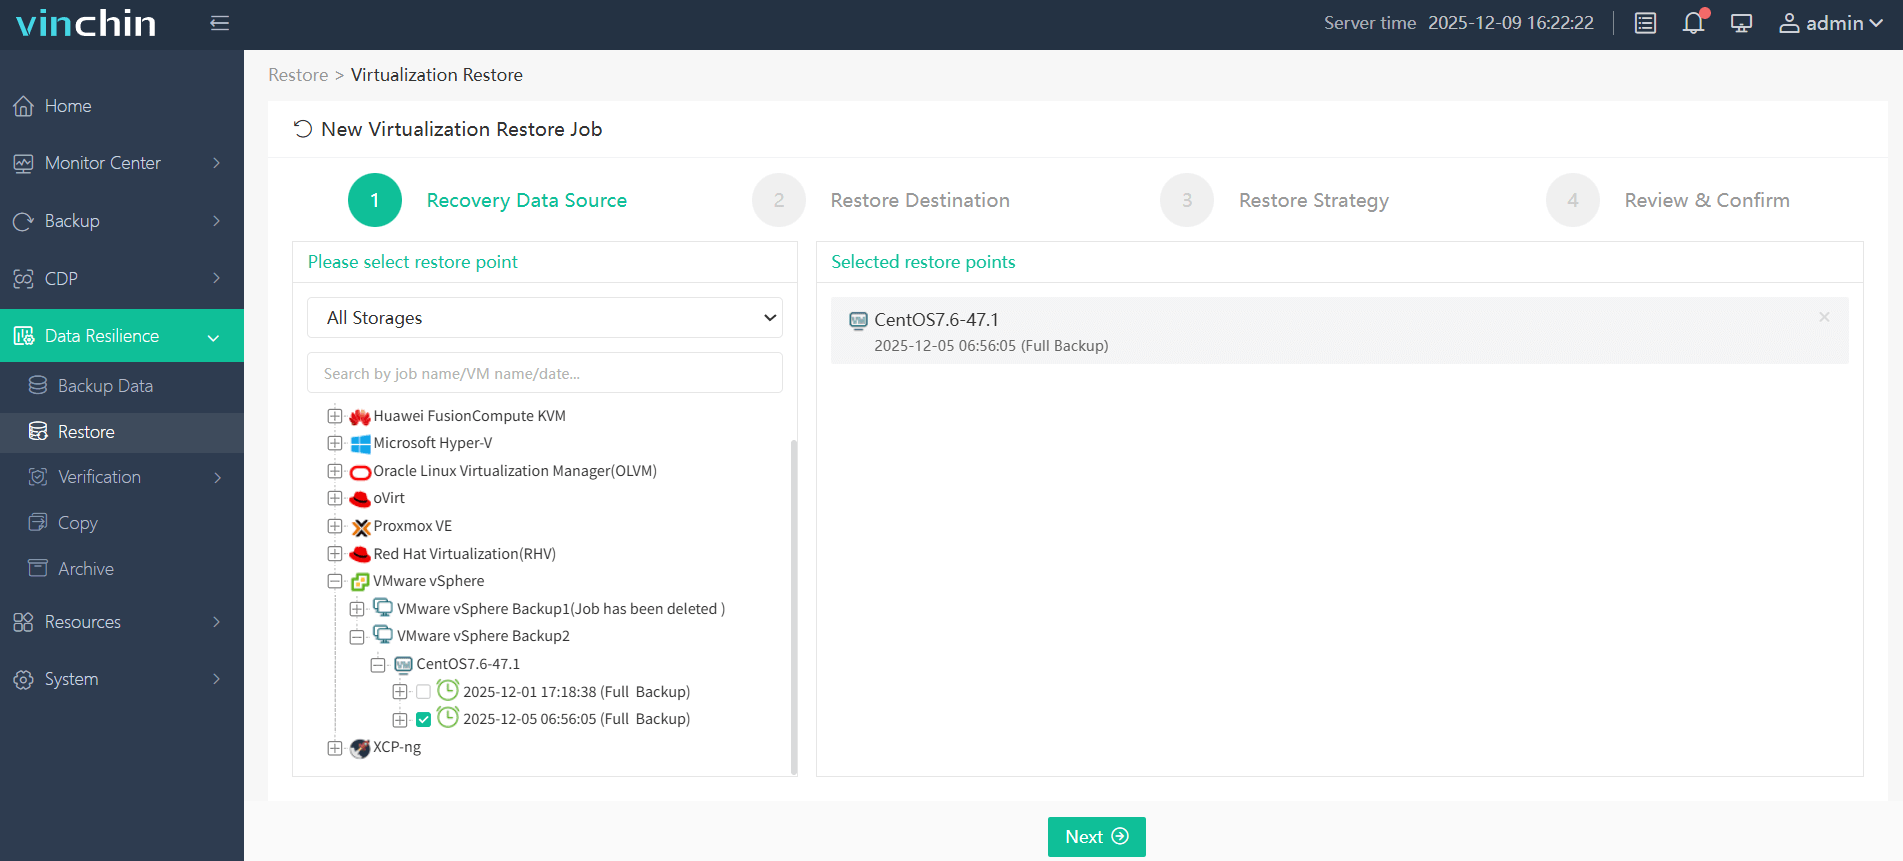
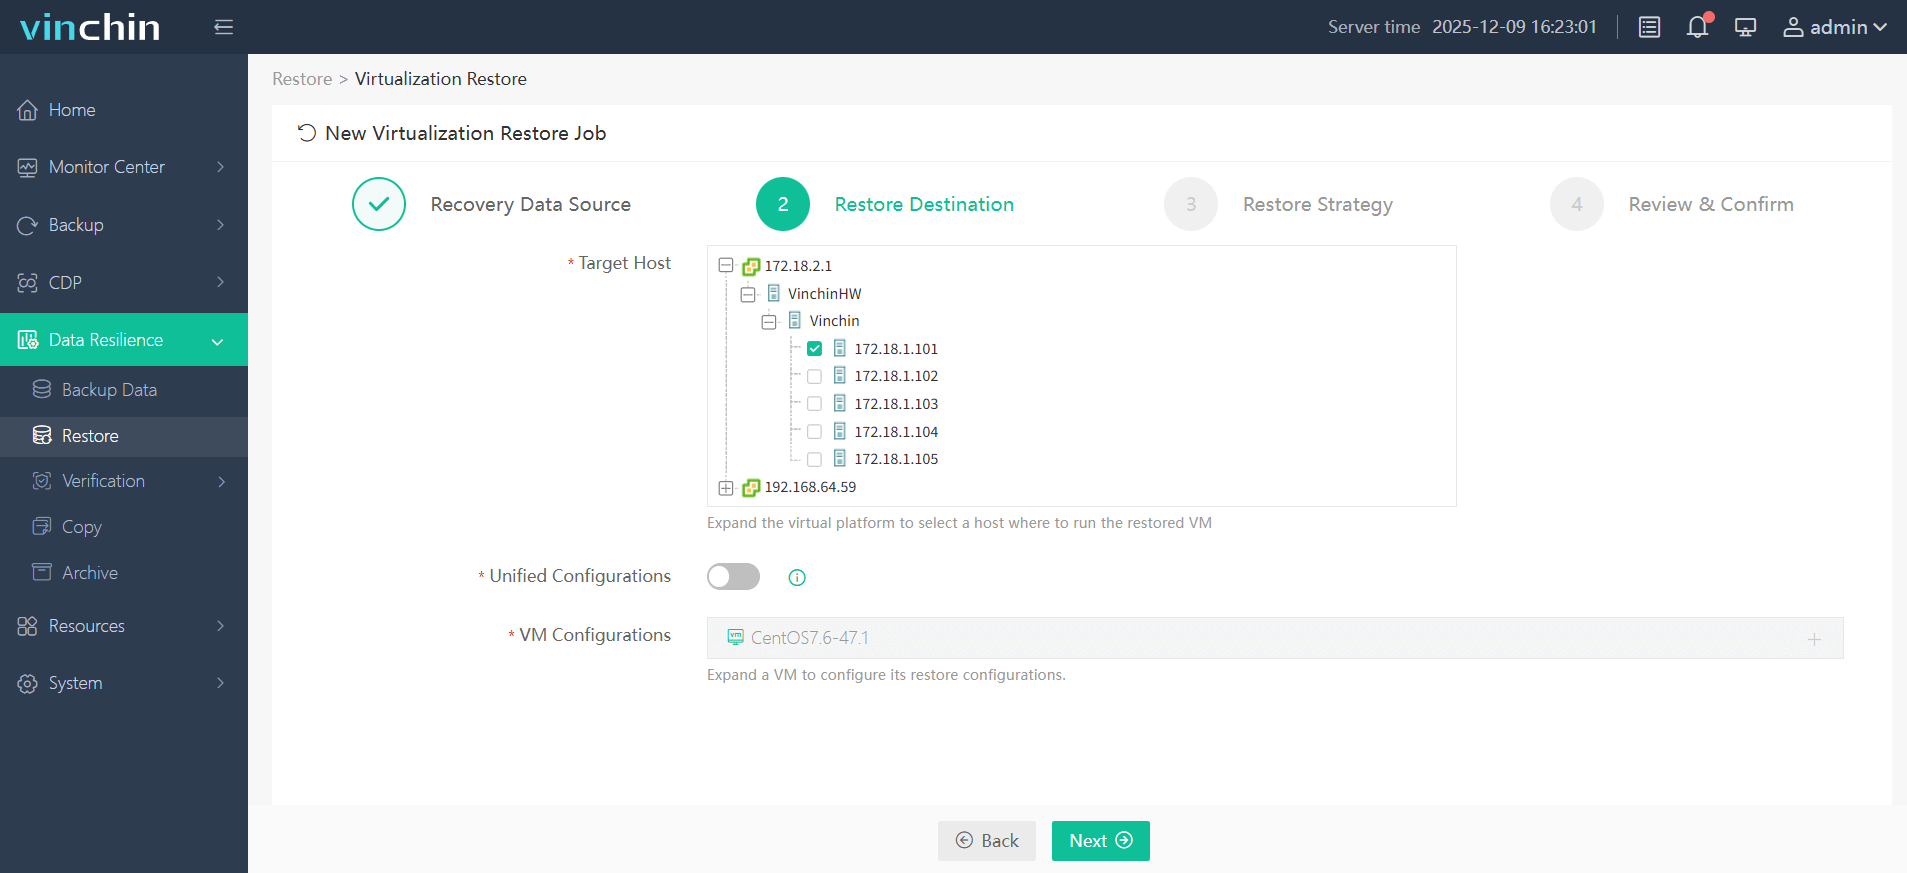
3. Choose the target host and VM configurations to complete the restore destination.
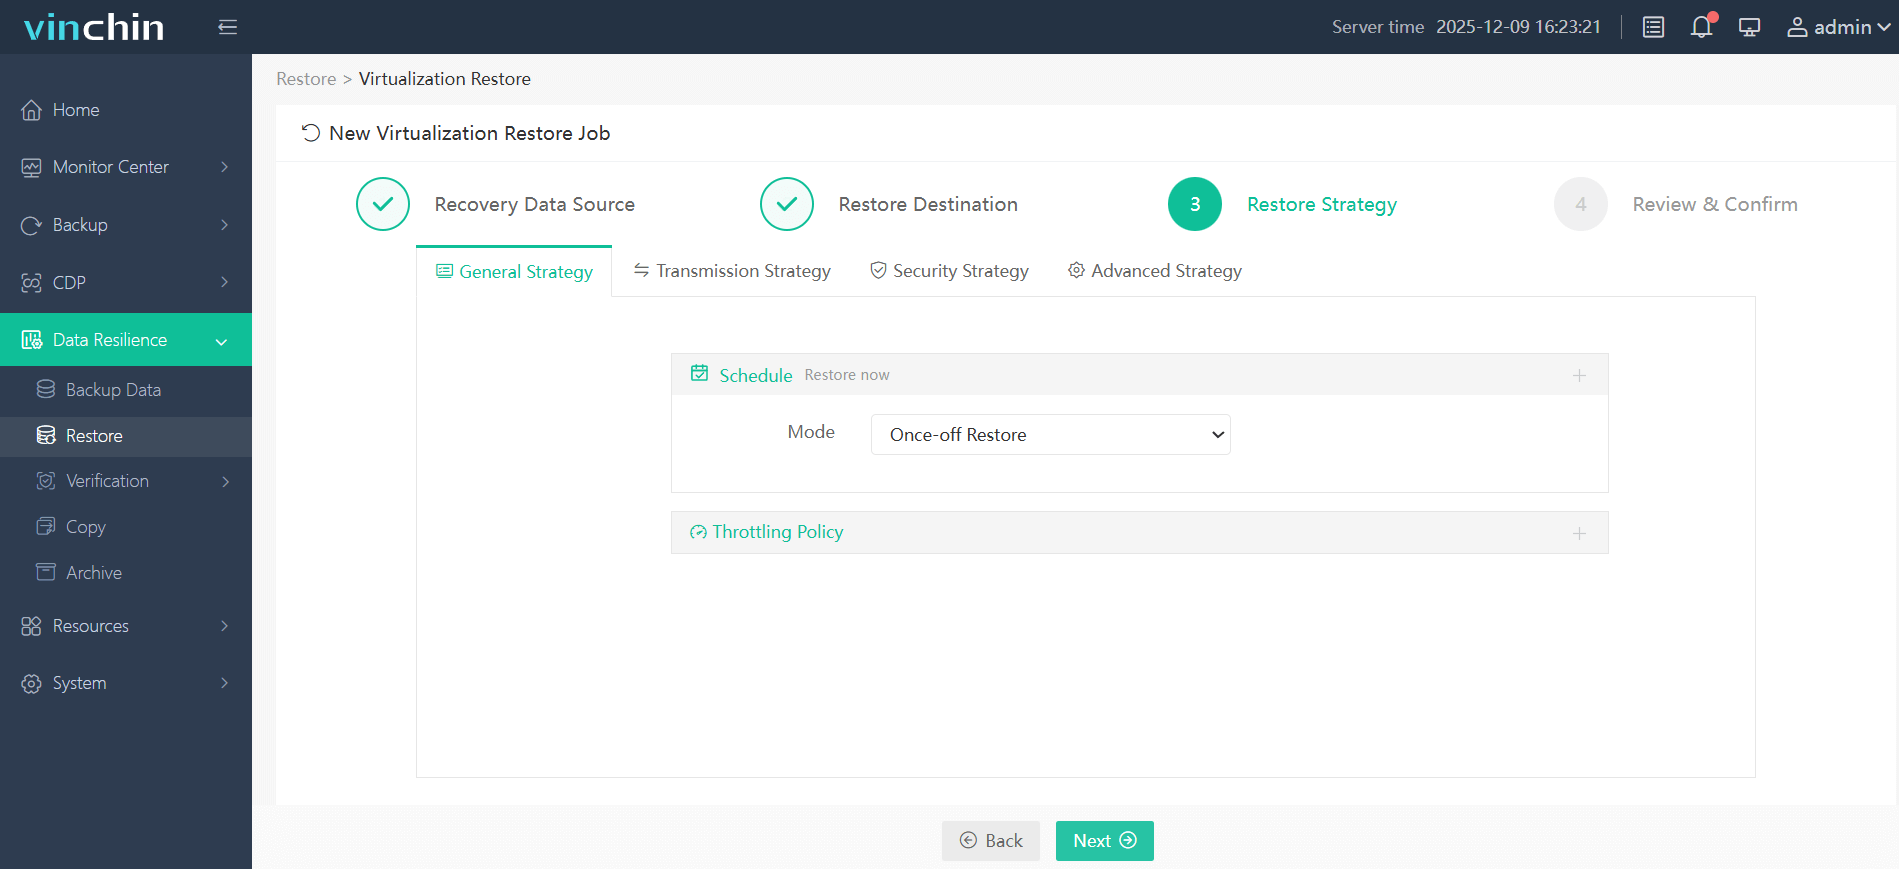
4. Customize the restore strategies; set the restore time, throttling policy, and transmission, security, and advanced strategies.
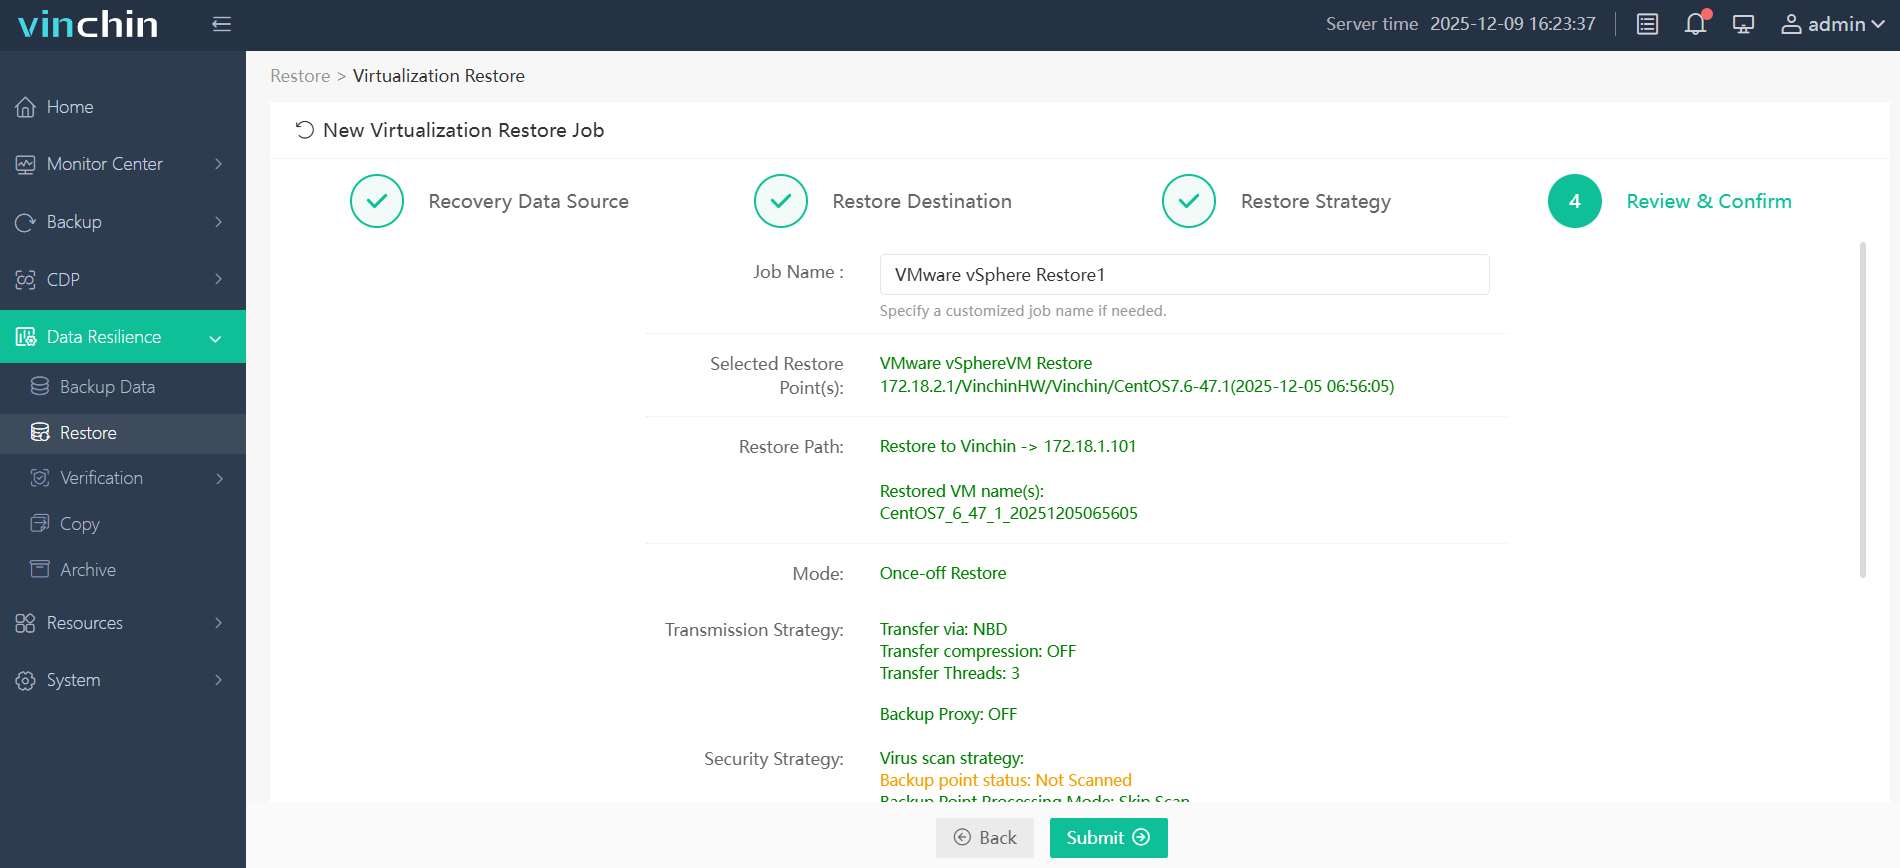
5. Confirm all the options and click Submit. Later, you can monitor the current task in the Monitor Center > Jobs.
Vinchin Backup & Recovery provides an all-in-one data protection solution covering backup, restore, verification, and monitoring. It helps organizations automate protection workflows and reduce manual efforts. Start your 60-day fully featured free trial today and experience the features firsthand, and choose the plan that best fits your business needs.
Method 3: Convert VMware Workstation VM to Hyper-V Using MVMC
Microsoft Virtual Machine Converter (MVMC) is Microsoft’s legacy conversion tool that can convert VMware Workstation virtual disks (VMDK) to Hyper-V compatible VHD files.It provides a straightforward way to migrate individual VMs but may have limitations due to its discontinued development.
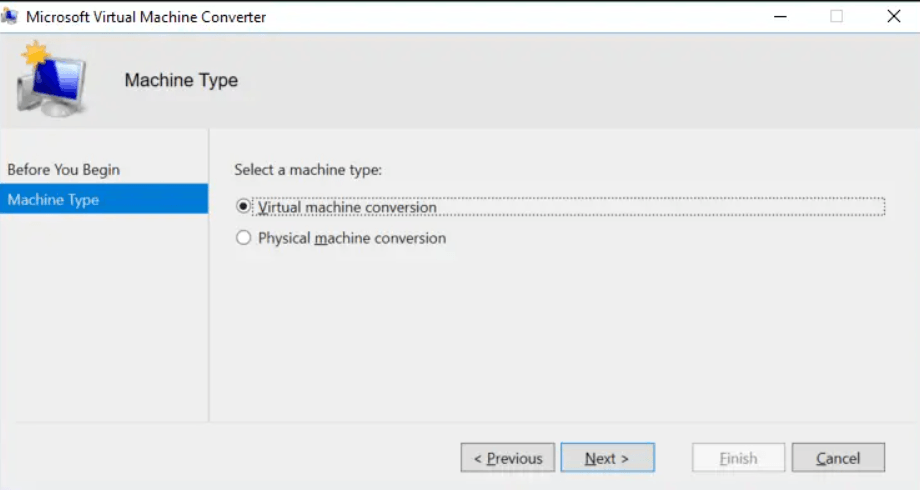
Step 1: Install and Launch MVMC
Download and install MVMC on a Windows machine. Open the conversion wizard and select the option to convert a virtual machine.
Step 2: Prepare the VMware Workstation VM
Before conversion:
Shut down the VM completely
Remove unnecessary snapshots
Make sure the virtual disk file(.vmdk) is accessible
Uninstall VMware tools if needed to avoid driver traffic after migration
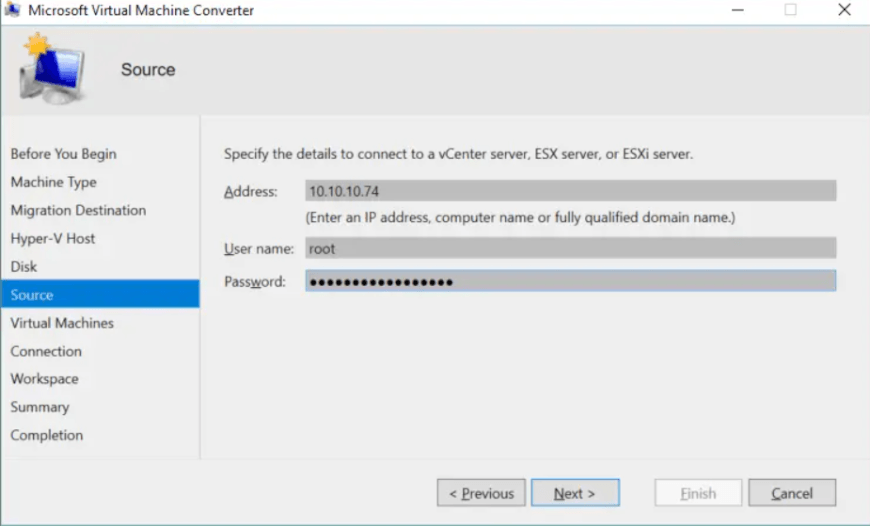
Step 3: Select the VMware VM as the source
Choose VMware as the source platform and provide the location of the VMware VM or VMDK file. Configure the source VM information and authentication settings if required.
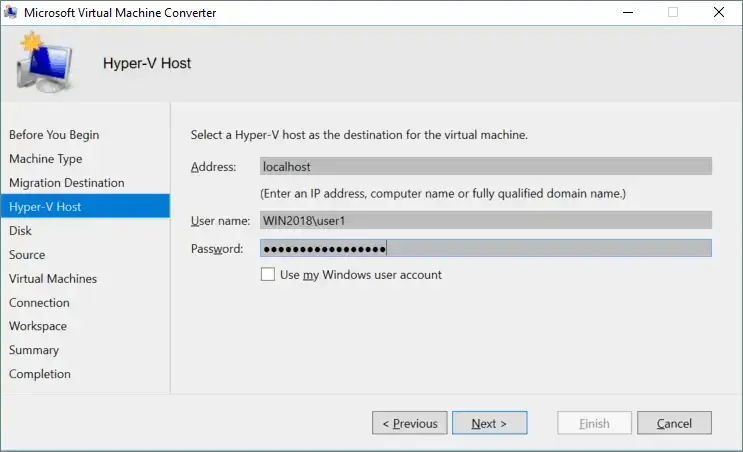
Step 4: Configure Hyper-V as the destination
Select Hyper-V as the target platform and specify Hyper-V host name, destination storage path, VM name, and network settings.
Step 5: Verify and start the migrated VM
After conversion:
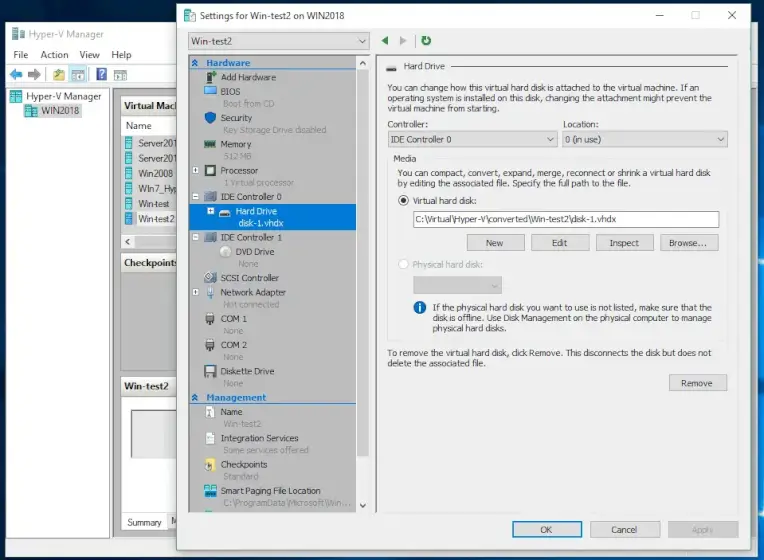
1. Open the Hyper-V Manager;
2. Check the VM hardware settings, including memory, CPU, and network adapter.
3. Start the VM and verify that the operating system boots properly.
4. Install Hyper-V integration components or update drivers if necessary.
Migrate VMware Workstation to Hyper-V FAQs
Q1: Which is the best way to migrate VMware Workstation to Hyper-V?
It depends on your requirements. MVMC or qemu-img works well for individual VM migration, while backup-based solutions are more suitable for multiple VMs or enterprise environments.
Q2: Will my Windows license remain activated after migration?
Not always. Since Hyper-V uses different virtual hardware, Windows may detect a hardware change and require reactivation.
Q3: Can I directly import a VMware Workstation VM into Hyper-V?
No. VMware Workstation uses VMDK virtual disks, while Hyper-V uses VHD/VHDX. You need to convert the virtual disk or use a migration solution before running the VM on Hyper-V.
Conclusion
Migrating VMware Workstation to Hyper-V helps users achieve better Windows integration, scalability, and enterprise-level management. This guide introduced three migration methods: MVMC, qemu-img conversion, and Vinchin Backup & Recovery. Compared with other two methods, Vinchin makes V2V migration easier with automated workflows, centralized management, and batch migration capabilities, reducing complexity and downtime.