What Is Live VM Migration?
Live VM migration is a process of moving a running virtual machine from one physical host to another with minimal service interruption.
Unlike cold migration, which requires shutting down the VM first, live migration keeps applications available during the transfer, making it suitable for maintenance, resource optimization, and infrastructure changes.
How Does Live VM Migration Work?
Live VM migration typically involves several steps to move a running VM between physical hosts with minimal interruption.
Step 1: Pre-migration Preparation
The hypervisor checks the target host's CPU, memory, storage, and network resources to ensure the migration can be completed successfully.
Step 2: Memory Transfer
The VM's memory pages are copied to the destination host while the VM continues running. Changed data is transferred repeatedly until synchronization is complete.
Step 3: Switchover and Verification
The VM is briefly paused to transfer the remaining state, including CPU and device information, then resumed on the new host. Administrators can verify network connectivity and application availability after migration.
Benefits of Live VM Migration
Live VM migration improves availability, flexibility, and resource utilization in virtualized environments. Key benefits include:
Reduce Downtime:
Keeps VMs running during migration to minimize service interruptions.
Hardware Maintenance Without Service Interruption:
Allows administrators to perform maintenance or upgrades without shutting down workloads.
Load Balancing:
Redistributes workloads across hosts to improve resource usage and performance.
Disaster Recovery Support:
Enables faster workload relocation to maintain business continuity during failures.
How to Achieve Live VM Migration?
There are two common ways to perform live VM migration: using native migration technologies provided by hypervisors or using third-party VM migration software
Native tools are suitable for environments running on a single virtualization platform, while third-party solutions provide more flexible migration capabilities, centralized management, and additional data protection features.
The right method depends on your virtualization environment, migration requirements, and the level of protection needed before moving production workloads.
Method 1: Use Native Hypervisor Migration Tools
Most virtualization platforms provide built-in live migration technologies that allow administrators to move running virtual machines between hosts with minimal downtime. These native tools are tightly integrated with the hypervisor and are commonly used for planned maintenance, resource balancing, and infrastructure optimization.
Popular examples include VMware vMotion, Hyper-V Live Migration, and Proxmox Live Migration. In this guide, we will use VMware vMotion live migration as an example to demonstrate how native hypervisor migration tools work.
VMware vMotion Live Migration
Step 1: Log in to vCenter Server
Open the vSphere Client and log in to vCenter Server. Navigate to the virtual machine inventory and locate the VM that needs to be migrated.
Step 2: Select the Target VM and Start Migration
Right-click the VM, select Migrate, and choose the migration option. For live migration between hosts, select Change compute resource only.
Step 3: Select the Destination ESXi Host
Choose the target ESXi host where the VM will run. vCenter will check resource availability, network configuration, and compatibility before proceeding.
Step 4: Review and Complete the Migration
Review the migration settings and click Finish to start the vMotion process. The VM remains running during migration and resumes operation on the destination host after completion.
Besides VMware vMotion, other virtualization platforms also provide built-in live migration technologies for moving running virtual machines with minimal downtime.
For Microsoft virtualization environments, Hyper-V Live Migration allows administrators to move running VMs between Hyper-V hosts without shutting down workloads. It is commonly used for server maintenance, hardware upgrades, and workload balancing.
For Linux-based virtualization environments, Proxmox Live Migration enables administrators to migrate running VMs between Proxmox VE nodes with minimal service interruption. It is often used in cluster environments for resource optimization and infrastructure maintenance.
Method 2: Use Third-Party VM Migration Software
While native hypervisor migration tools work well within the same platform, they are often limited by platform compatibility and lack advanced features such as batch migration and centralized management. Third-party VM migration software provides a more flexible solution for complex migration scenarios.
Vinchin Backup & Recovery supports agentless VM migration and X2X migration, enabling seamless workload movement across platforms such as VMware, Hyper-V, Proxmox, oVirt, XCP-ng, XenServer, and OpenStack without installing agents inside guest systems.
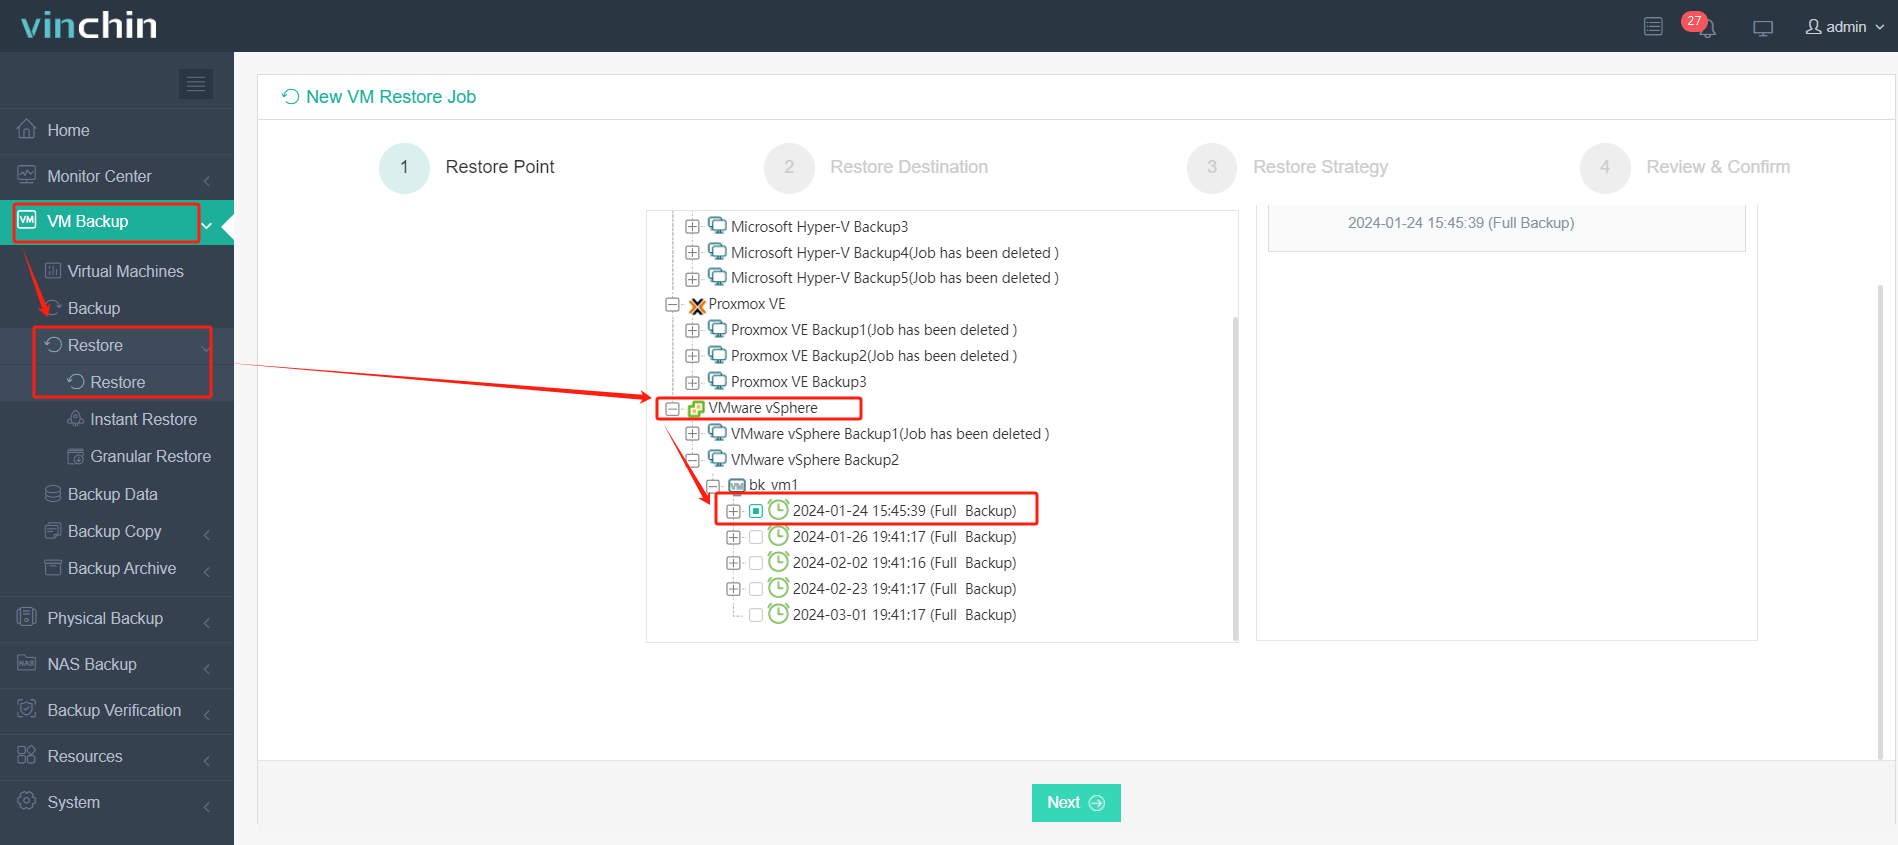
With Vinchin, migrating multiple VMs to another host is simple. After backing up the VMs, follow the steps below to complete the migration.
Step 1: Select the source machine that you want to migrate.
Step 2: Select the target host that you want to move the VM to.
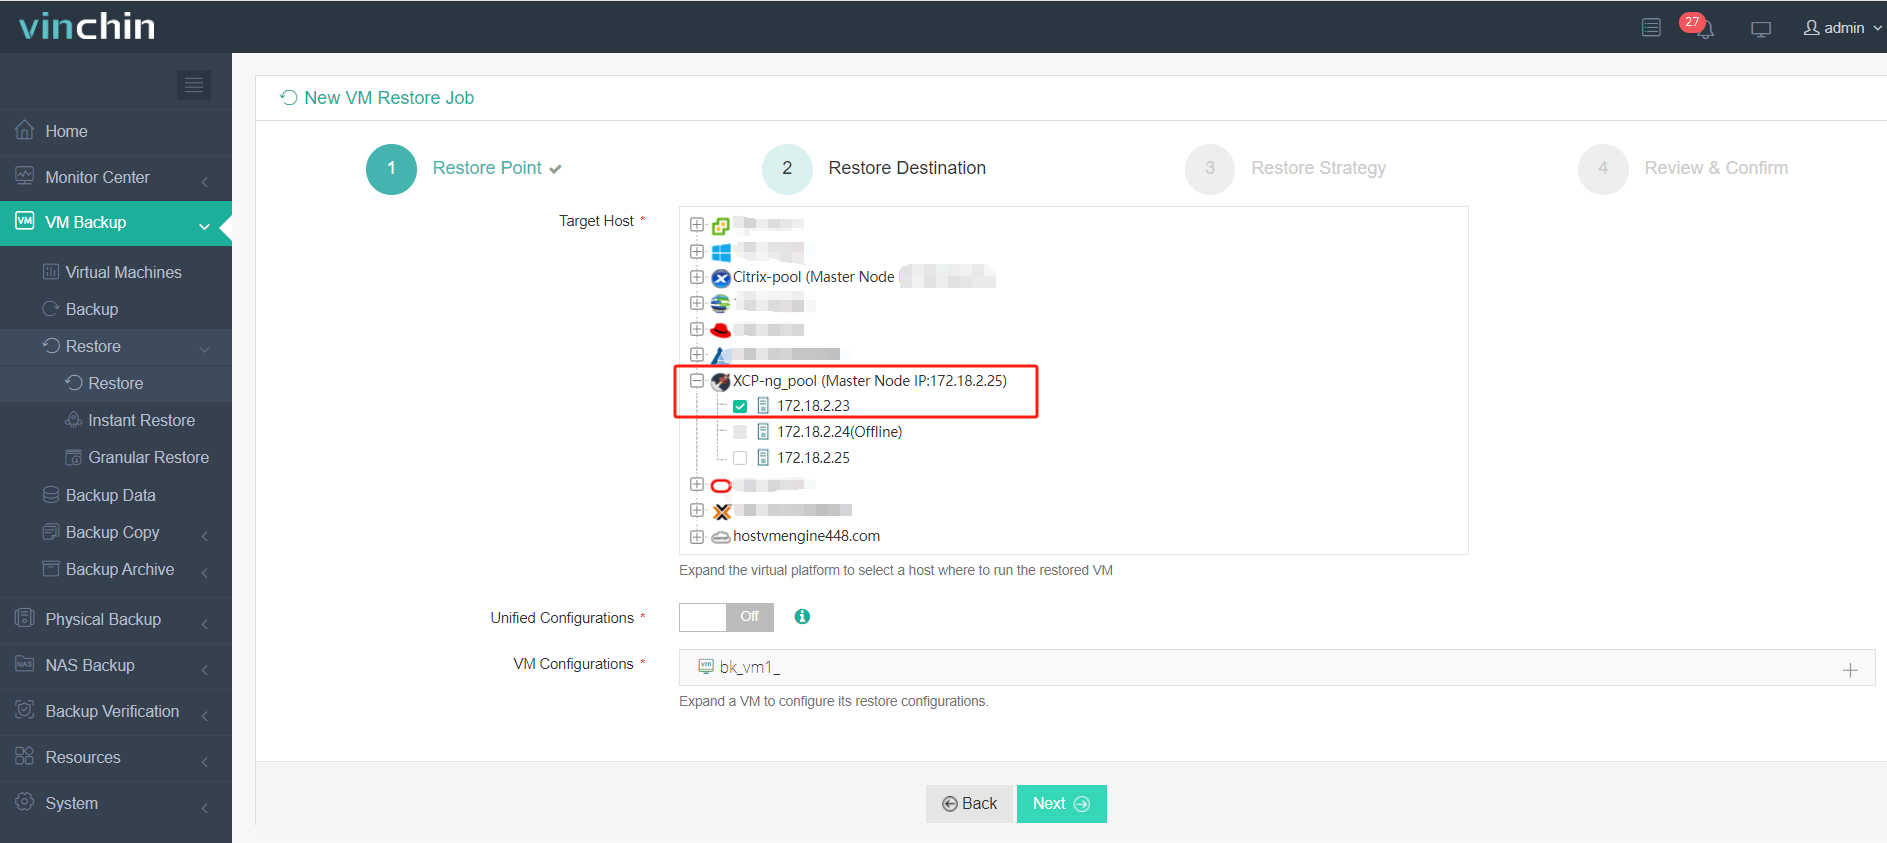
Step 3: Set up the migration strategies according to your business.
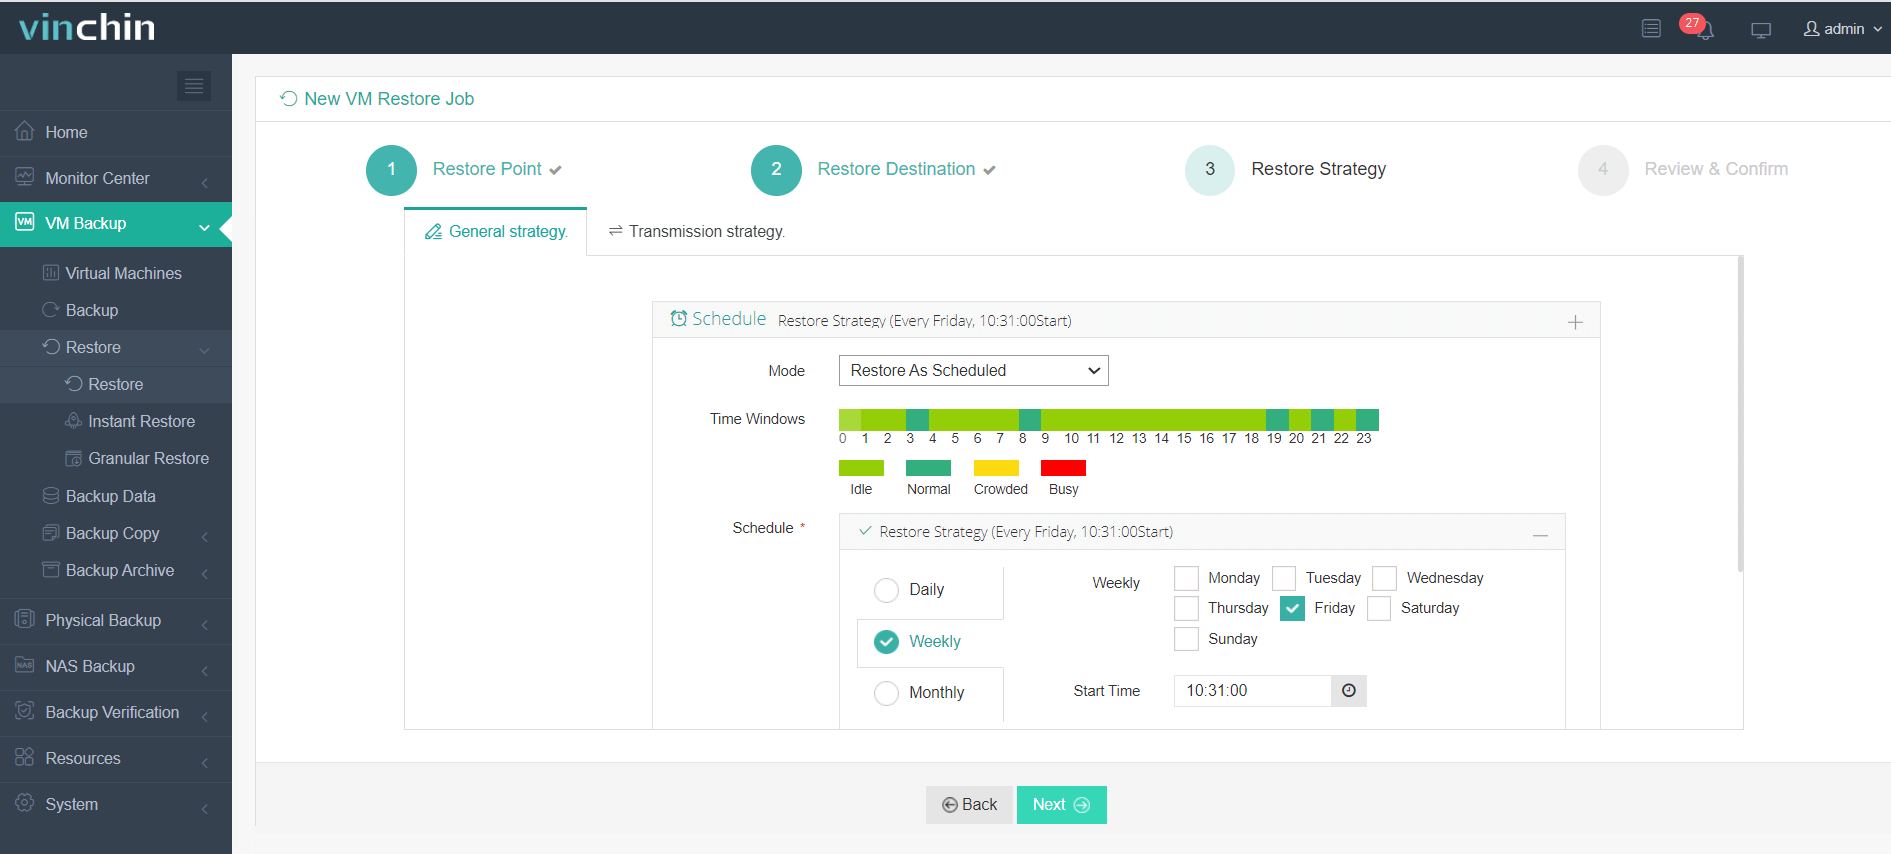
Step 4: Review and confirm the migration task.
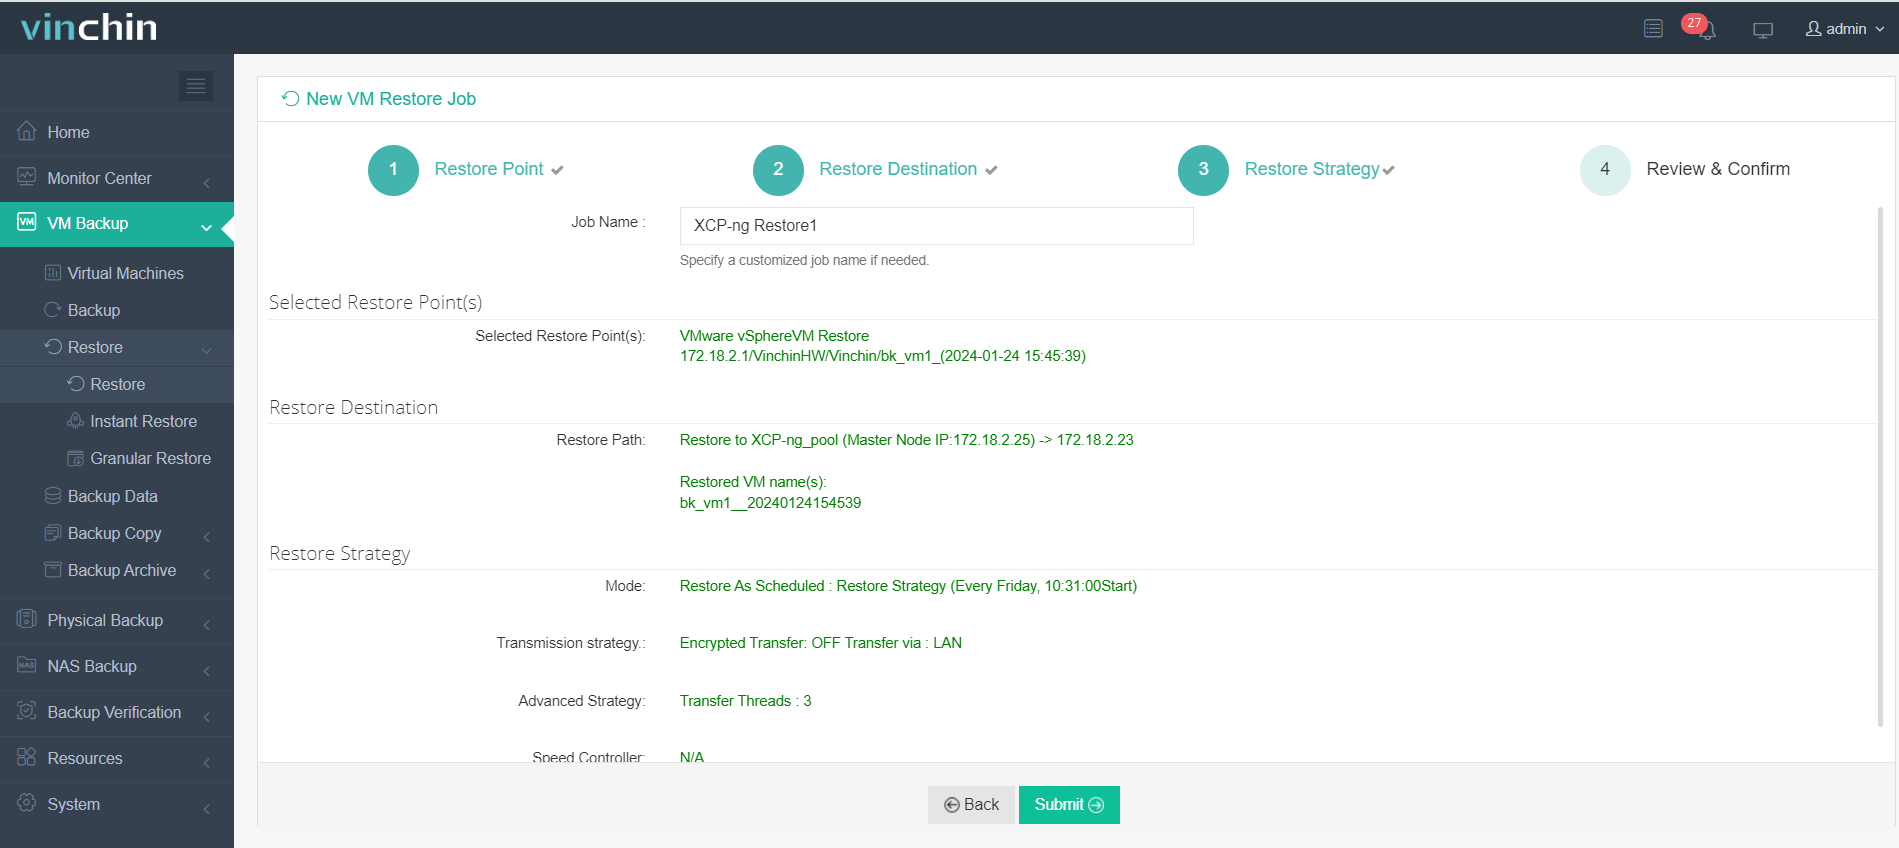
Download Vinchin Backup & Recovery and start your 60-day free trial to perform agentless VM migration across heterogeneous environments and move workloads between VMware, Hyper-V, Proxmox, and other virtualization platforms.
Common Live VM Migration Issues and Fixes
Live VM migration reduces downtime, but it can still fail if networks, storage, resources, or applications are not ready.
Here are some common live VM migration issues and practical fixes:
1. Network Connectivity Issues
Problem: After migration, the VM may lose access to the gateway, DNS, or application users because the destination host uses different VLANs, port groups, virtual switches, firewall rules, or routes.
Solution: Compare source and target network settings before migration. For vMotion live migration, verify the vMotion network and VM port group on the target ESXi host. For Hyper-V live migration and KVM live migration, check virtual switch, bridge, firewall, and routing settings.
2. Storage Compatibility Problems
Problem: Migration may fail when the target host cannot access the VM disks, datastore, SMB share, NFS mount, iSCSI volume, or storage pool.
Solution: Confirm shared storage access and free space before migration. Remove unnecessary snapshots or checkpoints to reduce transfer time and avoid storage conflicts.
3. Insufficient Host Resources
Problem: The target host may not have enough CPU, memory, bandwidth, or storage I/O to run the migrated VM.
Solution: Check host utilization in advance, keep enough resource headroom, avoid concurrent migrations of heavy workloads, and schedule live VM migration outside peak hours.
4. Application Interruption
Problem: Some applications may be affected by a short pause, network reconnection, or locked files during switchover.
Solution: Prepare a post-migration test plan. Verify login, database connections, file access, scheduled tasks, and service logs. For critical workloads, keep a recent VM backup and rollback plan ready.
Even with these fixes, migration still carries risks, so it is better to back up important data or the entire VM before starting live VM migration.
FAQs About VMs Live Migration
Q1: Should backup jobs run during live migration?
A1: Avoid running heavy backup jobs during migration if possible. Backup and migration both consume network, storage, and CPU resources, which may slow the process.
Q2: Is live migration the same as failover?
A2: No. Live migration is usually a planned operation, while failover responds to host or site failure. For disaster recovery, you still need backup or replication.
Q3: Does live migration move VM disks too?
A3: Not always. Some migrations only move the running VM to another host while the disks stay on shared storage. If the VM disks also need to move, use storage migration or a migration mode that copies storage.
Q4: What is the difference between Hyper-V live migration and quick migration?
A4: Live migration is for near-continuous service, while quick migration is faster to execute but causes service interruption.
Sum Up
Live VM migration helps move running VMs between hosts with minimal downtime, making it useful for maintenance, load balancing, and infrastructure changes. However, network, storage, resource, and application issues can still affect migration success.
Vinchin Backup & Recovery simplifies VM migration with flexible migration workflows, centralized management, and support for moving workloads across different virtualization environments.