Although Proxmox VE and Proxmox Backup Server are widely used for virtual machine protection, backing up physical Windows machines to PBS is still challenging because a native Windows backup client is not officially available. This article explains possible methods for backing up Windows systems to PBS, including WSL-based approaches and VM migration, while also introducing a more direct enterprise backup solution for Windows environments.
Does Proxmox Backup Server Support Windows?
There are currently some limitations when backing up physical Windows machines directly to a Proxmox Backup Server. While the Proxmox backup client works well in Linux environments, many users still rely on Windows systems, which introduces additional complexity.
At the moment, there is no official Proxmox Backup Client for Windows. However, several workaround methods can be used to achieve Windows data backup.
Method 1: Mount Windows Share on Linux
While this method may require some additional setup and configuration, it can serve as a solution for backing up physical Windows machines to PBS.
Steps
1. Share a folder or drive on the Windows machine via SMB.
2. Mount the shared directory on a Linux system.
3. Install the Proxmox backup client on Linux.
4. Run backup jobs to send the mounted data to PBS.
Method 2: Use Windows Subsystem for Linux (WSL)
This method runs the Proxmox backup client inside WSL on a Windows machine to back up selected files. And it allows you to back up specific paths and folders instead of the entire operating system, which can work very well in some cases.
Steps
1. Install WSL2 on the Windows system.
2. Install a Linux distribution (e.g., Ubuntu).
3. Install and configure the Proxmox backup client inside WSL.
4. Back up specific folders or paths to PBS.
Both methods are mainly suitable for file-level backups. They do not provide full system (bare-metal) backup or application-aware protection.
Convert a Physical Windows Machine into a Proxmox VM
Since Proxmox Backup Server mainly protects virtual machines and containers inside Proxmox VE, another workaround is to virtualize the physical Windows machine first and then let PBS back up the VM natively.
This is not a direct Windows backup method, but it allows Windows systems to be protected through the Proxmox virtualization environment.
Preparation
Back up your data:
Before starting, make sure all important data on the physical Windows machine is backed up to prevent unexpected data loss.
Get a conversion tool:
Download and install a suitable Physical-to-Virtual (P2V) conversion tool.
Step 1. Convert the Physical Machine Disk
Run the P2V conversion tool on the physical Windows machine and follow the instructions to convert the system disk into a virtual disk format such as VMDK or QCOW2.
Step 2. Upload the Converted Disk to Proxmox
Upload the converted virtual disk file to the appropriate storage location on the Proxmox VE server.
Step 3. Create a New Virtual Machine
Create a new VM in Proxmox VE and select the appropriate operating system type and version.
Then attach the uploaded virtual disk as the VM’s system disk.
Step 4. Configure the Virtual Machine
Configure VM resources such as CPU cores, memory size, and network settings (including network adapter and IP configuration).
Step 5. Start and Test the VM
Start the virtual machine and verify that Windows boots correctly.
If needed, install VirtIO drivers to improve performance and compatibility.
Step 6. Back Up the VM Using Proxmox Backup Server
In the Proxmox VE interface, configure storage and connect to Proxmox Backup Server.
Then create a backup job for the newly created virtual machine.
Select:
Monitor the backup task status to ensure it runs successfully.
Restore the Virtual Machine
If recovery is needed, go to Proxmox Backup Server, select the corresponding backup point, and perform a restore to bring the VM back online.
A Professional Solution for Windows Backup: Vinchin Backup & Recovery
Proxmox Backup Server is more suitable for backing up virtual machines and containers in a virtualized environment rather than directly backing up Windows clients. If you want to back up Windows clients, it is usually recommended to use specialized backup software, such as Vinchin Backup & Recovery.
Vinchin Backup & Recovery is a professional enterprise backup and disaster recovery solution, supporting backing up Windows/Linux server (like Windows 2022/2019/2016/2012/2012 R2/2008/2008 R2/2003/ 2003 R2), virtual machine, file server, NAS , database, etc. providing easy protection for complex IT environment.
Vinchin’s physical server backup solution incorporates the VSS (Volume Shadow Copy Service) technique for Windows Server Backup, enabling the creation of application-aware snapshots of NTFS volumes. Furthermore, a custom snapshot mechanism is included for Linux server users to maintain the coherence of backup data.
Except for os-level backup, file-level backup is also supported in Vinchin Backup & Recovery to help protect files and folders regularly.
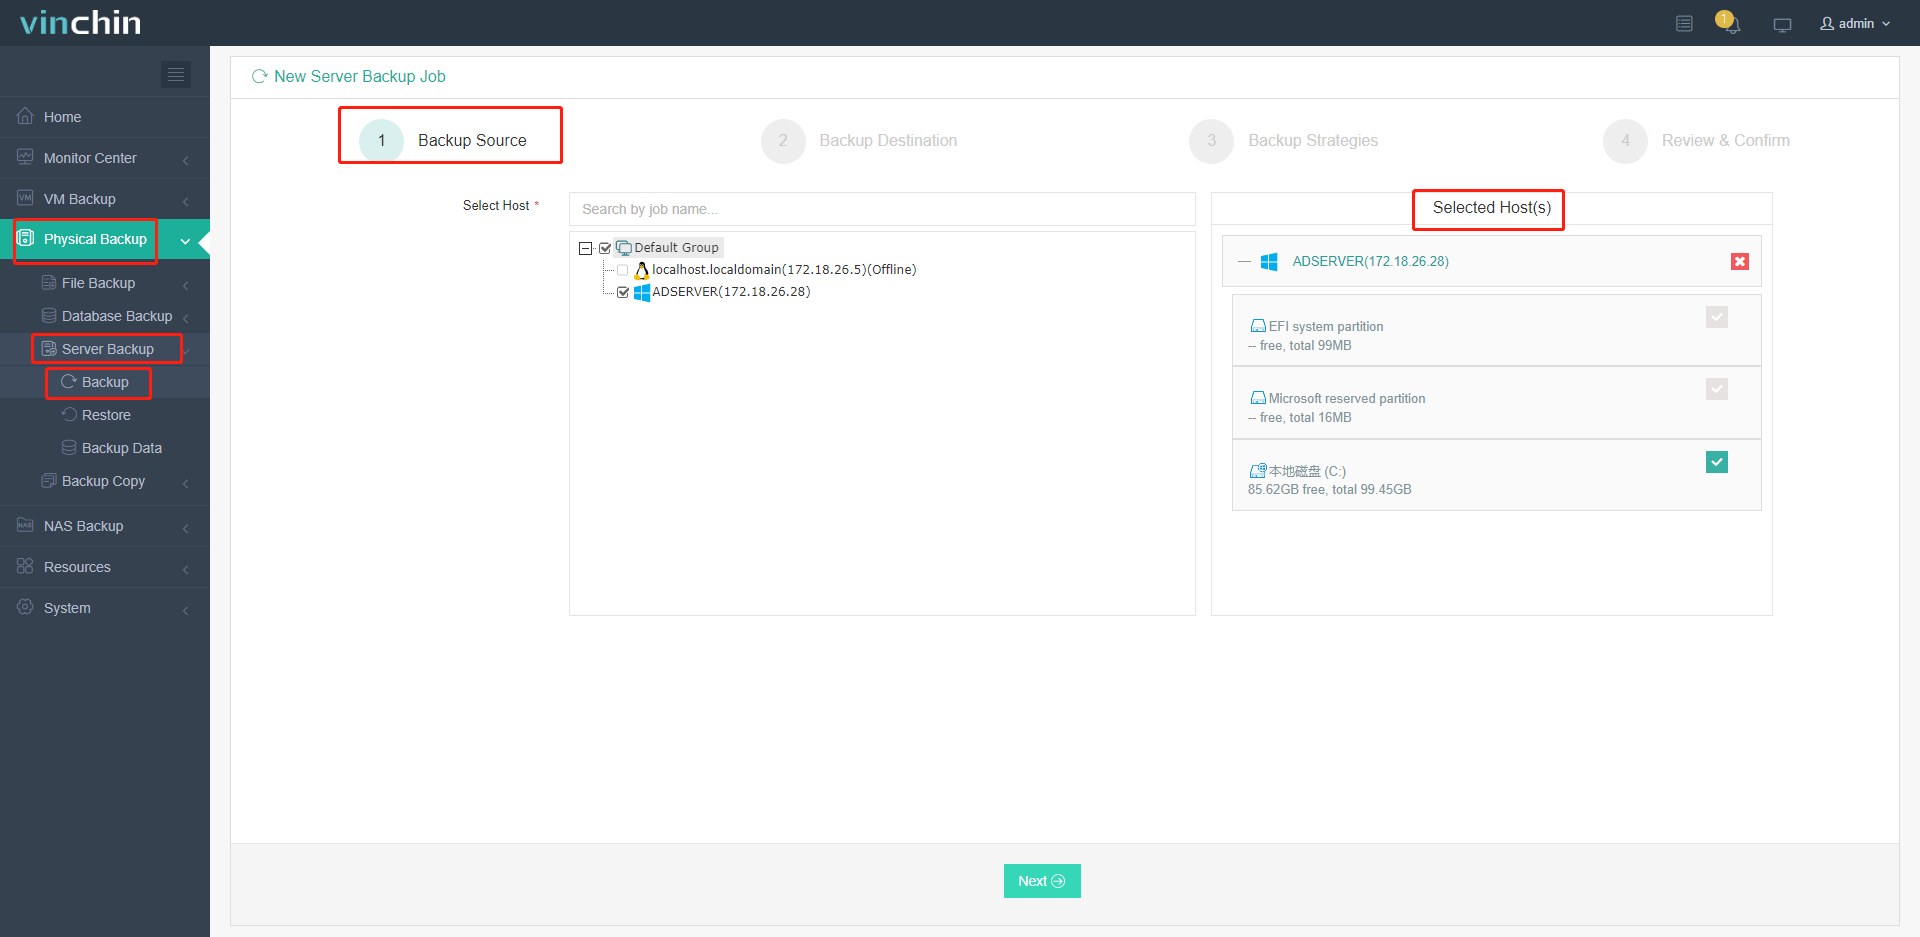
A user-friendly web console will help easily perform bare metal backup and restore on Windows server. To backup your Windows server, just follow the steps below:
1. Go to Physical Backup > Server Backup > Backup, then choose the Windows server you want to protect as the backup source.
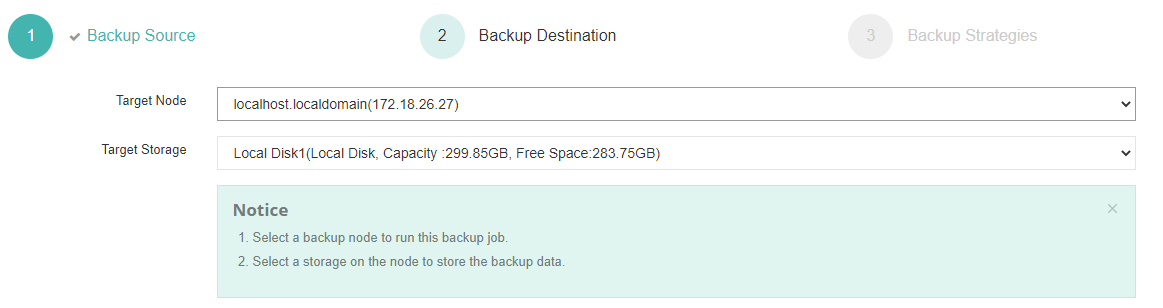
2. Select the backup destination by specifying the target node and storage device.
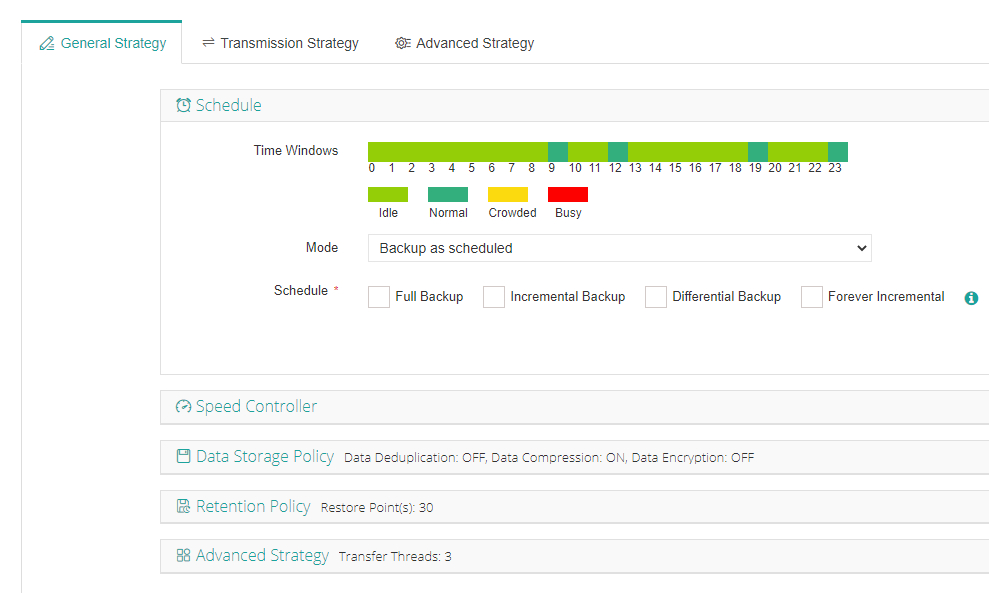
3. Configure the backup strategy and related policies according to your requirements, then choose to schedule the job or run it immediately.
4. Review all backup settings carefully, and click Submit to start the backup task.
The bare metal backup will include the operating system and the other data and then you can use it to perform a bare metal recovery process.
You can start a 60-day full-featured free trial here. Also, contact us, leave your requirements, and then you will receive your tailored solution.
Proxmox Backup Client Windows FAQs
Q1: Does Proxmox Backup Server support cross-platform backup and recovery?
Proxmox Backup Server is mainly used to back up and restore virtual machines and containers in the Proxmox VE environment. While it may not directly support backup and restore from other platforms such as VMware or Hyper-V, virtual machines can be imported into a Proxmox VE environment via conversion tools and then backed up and restored using PBS. And Vinchin Backup & Recovery will be a better choice for V2V migration without additional conversion process.
Q2: What is the relationship between Proxmox Backup Server and Proxmox Backup Client?
The Proxmox Backup Server and Proxmox Backup Client work together in a client-server relationship to facilitate data backup and recovery. The client is installed on the systems that need to be backed up and is responsible for preparing and sending the data to the server. The PBS, installed on a dedicated machine, is tasked with managing, storing, and allowing for the restoration of these backups. It provides a web interface for administration, while the client operates on the command line or through scripts, ensuring users can efficiently secure their data across different operating systems.
Conclusion
Backing up a physical Windows machine to a Proxmox backup server may require some extra work and adjustments, but you can try using WSL in combination with a Proxmox backup client or a shared drive to achieve backup. If a Windows backup client is not available, you may want to consider other backup solutions like Vinchin Backup & Recovery to ensure the security and reliability of your data.


