-
Benefits of creating VM in proxmox
-
How to create a virtual machine in Proxmox VE?
-
How to use a Proxmox script to create a VM?
-
Best practices for Proxmox VM creation with Vinchin Backup & Recovery
-
FAQ: Can you create a Proxmox virtual machine from a backup?
-
Conclusion
Proxmox Virtual Environment (Proxmox VE) is an open source virtualization platform designed to simplify the creation and management of virtual machines. With Proxmox VE, users can easily create, configure and run VMs in an environment based on KVM virtualization and LXC container technology. This platform provides an intuitive interface and powerful features that make the virtualization process easier and more efficient.
Benefits of creating VM in proxmox
Creating virtual machines in Proxmox comes with a myriad of advantages, making it a standout choice for virtualization needs. Let's delve into the key benefits:
User-friendly Interface: Proxmox provides an intuitive and easy-to-use user interface that simplifies the operation process of creating a virtual machine in Proxmox.
Powerful Performance Monitoring: Proxmox is equipped with powerful performance monitoring and management tools that allow users to track the running status of virtual machines in real time to ensure system efficiency and stability.
Multiple Virtualization Technology Support: Proxmox supports multiple virtualization technologies, including KVM and LXC, enabling users to choose the most suitable virtualization method according to actual needs.
Flexibility and Efficiency: Designed with a focus on flexibility and efficiency, Proxmox enables users to easily create, manage and deploy virtual machines, providing a highly customizable virtualization environment.
Comprehensive Management Tools: Proxmox integrates comprehensive virtualization management tools that allow users to easily perform backup, restore, migration and other operations, improving the manageability of the entire virtualized environment.
How to create a virtual machine in Proxmox VE?
Using proxmox to create a virtual machine is a straightforward process that allows you to set up and manage virtualized environments with ease. By following the steps below, you'll be well on your way to creating your own virtual machine in Proxmox:
1. Login to the Proxmox VE web
2. Click Create VM < specify your configuration < hit Finish
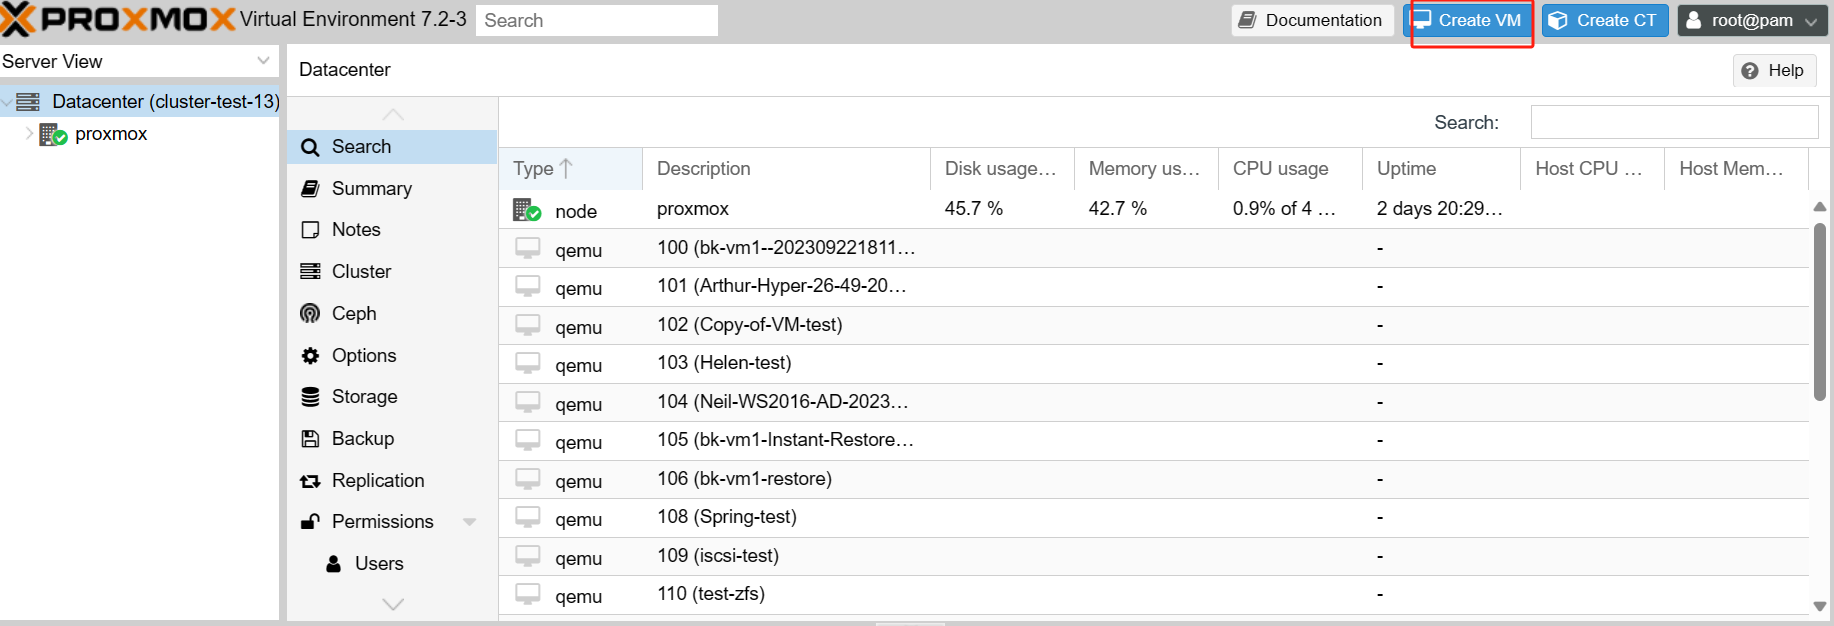
General Configuration of Proxmox create VM
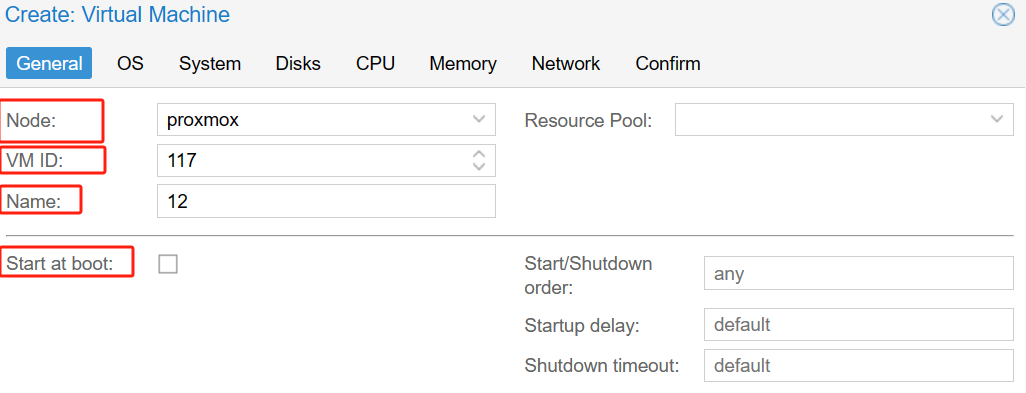
Name: This is the name of the VM and is used to identify the VM in the Proxmox interface.
ID:Each VM has a unique ID that is used to identify the VM in the Proxmox system. Usually, this is assigned automatically.
Node: A node in the Proxmox VE cluster, e.g., a physical host on which a VM is running.
Start at boot: Whether the VM is automatically started when the physical host is booted.

Guest OS (Guest Operating System): An operating system that runs in a virtualized environment.
ISO Image: Path to the ISO image file used to install the operating system.
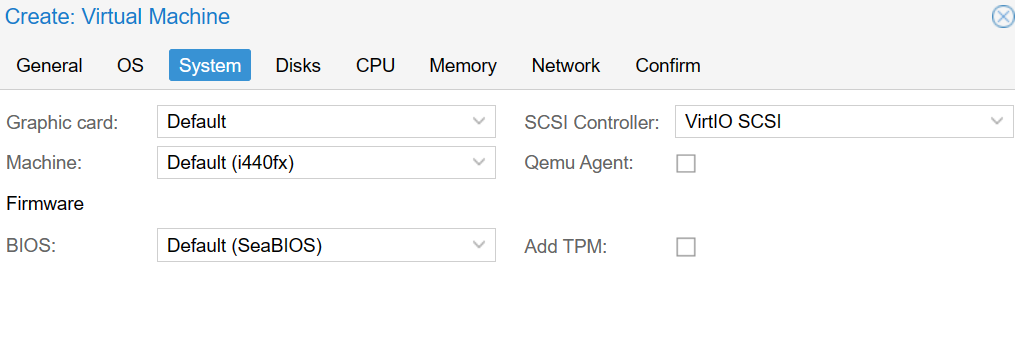
The system configuration does not require much intervention and default values can be used. If you need to change the graphics card or configure secure boot, you can set the appropriate settings here.
Enable QEMU Agent:Whether or not to enable the QEMU agent, a tool used to communicate with VMs.
Add TPM: Add the Trusted Platform Module (TPM) hardware security module to a computer system to provide additional hardware-level security features such as key storage, random number generation, and secure boot.
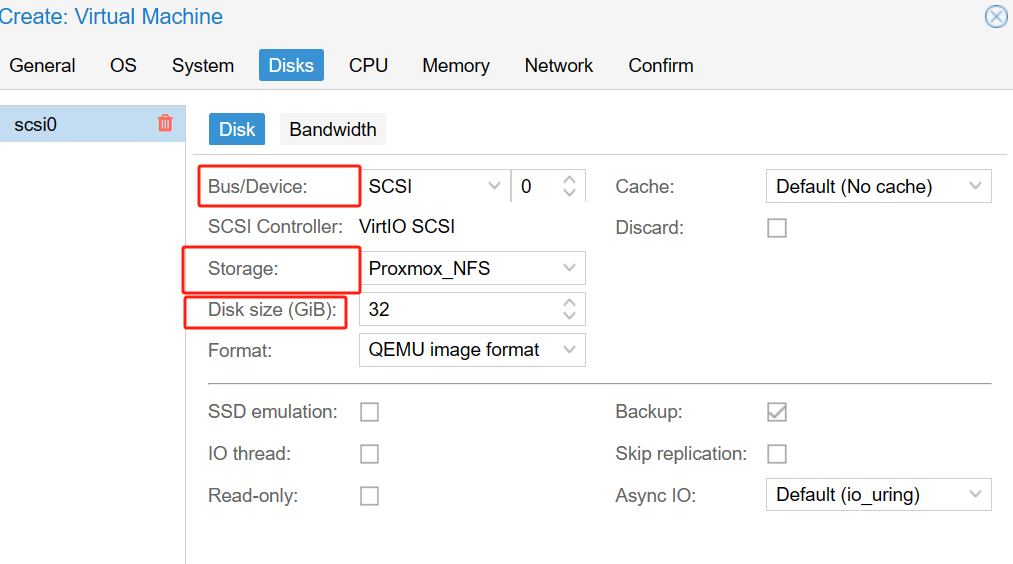
Bus/Devices: By default, Proxmox will select SCSI.
Storage: Select the location where you want to save the virtual hard disk.
Disk size: You can choose the storage size and by default 32GB storage will be selected.

Sockets/Cores/Threads:Configure the number of sockets, cores, and threads for the processor.
Note: CPU configuration depends on your environment requirements. By default, Proxmox will allocate 1 CPU. If you need more CPUs, you can add it. For example: 4 CPUs are provided, so change Cores to 4.
Memory: Specifies the memory size of the VM.
Network Device: Configure the network adapter settings for the VM.
How to use a Proxmox script to create a VM?
With Proxmox scripts, you can automatically create VM in Proxmox, which saves time and ensures consistency of deployment. To use Proxmox scripts creating VM, follow these steps:
1. In Proxmox VE, select host < choose Shell
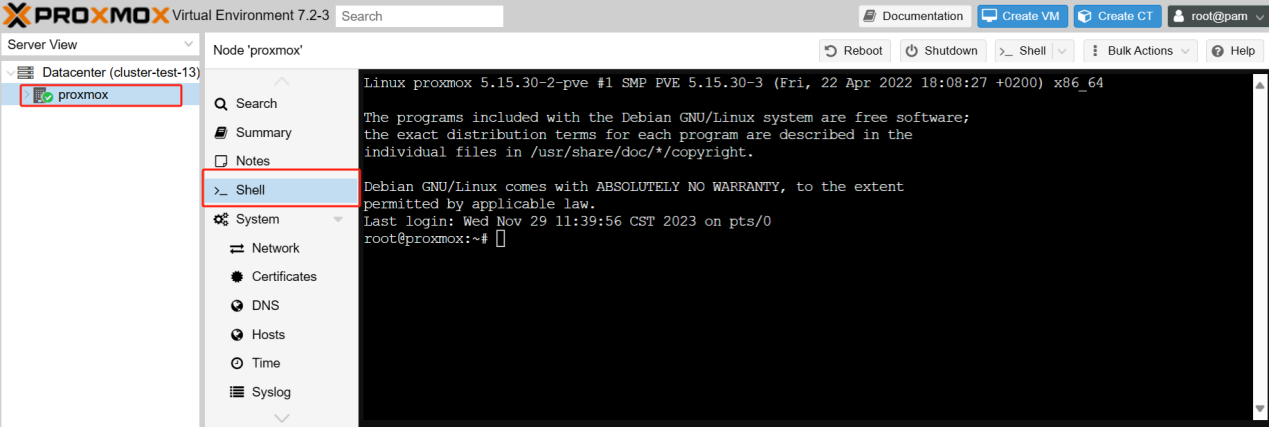
qm create <vmid> --name <vm_name> --memory <memory_size> --net0 <model=e1000,bridge=vmbr0> --cores <number_of_cores> --sockets <number_of_sockets> --cpu <cpu_type>
qm create 1233456 --name 12345 --memory 1024 --net0 model=e1000,bridge=vmbr0 --cores 2 --sockets 1 --cpu host
<vmid>: Unique identifier of the VM
<memory_size>: Specify the size of the VM's memory, in MB or GB
<model=e1000,bridge=vmbr0>: Network configuration, which can be modified as needed. Specify the network model of the VM as e1000 and the network bridge to the VM as vmbr0.
Best practices for Proxmox VM creation with Vinchin Backup & Recovery
Vinchin Backup & Recovery is a backup solution designed for virtual machines of Proxmox, VMware, Hyper-V, XenServer, XCP-ng, oVirt, RHV, etc. It provides comprehensive and powerful VM backup and recovery features like agentless backup, instant recovery, V2V migration designed to protect and manage critical data in the virtualization environment.
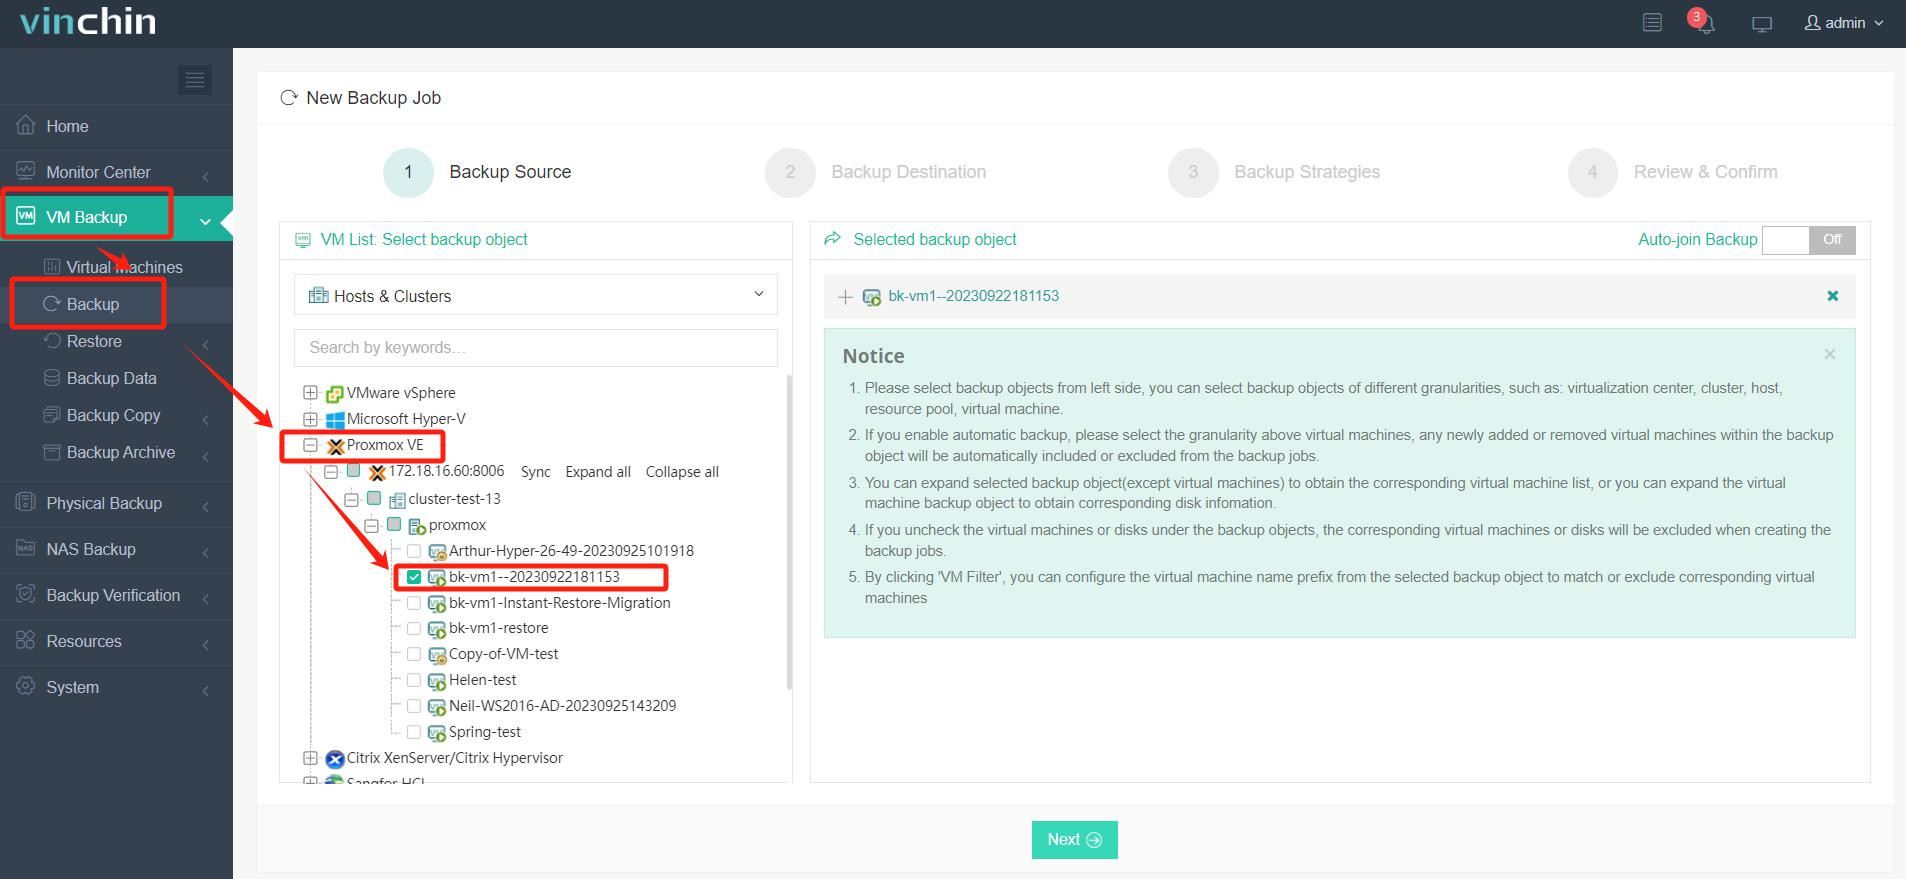
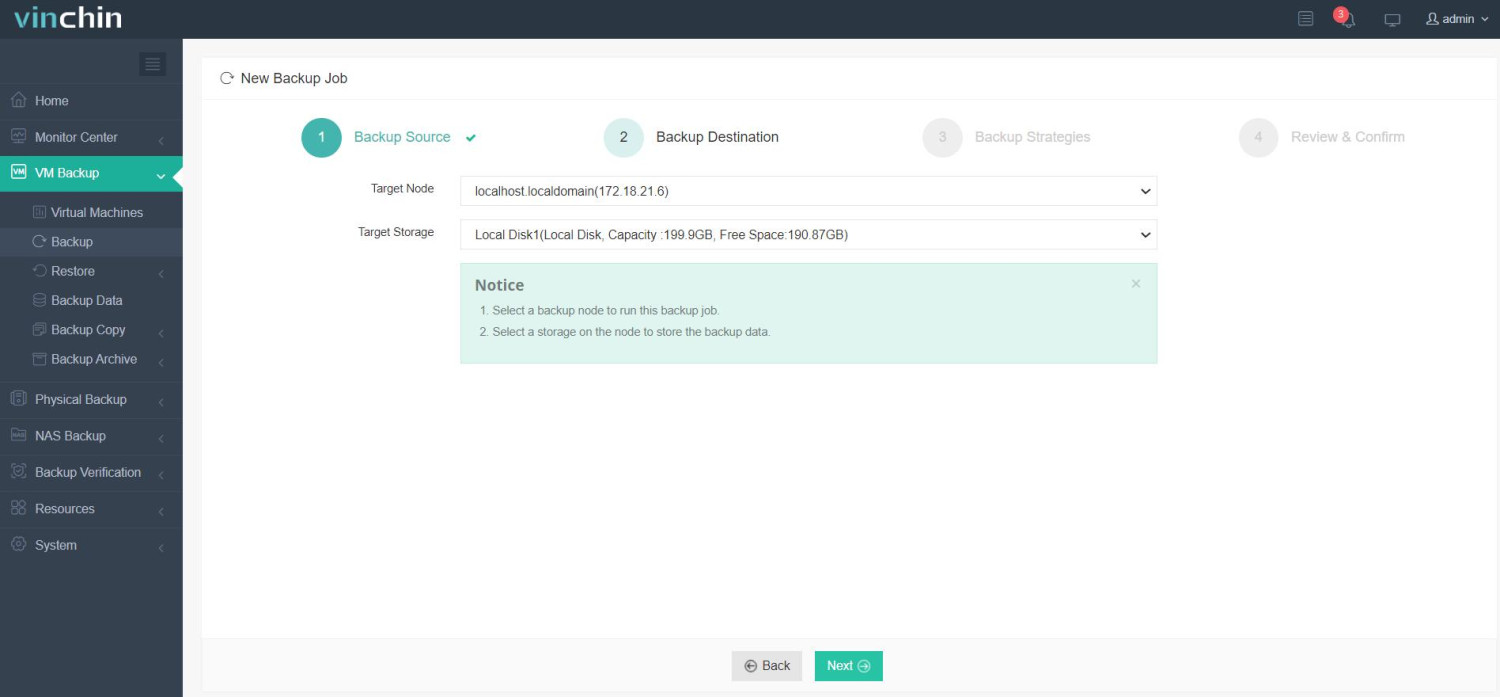
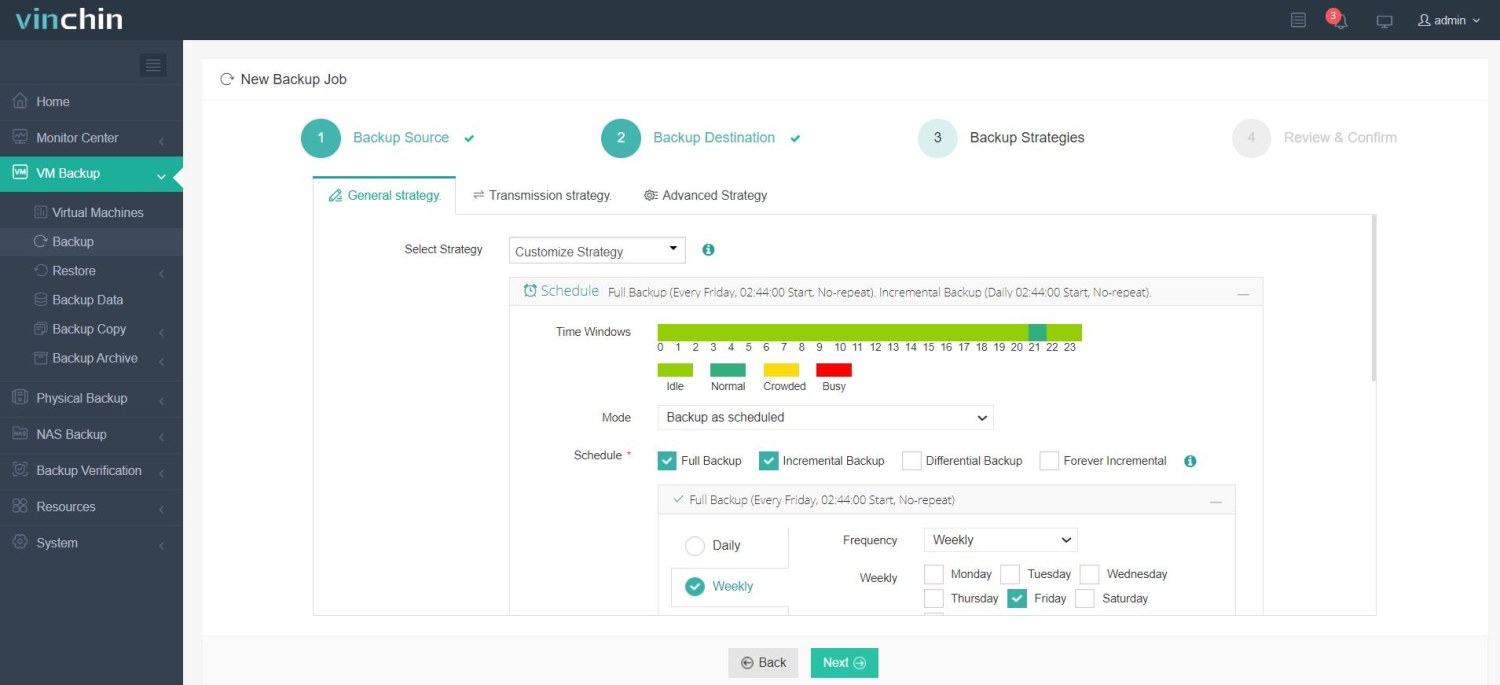
Vinchin Backup & Recovery's operation is very simple, just a few simple steps.
1. Just select VMs on the host
2. Then select backup destination
3. Select strategies
4. Finally submit the job
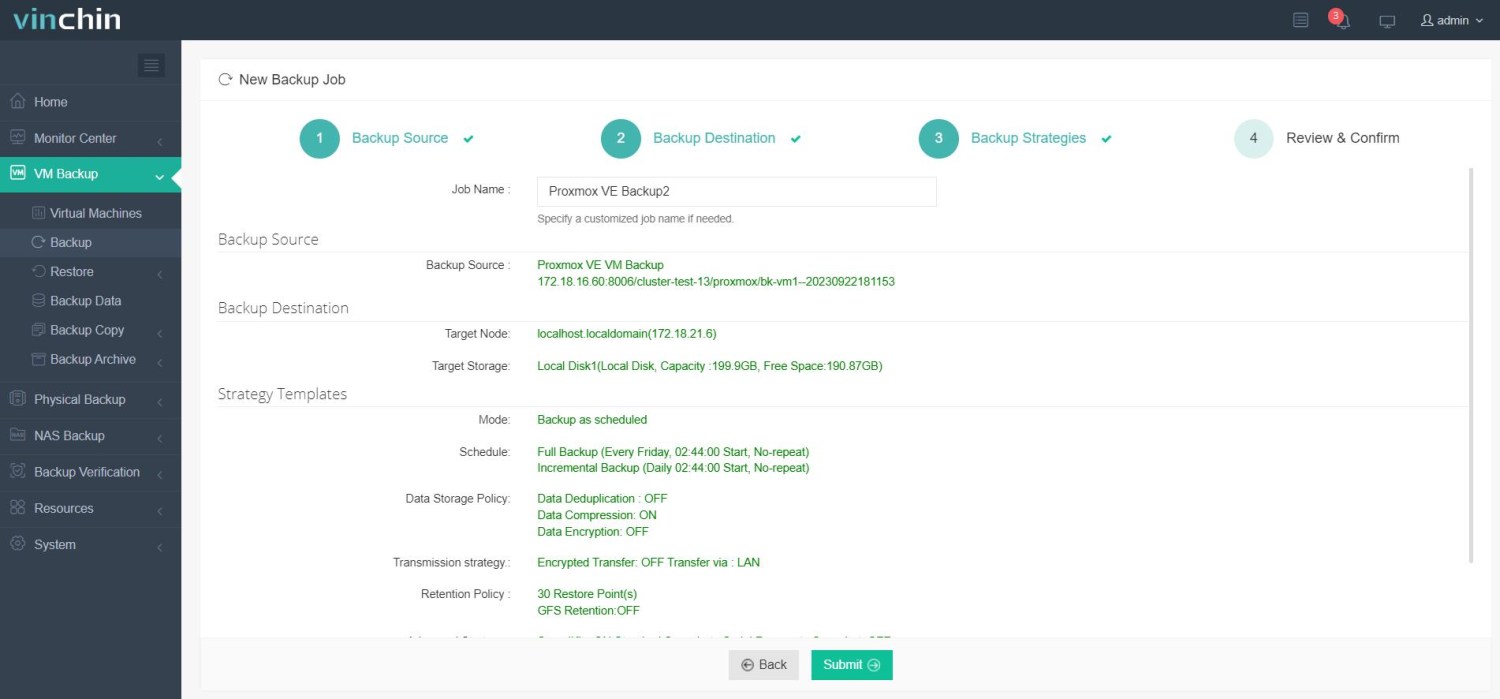
Vinchin offers a free 60-day trial for users to experience the functionality in a real-world environment. For more information, please contact Vinchin directly or contact our local partners.
FAQ: Can you create a Proxmox virtual machine from a backup?
With Proxmox's powerful backup and restore features, you can easily recreate VMs using previously created backups. Below you will find an overview of how does Proxmox create a VM from a backup using Proxmox in 2 ways.
Create a VM directly from a backup within the interface
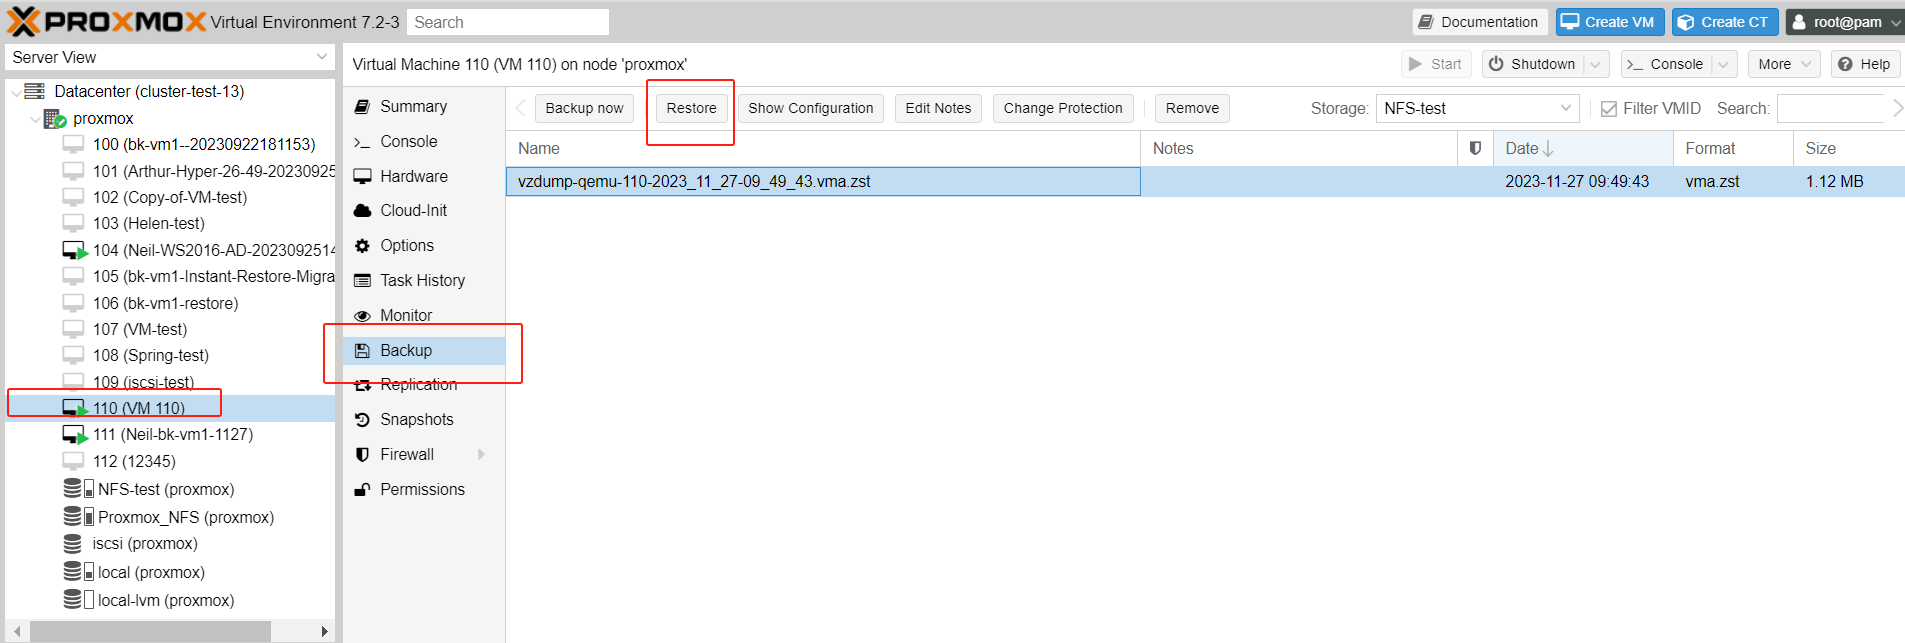
1. In Proxmox VE, select VM > choose Backup > select the backup file > click Restore
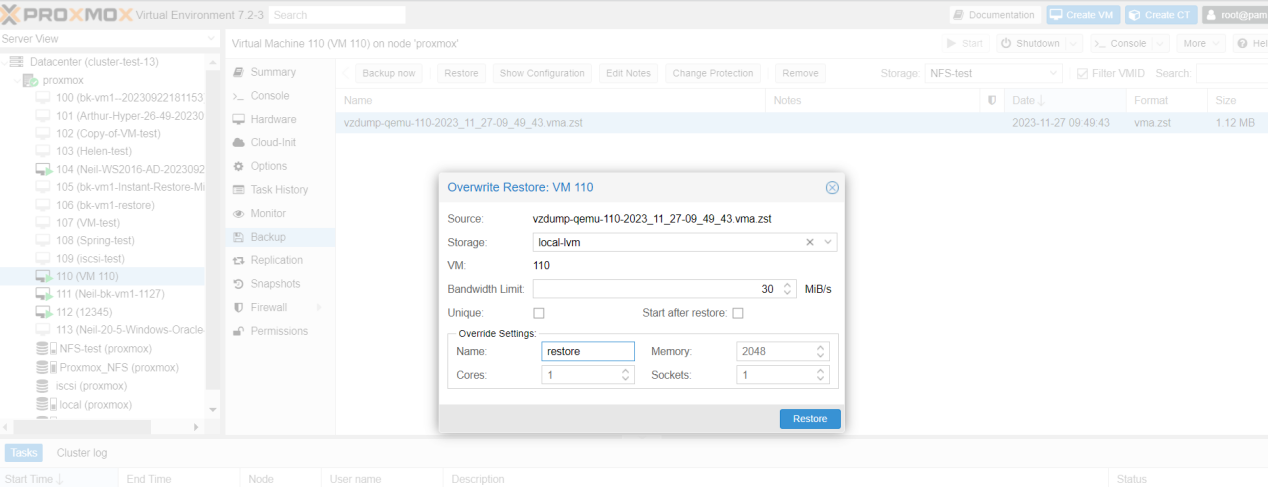
2. In the pop-up page, configure the relevant recovery parameters < hit Restore
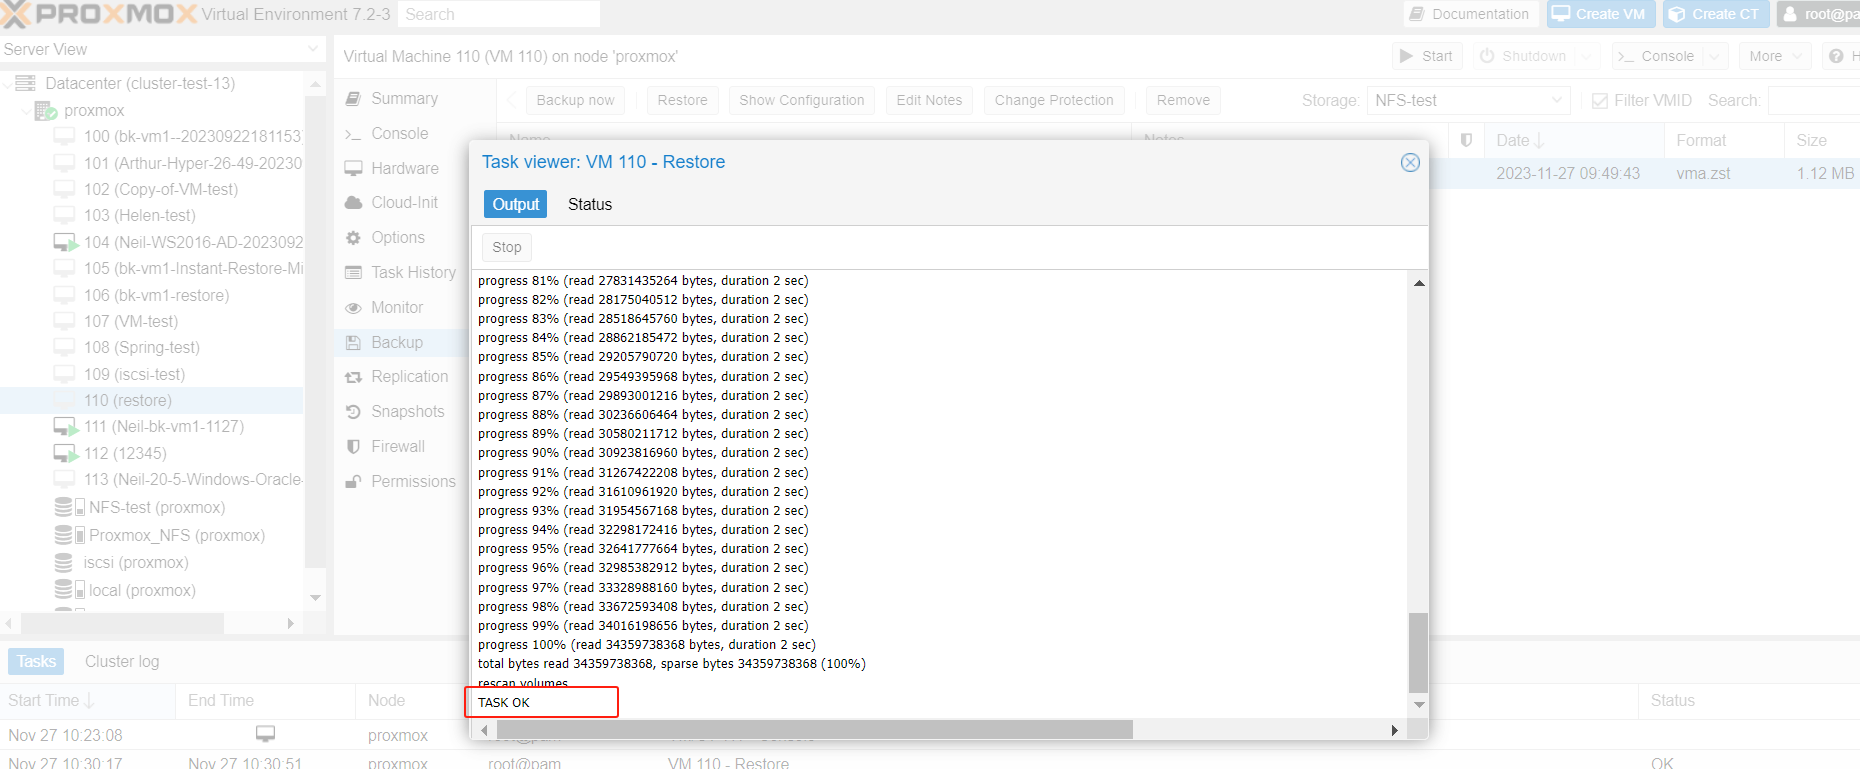
3. When the task is completed, the window will show TASK OK
Using Proxmox script to create VM
1. In Proxmox VE, click host > choose Shell
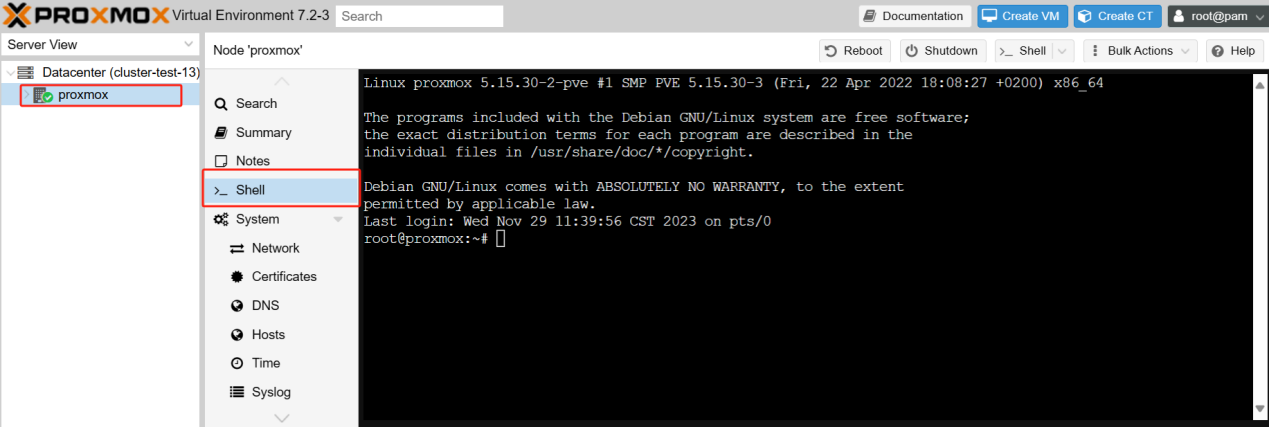
2. Type the following command:
qmrestore /path/to/backup-file.vma [new_vm_id]
qmrestore /var/lib/vz/dump/vzdump-qemu-1233456-2023_11_29-10_09_37.vma 8888989


Of course, if you have a VM backup in Vinchin Backup & Recovery, you can also create a new VM from that backup.
Conclusion
In short, Proxmox VE is an open source virtualization platform that stands out for its user-friendly interface, powerful performance monitoring, and comprehensive management tools. Creating virtual machines in Proxmox is a straightforward process that can be done through the web interface or using scripts. In addition, Proxmox's integration with Vinchin Backup & Recovery enhances data protection and management in virtualized environments, providing a simple and effective solution for VM backup and recovery.
Share on:


