VMDK (Virtual Machine Disk) is a file format that includes all the hard disk stored information of a VMware virtual machine, such as VMware ESXi, VMware Workstation, VMware Fusion, etc. The VMDK format is the combination of virtual disk descriptor (name.vmdk) and virtual disk extent (name-flat.vmdk, storing raw files) for VMware ESXi, and an extended data file (name.vmdk, monolithic sparse) for VMware Workstation.
There are situations when you want to access the VMDK file but the VM is unavailable and you need to know some VMDK opening methods in such cases. Here in this article, I’ll introduce 3 methods to open VMDK files in VMware.
Method 1: Open VMDK with a Live DVD Even When the Guest OS Fails
This technique needs a VM that can boot from a DVD disc, then you may launch your VM using the ISO image as a DVD disc, mount partitions of virtual disks, and copy files to a USB hard drive connected to the VM, your host computer, or other machines via a network. This method applies to VMware ESXi/Workstation/Player (here is ESXi).
1. Download the Ubuntu ISO installation image.
2. Log in to vSphere Client and access the VMs in the Hosts and Clusters section. Right-click the VM and choose Edit Settings…
3. In the CD/DVD Drive section, select Datastore ISO File. Then go to CD/DVD Media, and click Browse to designate the ISO file.
4. Boot the VM from ISO file and choose Try Ubuntu Without Installing. After that, open the Terminal. Enter the following commands.
Gain toot privilege:
sudo -i
Find the list of hard drives available:
ls -al/dev/sd*
Make the directories as mount points for partitions:
mkdir/mnt/win-disk1
mkdir/mnt/win-disk2
Mount partitions:
mount/dev/sda1/mnt/win-disk1/
mount/dev/sda2/mnt/win-disk2/
List the mounted partitions files:
ls -al/mnt/win-disk2/
ls -al/mnt/win-disk1/
5. Attach the USB hard drive to the ESXi host with a USB pass-through and copy the required VMDK files. Or use SMB (CIFS) share and copy virtual disk contents to another target destination via a network.
Method 2: Mount a VMDK File to a VMware ESXi or Workstation VM
This way requires the VMDK connection to an existing virtual machine with running OS. VMDK files can be added as an additional virtual disk to the VM.
Mount a VMDK file to an ESXi VM
1. In the vSphere Client, navigate to Storage >Datastore Browser> select the VMDK file> click Copy to.
2. Specify the location datastore, then go back.
3. In the Hosts and Clusters section, right-click the VM and choose Edit Settings.
4. Click ADD NEW DEVICE on the top right of the pane> choose Existing Hard Disk.
5. Choose the copied VMDK files and click OK.
6. In Windows Explorer, open the mounted drive and copy VMDK contents.
Mount a VMDK file to a Workstation VM
1. In the vSphere Client, navigate to Storage >Datastore > File> Download (then unzip the files in the ZIP archive).
2. In VMware Workstation, select the VM and click Edit the virtual machine settings.
3. Click Add in the wizard > Hard Disk > SCSI > Use an existing virtual disk > locate the downloaded VMDK > click Finish.
4. Boot the Windows Disk Management, alter the virtual disk state to online, then give a drive letter to a partition and browse the files.
Method 3: Access a VMDK File Without Attaching It to a VM
Mount VMDK files to Workstation while the VM is Powered off in Windows
1. Log in to Workstation. Go to File > Map Virtual Disks > Browse.
2. Check the Open file in read-only mode (recommended) in the checkbox to avoid unnecessary virtual disk damage. The default Drive Z: means the drive is automatically launched in Windows Explorer following the mapping. Click OK.
3. Verify the delta virtual disk connected to the first snapshot in the wizard and click Disconnect Virtual Disk.
Mount a Workstation VMDK file on a Linux host while the VM is Powered off
1. In VMware Workstation, go to File > Mount Virtual Disks > Browse. Select the VMDK file.
2. In the Linux file system, create a directory to mount the VMDK virtual disk.
mkdir/mnt/vmdk/
chown -R userX: groupX/mnt/vmdk/
3. Choose the target directory and check Mount read-only option.
4. In Linux explorer, open mnt / vmdk / directory and find the files on VMDK disk. Unmount the VMDK image file from Linux once not in use.
5. Enter the commands to mount the VMDK on Linux. Then click Disconnect Virtual Disk.
vmware-mount/media/userX/vms/vmname/vmdiskname.vmdk/mnt/vmdk
Protect and Migrate VMware VMs with Vinchin Backup & Recovery
To prevent unbootable virtual machines or corrupted VMDK files caused by malware, system upgrades, or unexpected failures, regular VM backup is essential. Vinchin Backup & Recovery provides centralized protection for 15+ virtualization platforms including VMware, oVirt, Oracle OLVM, and XenServer, as well as databases, Linux and Windows servers, and NAS systems.
It supports automated agentless VMware backup with flexible schedules and email alerts, while intelligent backup strategies such as incremental backup, data deduplication, compression, and HotAdd transport help reduce backup size and improve transmission efficiency.
In addition, its cross-platform V2V migration feature allows administrators to migrate workloads between different hypervisors through simple recovery operations, while 15-second instant recovery helps quickly restore failed VMware VMs directly from backup repositories to maintain business continuity.
Here shows an example of backing up VMware ESXI in Vinchin:
1. Select a backup source
Navigate to VM Backup > Backup in the Vinchin backup server, then select the backup source (s) from expanded VMware VMs added to the software.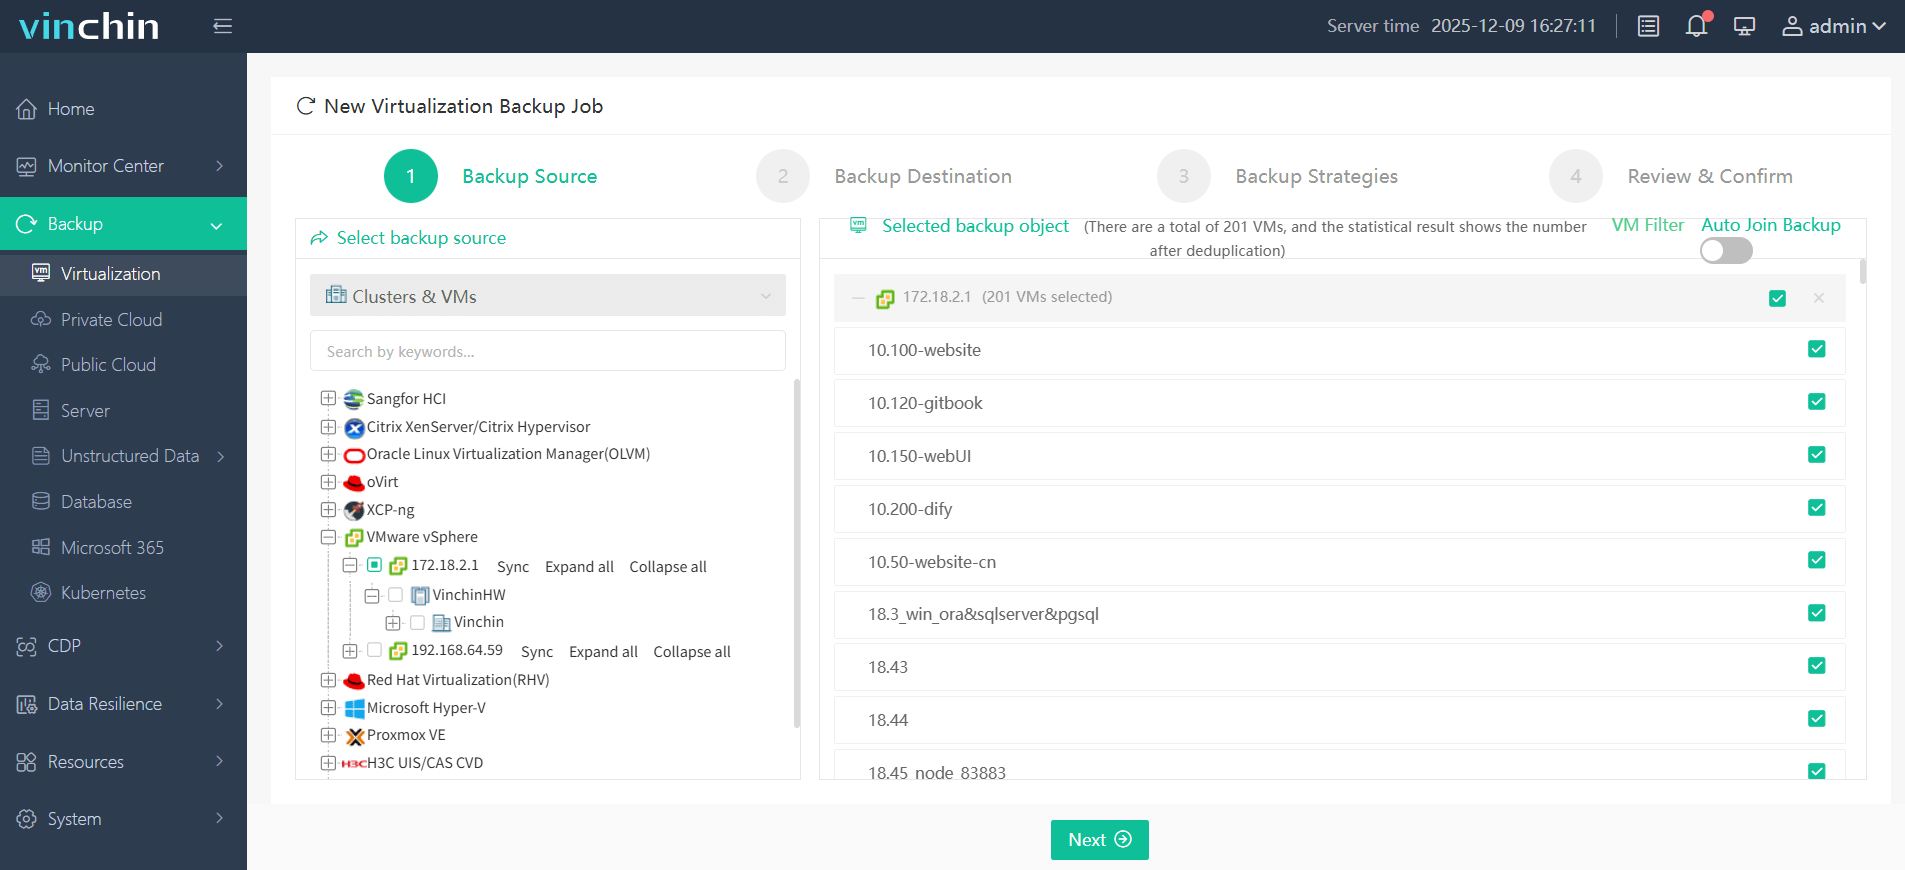
2. Select a backup destination
Specify the backup destination for the VM. Select the backup node and storage associated with it from the dropdown lists.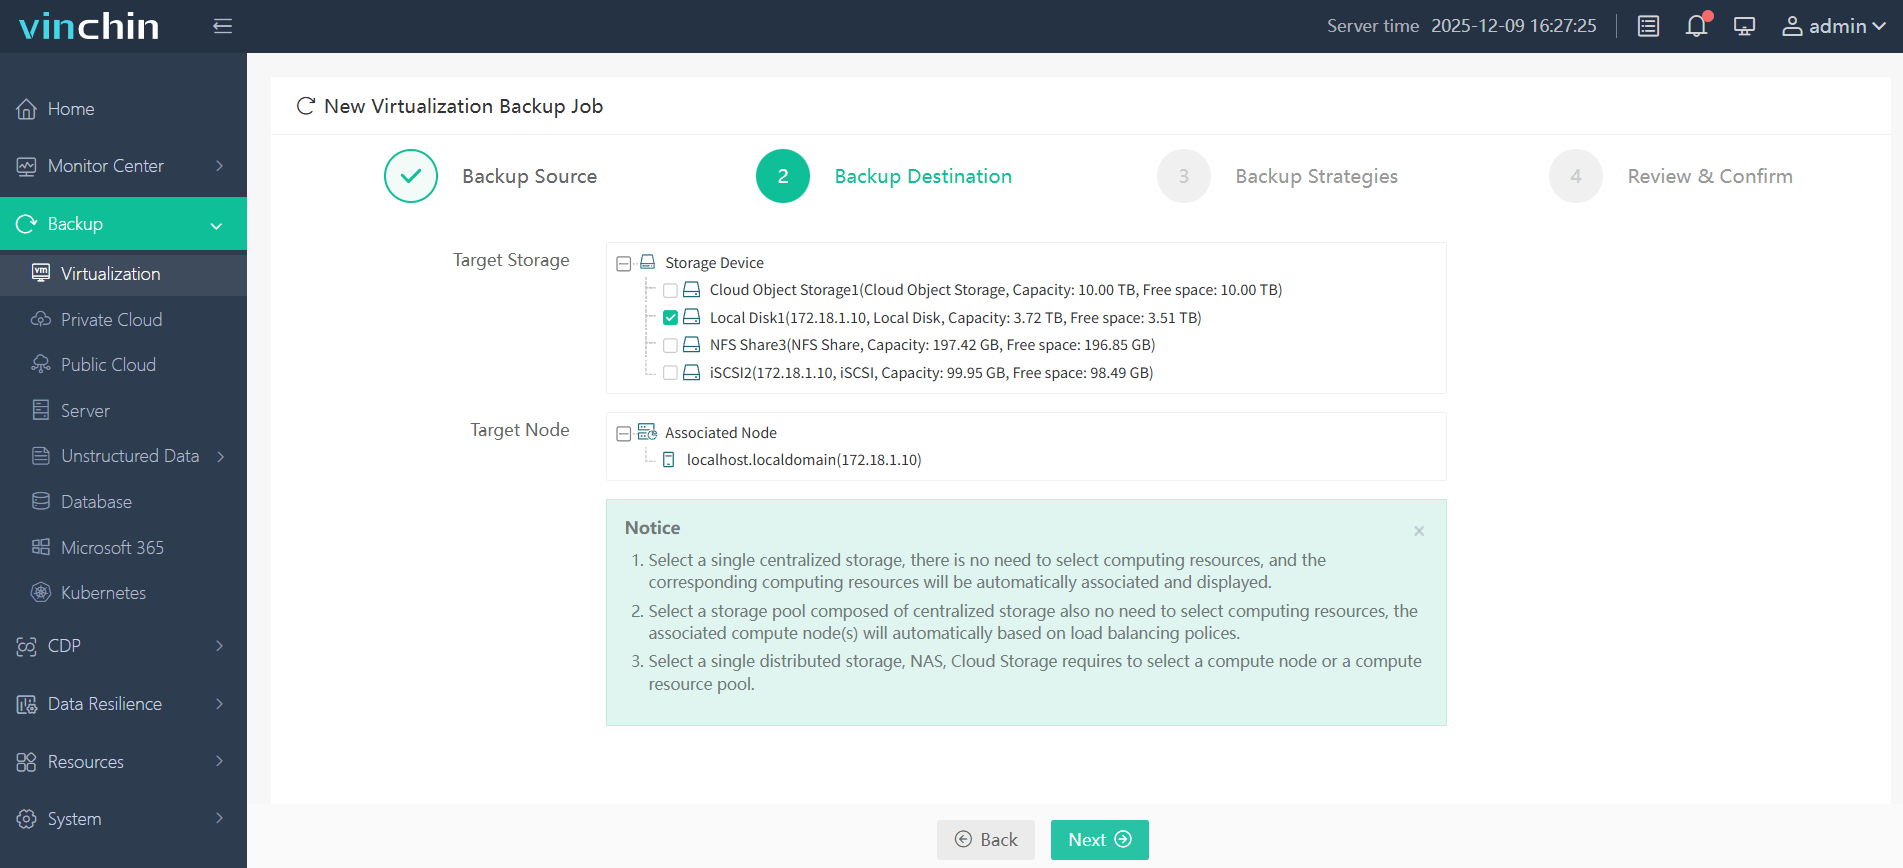
3. Customize backup strategies
Configure backup strategies. Customize backup schedules, data reduction options, retention mode (GFS or normal settings), transmission modes, and more here to streamline VMware backup effortlessly.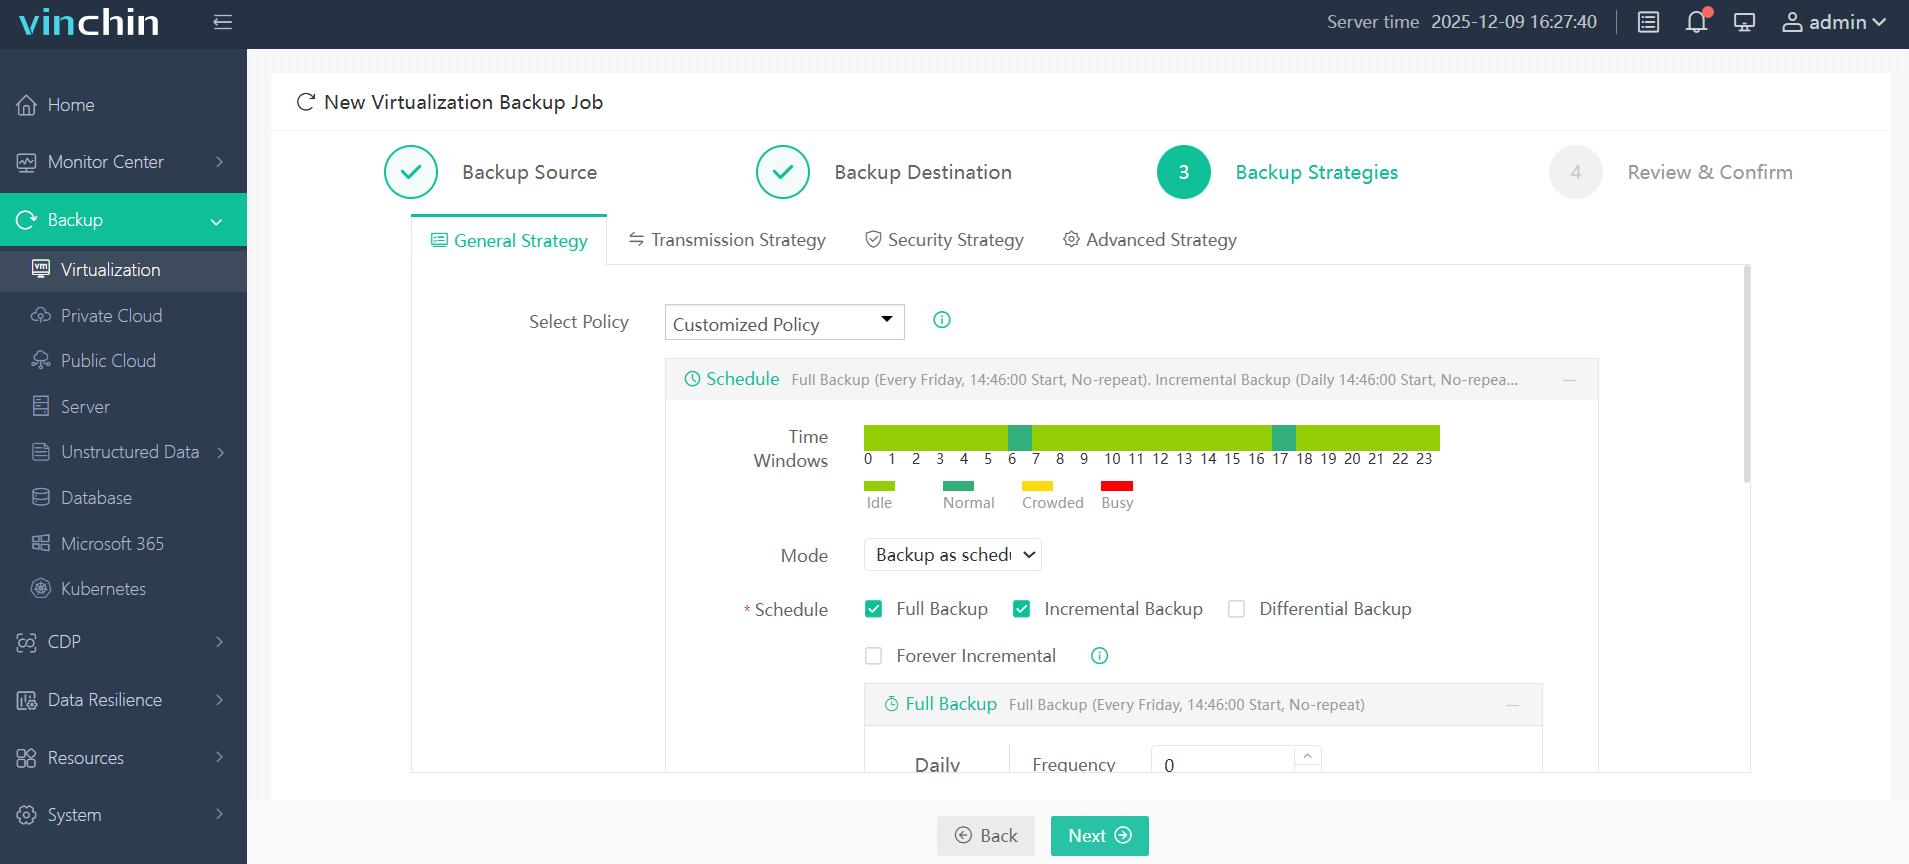
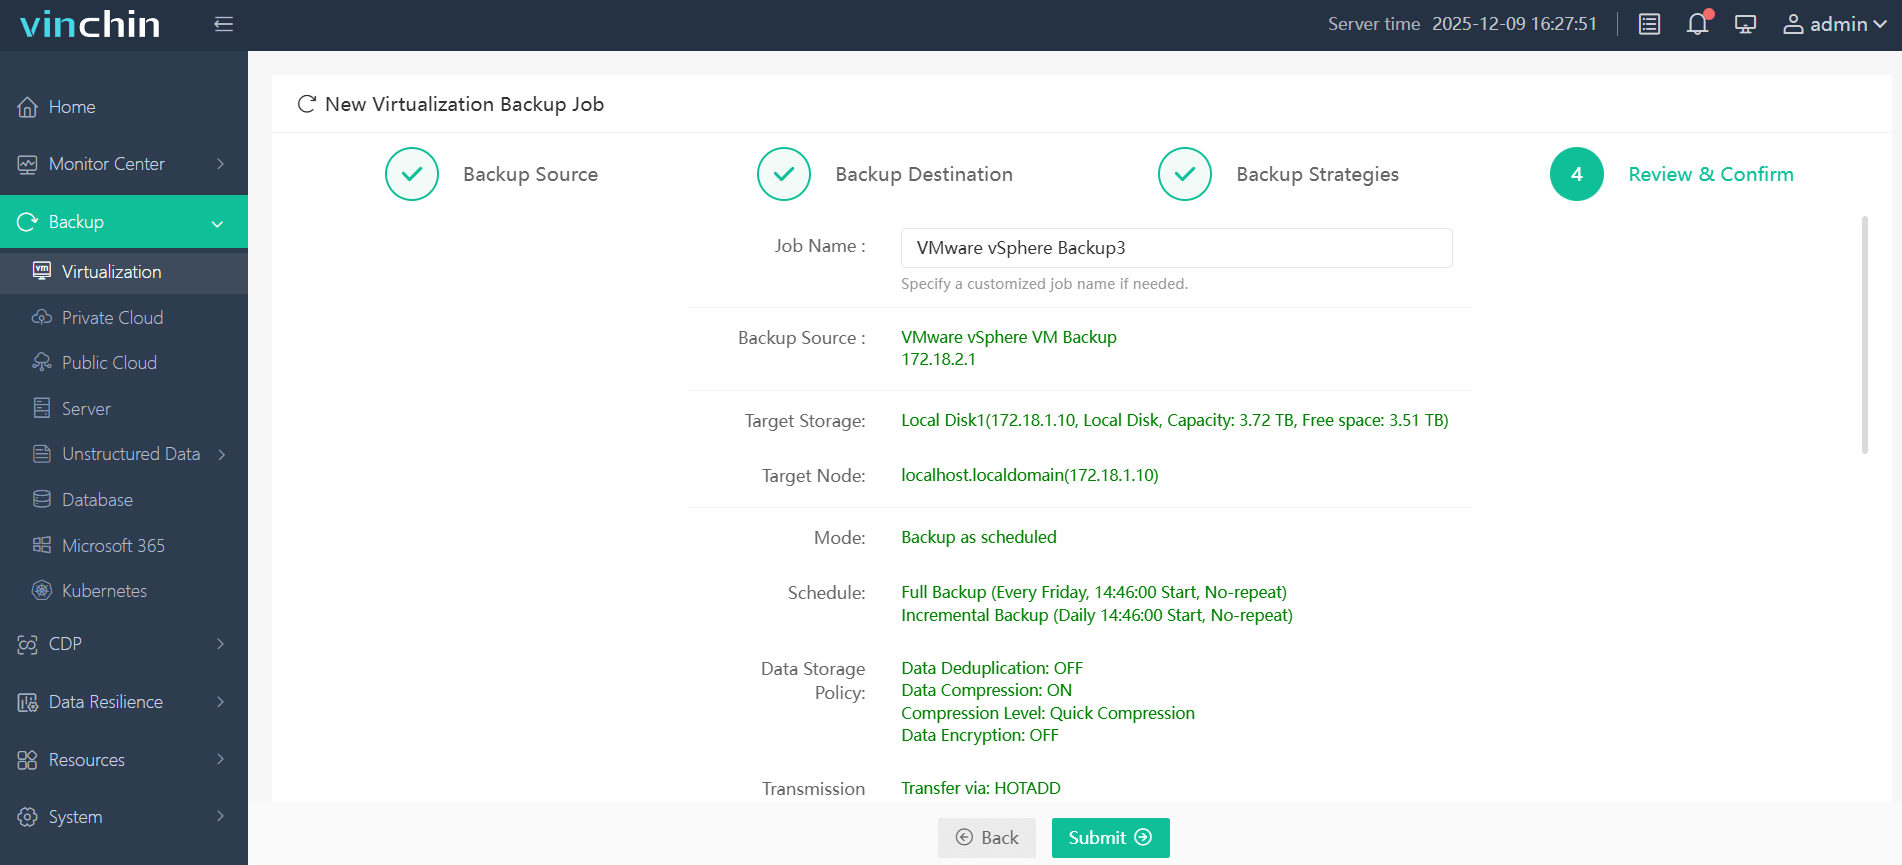
4. Submit the job
review all the configurations and click Submit.
Vinchin Backup & Recovery has been widely recognized as a robust and reliable VM backup, recovery, and migration solution. It offers a 60-day free trial with full features; click the Download button below to see how fast, simple, and secure its backup feature is.
FAQs Related to Opening VMDK in VMware
Q1: What should I do if the VMDK file is corrupted or the VM cannot boot?
You can try accessing the VMDK with a Live DVD or recover the VM from backup. Using reliable VM backup software helps reduce the risk of permanent data loss.
Q2: Is it safe to edit files inside a mounted VMDK?
Yes, but modifications should be performed carefully. Editing active VM disk files without proper precautions may cause file system inconsistency or application corruption.
Q3: Why is my VMDK file locked?
A VMDK file may be locked because the VM is powered on, a snapshot exists, or another process is using the disk. Releasing the lock usually requires shutting down the VM or removing stale lock files carefully.
Q4: Should I back up VMware VMs before opening or mounting VMDK files?
Yes. Creating VM backups before accessing or modifying VMDK files helps prevent data loss caused by accidental corruption, misoperations, or system failures.
Conclusion
VMDK files can be opened using live DVD or mounting as an additional virtual disk even if the VM is unavailable. But note that data backup is always necessary before any risky operations. Vinchin Backup & Recovery can help you with fast, agentless, and smart VM backup and safeguards your data during and after the backup process with anti-malware features and instant recovery.


