What Delete VMware VM Actually Does
A VMware virtual machine is not a single file, it is a folder on a datastore containing several components that together define the machine’s identify and it’s data.
Delete different file types have different purpose:
.vmx - VM configuration (hardware, boot order, network)
.vmdk - Virtual disk data
-flat.vmdk - Actual disk contents (raw blocks)
.nvram - BIOS/UEFI firmware settings
.vmsd - Snapshot metadata
-delta.vmdk - Snapshot delta files
.log - VMware log files
VMware surfaces two fundamentally different actions, and confusing them is the most common source of trouble:
Action | Remove from Inventory? | Remove Files from Datastore? | Recoverable? |
Remove from Inventory | Yes | No | Yes, re-register the .vmx |
Delete from Disk | Yes | Yes, all VM files | Only if a backup exists |
Warning:
Delete from Disk is permanent. Once executed, the VM and all associated datastore files are gone. VMware does not send deleted files to a recycle bin for vSphere or ESXi environments. Always confirm a backup exists before proceeding.
Checklists Before You Delete
A short checklist before any deletion:
Verify you have a backup: A VMware snapshot is not a backup, it depends on the original disk chain and is destroyed alongside the VM when you delete from disk.
Check network dependencies: Is the VM running a DNS server, domain controller, database, or load balancer that other systems rely on?
Check for IP/MAC reservations: Static IPs or DHCP reservations associated with the VM may need to be released.
Export or archive if uncertain: An OVF/OVA export preserves the VM in a portable format that can be re-imported later.
Power off: Always shut down the guest OS first. A hard power-off risks disk corruption inside the VM’s file system.
Method 1. vSphere Client
The vSphere Client is the standard interface for environments managed by vCenter Server. This is the most common method in enterprise data centers.
Shut down the VM:
1. Open a browser and log in to the vSphere Client using your vCenter credentials.
2. In the left navigation tree, go to Virtual Machine and Templates or use the Hosts and Clusters view to locate the target VM.
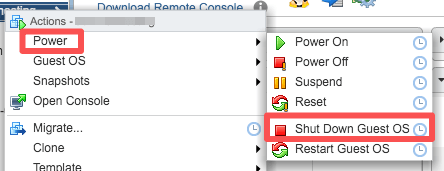
3. If the VM is running, right-click it > Power > Shut Down Guest OS. This sends a graceful ACPI shutdown through VMware Tools. If VMware Tools is unresponsive, use Power Off as a fallback.
4. Wait until the VM status shows Powered Off in the Summary tab before proceeding.
Delete from Disk:
1. Right-click the powered-off VM in the inventory tree.
2. Select Delete from Disk from the context menu.
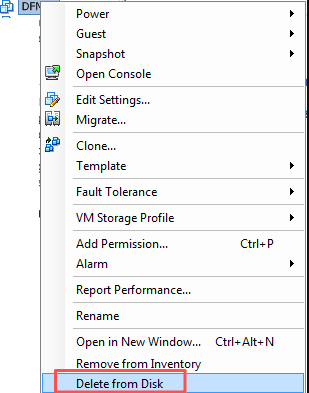
3. A confirmation dialog will appear. Click Yes, vCenter will remove the VM from inventory and delete all associated files from the datastore.
Note:
You need the
Virtual machine → Inventory → Remove and
Virtual machine → Inventory → Delete privileges in vCenter to perform this action. If the options are greyed out, check your role assignment with your vCenter administrator.
Method 2. ESXi Host Client
If you manage a standalone ESXi host not connected to vCenter, use the ESXi Host Client directly.
1. Open a web browser and navigate to https://<ESXi-host-IP>. Log in with administrator credentials (typically root).
2. In the left sidebar, click Virtual Machines.
3. Select the VM you want to remove. If it is powered on, right-click it > Power > Shut down. Confirm and wait for it to reach the Power Off state.
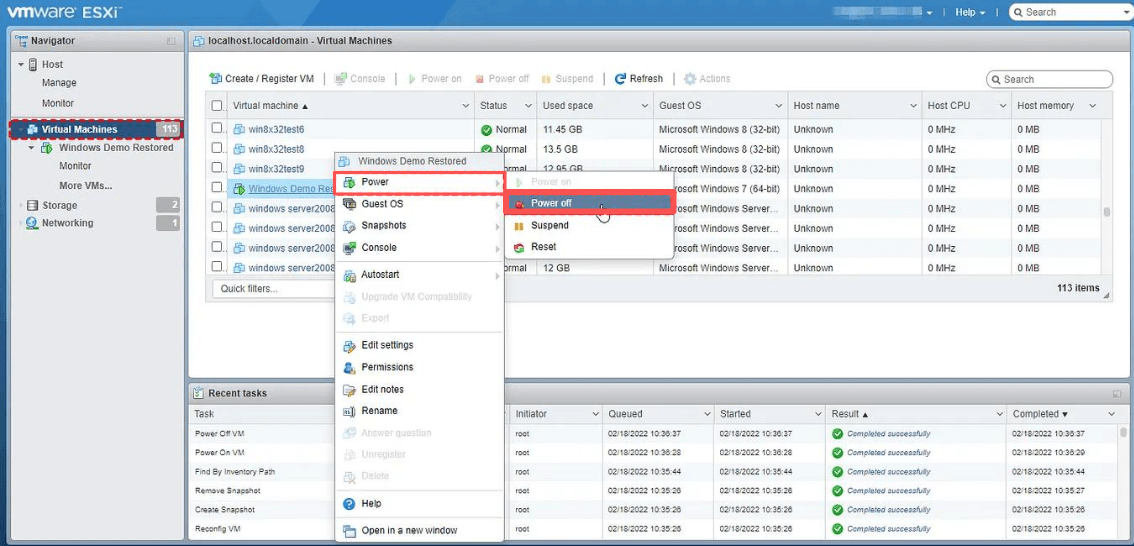
4. Right-click the powered-off VM > Delete (some ESXi versions show this as Delete from disk).
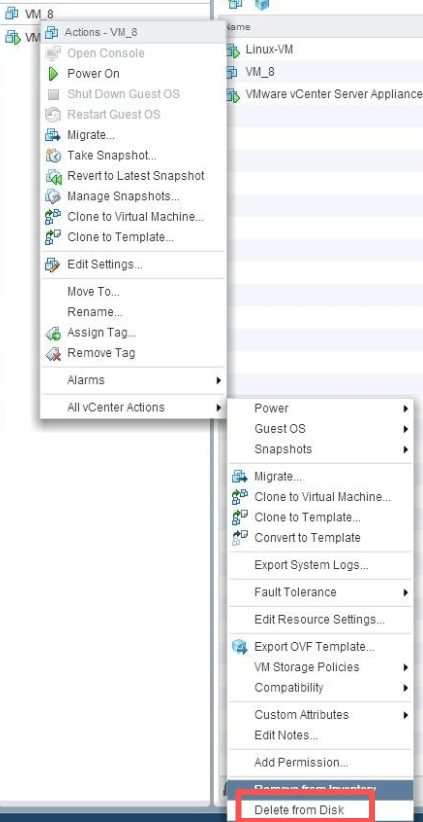
5. Click Yes in the confirmation prompt. The ESXi host will unregister the VM and remove all its files from the local datastore.
Deleting via SSH/ESXi Shell:
When a VM appear as invalid or orphaned and the GUI options are greyed out, SSH access to the host and vim-cmd can resolve it:
1. List all registered VMs and their VMIDs
vim-cmd vmsvc/getallvms
2. Power off the VM (replace 42 with your VMID)
vim-cmd vmsvc/power.off 42
3. Destroy the VM (removes from inventory + deletes files)
vim-cmd vmsvc/destroy 42
Method 3. VMware Workstation & Fusion
VMware Workstation (Windows/Linux) and VMware Fusion (macOS) are used for desktop virtualization and development labs. Deletion here removes files from the local disk rather than a networked datastore.
VMware Workstation (Pro/Player)
1. Open VMware Workstation and locate the VM in the Library panel on the left.
2. If the VM is running, power it off: VM menu > Power > Shut Down Guest.
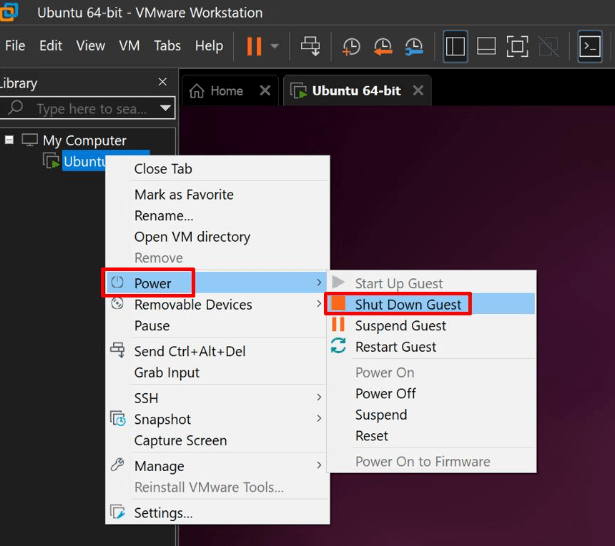
3. Right-click the VM in the library > Manage > Delete from Disk.
Alternatively: Select the VM, then go to the top menu VM > Manage > Delete from Disk.
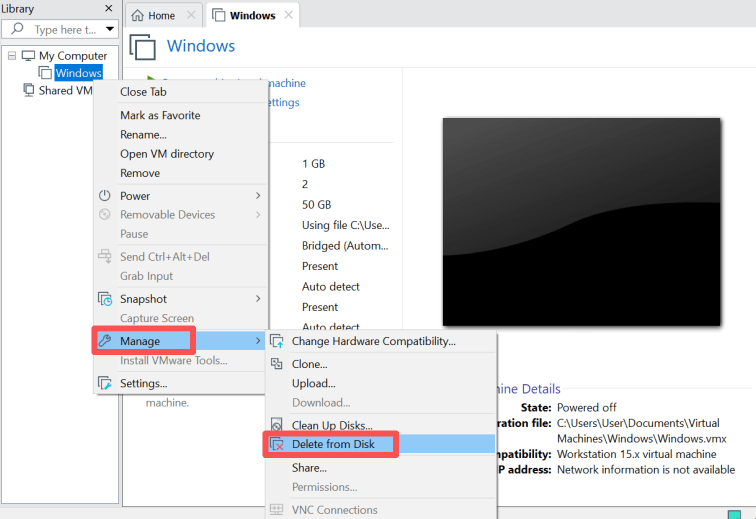
4. Click Yes to confirm. The VM is moved to the Recycle Bin on Windows. Empty the Recycle Bin afterward to fully reclaim disk space.
VMware Fusion (macOS)
1. Open VMware Fusion. From the Virtual Machine Library, right-click the VM you want to remove.
2. Select Delete from the context menu, then confirm.
Method 4. PowerCLI (Scripted/Bulk Deletion)
PowerCLI is VMware’s PowerShell-based automation framework, ideal for deleting multiple VMs, automating cleanup tasks, or integrating deletion into broader orchestration pipelines.
Delete a single VM:
1. Connect to vCenter
Connect-VIServer -Server vcenter.company.local -User admin@vsphere.local -Password 'YourPassword'
2. Power off the VM if running
Stop-VM -VM "OldWebServer01" -Confirm:$false
3. Delete from disk (permanently removes all files)
Remove-VM -VM "OldWebServer01" -DeletePermanently -Confirm:$false
Bulk deletion: remove all VM matching a naming pattern
1. Delete all VMs whose names start with "Test-" (use caution)
Get-VM -Name "Test-*" | ForEach-Object {
    if ($_.PowerState -eq "PoweredOn") {
        Stop-VM -VM $_ -Confirm:$false
    }
    Remove-VM -VM $_ -DeletePermanently -Confirm:$false
    Write-Host "Deleted: $($_.Name)"
}
Cleaning Up Orphaned Files in the Datastore
Sometimes a VM is removed from the vCenter inventory but its files remain in the datastore. This is common after a failed migration, a host disconnection, or when Remove from Inventory was used instead of Delete from Disk. The result: waste storage space that is invisible from the VM list.
Delete orphaned VM folders via vSphere Client:
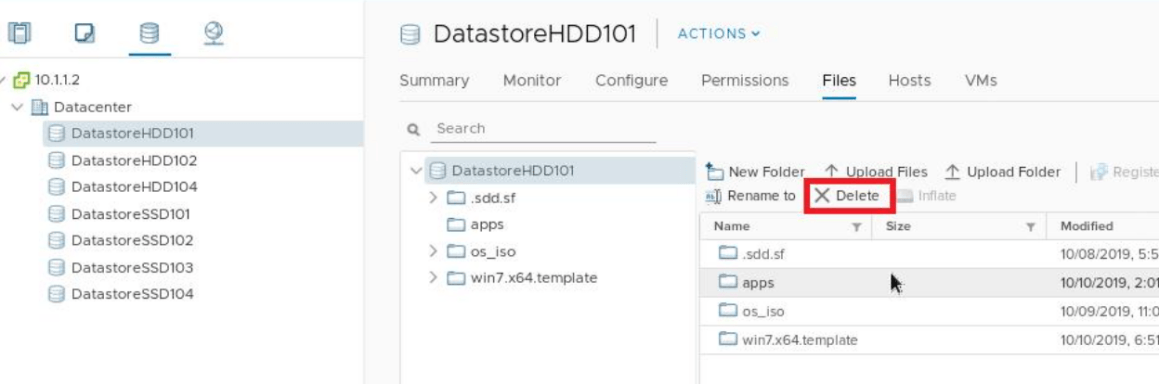
1. In the vSphere Client, go to Storage in the left navigation.
2. Select the datastore where the orphaned VM folder resides.
3. Click Datastore Browser.
4. Locate the VM folder by name. Confirm it corresponds to the decommissioned VM, check the .vmx file for the VM name if unsure.
5. Select the entire VM folder and click Delete.
Protect VMware VMs Before Deletion with Vinchin Backup & Recovery
The single most common regret after deleting a VMware VM is discovering there was no backup.
Vinchin Backup & Recovery provides agentless, image-based backup for VMware environments, enabling administrators to protect entire virtual machines, including operating systems, applications, configuration files, and virtual disks, without disrupting production workloads.
Forever incremental backup with CBT (Changed Block Tracking)
Instant VM Recovery to reduce downtime
Granular file-level recovery
Cross-platform VM migration and restoration
Automated backup scheduling and retention policies
Support for immutable backup storage to strengthen ransomware resilience
Step-by-step to protect VMware VMs:
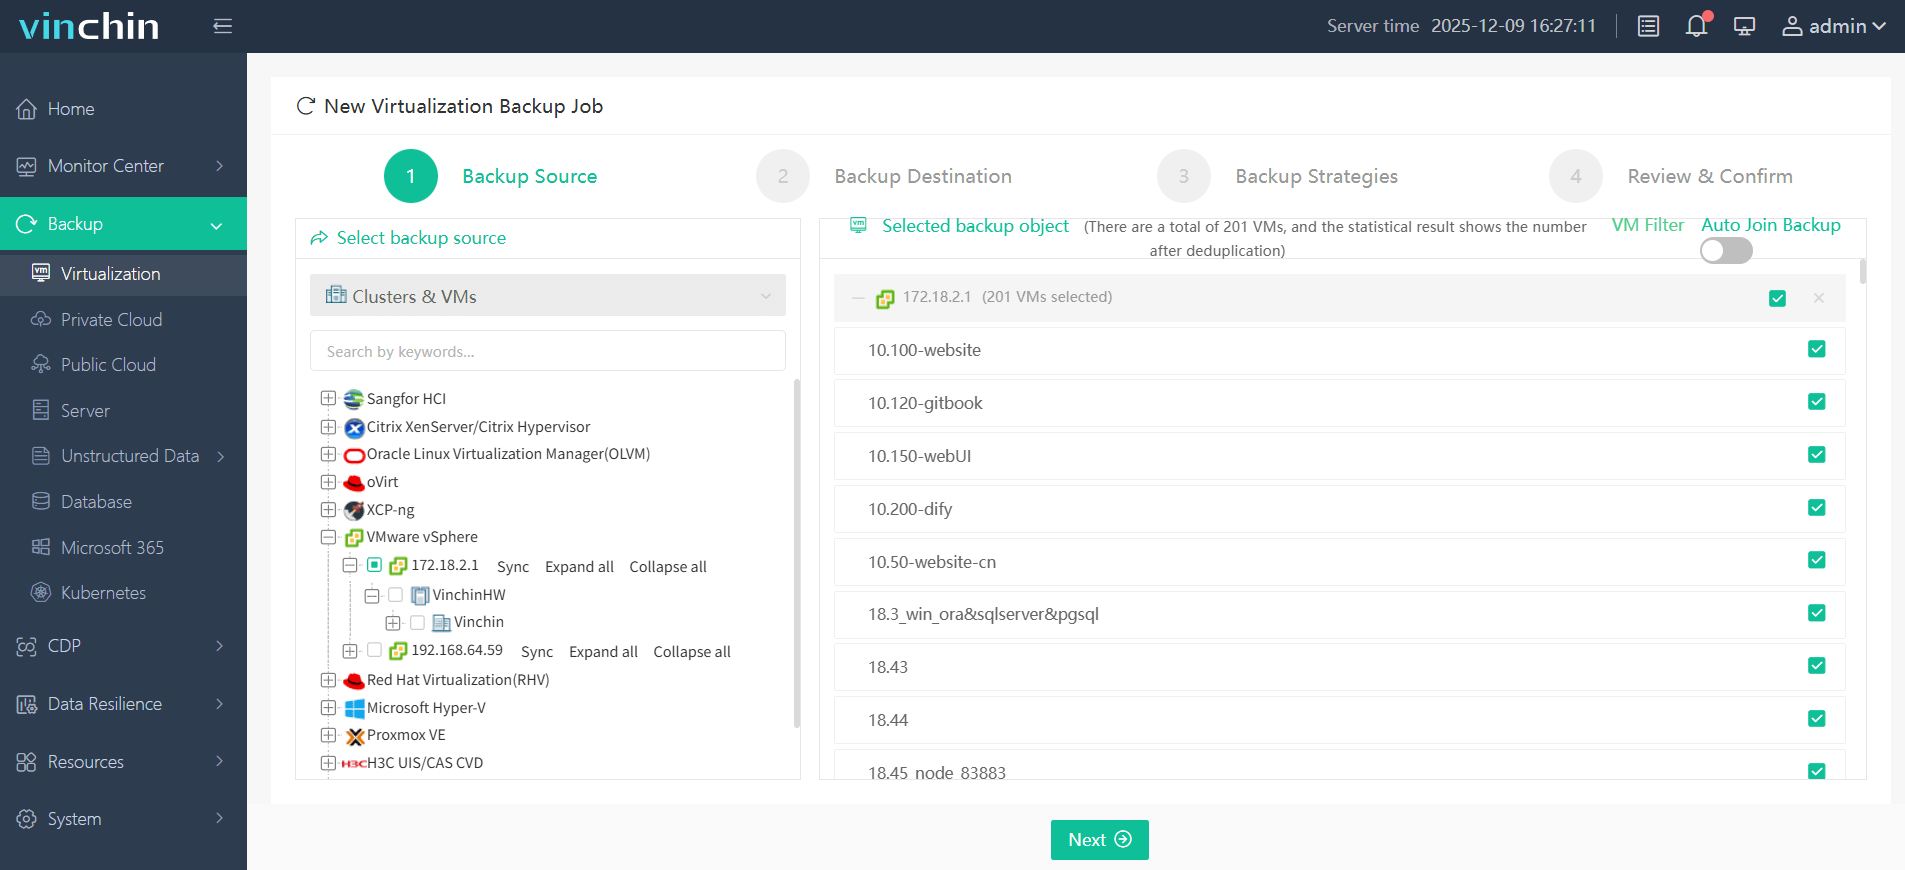
Step 1. Choose your VMware VM to backup under Backup > Virtualization.
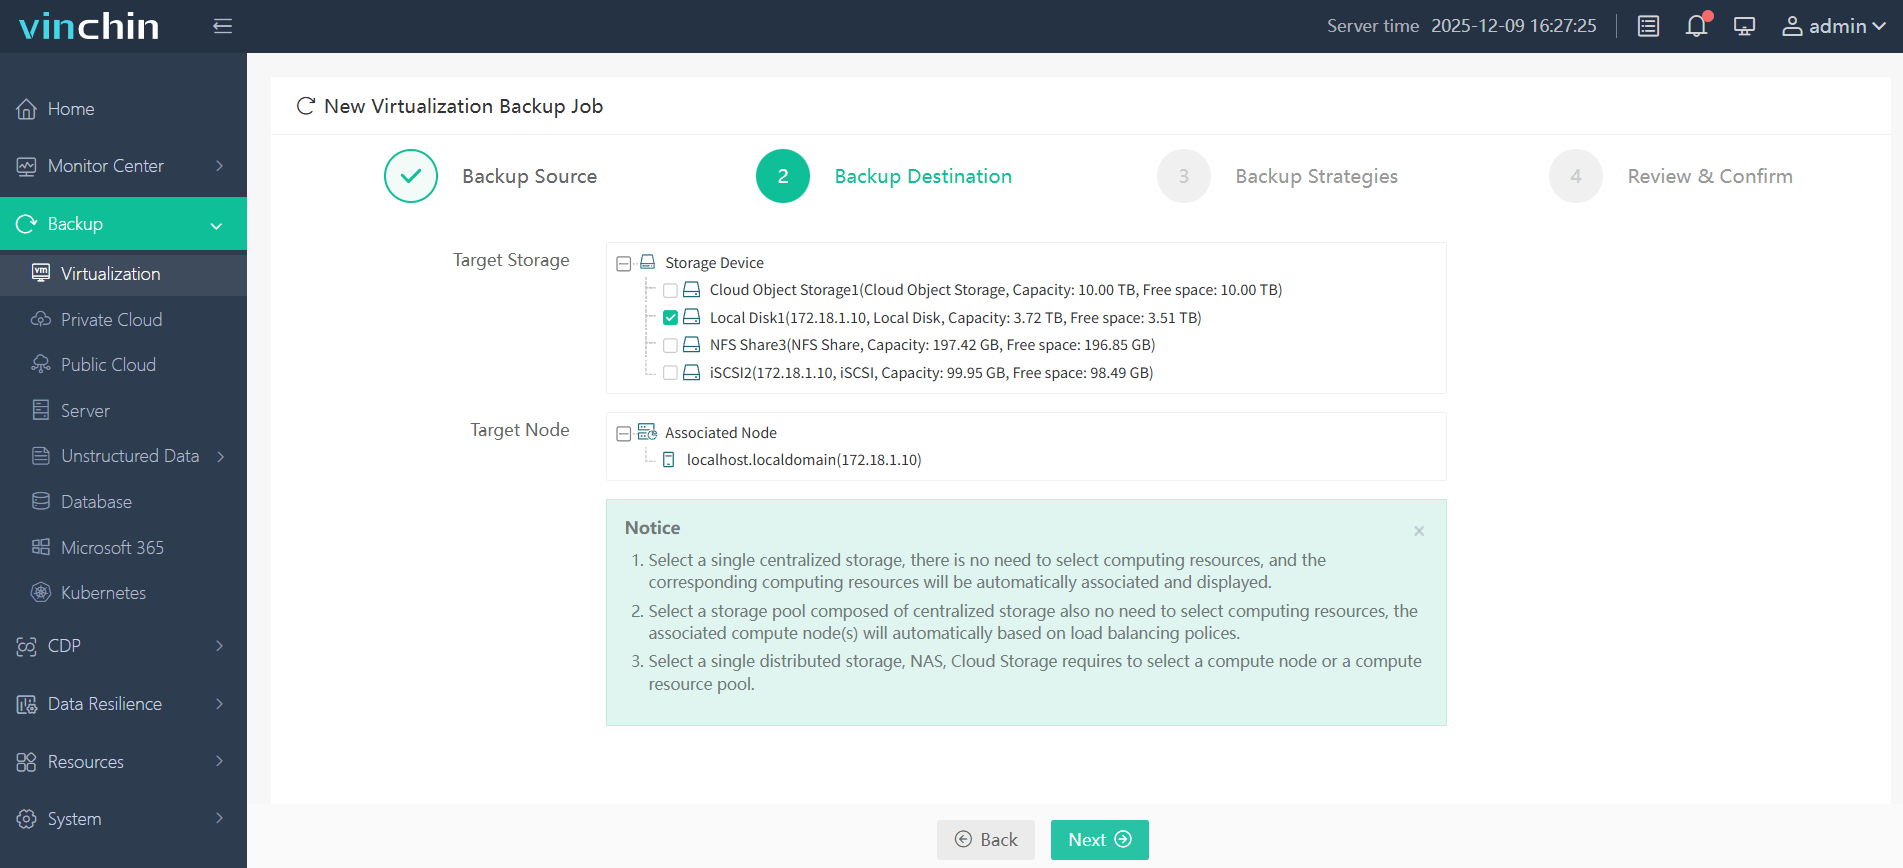
Step 2. Select the backup destination (cloud object storage, local disk, NFS share, and iSCSI).
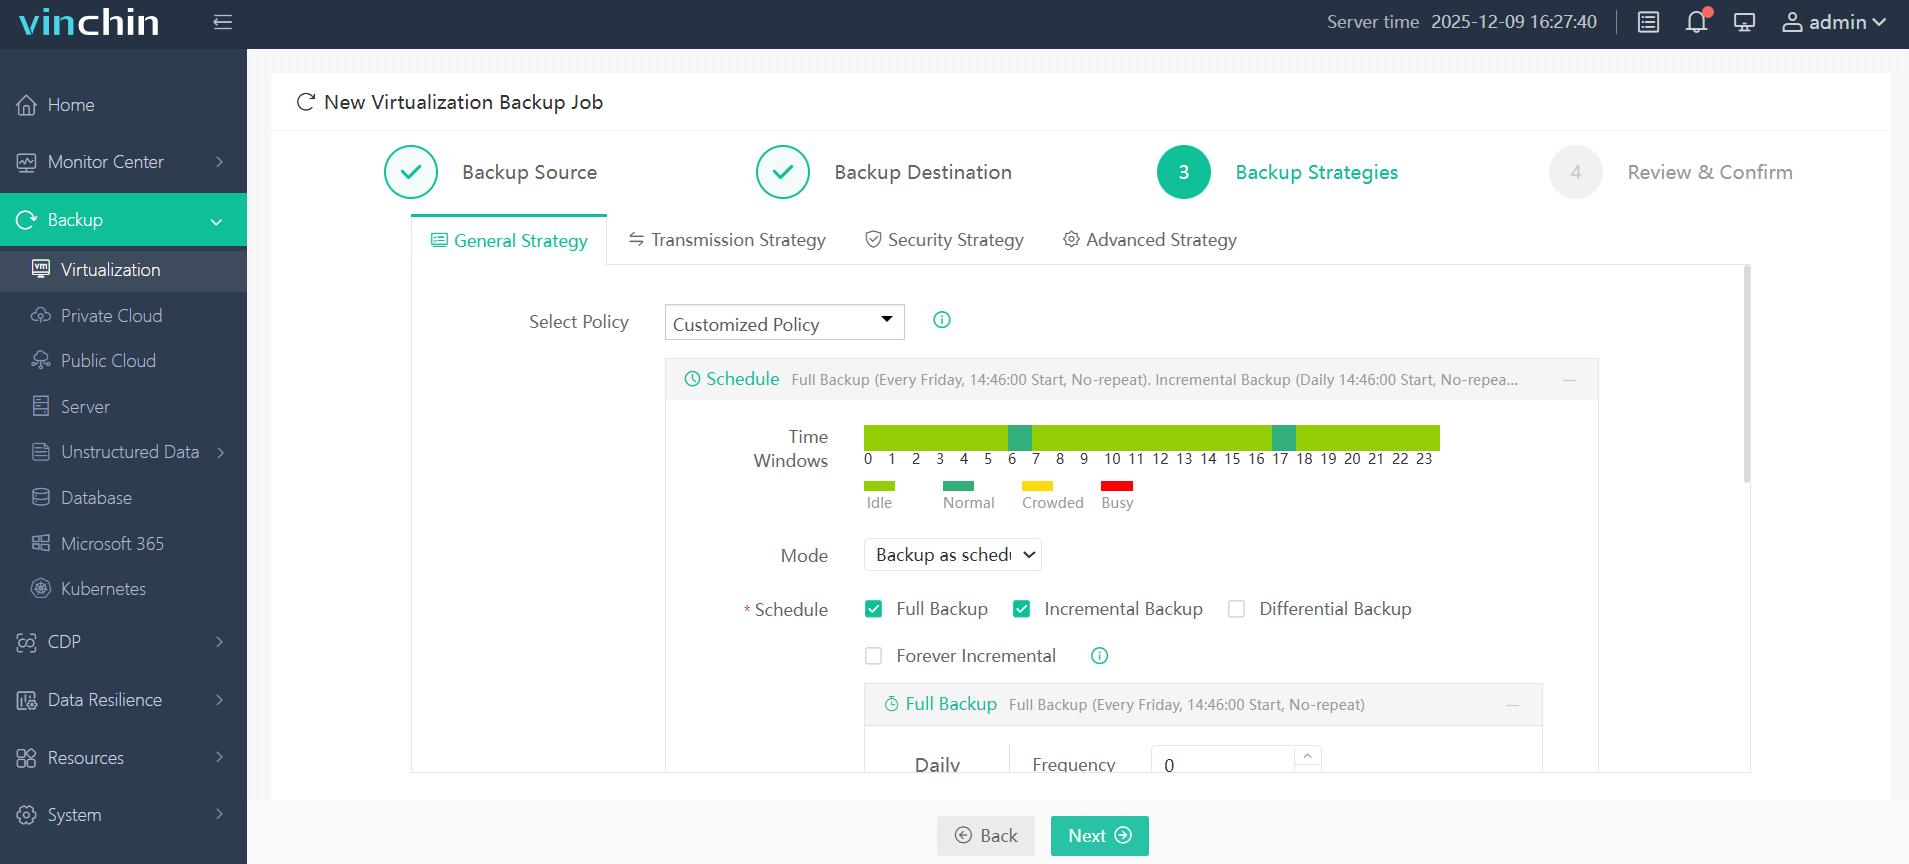
Step 3. Configure backup strategies, like schedule and retention policy.
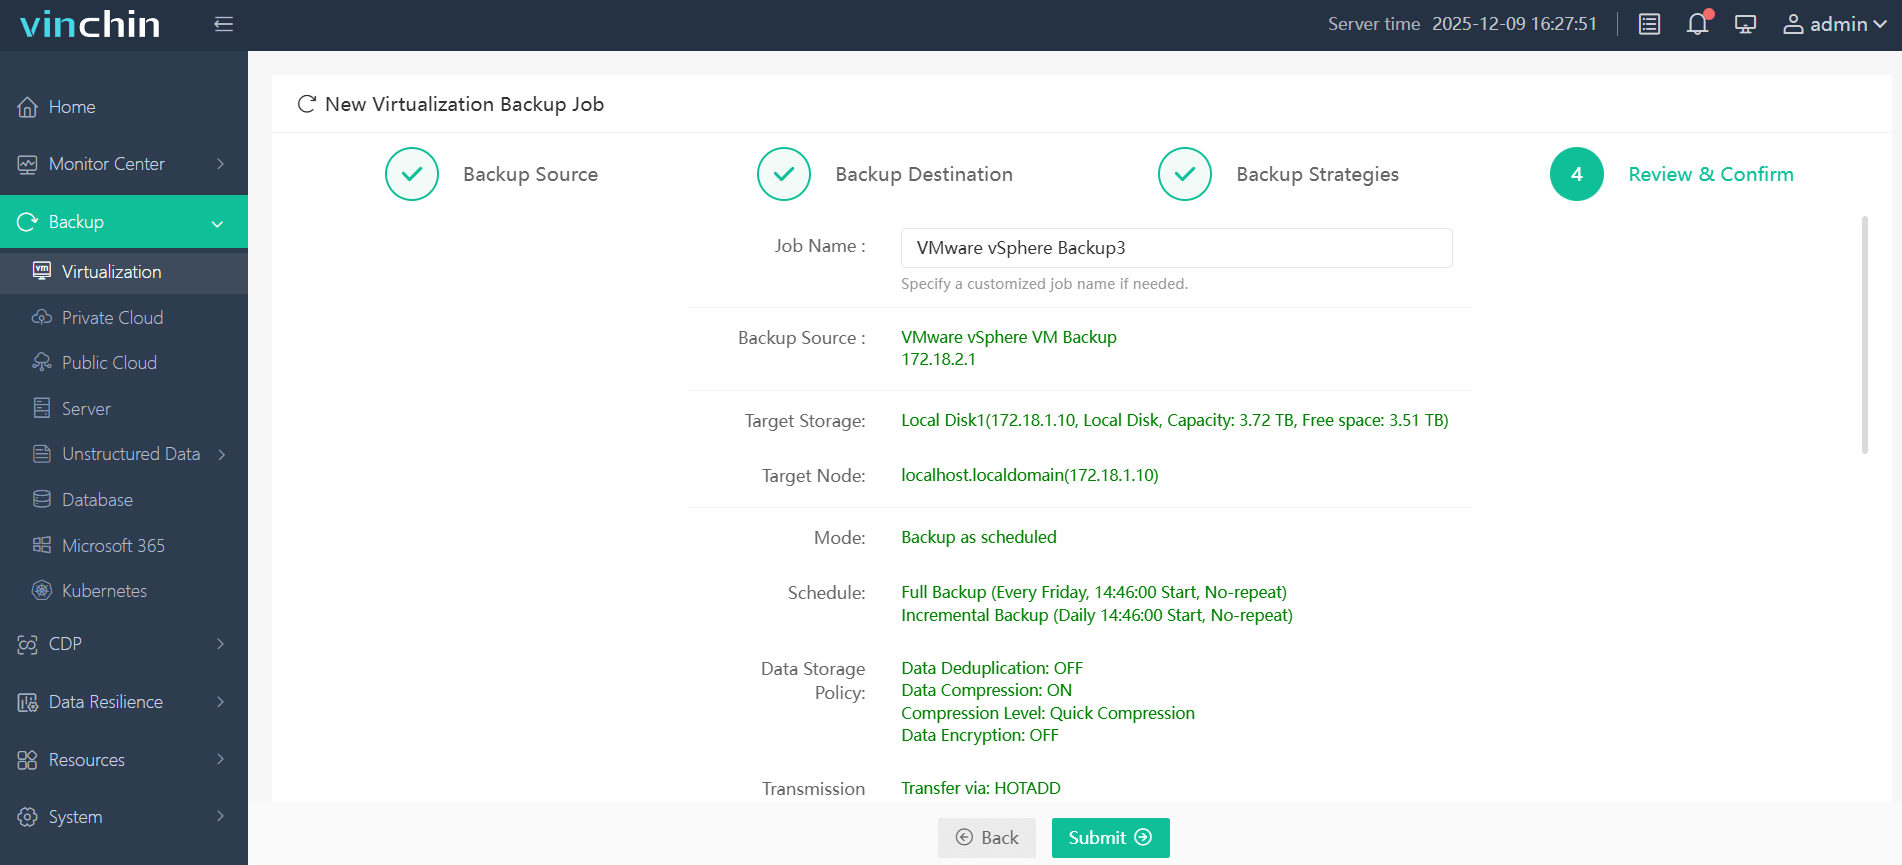
Step 4. Review and confirm the backup setting, then click Submit.
Integrating backup into your VM lifecycle management allows you to safely remove unnecessary virtual machines while keeping critical workloads recoverable. Now, download Vinchin Backup & Recovery to enjoy the full-featured free trial for 60 days!
FAQs
Q1: What files are deleted when I choose Delete from Disk in VMware?
Delete from Disk removes the entire VM folder from the datastore, including: the configuration file (.vmx), virtual disk descriptor and data files (.vmdk, -flat.vmdk), snapshot delta files (-delta.vmdk), snapshot metadata (.vmsd), NVRAM/BIOS file (.nvram), and VMware log files (.log).
Q2: Is it safe to delete a VM if it has snapshots?
Technically, yes, Delete from Disk will remove the VM along with all of its snapshot delta files.
Conclusion
By distinguishing between Remove from Inventory and Delete from Disk, following the appropriate deletion method for your VMware environment, and verifying dependencies beforehand, you can avoid accidental data loss and unnecessary downtime.
Most importantly, always create a reliable backup before deleting production workloads. With Vinchin Backup & Recovery, you can protect VMware VMs, simplify recovery, and confidently manage your virtual infrastructure throughout its lifecycle.