VirtualBox vs VMware: Key Differences
Why migrate VirtualBox to VMware? See the following table you will get the answer.
Feature | VirtualBox | VMware |
Vendor | Oracle | VMware by Broadcom |
Primary Use | Desktop/Test Labs | Enterprise Virtualization |
Hypervisor Type | Type-2 | Type-1 &Type-2 |
Enterprise Features | Limited | Extensive |
vCenter Integration | No | Yes |
HA & DRS | No | Yes |
Commercial Support | Limited | Enterprise-grade |
Performance | Moderate | Advanced |
So, migrate VirtualBox to VMware can enjoy more advanced enterprise and have better performance optimization.
Preparation for VirtualBox to VMware
Before starting the migration process, verify the following.
1. Backup the Original VM
Always create a full backup of the VirtualBox VM files before conversion.
Important VM files include: .vdi, .vmdk, .vbox, and snapshots
2. Remove Unnecessary Virtual Hardware
Inside VirtualBox:
Remove unused USB controllers
Remove unnecessary ISO mounts
Disconnect unsupported devices
This can reduce hardware compatibility problems after migration.
3. Clean Up the Guest OS
Inside the guest operating system:
This helps prevent driver conflicts after moving to VMware.
Method 1. Export VirtualBox VM as OVA/OVF (Simplest)
Step 1. Export Appliance from VirtualBox
1. In Oracle VirtualBox, open VirtualBox and select the VM
2. Click File > Export Appliance
3. Choose the store location and OVA format, then click Next

4. Click Export to begin the process

Step 2. Import into VMware
For VMware Workstation:
1. Open VMware Workstation, click File > Open

2. Select the .ova file, and complete the popup windows
3. After finishing, click Import

For VMware ESXi/vSphere:
1. Open vSphere Client, select Deploy OVF Template

2. Upload the OVA file
3. Configure storage and networking
Method 2. Convert VirtualBox Disk to VMware VMDK (Great Flexibility)
Step 1. Locate the VirtualBox Disk
Common VirtualBox disk formats include: VDI, VMDK, and VHD
Step 2. Convert VDI to VMDK
Use the VirtualBox command:
VBoxManage clonemedium disk source.vdi target.vmdk --format VMDK
Older VirtualBox versions may use:
VBoxManage clonehd source.vdi target.vmdk --format VMDK
Step 3. Create a New VMware VM
1. In VMware, create a new VM
2. Select the Use an existing virtual disk

3. Attach the converted VMDK
4. Configure CPU, RAM, and network settings
Step 4. Install VMware Tools
1. After booting successfully, install VMware Tools
2. Reboot the guest OS
Method 3. Use VMware vCenter Converter to Convert VirtualBox to VMware
Although VMware Converter has had changing support availability over the years, many administrators still use compatible releases in lab or legacy migration environments.
Step 1. Prepare the VirtualBox VM
Before conversion, clean up the VM to avoid driver and boot issues.
1. Uninstall VirtualBox Guest Additions
For Windows:
Control Panel → Programs → Uninstall VirtualBox Guest Additions
For Linux:
sudo /opt/VBoxGuestAdditions*/uninstall.sh
2. Remove Unnecessary Snapshots
In VirtualBox, select the VM and delete unnecessary snapshots
3. Verify Disk Space
For Windows:
chkdsk /f
For Linux:
Fsck
Step 2. Launch VMware vCenter Converter
In VMware vCenter Converter, click Convert Machine

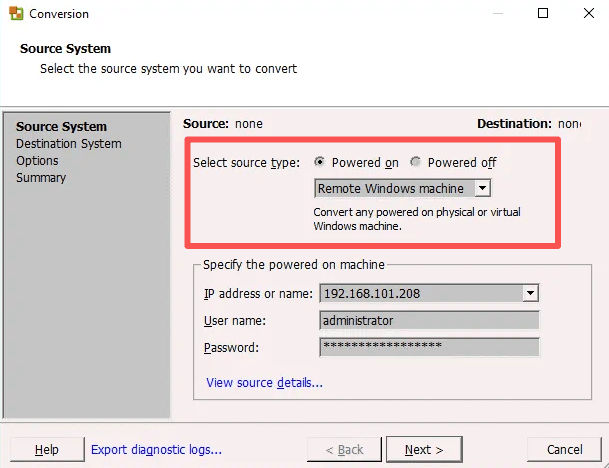
Step 3. Select the Source Machine
1. Select Power on as the source type, and you choose This local machine, Remote Windows machine, or Remote Linux machine
2. Provide the IP address or name, Username, and Password
Step 4. Select Destination Machine
1. Choose the destination type, VMware Infrastructure virtual machine or VMware Workstation or other VMware virtual machine
2. Provide the Server, User name, and Password
Step 5. Configure VM Options
Configure CPU & Memory, disk provisioning, and network configuration
Step 6. Start the Conversion
Click Finish to run the job
Further Action: Backup VMware VMs after Migration
After successfully migrating to VMware, implement a proper backup strategy immediately.
Enterprise VMware environments often require:
Vinchin Backup & Recovery not only can provide the above features, but also have more features in VMware environments.
Reduce Backup Storage Costs: VM backups consume huge amounts of storage, especially in large clusters. Vinchin can solve it by using deduplication, compression, and forever incremental backup.
Ransomware Protection: Ransomware attacks increasingly target backup repositories, without immutable or isolated backups, recovery may become impossible. With Vinchin, you can use immutable backup storage, backup encryption, malware scanning, and offsite backup copy to against ransomware.
Simple steps to protect VMware VMs:
Step 1. Under Backup > Virtualization, choose the VMware VM you want to backup

Step 2. In Backup Destination tab, choose Target Storage and Target Node

Step 3. In Backup Strategies tab, choose Time Windows and Mode

Step 4. Confirm all your backup settings, then click Submit to start the backup

Download Vinchin Backup & Recovery now to get the full featured 60-day free trial!
FAQs about Converting VirtualBox to VMware
Q1: Why does my VMware VM show "Operating System Not Found" after migration?
This usually happens because:
The boot order is incorrect
The bootloader is missing
The disk controller changed during migration
EFI/BIOS settings do not match the original VM
Try:
Switching SATA/SCSI controller types
Rebuilding the bootloader
Verifying the active boot partition
Q2: Does VMware automatically optimize hardware settings after migration?
Not completely. After migration, administrators should still manually review: vCPU allocation, RAM sizing, network adapter type, storage controller type, and thin/thick provisioning.
Conclusion
Migrating VirtualBox to VMware is a common modernization step for organizations seeking better scalability, enterprise management, and production-grade virtualization capabilities.
For smaller workloads, OVA export is often sufficient. For complex enterprise workloads, VMDK conversion or advanced migration utilities provide greater control and flexibility. What's more, for VMware environments security, try Vinchin Backup & Recovery to backup VMware VMs!


