As environments scale, administrators often need to move virtual machines across hosts or clusters to balance resources and optimize performance. However, traditional manual migration requires human effort and incurs high time costs, which is why automated VM migration was introduced. In this post, we’ll elaborate on four methods to migrate VMs automatically in Proxmox: CLI commands, API, Proxmox HA, and an easier backup and restore solution.
Prerequisites of Proxmox Auto Migrating VMs
Before performing VM migration in a Proxmox environment, it’s essential to ensure that the underlying infrastructure is properly prepared to avoid failures or performance issues.
1. Configure shared storage
Shared storage such as NFS, iSCSI, or Ceph ensures VM disks are accessible across all nodes, enabling seamless migration without data relocation.
2. Verify cluster health
Ensure the Proxmox cluster is in quorum, and all nodes are online to avoid migration failures or inconsistent states.
3. Check network connectivity
Stable and low-latency network links between nodes are required, as migration performance depends heavily on bandwidth and packet stability.
4. Review VM compatibility
Verify CPU type, hardware settings, and device configurations are compatible across nodes to ensure the VM can run properly after migration.
Method 1: Automate Proxmox VM Migration Using CLI Commands
Proxmox provides native CLI tools that allow automatic VM migration across cluster nodes, making it suitable for batch operations and scheduled maintenance tasks.
Step 1. Identify the VM to migrate
Before starting, list available VMs and confirm the VM ID you want to migrate.
Step 2. Perform a basic VM migration
Use the qm migrate command to move a VM to the target node.
qm migrate 101 node2
For live migration, you can add the --online flag:
qm migrate 101 node2 --online
Step 3. Batch migrate multiple VMs
Use a shell script to automate migration for multiple VM IDs.
#!/bin/bash

TARGET_NODE="node2"
VM_LIST="101 102 103 104"

for VMID in $VM_LIST; do
  echo "Migrating VM $VMID to $TARGET_NODE..."
  qm migrate $VMID $TARGET_NODE --online
done
Step 4. Schedule migrations using cron
To automate migrations during off-peak hours, you can schedule scripts using cron.
Example: run migration at 2 PM daily:
0 2 * * * /root/migrate_vms.sh
Method 2: Proxmox Auto Migrate VM via API
Proxmox REST API allows administrators to automate VM migration by sending HTTP requests to the cluster management interface.
Step 1. Create an API token for authentication
First, generate an API token in Proxmox to enable secure access for automation scripts.
pveum user token add root@pam automation-token
Step 2: Prepare API request headers
Use the generated token to authenticate API calls via request headers.
Authorization: PVEAPIToken=root@pam!automation-token=YOUR_SECRET
Step 3. Trigger VM migration request
Send a POST request to the migration endpoint to start moving a VM to the target node.
curl -k -X POST \
"https://proxmox-host:8006/api2/json/nodes/node1/qemu/101/migrate" \
-H "Authorization: PVEAPIToken=root@pam!automation-token=YOUR_SECRET" \
-d "target=node2" \
-d "online=1"
Step 4. Capture migration task ID (UPID)
Once the request is accepted, Proxmox returns a task ID that can be used for tracking.
Step 5. Monitor the migration process
Query the task status using the returned UPID until completion.
curl -k \
"https://proxmox-host:8006/api2/json/nodes/node1/tasks/UPID:xxx/status" \
-H "Authorization: PVEAPIToken=root@pam!automation-token=YOUR_SECRET"
Method 3: Automate VM Migration Using Proxmox HA
For environments that require high availability, Proxmox HA (High Availability) can automatically recover workloads when a node becomes unavailable. By placing VMs under HA management, administrators can reduce manual intervention and improve service continuity.
Step 1. Verify HA prerequisites
Before configuring HA, ensure that your Proxmox cluster has quorum and shared storage accessible by all participating nodes.
pvecm status
Step 2. Create an HA group
HA groups define which nodes are eligible to run protected VMs. You can create a group and assign cluster nodes to it.
ha-manager groupadd production --nodes node1,node2,node3
Step 3. Add the VM to HA management
Register the VM as an HA resource so that Proxmox can automatically manage its availability.
ha-manager add vm:101 --group production
Step 4. Verify HA resources status
Check whether the VM has been successfully added and is being monitored by the HA manager.
ha-manager status
Example output:
vm:101 started node1
Step 5. Test automatic failover
If the current node becomes unavailable, the HA manager will detect the failure and restart the VM on another eligible node within the configured HA group. You can validate the configuration by simulating a node outage in a test environment and monitoring the failover process.
Method 4: Migrate Proxmox VMs Automatically with Vinchin Backup & Recovery
While Proxmox CLI commands, REST APIs, and HA features can automate certain migration tasks, they often require cluster dependencies, scripting knowledge, or manual planning. Vinchin Backup & Recovery provides a backup-based migration approach that simplifies VM relocation through automated backup, scheduling, and recovery workflows. It is particularly suitable for cross-cluster migrations, storage migrations, and environments where rollback capability is a priority.
With Vinchin’s intuitive web console and automated workflows, it’s easy and fast to automate Proxmox VM migration:
1. First, you need to create a backup of the source Proxmox VM and then restore the backup data to the target host.
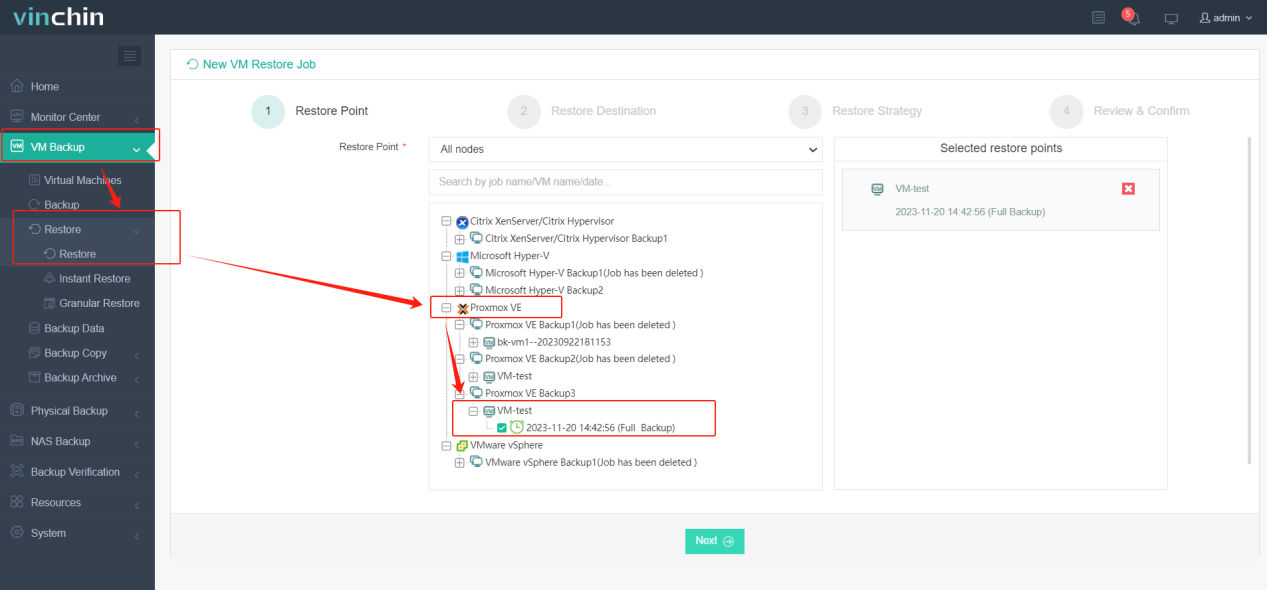
2. Go to VM Backup > Restore, select the Proxmox backup storage you created as the restore point.
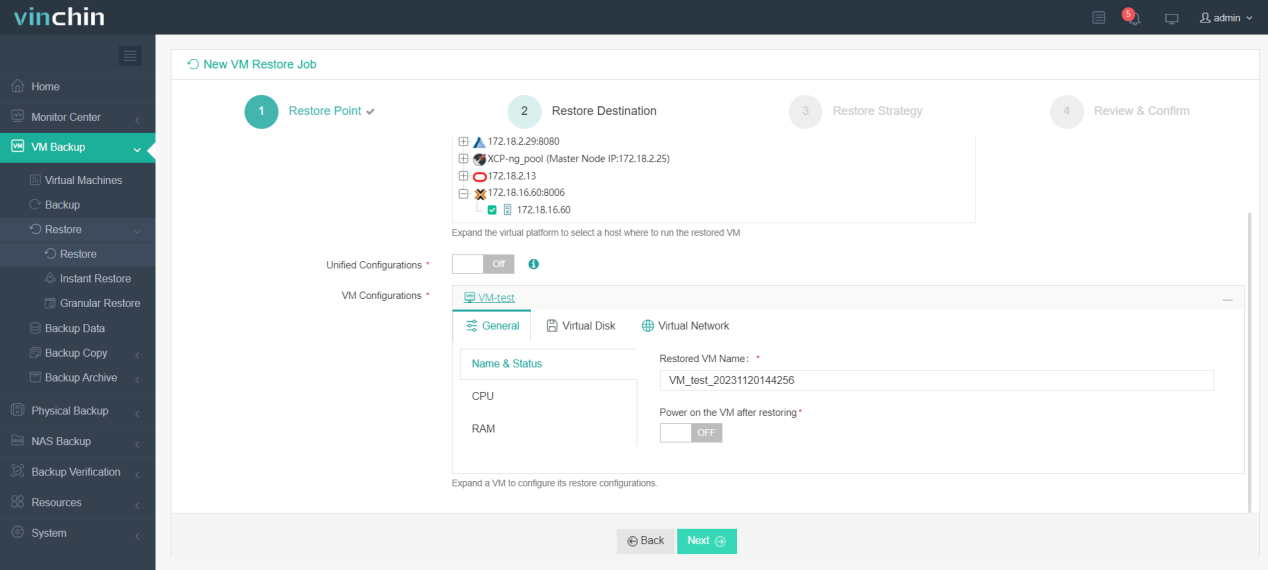
3. Configure restore destinations by choosing the target node and storage device.
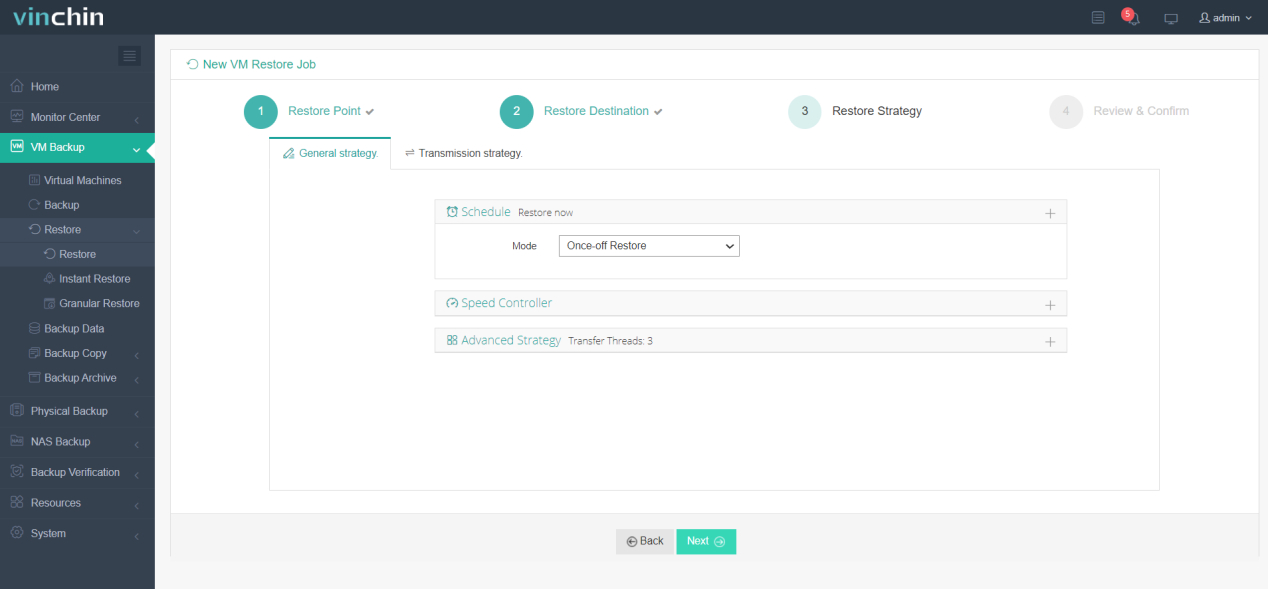
4. Customize restore strategies; either run the migration now or schedule it following specific time plans.
5. Name the job, check the settings, and click Submit to initiate the job. 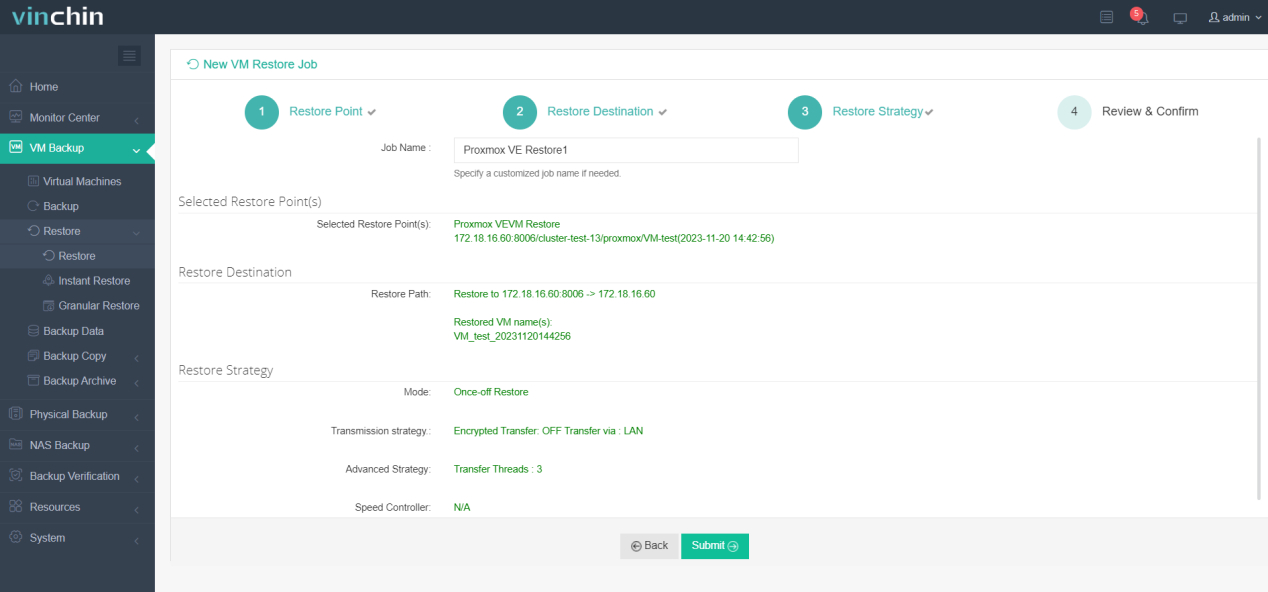
Vinchin Backup & Recovery has been welcomed by thousands of organizations globally due to its reliable and secure data protection and disaster recovery capabilities. It offers a 60-day free trial with full features accessible to all users; click the Download button to give it a try.
Bonus Tips for a Successful Proxmox VM Auto Migration
The following tips can help reduce risks and improve migration success rates.
Test Before Production
Always perform migration tests in a staging or non-production environment before moving critical workloads. This helps identify potential compatibility issues, performance bottlenecks, or configuration errors early.
Automate Validation Checks
After migration, automate basic validation tasks such as VM boot status, network connectivity, and service availability to ensure workloads are functioning as expected without manual inspection.
Keep Reliable Backups
Maintain up-to-date backups before any migration activity. This ensures you can quickly roll back in case of failure, data corruption, or unexpected behavior during the migration process.
Monitor Migration Tasks
Continuously monitor migration progress and system logs to detect issues early. Proper monitoring helps identify failed tasks, performance degradation, or network-related problems in real time.
Proxmox Auto Migrate VM FAQs
Q1: Does Proxmox support automatic VM migration?
Yes. Proxmox supports automatic workload relocation through HA (High Availability). When a node fails, HA can automatically restart VMs on another available node. However, this is failover-based rather than live migration.
Q2: Can Proxmox automatically balance VM workloads across nodes?
Not natively in a fully automated manner. Load balancing often requires manual migration, scripts, or external orchestration tools to redistribute VMs based on resource usage.
Q3: Can Proxmox migrate VMs automatically without shared storage?
Yes, but it depends on the method. Without shared storage, migration will involve copying disk data, which increases migration time and network load. Backup-based migration or storage replication is often used in such cases.
Sum Up
Automatic Proxmox VM migration helps balance workloads, optimize resource utilization, and reduce manual administrative effort. This article introduced four practical approaches: CLI commands, REST API, Proxmox HA, and Vinchin Backup & Recovery. The first three methods are more suitable for administrators with scripting or system-level experience, while Vinchin is better suited for large-scale enterprise environments and cross-cluster workload migration scenarios.