Why Migrate VMs Between vCenter Servers?
Organizations migrate VMs between vCenters when VMware environments change, but workloads must stay available. Common reasons for cross vCenter migration include:
Move VMs to new hosts, storage, and networks during a data center move or hardware renewal.
Transfer VMs for host upgrades, storage replacement, cluster redesign, or architecture optimization.
Centralize VMs from multiple vCenters after mergers, expansion, or infrastructure growth to simplify management.
Move VMs to isolate production and test workloads, separate business units, or meet security requirements.
If you are planning a cross vCenter migration for similar scenarios, the following guide will walk you through the key preparation steps and migration methods to help ensure a smooth and reliable VM transfer.
Preparation before Cross vCenter Migration
Before cross vCenter migration, verify both source and target environments to reduce failed tasks, downtime, and post-migration issues:
Check vCenter, ESXi, VM hardware, and VMware Tools compatibility.
Confirm management, vMotion, VM, and storage network connectivity.
Ensure target hosts and datastores have enough CPU, memory, and storage.
Verify permissions, folders, clusters, port groups, and datastore mappings.
Create a recent backup or rollback point.
Record IP, DNS, VLAN, firewall, and application dependencies.
3 Methods to Migrate VMs Between vCenters
There are three ways to migrate VMs between vCenters, and the best choice depends on your VMware version, network conditions, downtime tolerance, VM size, and migration scale. Use the comparison below to choose a suitable option quickly.
Method 1: Cross vCenter vMotion
Cross vCenter vMotion allows you to migrate a running VM from one vCenter Server to another with little or no service interruption, as long as the required compatibility, network, and licensing conditions are met.
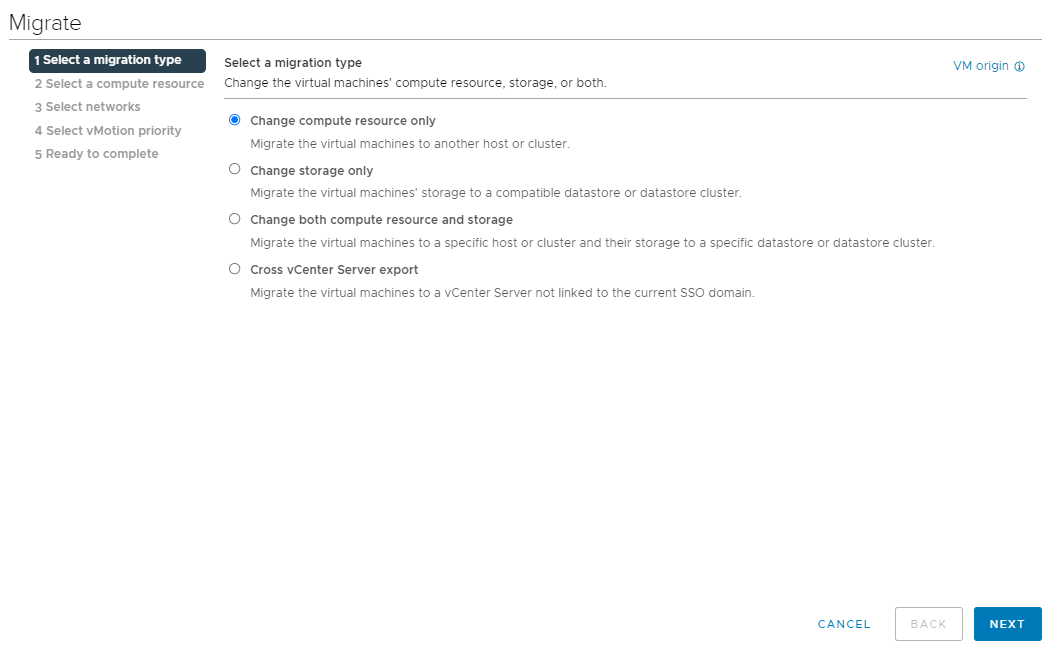
Step 1: Open VMware vSphere client, right click the virtual machine you want to migrate and then, select Change computer resource only.
Step 2: Select the server you want to migrate the virtual machine to and click Next.
Step 3: Select network if you have created a vSphere distributed switch and port group. If not, just click Next to skip this step.
Step 4: Review your migration job and click Finish. Virtual machine would be migrated in a while.
Best for: Production VMs that require hot migration and minimal downtime.
Pros: Minimal service interruption; no need to export and re-import VM files; suitable for live workloads.
Cons: Requires strict cross vCenter vMotion requirements, including compatible versions, available vMotion network, proper permissions, and sufficient bandwidth.
Method 2: Export and Import VMs Using OVF or OVA
OVF or OVA export is a simple way to move VMs from one vCenter to another when live migration is not required. It is often used for small workloads, test environments, or one-time migrations.
Step 1: Shut down the source VM to keep the exported VM data consistent.
Step 2: In the source vCenter, select the VM and export it as an OVF or OVA template.
Step 3: Download the exported files to a local machine or accessible storage location.
Step 4: Log in to the target vCenter and choose Deploy OVF Template.
Step 5: Upload the OVF or OVA file, then select the target host, datastore, disk format, and network mapping.
Step 6: Finish the deployment, power on the VM.
Best for: Small-scale VM migration, lab environments, or cases where downtime is acceptable.
Pros: Easy to use; does not require vMotion network configuration; suitable for isolated environments.
Cons: Requires VM downtime; large VMs may take a long time to export and import; manual network and application checks are still needed.
Method 3: Use Vinchin Backup & Recovery to Migrate VMs
In addition to VMware native migration methods, organizations can also use third-party VM migration software for more flexible migration scenarios, such as cross-network transfers, batch VM migrations, or moves between different infrastructures.
Vinchin Backup & Recovery provides this capability by migrating VMs between vCenters through backup and restore. It is especially useful when vMotion is unavailable, the source and target environments are isolated, or multiple VMs need to be transferred efficiently.
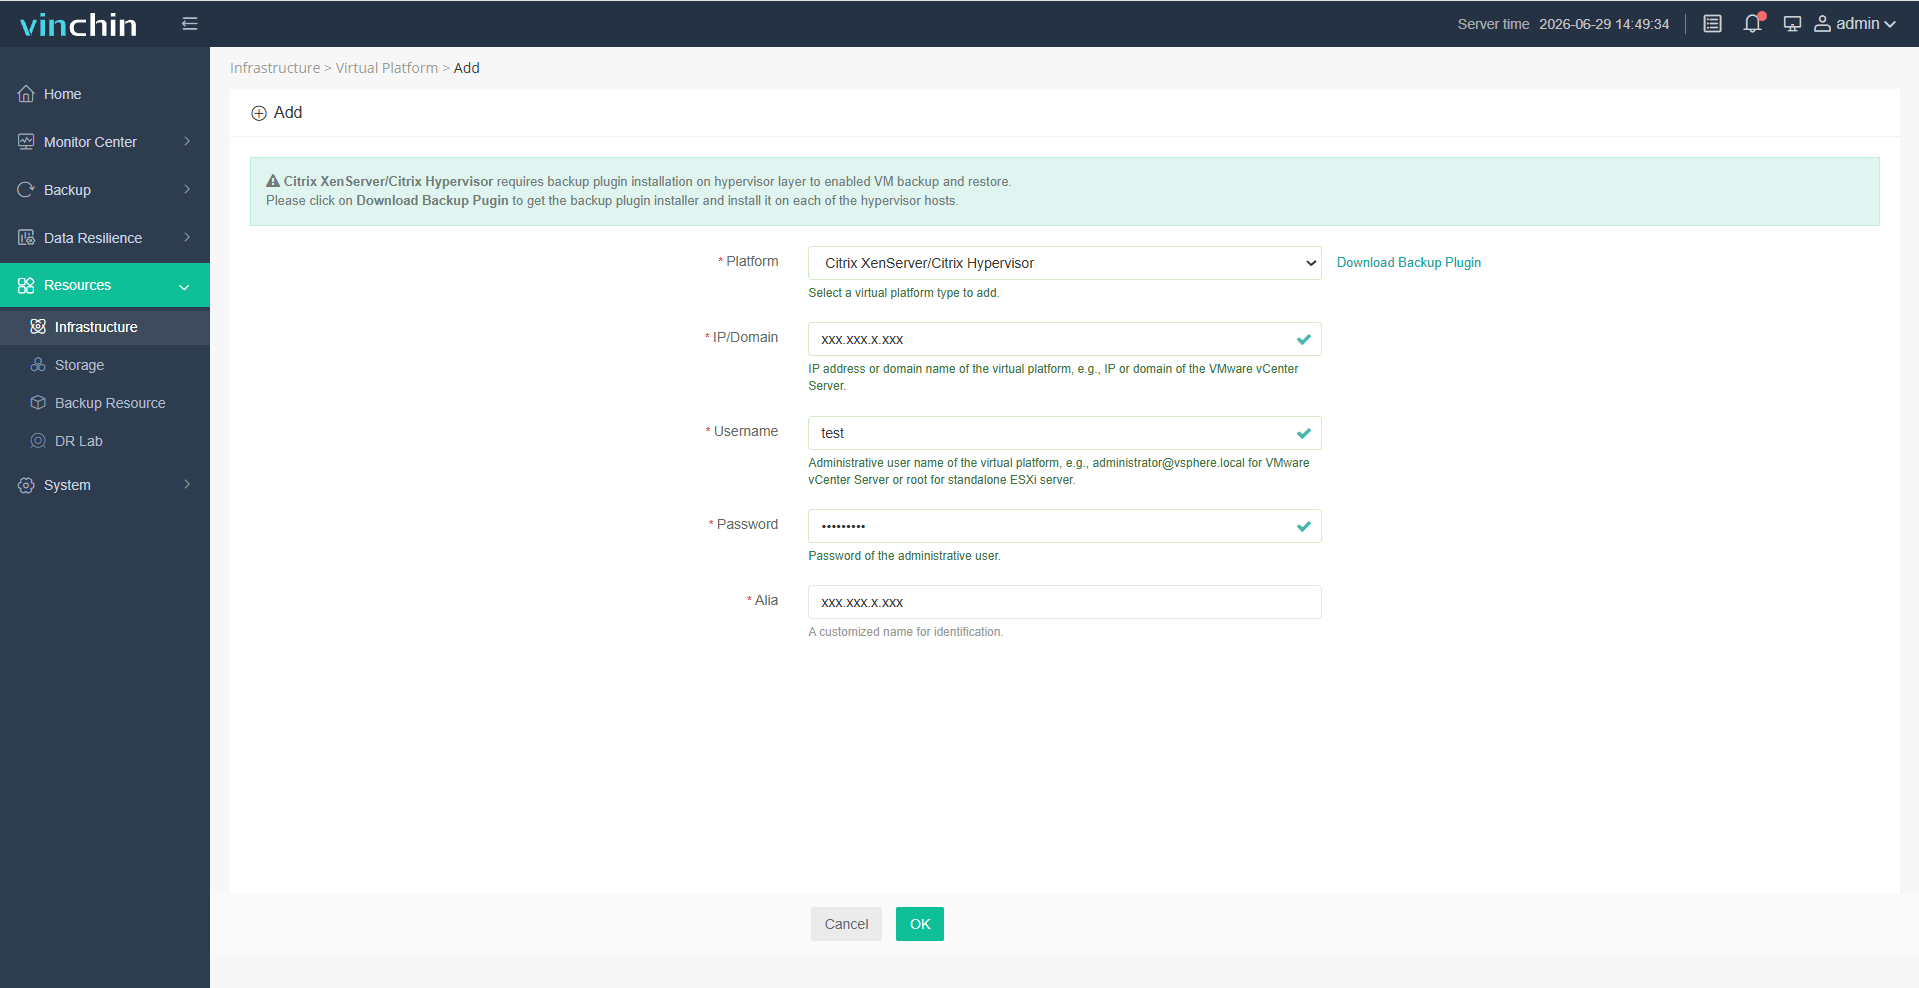
Step1: Click Resources > Infrastructure > Virtual Platform, then add both source and target VMware vSphere.
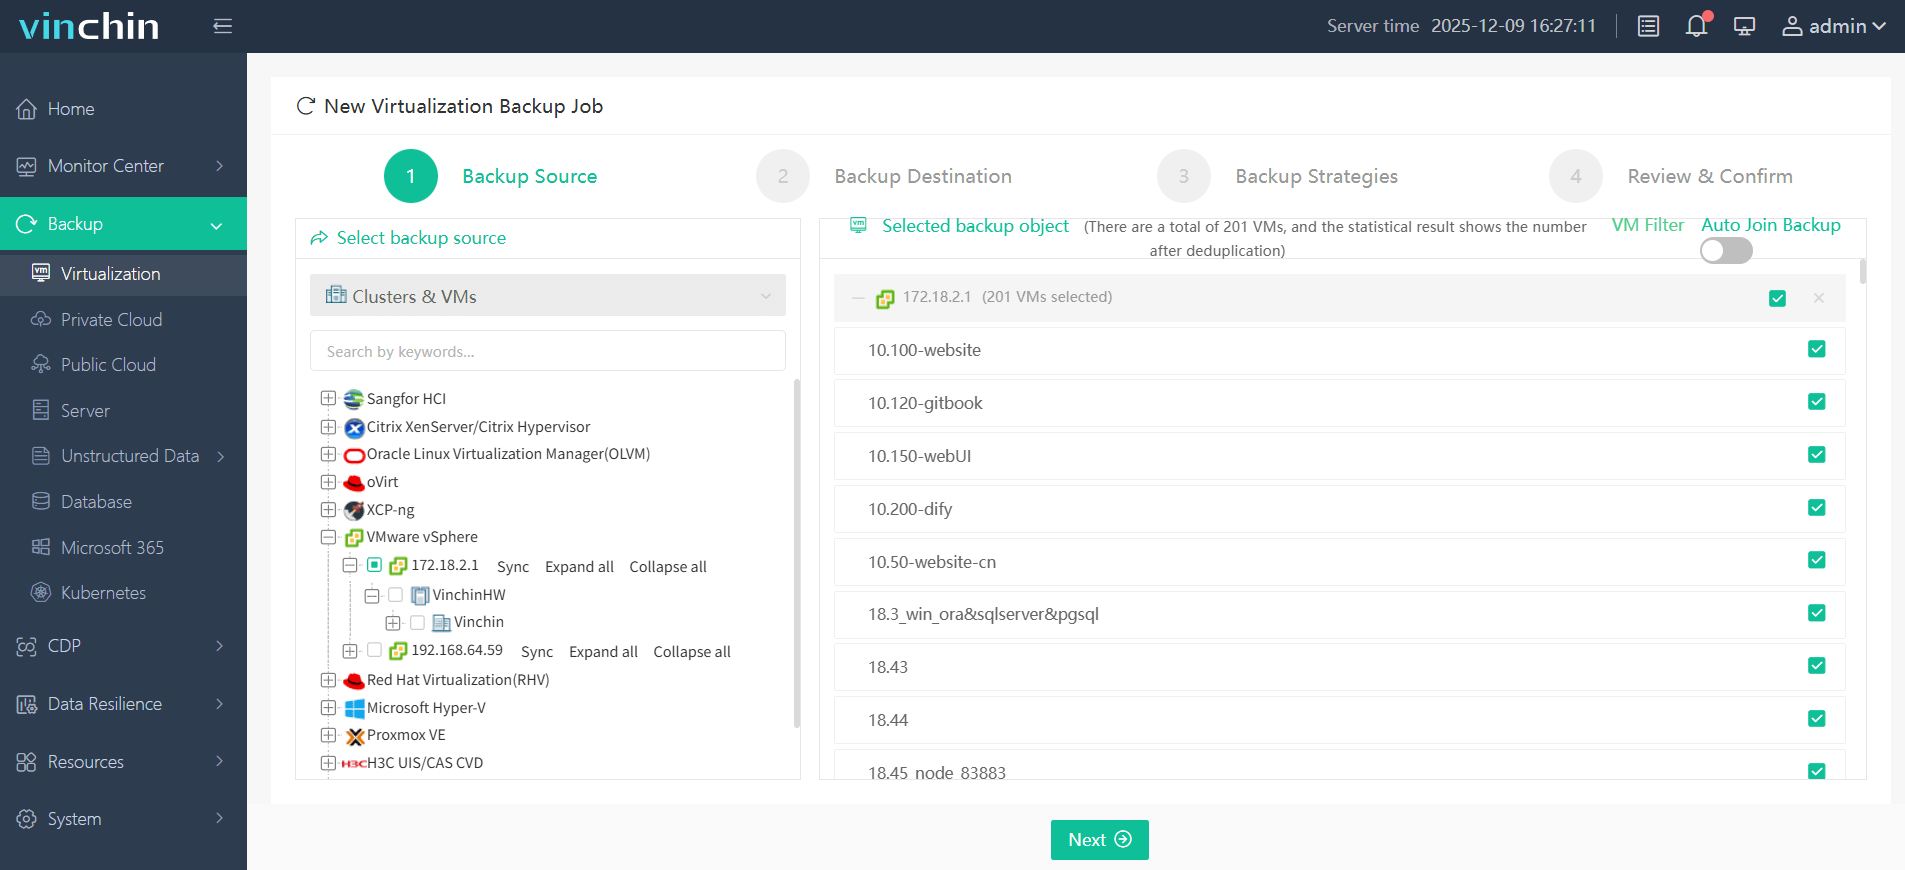
Step2: Go to Backup > Virtualization, select the source VMs, and create a backup task.
Step3: Once the backup task completes, go to Data Resilience > Restore and choose the restore point you created just now.
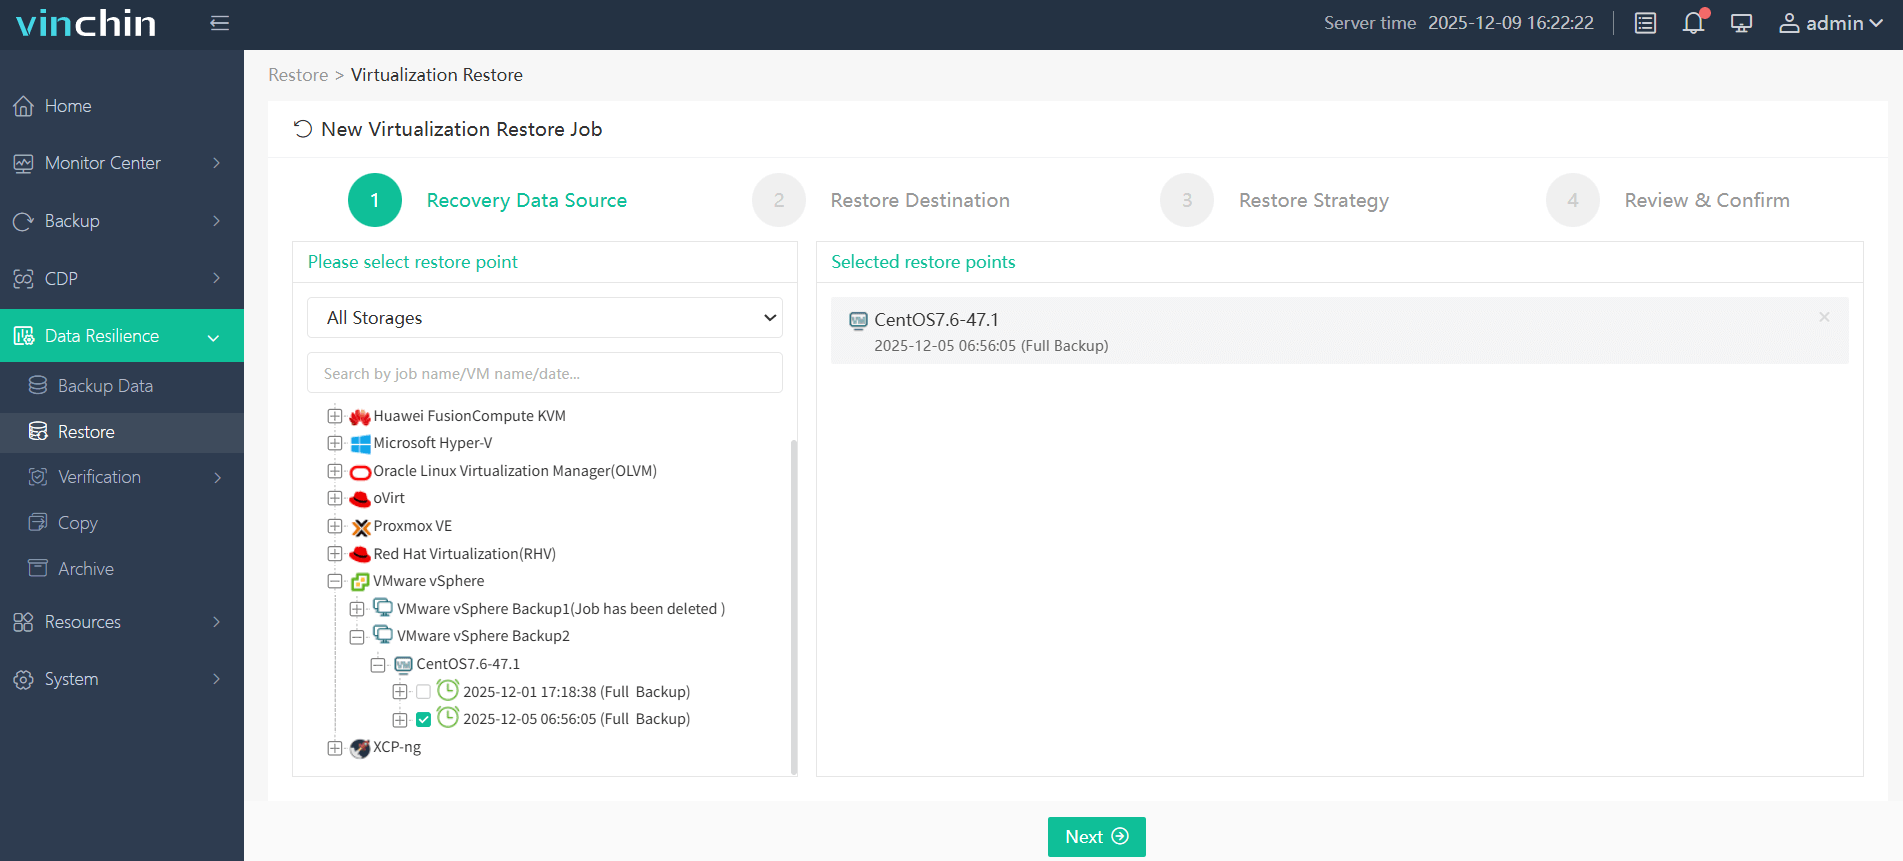
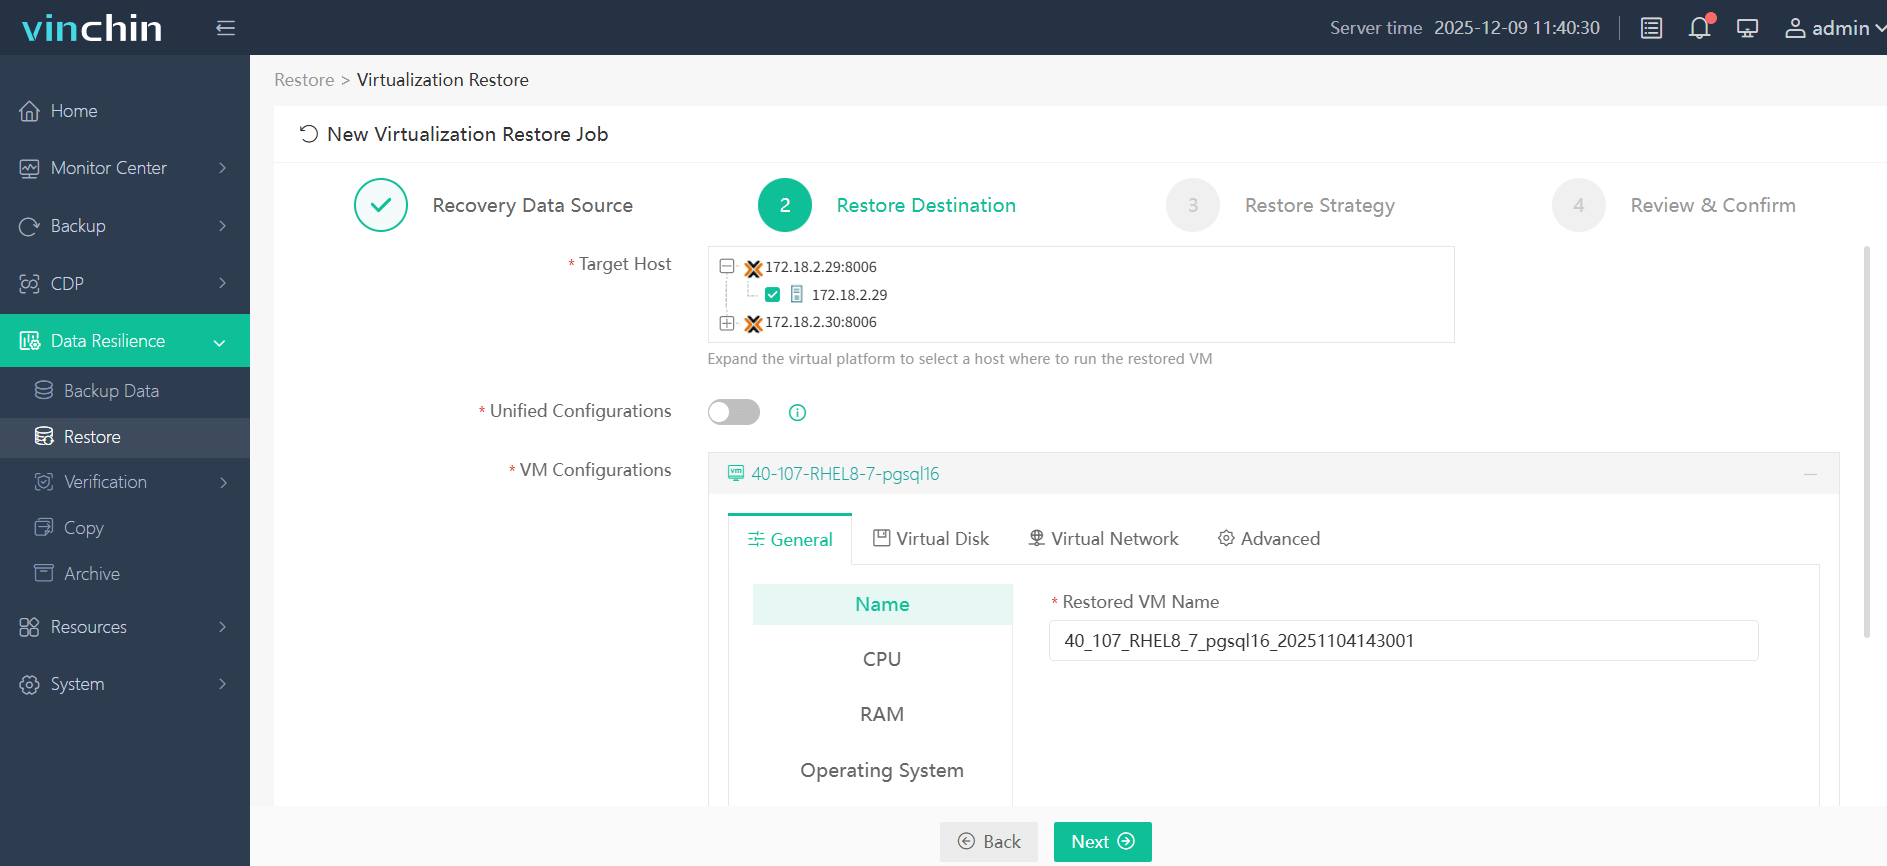
Step4: Select the target host that you want to migrate the VMs to.
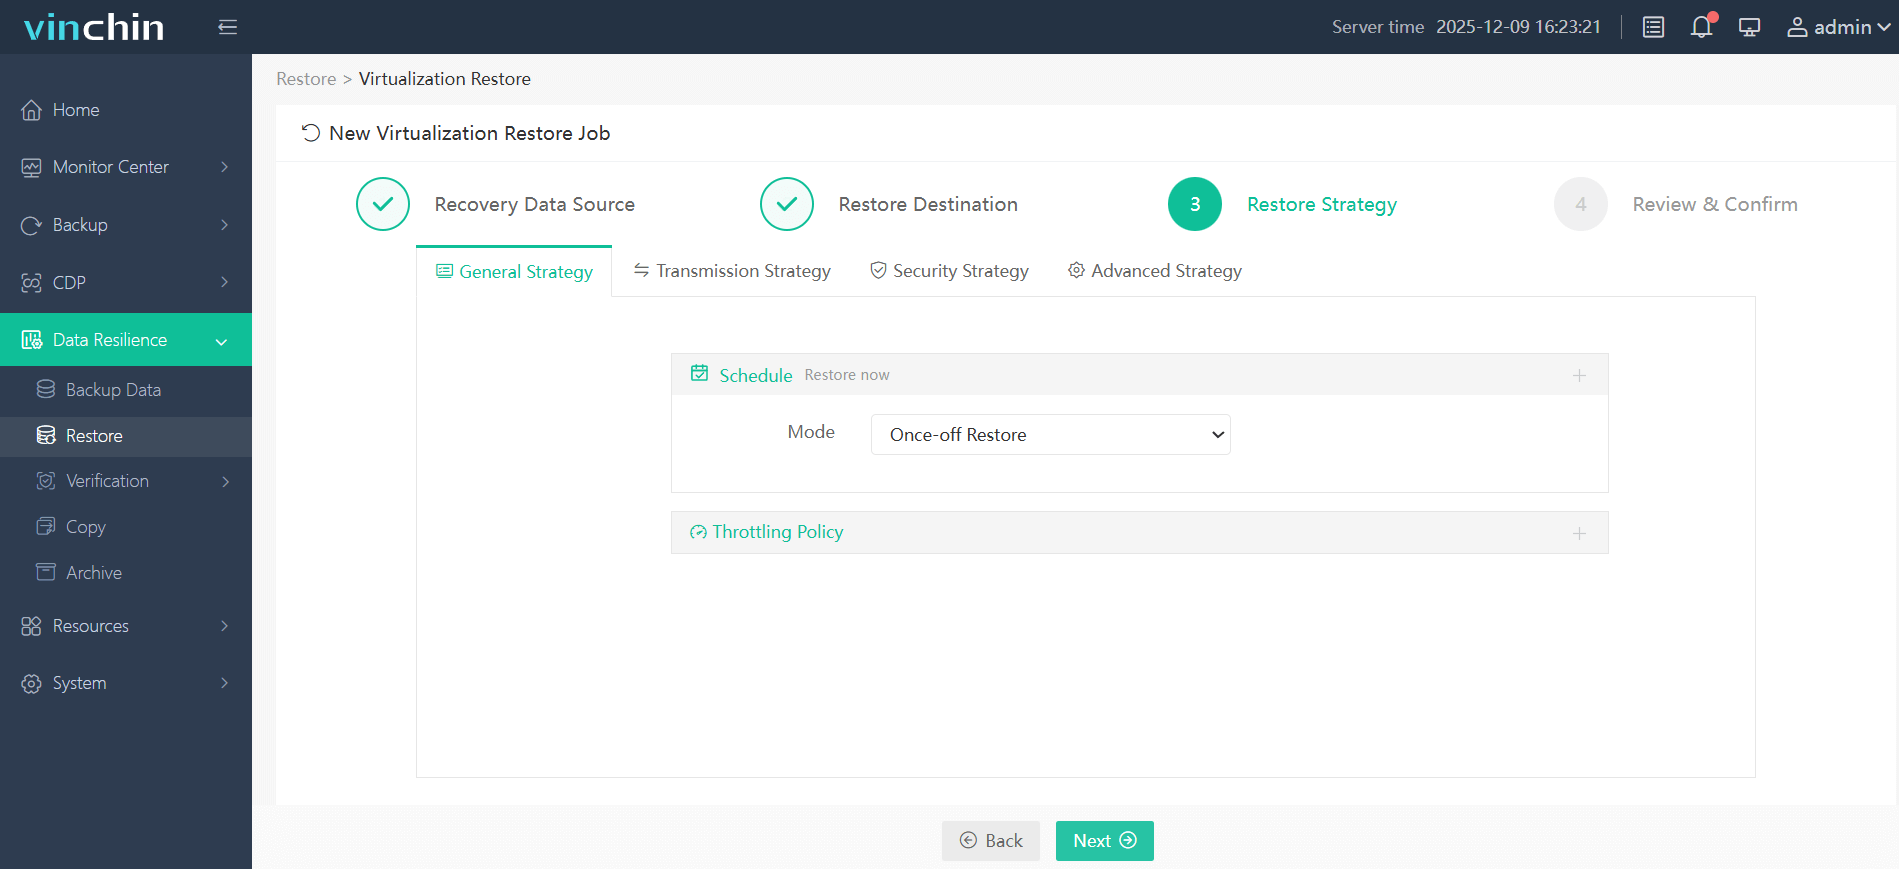
Step5: Configure the restore strategy and confirm the task.
Best for: Batch migration, remote site migration, disaster recovery, or environments without available vMotion networks.
Pros: Does not depend on vMotion; supports migration from restore points; useful for large-scale or complex environments.
Cons: Requires backup storage and restore time; the final downtime depends on VM size, network speed, and recovery strategy.
Download Vinchin Backup & Recovery right now and unlock a full-featured 30-day free trial! Get complete access to all core virtual machine protection and migration capabilities, allowing you to seamlessly move, replicate, and transfer VMs across diverse virtual platforms during your trial period.
Common Issues & Troubleshooting
Even with careful planning, cross vCenter migration can fail because of network, compatibility, or application configuration issues. The following problems are common before or after migrating VMs between vCenters.
If you are facing migration failures or unexpected errors, the solutions below may help you troubleshoot and resolve the issues efficiently.
Issue 1: Cross vCenter vMotion Failed Due to Network Connectivity
Cause:
The vMotion network is unreachable, firewall rules block required traffic, or the available bandwidth is not enough for live migration.
Solution:
Check the VMkernel adapter configuration and make sure vMotion is enabled on the correct network. Verify routing, DNS, firewall rules, and network latency between source and target hosts. If the vMotion network cannot be used, consider another method that does not depend on vMotion, such as OVF/OVA export or backup-based migration.
Issue 2: VM Migration Failed Due to Compatibility Issues
Cause:
The source and target environments may use different ESXi versions, incompatible CPUs, unsupported VM hardware versions, or mismatched VMware Tools status.
Solution:
Check the VMware compatibility matrix before migration. Make sure the target ESXi host supports the VM hardware version, and adjust the VM configuration if needed. For CPU compatibility issues, review EVC settings or choose a compatible target host.
Issue 3: VM Boots Successfully but Application Does Not Work
Cause:
The VM may power on normally, but applications can fail because of changed IP addresses, missing network mappings, DNS issues, firewall rules, or dependencies on the old environment.
Solution:
Plan network settings before migration, including IP address, subnet, gateway, DNS, VLAN, and port group mapping. After migration, verify OS login, network connectivity, service status, application access, and communication with dependent systems.
Issue 4: Migration Takes Too Long
Cause:
Large virtual disks, limited bandwidth, slow storage, snapshots, or one-by-one migration tasks can extend the migration window.
Solution:
Remove unnecessary snapshots before migration, schedule tasks during off-peak hours, and prioritize critical VMs. For large-scale migrations, use incremental transfer, batch migration, or a tool such as Vinchin Backup & Recovery to reduce manual work and improve migration efficiency.
FAQs About Migrating VMs Between vCenters
Q1: Do source and target vCenters need to be in the same SSO domain?
A1: Not always. Some cross vCenter migration methods support different SSO domains, but requirements vary by vSphere version and migration method, so compatibility should be checked first.
Q2: Will the VM IP address change after migration?
A2: The IP address does not have to change, but it may need adjustment if the target site uses different VLANs, subnets, DNS, gateways, or firewall rules.
Q3: What should I check after the VM is migrated?
A3: Verify VM power status, VMware Tools, IP settings, DNS, application services, firewall rules, monitoring alerts, and user access before removing the original VM.
Final Thoughts
The best way to migrate VMs between vCenters depends on VM quantity, network conditions, and downtime tolerance. For a few VMs, cross vCenter vMotion is suitable when vMotion, compatibility, and licensing requirements are met. If vMotion is unavailable, OVF or OVA export and import can be used instead.
For large-scale migration or complex network environments, Vinchin Backup & Recovery offers a more flexible option with batch migration and no dependency on vMotion networks.