An external drive provides an offline storage option that improves security and portability. Backing up virtual machines to an external drive is a simple and cost-effective way to protect data from loss, corruption, or ransomware. In this guide, we will cover five practical methods to back up Hyper-V VM to an external drive and help you choose the right option.
Why Back up Hyper-V VM to an External Drive?
Backing up Hyper-V VMs to an external drive helps solve several real-world risks that users commonly face.
Data safety: accidental deletion or VM corruption can happen at any time, and an external backup ensures you always have a recoverable copy.
Disaster recovery: In case of a system crash or hardware failure, a backup stored on an external drive enables quick restoration with minimal downtime.
Ransomware protection: keeping backups offline reduces the risk of ransomware encrypting both production and backup data.
Storage flexibility: external drives provide an easy and scalable way to expand backup storage without modifying the main server infrastructure.
Must-Have Preparations
Before backing up the Hyper-V VM, make sure the following requirements are met to avoid errors and incomplete backups.
1. Windows with Hyper-V enabled
You need a system running Windows Server or Windows 10/11 Pro with the Hyper-V role installed and properly configured.
2. External hard drive (USB / SSD / HDD)
A reliable external storage device is required to store the VM backup files. Make sure it is properly connected and recognized by the system.
3. Sufficient storage space
Ensure the external drive has enough free space to accommodate the full size of the virtual machine, including its virtual disks and configuration files.
4. Administrator privileges
Administrator access is required to perform export, backup, or PowerShell operations in Hyper-V Manager.
5. Run or properly shut down the VM
The virtual machine should be in a stable state. For consistent backups, it is recommended to shut down the VM before starting the backup process.
Overview of 5 Methods: Which One Should You Choose?
Method | Ease of Use | Automation | Full VM Backup | Best For |
Hyper-V Manager Export | ⭐⭐⭐⭐⭐ | ❌ | ✅ | Simple full backup |
VHDX Copy | ⭐⭐⭐⭐ | ❌ | ❌ | Quick file backup |
PowerShell Export | ⭐⭐⭐ | ✅ | ✅ | Batch/automated backup |
Windows Server Backup | ⭐⭐⭐⭐ | ✅ | ✅ | Scheduled backups |
Vinchin Backup & Recovery | ⭐⭐⭐⭐⭐ | ✅ | ✅ | Enterprise data protection |
In the following parts, we’ll elaborate on these five methods and show you the operation steps in detail.
Method 1: Export Hyper-V VM to External Drive
The built-in Export feature in Hyper-V Manager allows you to create a full backup of a virtual machine, including its configuration, virtual disks, and checkpoints (if selected), and save it to an external drive.
Step 1: Launch Hyper-V Manager on your Windows system and locate the virtual machine you want to back up.
Step 2: Shut down the VM to ensure data consistency and avoid potential corruption.
Step 3: Right-click the target VM and select Export from the menu.
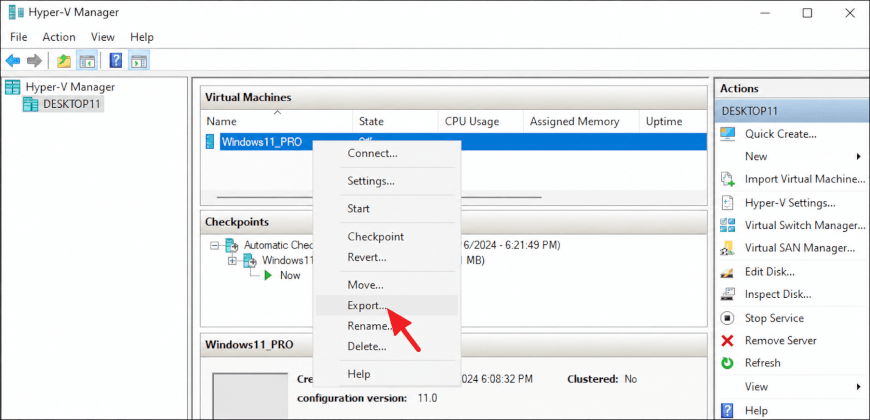
Step 4: Browse and select your external hard drive (USB, SSD, or HDD) as the export location. Make sure the drive has enough free space.
Step 5: The process may take time depending on VM size. Once completed, the backup folder will contain all VM data.
This method is best for users who want a simple, built-in way to create a full backup without installing additional software.
Method 2: Copy VHDX Files Manually
You can also back up a Hyper-V VM by manually copying its VHDX file to an external drive. This method is suitable for quick backups but does not include the VM configuration or checkpoints.
Step 1: Shut down the VM
Power off the virtual machine to ensure the VHDX file is in a consistent state.
Step 2: Locate the VHDX file
Find the virtual disk file in the folder where the VM is stored.
Step 3: Copy the file
Copy the VHDX file to your external USB drive, HDD, or SSD.
This is best for quickly copying a VM’s virtual disk for temporary storage or migration, but not as a complete backup solution.
Method 3: Use PowerShell Backup Script
PowerShell provides a quick and efficient way to export a Hyper-V virtual machine to an external drive, making it ideal for automation and batch backups.
Step 1: Open PowerShell as Administrator
Launch Windows PowerShell with administrator privileges.
Step 2: Run the Export command
Use the following command to export the VM to your external drive:
Export-VM -Name "VMName" -Path "E:\HypervBackup"
Replace VMName with the name of your virtual machine and E:\HyperVBackup with the destination folder on your external drive.
Step 3: Verify the backup
After the command completes, confirm that the exported VM files are stored in the specified location.
This method is best for administrators who need to automate or batch multiple VM backups.
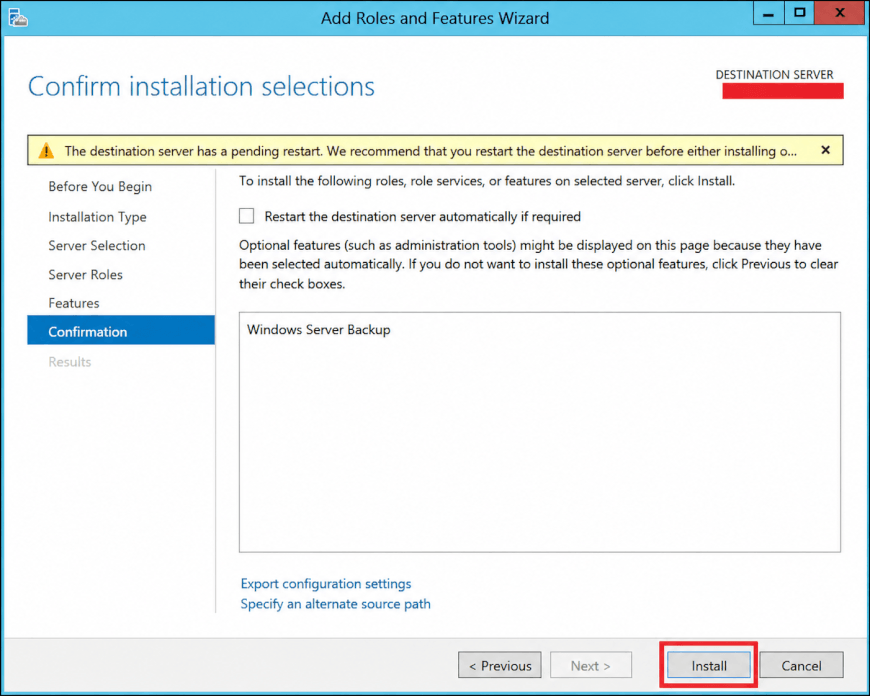
Method 4: Back Up Hyper-V VM with Windows Server Backup
Windows Server Backup is a built-in feature that allows you to back up Hyper-V virtual machines to an external drive. It supports scheduled backups and is suitable for Windows Server environments.
Step 1: Install Windows Server Backup
Open Server Manager and install the Windows Server Backup feature if it is not already installed.
Step 2: Launch Windows Server Backup
Open the tool and select Backup Once or Backup Schedule.
Step 3: Select the backup items
Choose Hyper-V or the virtual machine you want to protect.
Step 4: Choose the external drive
Select your external USB drive, HDD, or SSD as the backup destination, then start the backup.
This is best for Windows Server environments that require scheduled backups using built-in tools.
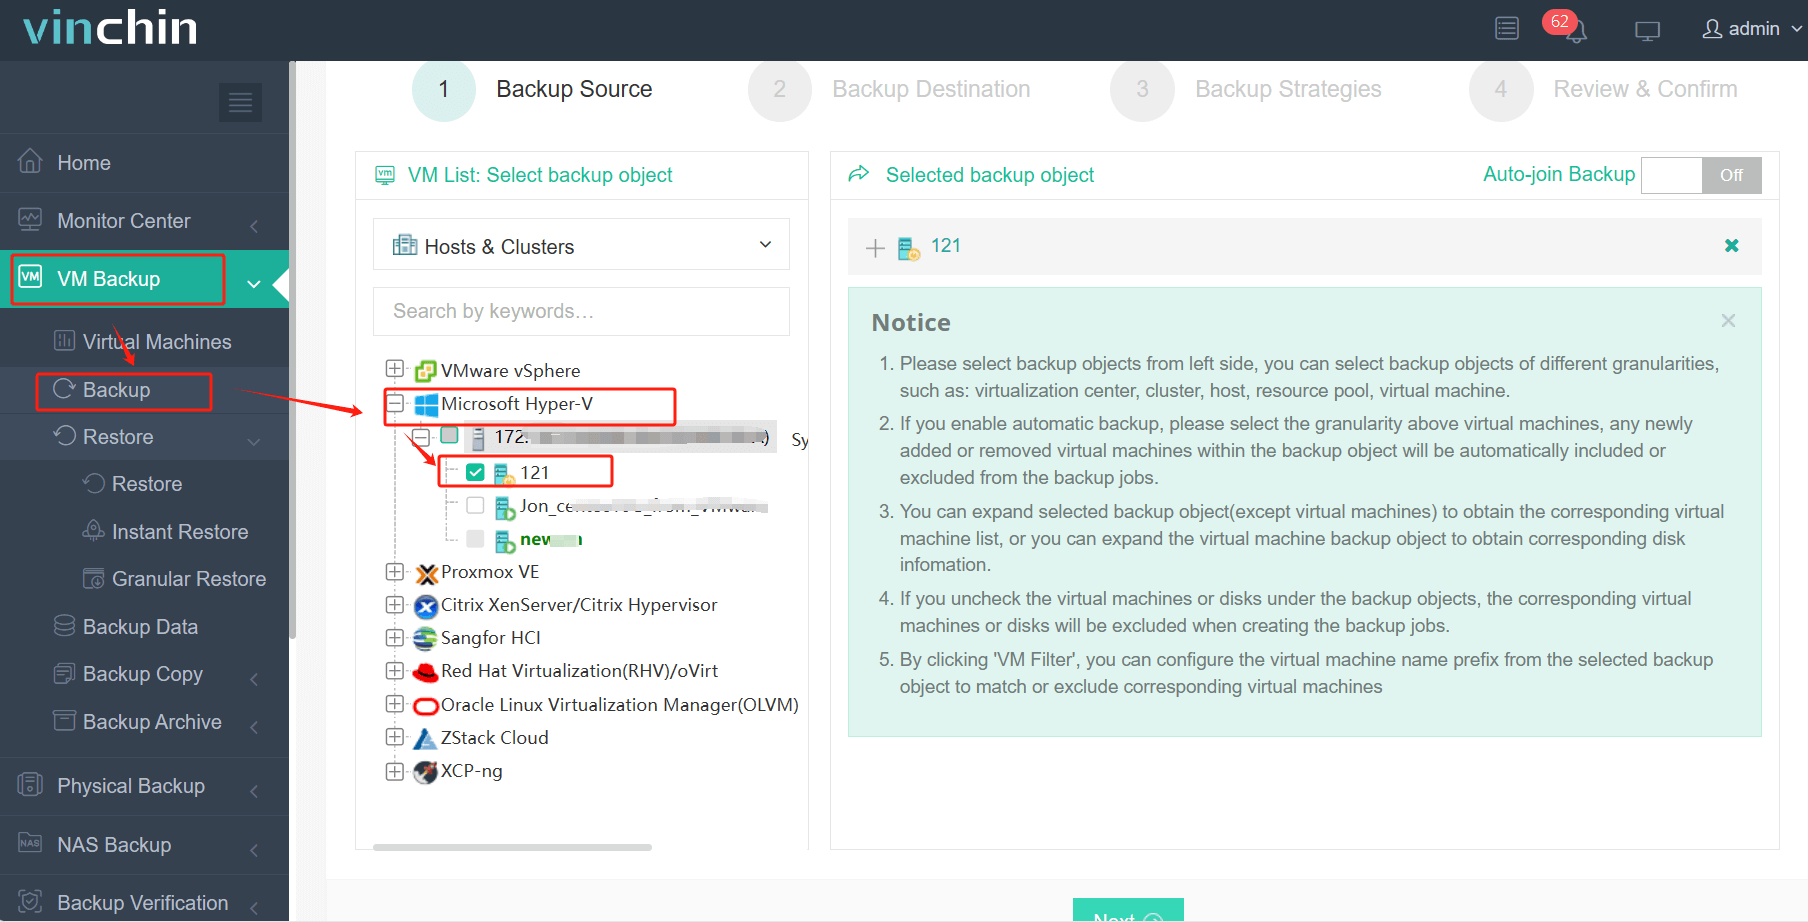
Method 5: Easily Back Up Hyper-V with Vinchin Backup & Recovery
While the methods above are suitable for basic Hyper-V backup needs, they often rely on manual processes and offer limited automation and recovery flexibility. For organizations that require a more secure and efficient approach to back up Hyper-V VMs to external drives, Vinchin Backup & Recovery provides a more robust alternative.
Vinchin uses an agentless architecture to enable VM backups without installing agents, reducing overhead and simplifying deployment. It supports 15+ virtualization platforms, including Hyper-V, VMware, and Proxmox, making it suitable for hybrid and multi-cloud environments. It also ensures Hyper-V security with encryption, immutable storage, and ransomware protection.
Here are the Hyper-V backup steps in Vinchin:
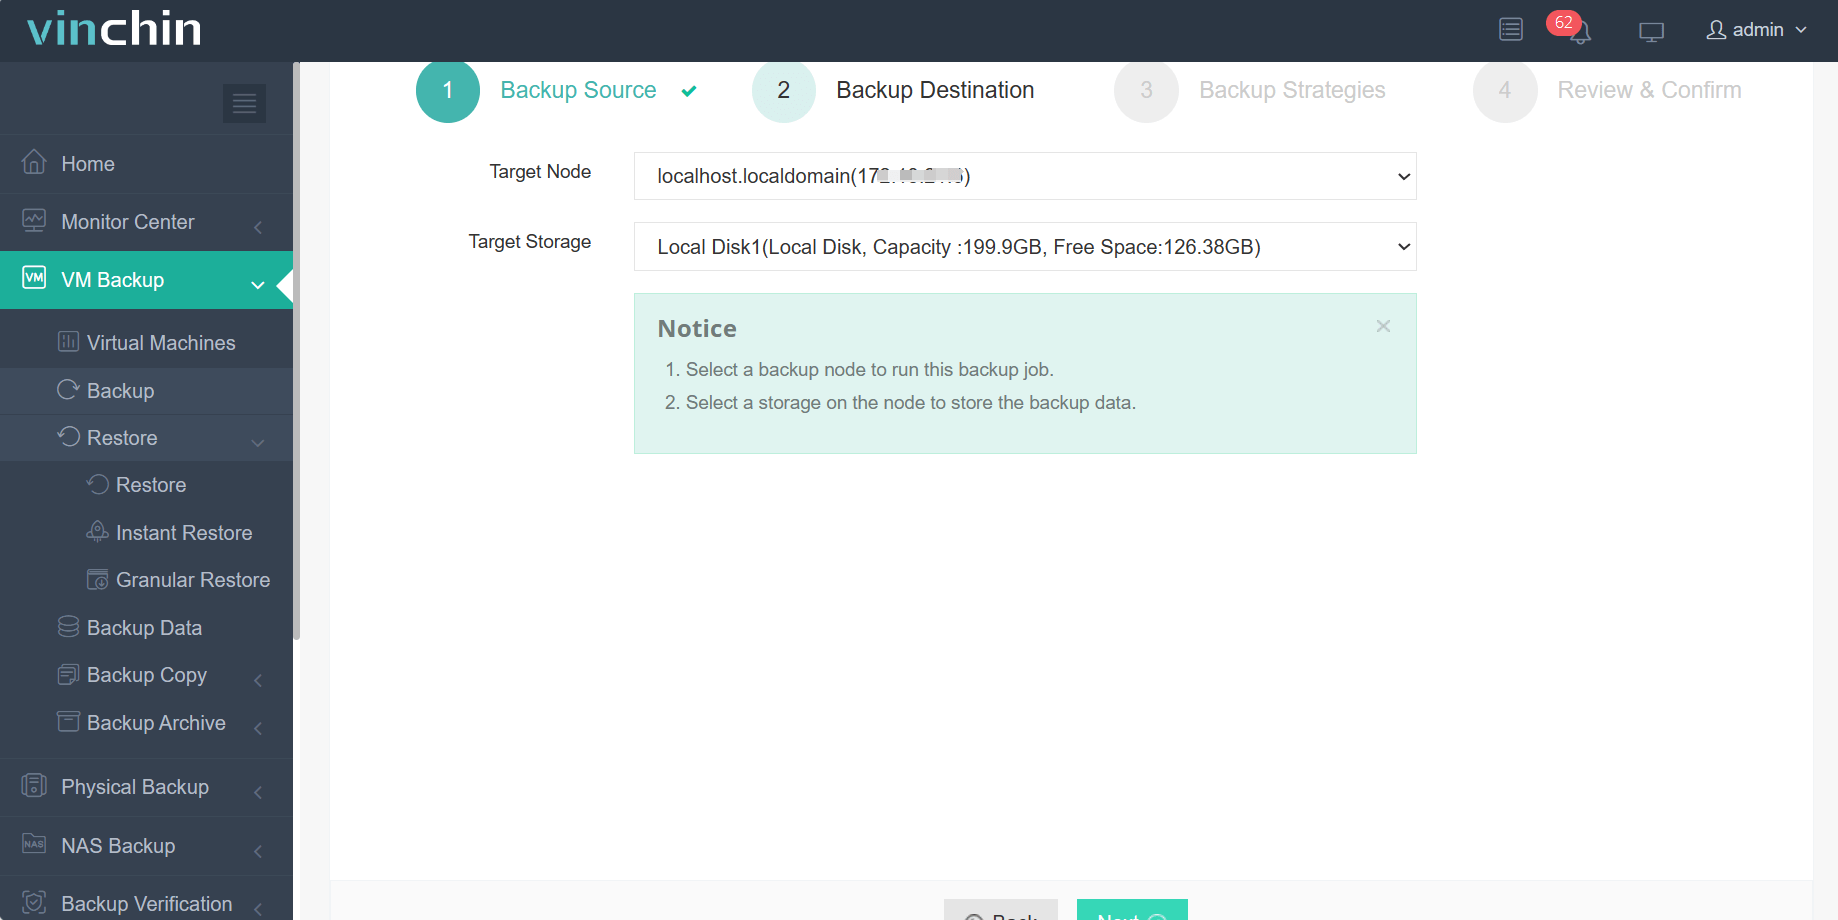
1. Go to VM Backup > Backup, and expand the VM list to select the Microsoft Hyper-V host as the backup source.
2. Specify the backup destination by choosing the target node and storage, here you can add the external drive in advance and then select it.
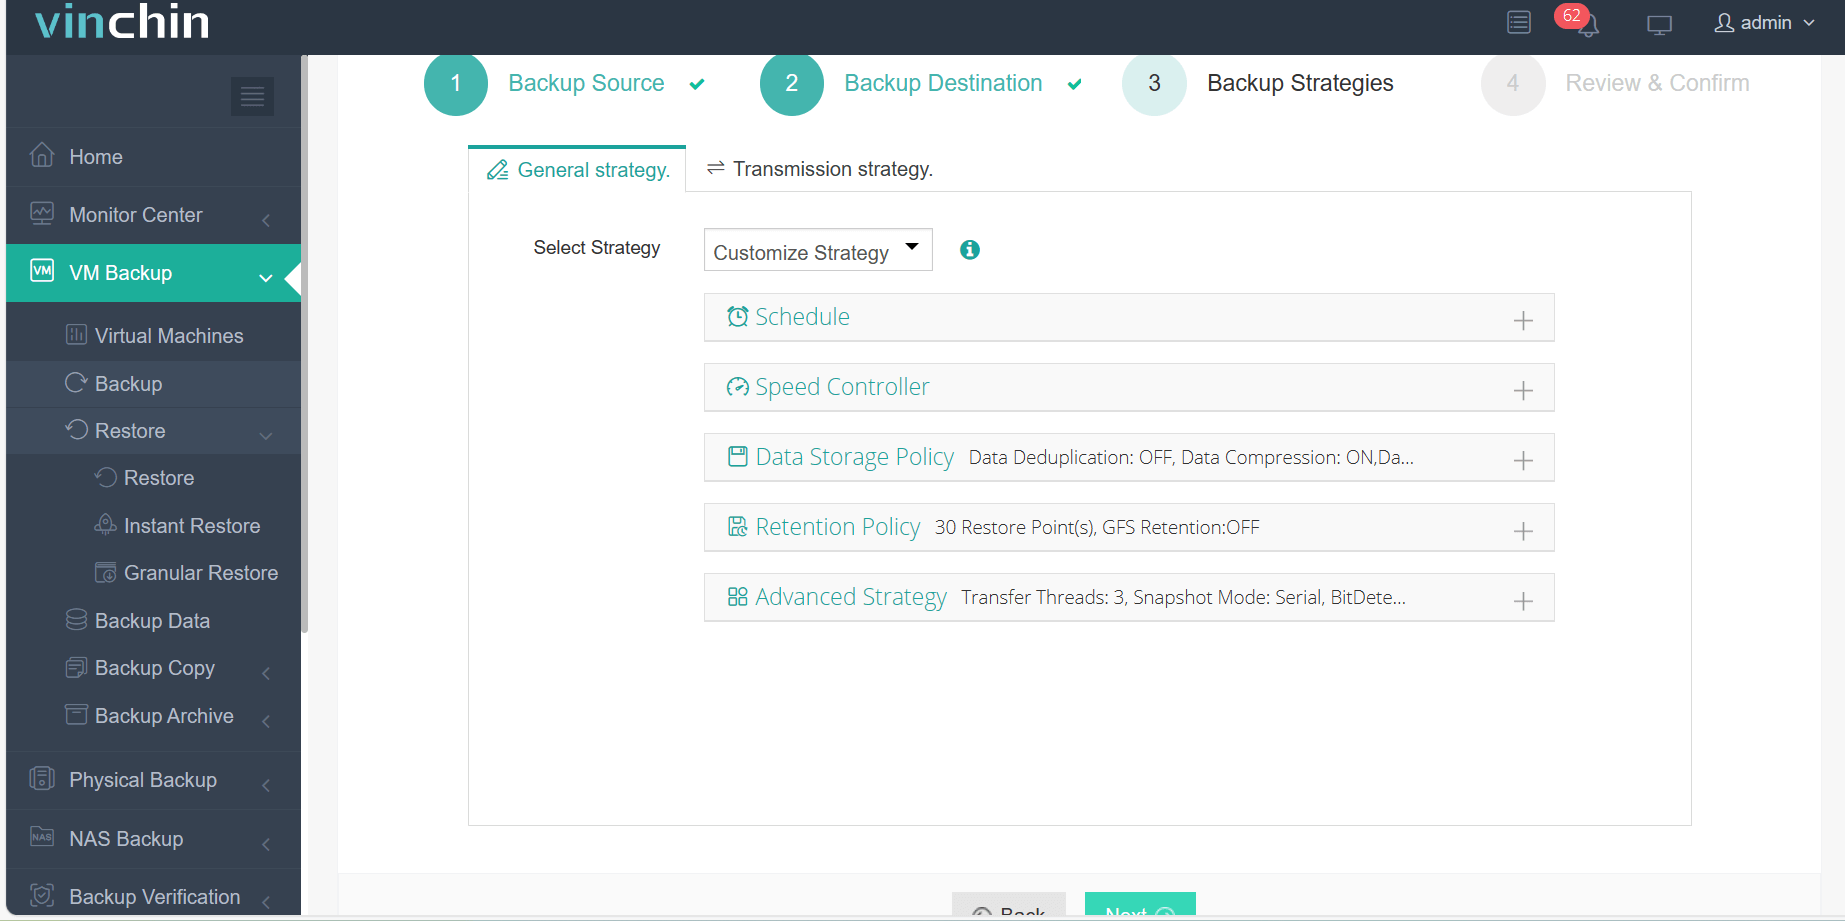
3. Customize the backup strategies, schedule the backup daily, weekly, or monthly combined with incremental, full, or differential backups, and complete the retention policy as well.
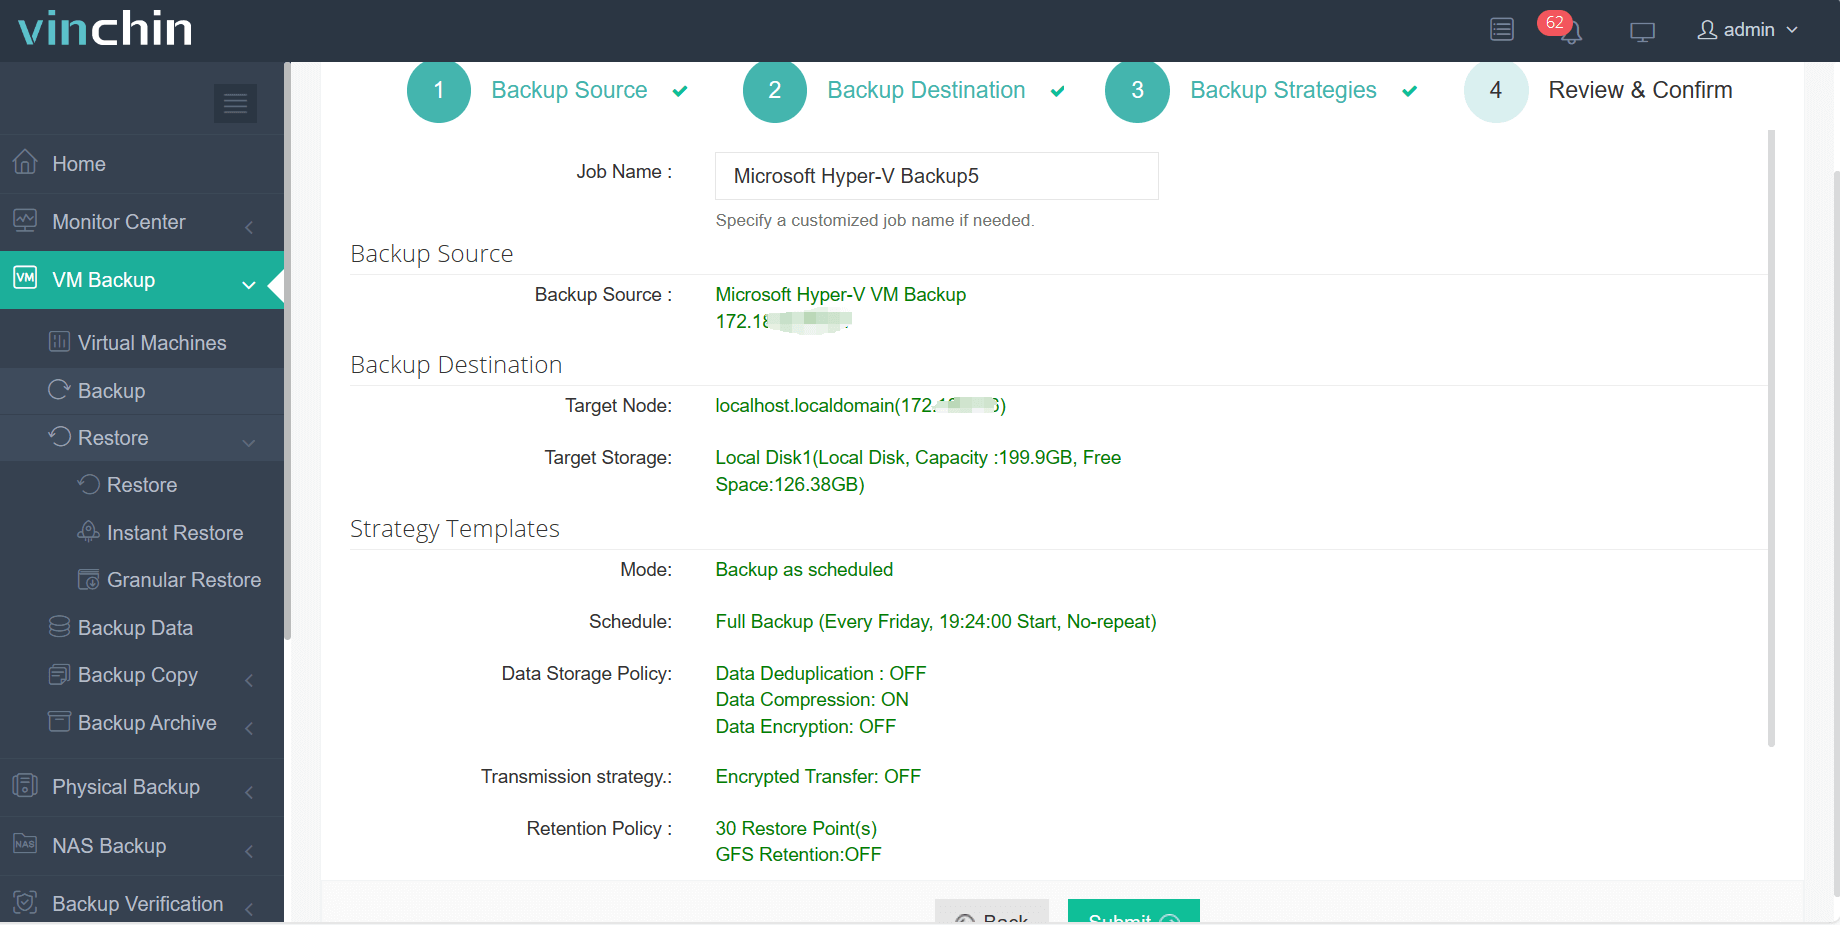
4. Check the settings you chose, and click Submit to run the backup task.
Vinchin Backup & Recovery is a trustworthy backup solution designed for both small and large-scale enterprises. To protect your hybrid and multi-cloud environments, you just need to download the 60-day free trial version.
Back Up Hyper-V VM to External Drive FAQs
Q1: Is copying a VHDX file enough to back up a Hyper-V VM?
Not completely. Copying only the VHDX file backs up the virtual disk but does not include the VM configuration, checkpoints, or network settings. For a complete backup, use Export or a dedicated backup solution.
Q2: How much storage space do I need for a Hyper-V VM backup?
The required space depends on the size of the virtual machine. As a best practice, ensure your external drive has at least the same amount of free space as the VM's used storage, plus additional capacity for future backups.
Q3: Can I schedule Hyper-V backups to an external drive?
Yes. Windows Server Backup supports scheduled backups. You can also automate Export-VM with PowerShell and Task Scheduler, or use dedicated backup software for more flexible scheduling and retention policies.
Q4: Can I restore a Hyper-V VM from an external drive?
Yes. If you exported the VM, you can restore it using Import Virtual Machine in Hyper-V Manager. If you only copied the VHDX file, you'll need to create a new VM and attach the existing virtual disk.
Sum Up
External drives offer a simple and reliable way to protect Hyper-V VM backups. This article covered five backup methods, including Hyper-V Manager, PowerShell, Windows Server Backup, manual VHDX copying, and Vinchin Backup & Recovery. For organizations that need automated backups, centralized management, and fast recovery, Vinchin provides a more efficient solution.