-
What is Hyper-V Manager?
-
System Requirements for Hyper-V Manager
-
How to Install Hyper-V Manager via Control Panel?
-
How to Install Hyper-V Manager Using PowerShell?
-
How to Connect Hyper‑V Manager to a Remote Server?
-
How To Backup Hyper-V VMs With Vinchin Backup & Recovery?
-
Install Hyper V Manager FAQs
-
Conclusion
Virtualization has become essential in IT operations today. If you want to run virtual machines on Windows systems, you need to install Hyper-V Manager first. This guide walks you through every step—from basic concepts to advanced setup—so you can manage virtual environments with confidence.
What is Hyper-V Manager?
Hyper-V Manager is Microsoft's built-in tool for managing Hyper-V hosts and their virtual machines (VMs). With this tool, you can create new VMs, configure settings, monitor performance, and manage resources—all from one interface. Whether your servers are local or remote, Hyper-V Manager gives you control over your virtualization environment without needing extra software or complex scripts.
Hyper-V Manager comes included with Windows Server editions as well as Windows 10/11 Pro or Enterprise versions (Microsoft Learn). Its familiar graphical interface makes it accessible even if you're new to virtualization technology.
System Requirements for Hyper-V Manager
Before you install Hyper V Manager on your machine, make sure your system meets the right requirements. There are two sets of needs: one for just the management tools (to connect to other hosts), and another if you plan to actually run virtual machines locally by enabling the full Hyper-V platform.
The management tools themselves are lightweight—they only require a supported version of Windows: Pro, Enterprise, Education (for desktops) or any modern Windows Server edition. You do not need special hardware if you're only using these tools to connect remotely.
However, if you want this computer to host virtual machines by enabling the Hyper-V Platform, then stricter hardware rules apply:
A 64-bit processor with Second Level Address Translation (SLAT)
CPU support for VM Monitor Mode Extensions (Intel VT-x or AMD-V)
At least 4 GB of RAM
BIOS-level support for hardware-assisted virtualization
Data Execution Prevention enabled
Hyper-V is not available on Home editions of Windows; attempting to install it there will fail.
To check your system’s compatibility quickly:
1. Open PowerShell or Command Prompt
2. Type systeminfo.exe and press Enter
3. Review the “Hyper-V Requirements” section; all items should say “Yes”
If any requirement says “No,” address that issue before proceeding further (Microsoft Learn).
How to Install Hyper-V Manager via Control Panel?
Many administrators prefer using a graphical interface when setting up features like Hyper-V Manager on desktop versions of Windows. This method works well on most supported client operating systems such as Windows 10/11 Pro or Enterprise.
Here’s how you can install hyper v manager using Control Panel:
First, open the Control Panel from your Start menu—searching "Control Panel" is often fastest. Next:
1. Click Programs and Features
2. Select Turn Windows features on or off in the left pane
3. In the pop-up window labeled "Windows Features," scroll down until you see Hyper-V
4. Expand this entry by clicking its plus sign (+)
5. Check only Hyper-V Management Tools if you want just the manager; also check Hyper-V Platform if this PC should host VMs too
6. Click OK—Windows will begin installing necessary files
7. When prompted after installation completes, click Restart now
After rebooting your computer:
Find Hyper-V Manager in your Start menu under "Windows Administrative Tools"
If only management tools were installed here but not the platform itself, use them to connect remotely to other servers running full Hyper-V roles
Note: On Windows Server editions instead of desktop OSes,
use the built-in Server Manager's "Add Roles and Features Wizard" rather than Control Panel's feature list.
How to Install Hyper-V Manager Using PowerShell?
For those who prefer automation—or need repeatable installs across many systems—PowerShell offers a fast way forward when installing hyper v manager components.
On modern desktop operating systems like Windows 10/11 Pro or Enterprise:
1. Click Start > type "Windows PowerShell"
2. Right-click it > select "Run as administrator"
3a.To install just management clients:
Enable-WindowsOptionalFeature -Online -FeatureName Microsoft-Hyper-V-Management-Clients -All
3b.To install both management tools and local hosting capability:
Enable-WindowsOptionalFeature -Online -FeatureName Microsoft-Hyper-V -All
4.When prompted after completion,type "Y" then press Enter so your PC restarts immediately
On recent versions of Windows Server (2016/2019/2022):
1.Open an elevated PowerShell window (Run as administrator)
2.Type:
Install-WindowsFeature -Name RSAT-Hyper-V-Tools
This command adds Remote Server Administration Tools specific for managing Hyper‑V roles from that server instance—even if it won’t host any guest VMs itself.
After rebooting,you’ll find "Hyper‑V Manager" available under administrative tools in Start Menu.This approach saves time especially when deploying at scale across multiple endpoints(Microsoft Learn).
How to Connect Hyper‑V Manager to a Remote Server?
Often,you’ll want to manage remote servers—not just local ones—with your newly installed manager.This is common practice in larger organizations where physical access isn’t always possible.Luckily,the process is straightforward once prerequisites are met:
First,double-check these basics:
– The target server must have its firewall configured so WinRM traffic(HTTP port 5985) passes through.
– Your user account needs admin rights on that server.
– Both computers should be joined either by workgroup trust or domain membership,and DNS resolution must work between them.
Method 1.Direct connection from client workstation:
1.Open "Hyper‑V Manager"
2.Right-click "Hyper‑V Manager" label at top left pane
3.Select "Connect to Server..."
4.In dialog box,pick "Another computer:",then enter hostname(or IP address)of target server
5.Click "OK"
If connection fails,double-check network reachability(firewall,DNS),ensure that "Hyper‑V Virtual Machine Management" service runs on remote host,and confirm credentials grant proper access.For older hosts,some additional ports(TCP/135,dynamic RPC)may also need opening(Microsoft Docs).
Method 2.Server Pool via Server Manager(for admins working mainly inside data centers):
You may add multiple servers into one pool within Server Manager’s dashboard,giving centralized oversight over all registered nodes—including their respective VM inventories.This method suits environments with many managed endpoints but requires initial configuration steps outside scope here;refer directly to Microsoft documentation for advanced pooling techniques.
Remote administration lets teams handle maintenance,tasks,and monitoring without ever leaving their desks—a huge productivity boost!
How To Backup Hyper-V VMs With Vinchin Backup & Recovery?
Once you've set up everything successfully, it's important to protect critical workloads through reliable backup solutions tailored for enterprise environments such as Microsoft Hyper‑V alongside VMware, oVirt/RHV/OLVM, XenServer/XCP-ng, ZStack, Proxmox VE and more—over fifteen mainstream platforms in total are supported by Vinchin Backup & Recovery.
With Vinchin Backup & Recovery supporting both standalone and clustered deployments across these platforms—including native integration with Microsoft’s ecosystem—you gain access to robust features like full/incremental/differential/forever-incremental backup, granular restore options, data deduplication and compression technologies, scheduled backups with flexible retention policies including GFS strategy, and secure encryption mechanisms for data protection at rest and during transfer—all designed for efficient storage utilization and rapid disaster recovery readiness.
Backing up a VM using Vinchin Backup & Recovery is straightforward thanks to its intuitive web console interface:
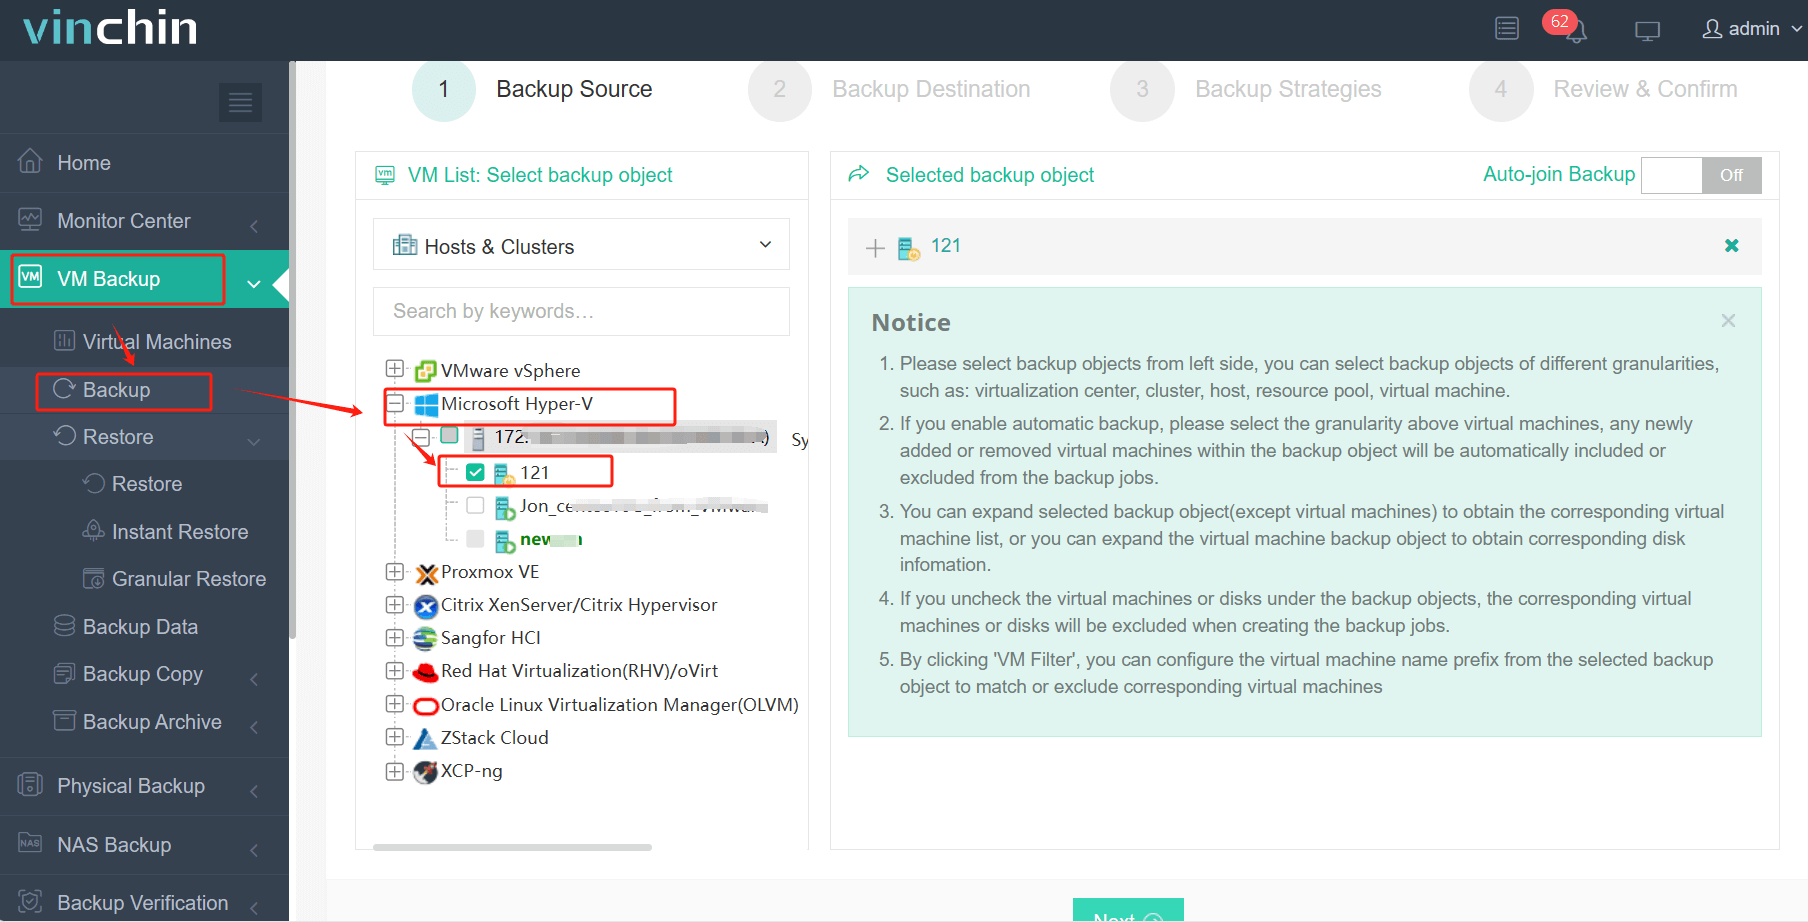
Step 1: Select the Hyper‑V VM(s) you wish to back up

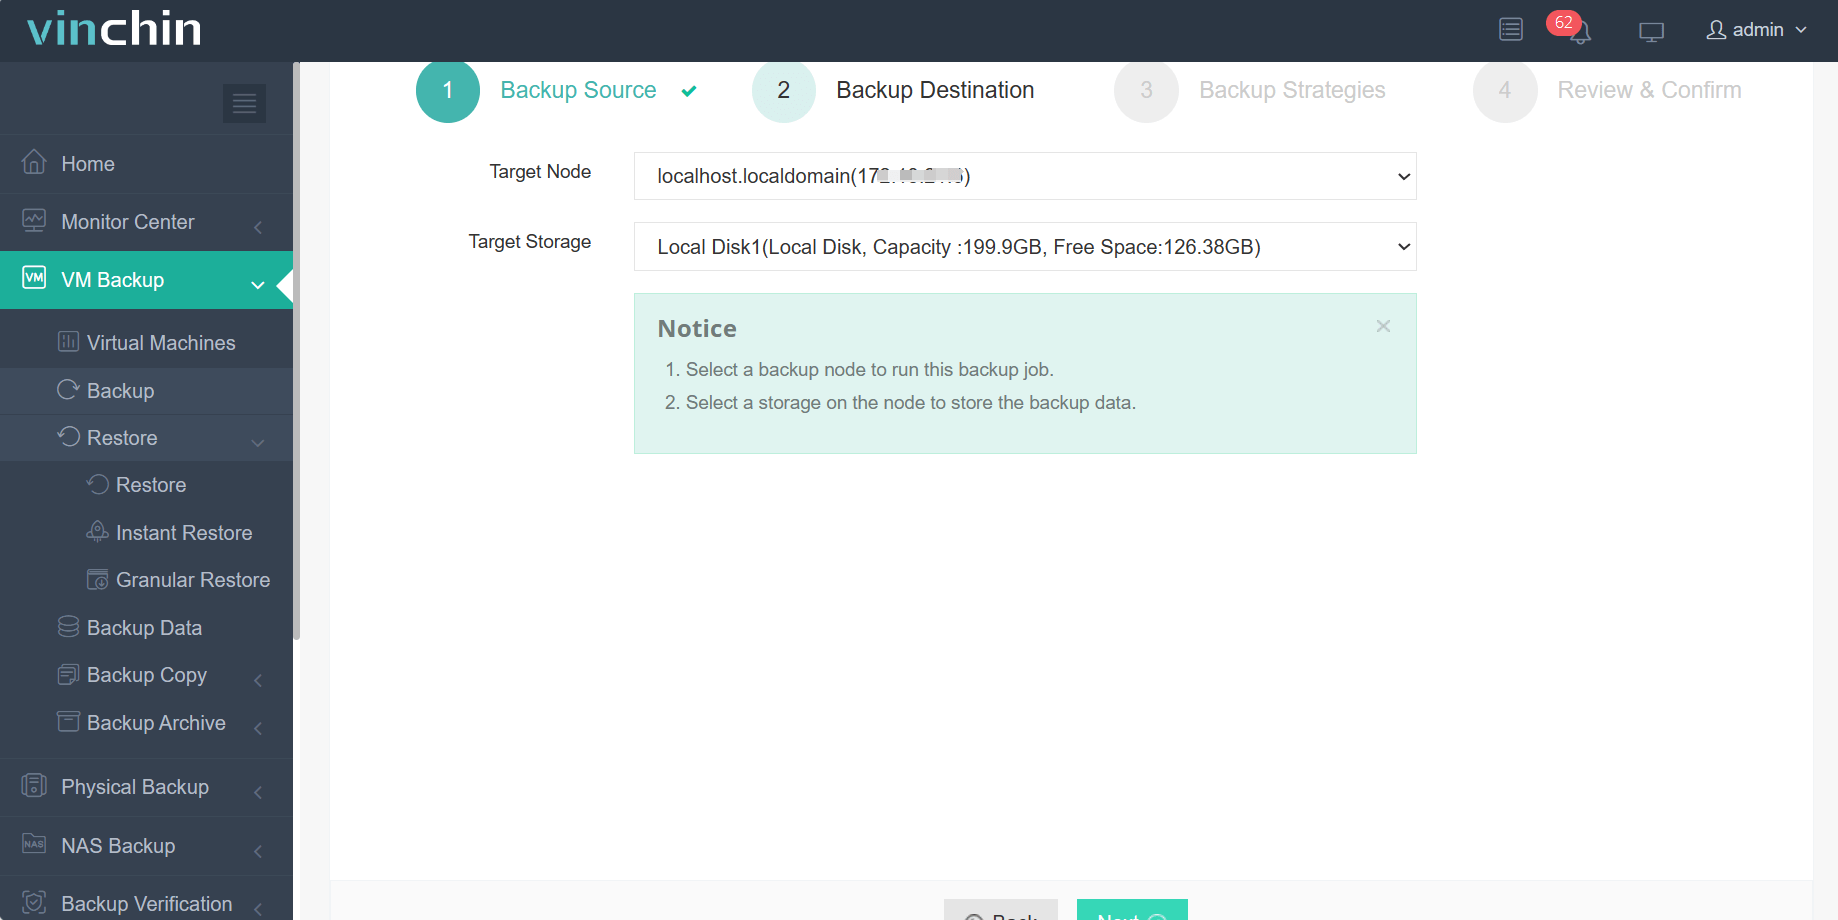
Step 2: Choose a suitable backup storage destination

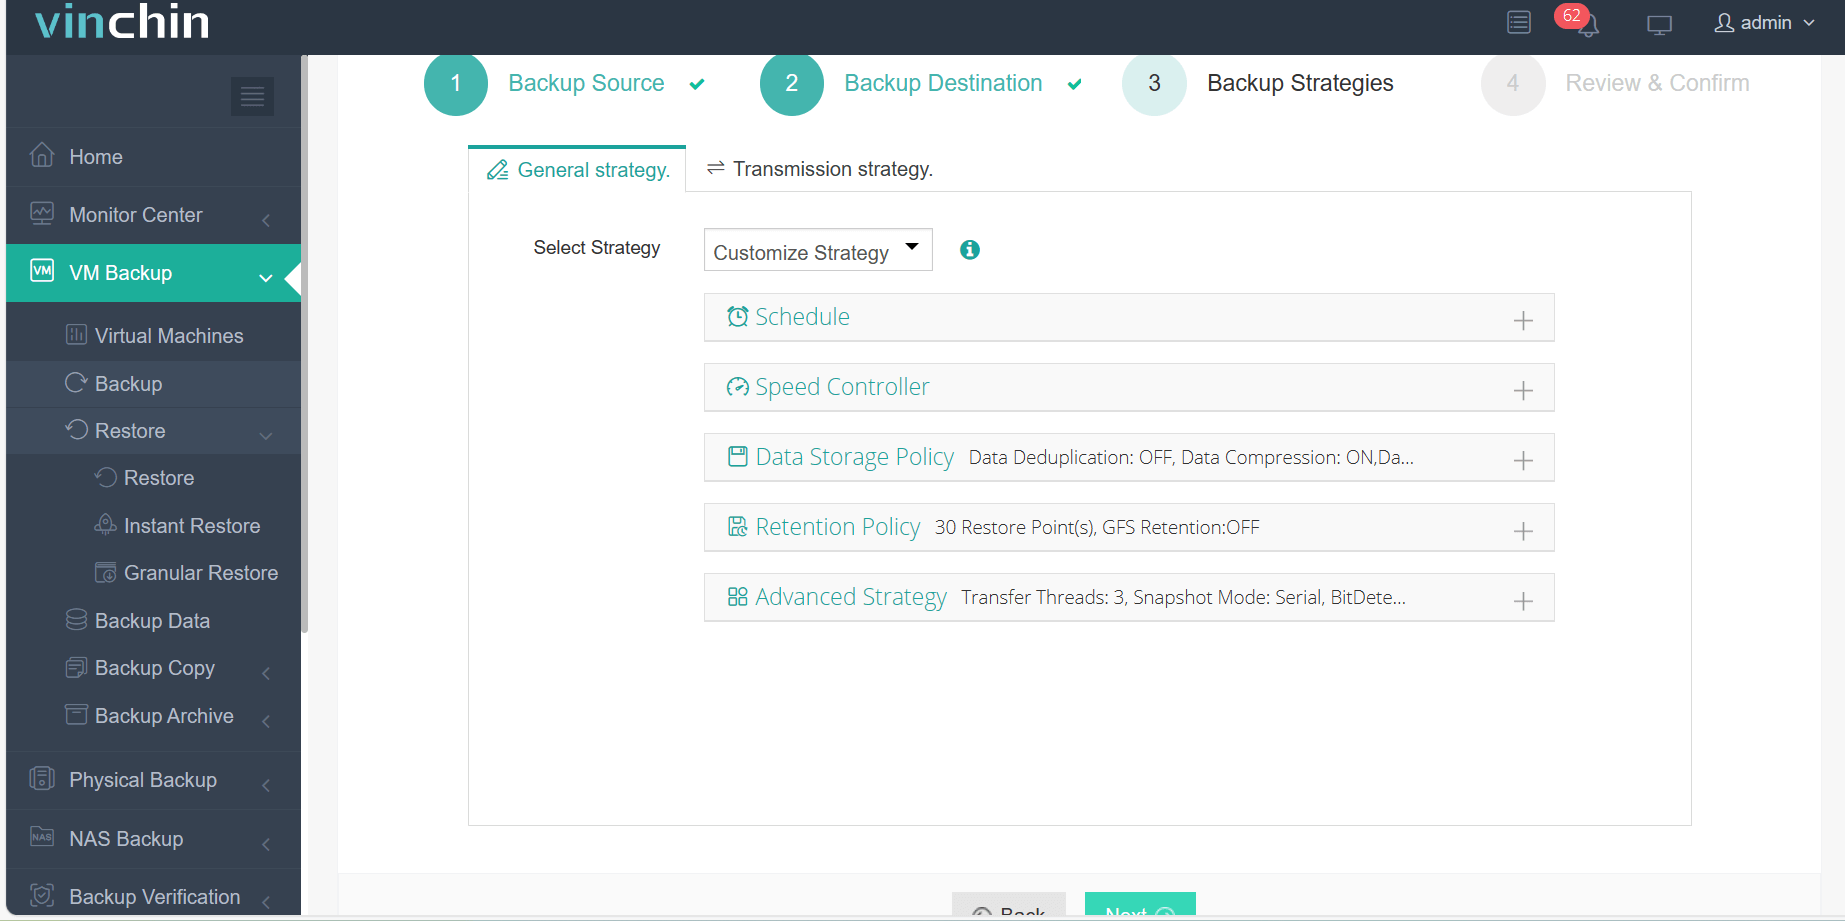
Step 3: Configure backup strategy parameters such as schedule and retention

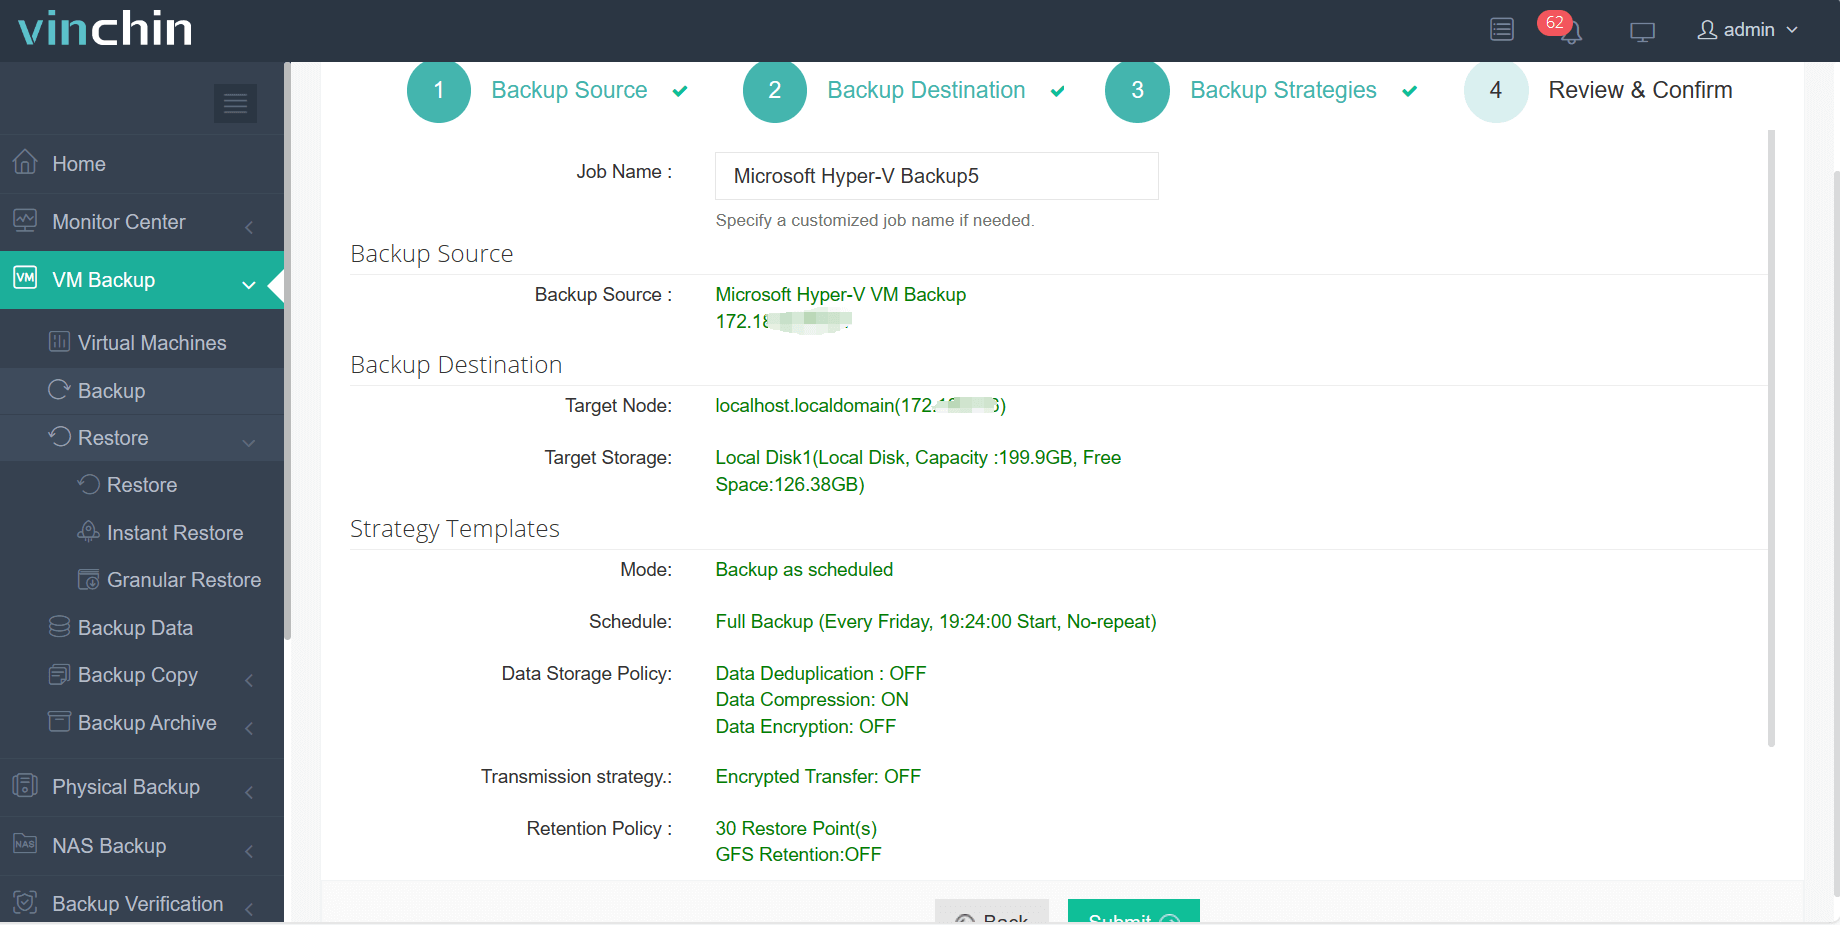
Step 4: Submit the job

Recognized globally among enterprise users for reliability and ease-of-use—with top ratings from thousands of customers—Vinchin Backup & Recovery offers a fully featured free trial valid for 60 days; click below to get started today!
Install Hyper V Manager FAQs
Q1: Can I use my laptop running Windows Home edition as a testbed after I install hyper v manager?
No—you must upgrade your laptop's OS to Pro,Edu.,or Enterprise before installing either platform or management tools successfully.
Q2: My company uses VPNs.Will connecting remotely via VPN let me administer offsite servers through hyper v manager?
Yes—as long as network routing/firewall rules allow WinRM traffic(VPN tunnel must carry TCP port 5985),remote connections function normally over VPN links too.
Q3: After uninstalling/reinstalling windows updates,my previously working hyper v manager disappeared.How do I restore it?
Go back into Control Panel>Programs & Features>Turn Windows features on/off>recheck both "Hyper‑V Management Tools"&“Platform”boxes>click OK>restart PC;if still missing,use PowerShell commands shown earlier above.
Conclusion
Installing hyper v manager unlocks powerful virtualization capabilities whether managing local labs or enterprise clusters.Both GUI-based setup and automated scripting fit different workflows.For reliable backups,Vinchin delivers robust protection—try our free trial today!
Share on:


