Backing up virtual machines is only half of an effective disaster recovery strategy; the ability to restore them quickly is just as important. Whether a VM has been accidentally deleted, corrupted, or lost due to hardware failure, Proxmox VE offers several reliable recovery methods. This article walks you through three ways to restore a VM from backup: using the Proxmox web interface, the command line, or Proxmox Backup Server (PBS). You'll also learn common troubleshooting tips and best practices to ensure a fast and reliable recovery.
What You Need Before Restoring a Proxmox VM
Before starting the restore process, make sure:
The backup file or PBS snapshot is available
The target storage has enough free space
You’ve chosen the target node and VM ID
The existing VM is powered off if you plan to overwrite it
Once these checks are complete, you’re ready to restore the VM using one of the methods below.
Method 1: Restore Proxmox VM Using the Proxmox Web Interface
The web interface is the easiest option for most administrators because it requires no command-line knowledge and is suitable for those who prefer a visual workflow and only restore VMs occasionally.
To restore a VM:
1. Log in to the Proxmox VE web interface.
2. Navigate to the storage that contains your backup files.
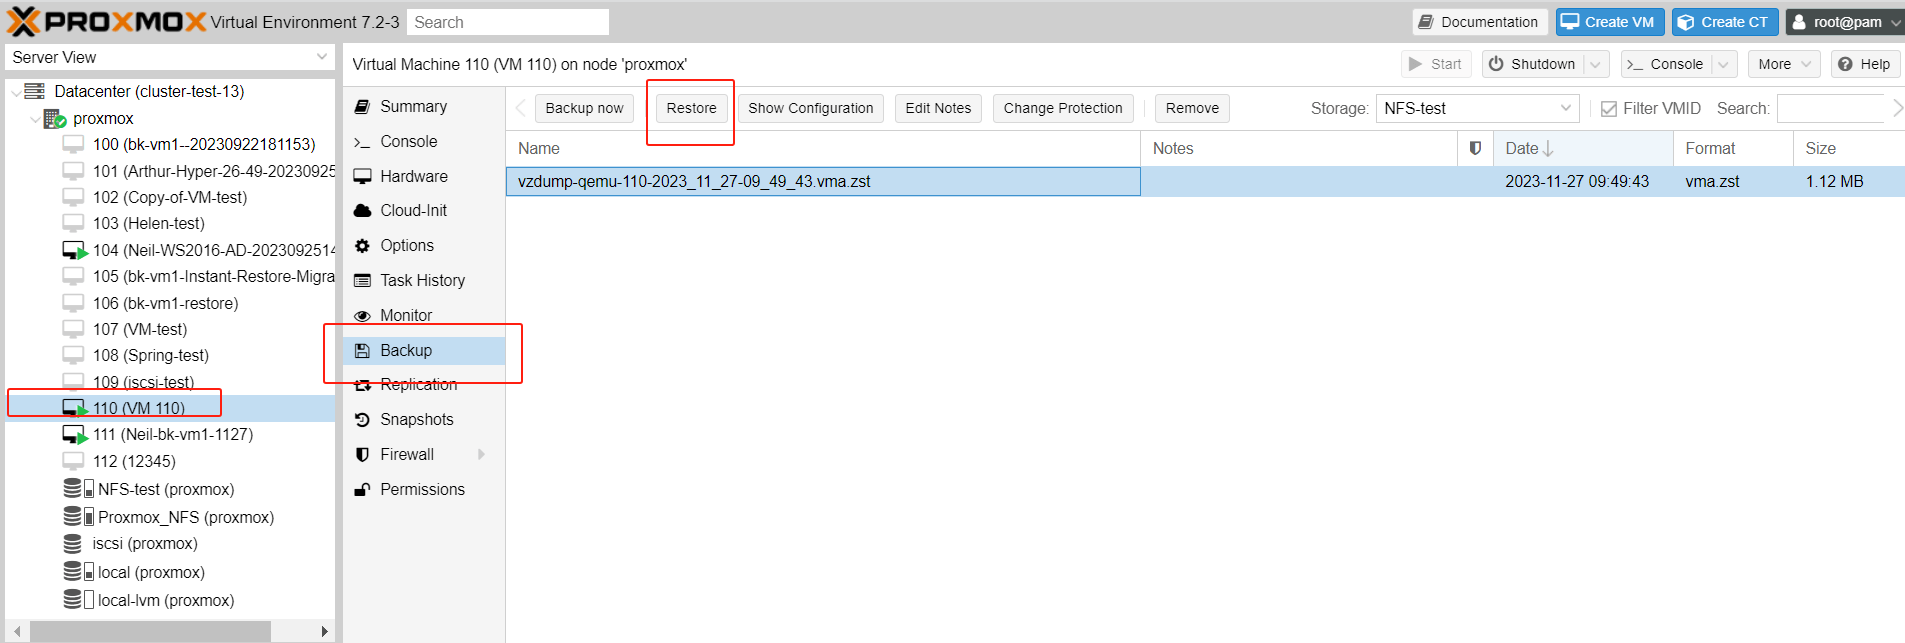
3. Open the Backups tab.
4. Select the backup archive you want to restore.
5. Click Restore.
A configuration window will appear where you can specify several restore options:
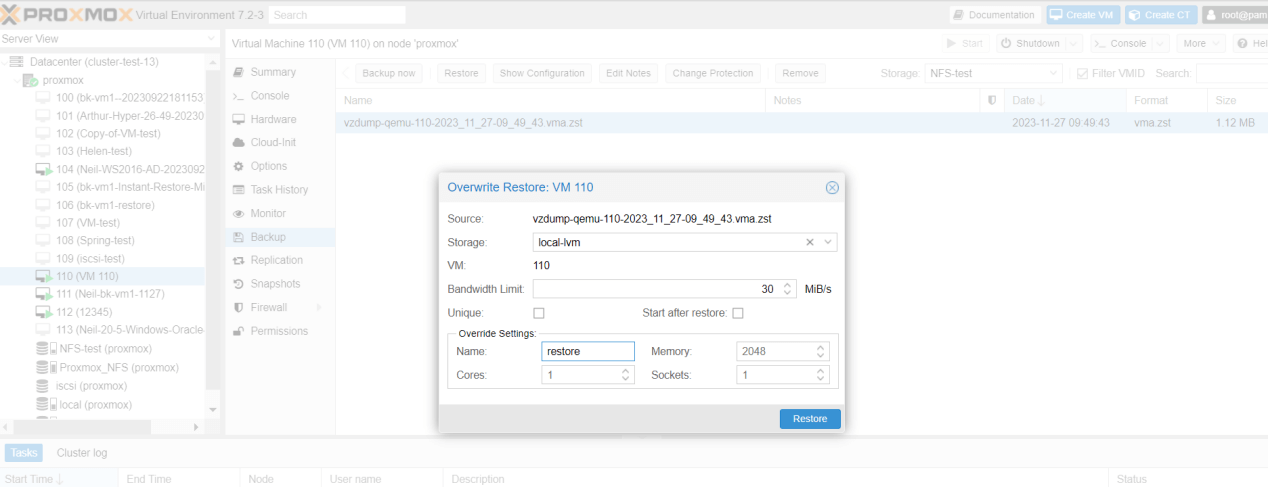
After confirming the settings, click Restore. Proxmox will recreate the virtual machine and restore its virtual disks and configuration from the selected backup.
Method 2: Restore Proxmox VM from Backup via the Command Line
If you prefer using the terminal or need to automate the restore process, Proxmox provides the qmrestore command. This method is especially useful for remote management, scripting, or batch operations.
Step 1. Log in to the Proxmox VE host via SSH or open the local shell.
Step 2. Locate the backup file you want to restore.
Step 3. Run the following command to restore the VM:
qmrestore <backup-file> <VMID>
For example:
qmrestore vzdump-qemu-100-2026_07_01-00_00_00.vma.zst 105
Step 4. (Optional) specify a target storage if you want to restore the VM to a different storage backend:
qmrestore vzdump-qemu-100-2026_07_01-00_00_00.vma.zst 105 --storage local-lvm
Step 5. Once the restore is complete, verify that the VM has been restored successfully and can boot naturally.
Tip: If the original VM still exists, restore the backup using a new VM ID first. This allows you to verify the restored VM before replacing the production instance.
Method 3: Restore a VM Backup From Proxmox Backup Server
If your backups are stored in Proxmox Backup Server, the restoration process is similarly straightforward while offering additional advantages such as deduplication and incremental backups.
To restore a VM from PBS:
1. Open the Proxmox VE web interface.
2. Select the configured Proxmox Backup Server Storage.
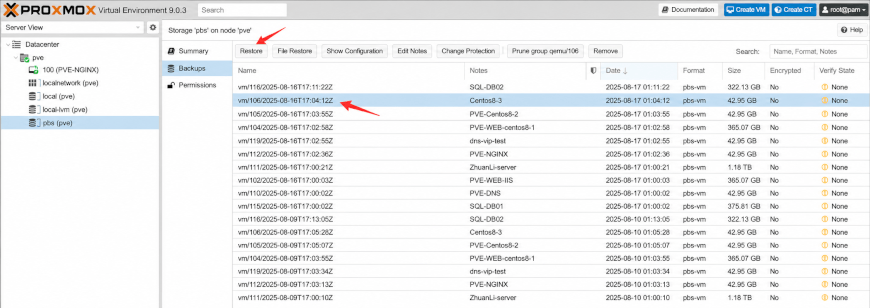
3. Browse the available backup snapshots.
4. Select the desired restore point and click Restore.
5. Configure the target node, VM ID, and storage and then start the restore process.
Because PBS stores backups incrementally, only unique data blocks are transferred and stored. This reduces storage consumption and can improve backup efficiency while still allowing complete VM restoration.
Simplify Proxmox VM Restore with Vinchin Backup & Recovery
While Proxmox VE provides built-in restore options, organizations often need more advanced recovery capabilities for business-critical workloads. Vinchin Backup & Recovery enhances Proxmox data protection with flexible recovery options, centralized management, and enterprise-grade disaster recovery features.
Key features include:
Instant recovery for quick starting VMs from backup and minimizing downtime.
Granular recovery to restore specific files without recovering the entire VM.
Cross-host migration to migrate VMs between multiple hosts from Proxmox to VMware, Hyper-V, Xenserver, OpenStack, etc.
Agentless backup without installing agents inside the guest OS.
Multiple storage options(local disks, NFS Shares, iSCSI, etc) to specify restore destinations based on your needs.
Backup verification to improve recovery reliability and reduce recovery risks.
To restore a Proxmox VM in Vinchin, you need to create a VM backup first and then follow the restore steps:
1. Navigate to Data Resilience > Restore, and choose the Proxmox backup storage you just created as the restore point.
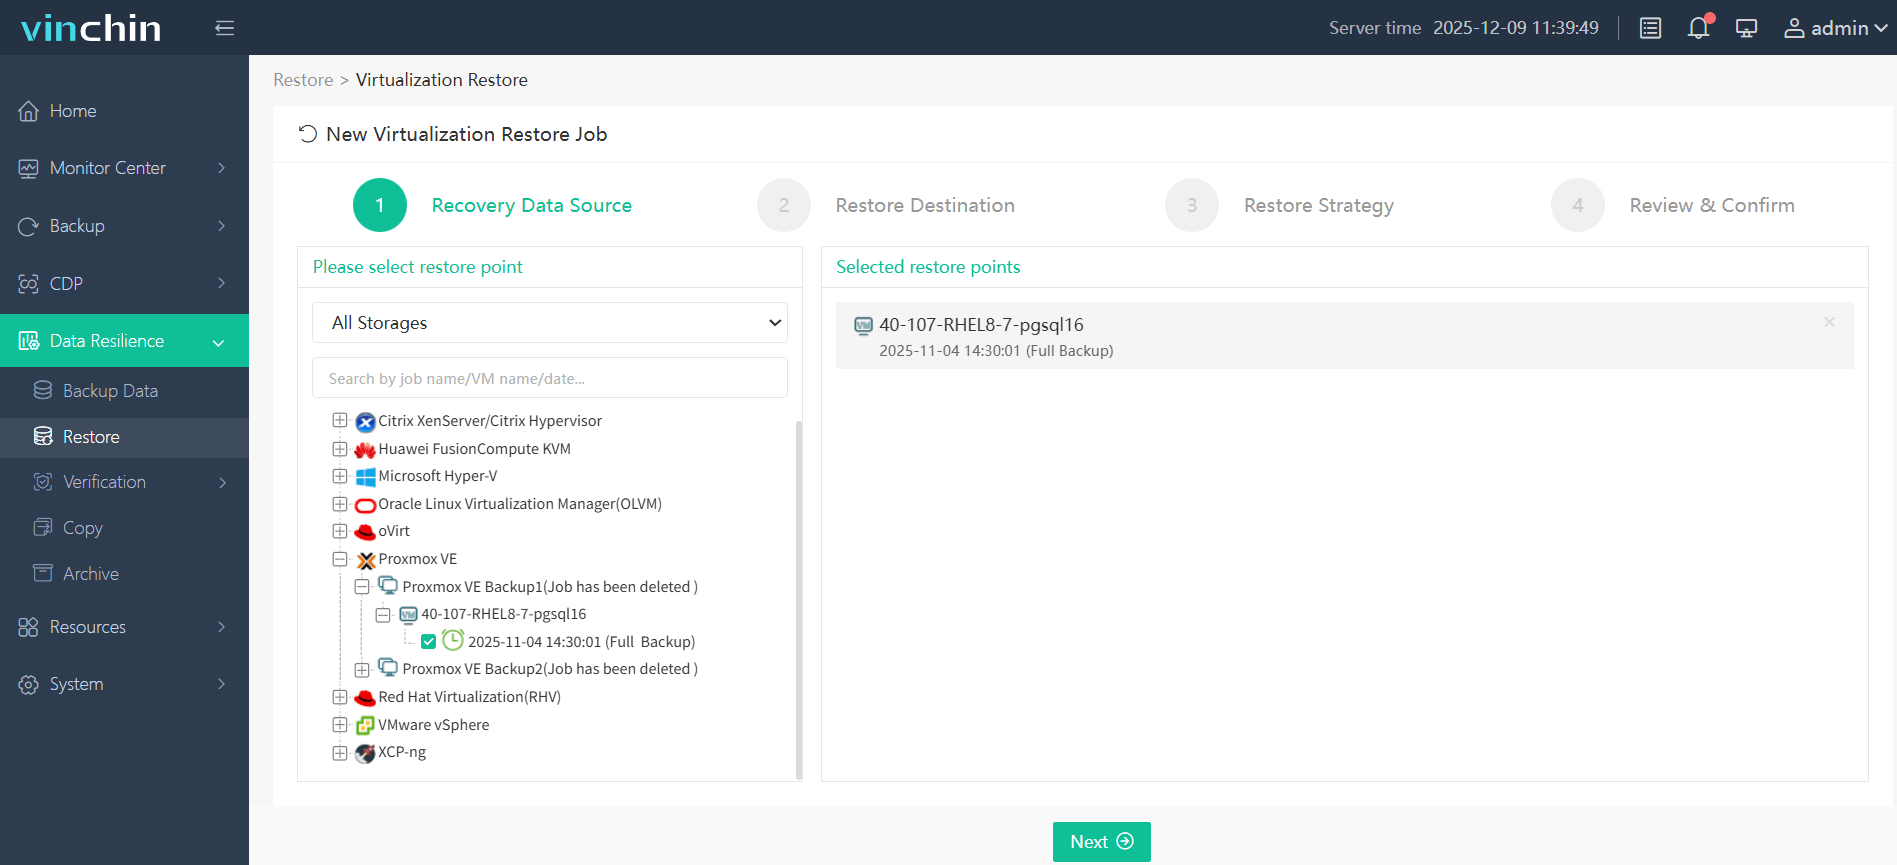
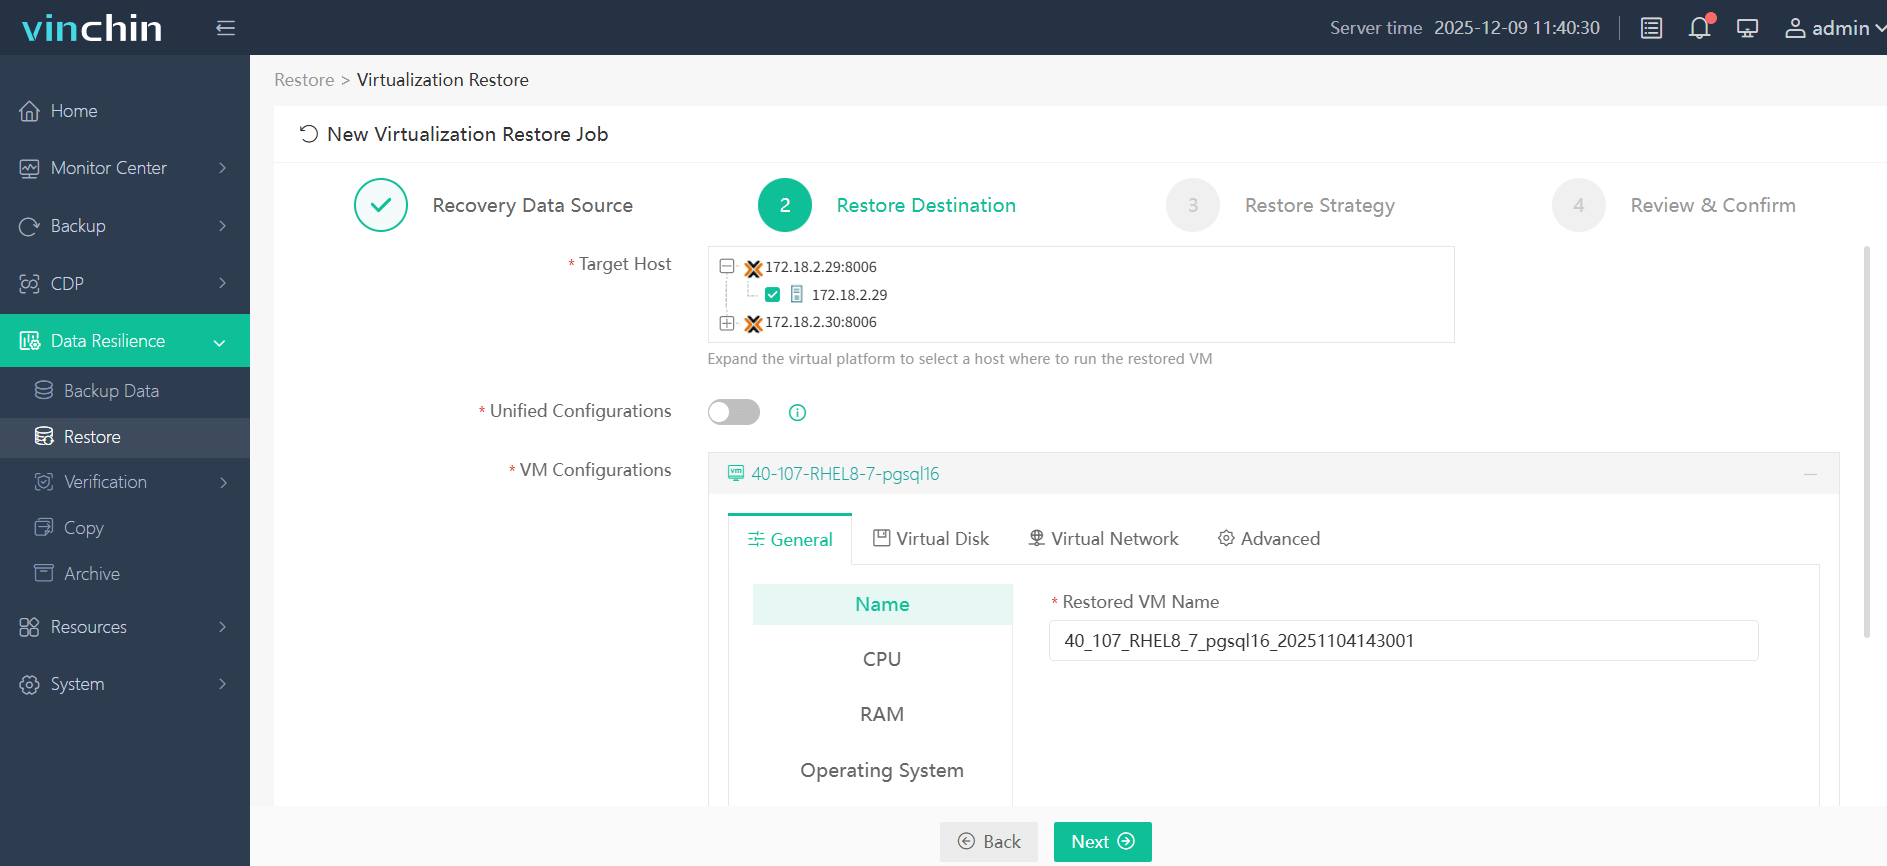
2. Then select the target host and configuration settings to specify the restore destination.
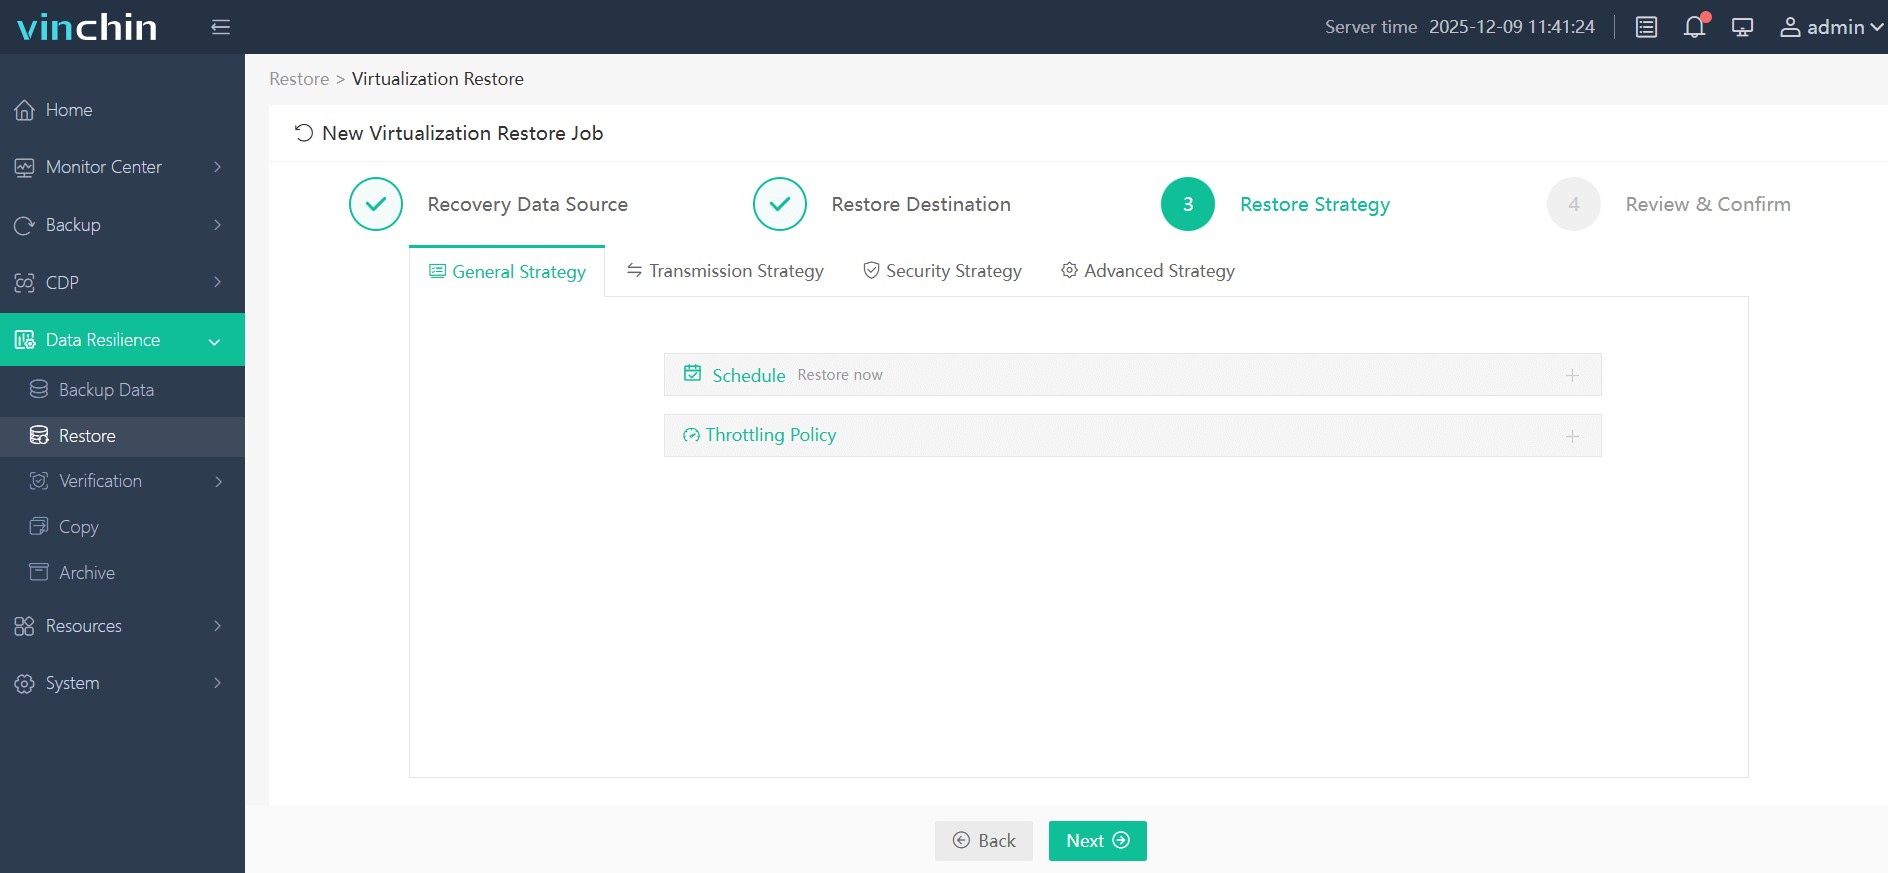
3. Choose to restore the task right now or schedule it later and customize the restore strategies.
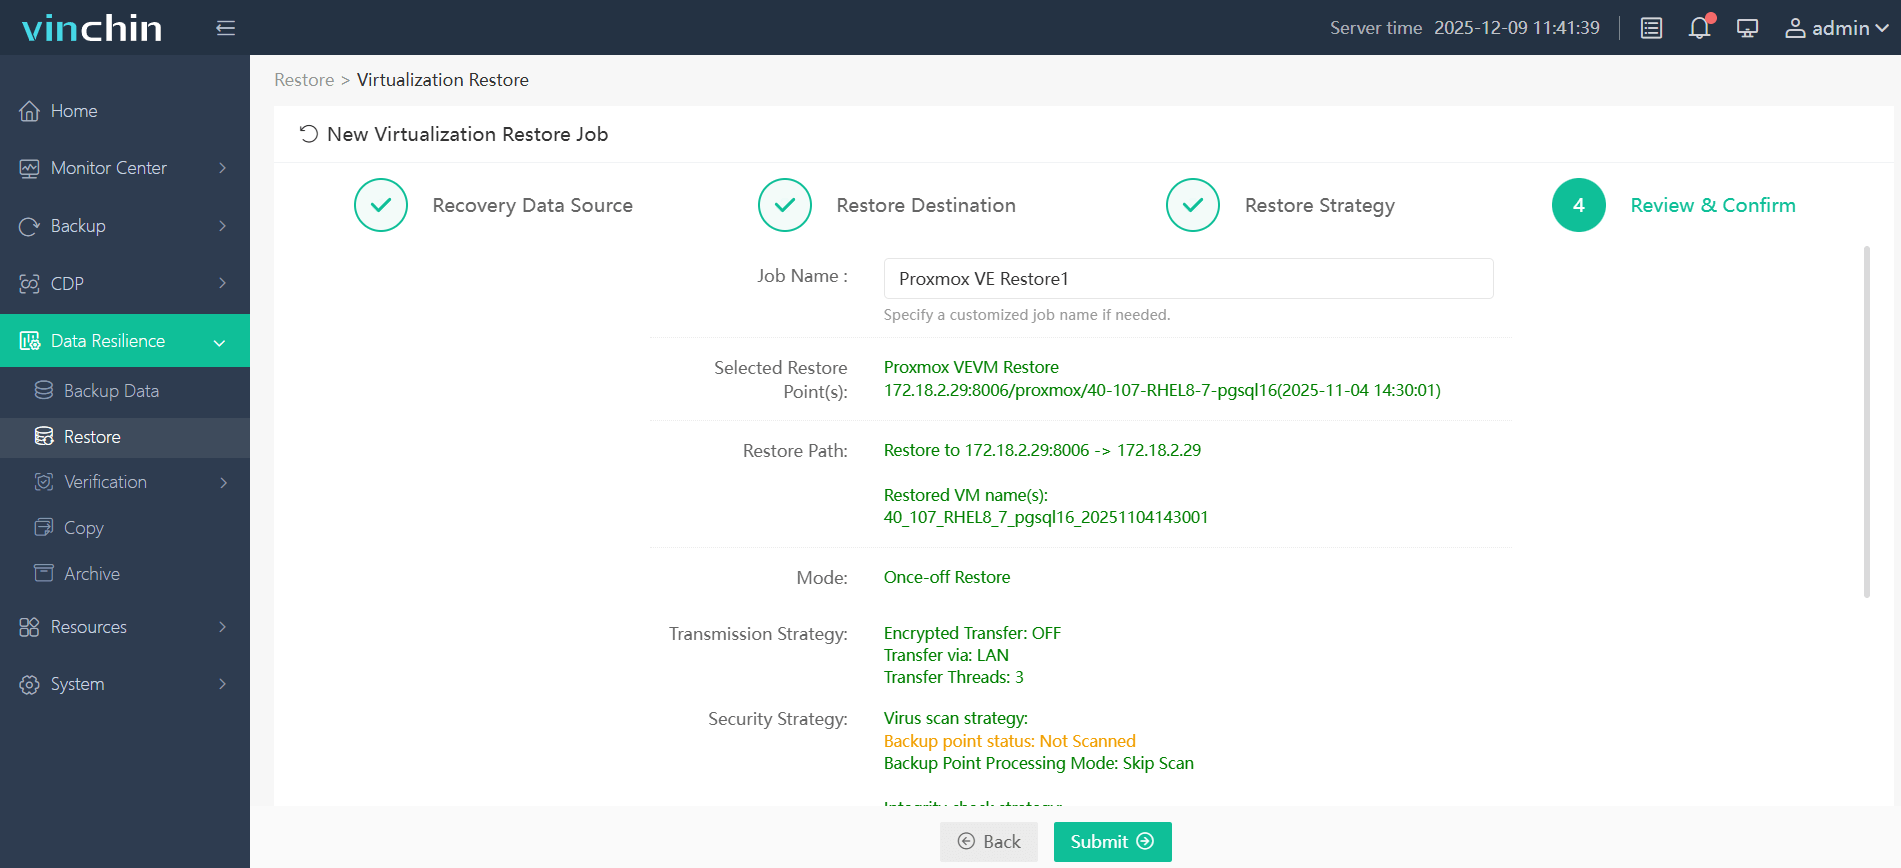
4. Check all the settings and click Submit to let the task run. Wait a few minutes; you’ll see the restored files on your new device.
Vinchin Backup & Recovery is designed to deliver reliable, hassle-free data protection for enterprises of all sizes while keeping customer needs at the center. You can start with a 60-day free trial to explore all features and evaluate the solution before purchasing.
Common Restore Errors and Solutions
While restoring a Proxmox VM is usually straightforward, you may encounter a few common issues. Here are the most frequent errors and how to fix them.
1. VM ID Already Exists
Cause: The target VM ID is already in use.
Solution: Use a different VM ID or remove the existing VM if it is no longer needed.
2. Insufficient Storage Space
Cause: The destination storage doesn't have enough free space.
Solution: Free up storage, expand the storage pool, or restore the VM to another datastore.
3. Backup File Not Found
Cause: The backup file is missing, or the storage isn't accessible.
Solution: Verify that the backup storage is mounted correctly and the backup file is available.
4. Corrupted Backup Archive
Cause: The backup file has been damaged or is incomplete.
Solution: Restore from another backup version and regularly verify backup integrity.
5. Permission or Access Errors
Cause: The target node cannot access the backup repository.
Solution: Check user permissions, storage credentials, and repository connectivity.
Best Practices to Ensure a Smooth Proxmox VM Recovery
Following a few best practices can help ensure successful VM recovery while minimizing downtime and data loss.
Test backups regularly to verify they can be restored successfully.
Keep multiple restore points in case the latest backup is corrupted.
Restore to a new VM ID first to validate the backup before overwriting the original VM.
Monitor available storage to avoid restore failures caused by insufficient capacity.
Store backups offsite to protect against hardware failures and site-wide disasters.
Proxmox Restore VM from Backup FAQs
Q1: Can I restore a deleted Proxmox VM?
Yes. If a valid backup still exists, you can restore the deleted VM using the web interface, qmrestore, or Proxmox Backup Server.
Q2: Can I restore a VM with a different VM ID?
Yes. Assigning a new VM ID creates a separate VM without overwriting the existing one, making it ideal for testing or migration.
Q3: How long does it take to restore a Proxmox VM?
Restore time depends on factors such as the backup size, storage performance, and network speed. Small VMs may take only a few minutes, while larger workloads require more time.
Q4: Can I restore individual files from a VM backup?
The built-in Proxmox restore process is primarily designed to recover an entire VM. If you need file-level recovery, a third-party backup solution like Vinchin Backup & Recovery may be a better choice.
Conclusion
Restoring a Proxmox VM from backup is straightforward when you choose the right recovery method and follow best practices. Whether you use the web interface, the command line, or Proxmox Backup Server, regular backup testing and a reliable backup solution are essential for ensuring fast and successful VM recovery. But if you unlike manual operations, Vinchin Backup & Recovery offers you an automated and simplified restore process while maximizing efficiency.