-
What Is VMware Hypervisor Recovery?
-
Why VMware Hypervisor Recovery Matters
-
How to Perform Manual VMware Hypervisor Recovery?
-
How to Backup VMware Virtual Machines with Vinchin Backup & Recovery?
-
VMware Hypervisor Recovery FAQs
-
Conclusion
Virtualization has changed how businesses run their IT infrastructure. With VMware hypervisors at the core of many data centers, stability is crucial. But what if your hypervisor fails? Maybe a patch goes wrong or hardware suddenly stops working—these are real risks every administrator faces. Knowing how to perform vmware hypervisor recovery can save hours of downtime and protect your business from bigger losses.
What Is VMware Hypervisor Recovery?
VMware hypervisor recovery means restoring your ESXi host when something goes wrong—like a failed update, misconfiguration, or hardware issue that prevents normal booting. This process focuses on fixing problems with the hypervisor itself—not just individual virtual machines (VMs). While VM-level recovery brings back lost files or systems inside a VM, vmware hypervisor recovery gets your entire virtualization platform running again so all VMs become accessible once more.
Recovery might involve rolling back to an earlier ESXi version using built-in tools, fixing boot errors through BIOS checks or hardware swaps, or reinstalling ESXi if needed. The goal is always fast restoration with minimal disruption.
Why VMware Hypervisor Recovery Matters
A failed hypervisor can bring everything to a halt—no VMs means no applications or services for users and customers. Even short outages can cause missed deadlines, lost sales, or damage to your company’s reputation. That’s why knowing how to use vmware hypervisor recovery tools is essential for any operations administrator who manages critical workloads on virtualized platforms.
Downtime isn’t just inconvenient—it’s expensive and risky. Imagine an online retailer losing access to its order system during peak shopping hours because of a failed ESXi update; every minute offline could mean thousands in lost revenue and unhappy customers who may never return. For healthcare providers relying on virtualized records systems, even brief outages could delay patient care or violate compliance rules like HIPAA.
That’s why quick vmware hypervisor recovery isn’t just technical—it’s vital for keeping promises to customers and meeting service level agreements (SLAs). Planning ahead makes all the difference when disaster strikes unexpectedly.
How to Perform Manual VMware Hypervisor Recovery?
When your ESXi host won’t boot after an update—or you see strange errors at startup—don’t panic! VMware includes built-in tools designed exactly for these situations: vmware hypervisor recovery mode lets you roll back quickly without complex procedures or extra software.
Before starting manual recovery steps below, remember this method works only if multiple versions of ESXi are installed (for example after an upgrade). If there’s only one version present on your server’s boot device (USB stick/SD card/hard drive), rollback won’t be available—but other options exist as backup plans.
Let’s walk through basic-to-advanced steps:
Step 1: Reboot Your ESXi Host
First things first—restart your server using its management interface or by pressing its physical reset button if needed.
Step 2: Enter Recovery Mode
As soon as you see the initial splash screen during reboot look closely at the bottom right corner; watch for “VMware Hypervisor Recovery” prompt appearing briefly! When it does press both Shift + R keys together right away—the timing matters here so don’t miss it!
If you miss this window simply restart again until successful entry into recovery mode occurs; patience pays off!
Step 3: Confirm Rollback Action
Once inside recovery mode you’ll see a message asking whether you want to revert back (“Roll Back”) to previous ESXi version stored in backup bootbank area; press Y key when prompted—to confirm action proceed further automatically loading older stable release instead of problematic one causing trouble now!
Step 4: Wait for Boot Completion & Check Services
After rollback completes let system finish starting up normally; log into vSphere client/web interface then check that all VMs/services are running as expected before declaring victory!
If everything looks good congratulations—you’ve performed successful vmware hypervisor recovery using native tools alone!
How to Backup VMware Virtual Machines with Vinchin Backup & Recovery?
To minimize risk and ensure rapid restoration from any failure scenario—including those requiring vmware hypervisor recovery—a robust backup solution is essential. Vinchin Backup & Recovery stands out as a professional enterprise-level virtual machine backup solution supporting over fifteen mainstream virtualization platforms such as VMware (with deep integration), Hyper-V, Proxmox, oVirt, OLVM, RHV, XCP-ng, XenServer, OpenStack, ZStack and more. Its broad compatibility ensures organizations can protect diverse environments efficiently within a single platform.
Vinchin Backup & Recovery delivers advanced protection capabilities tailored for modern data centers: forever incremental backup conserves space and accelerates jobs by copying only changed blocks after the initial full backup; deduplication and compression optimize storage usage while reducing bandwidth consumption; instant restore enables near-zero downtime by rapidly bringing critical VMs online; granular restore allows precise file-level recoveries within VMs; and scheduled backups automate routine protection tasks according to business needs—all combining to maximize uptime while minimizing resource impact.
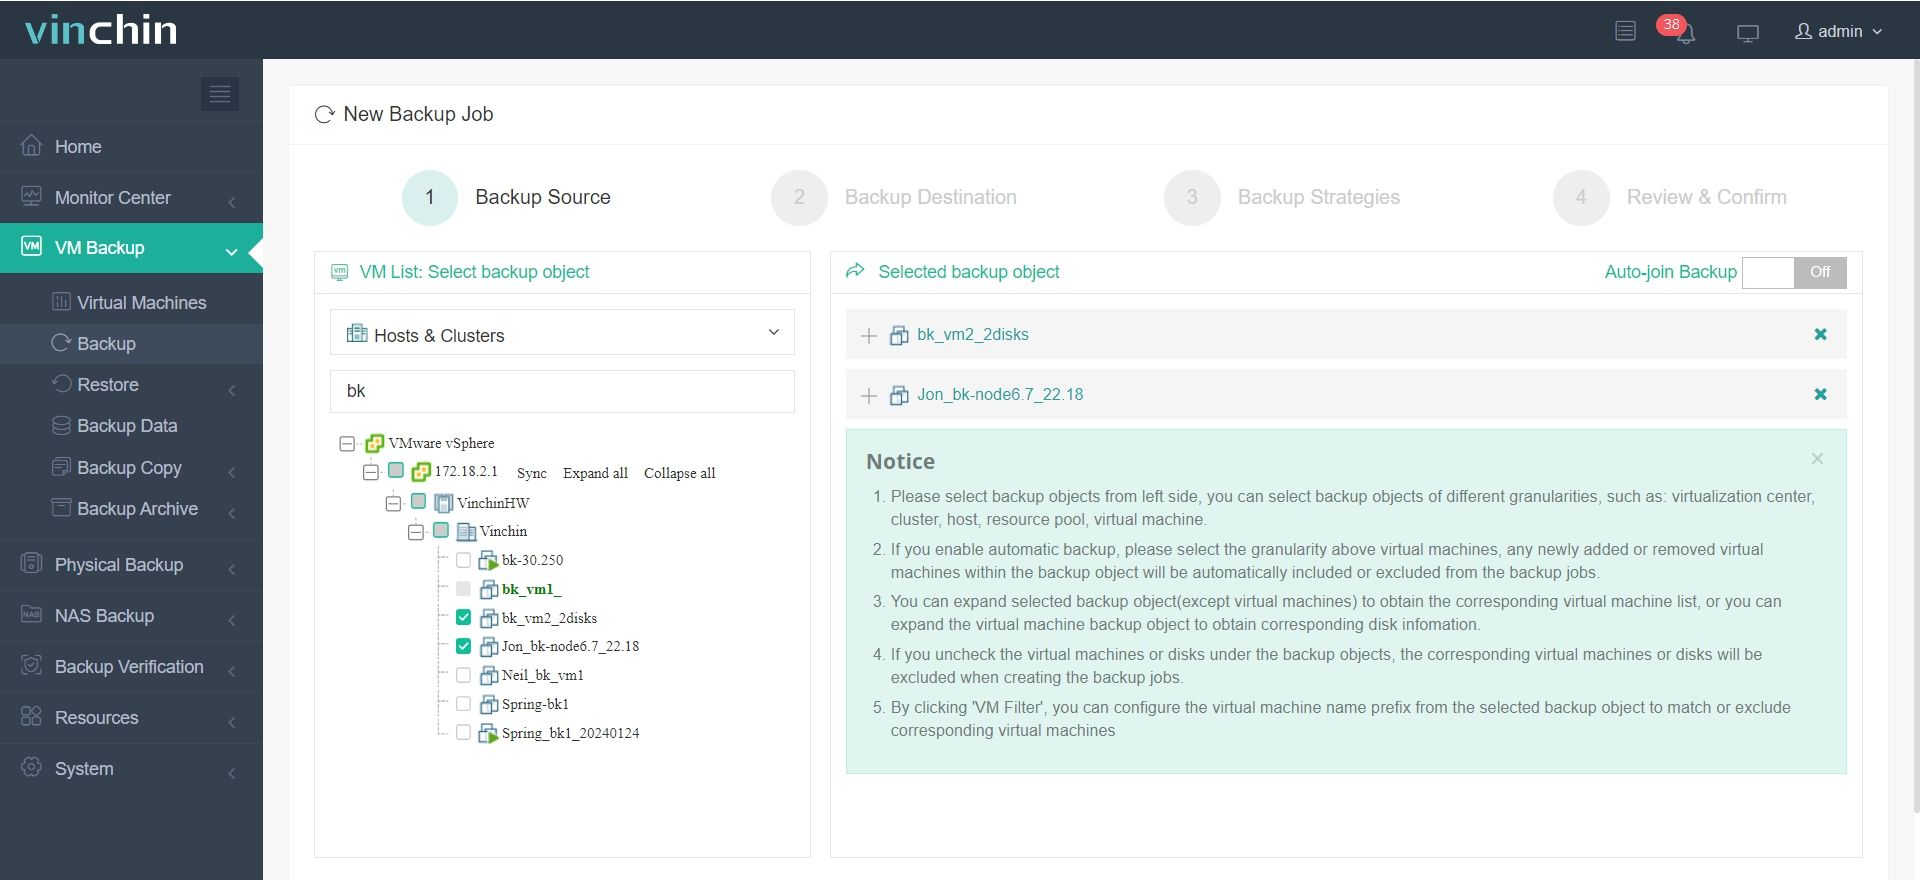
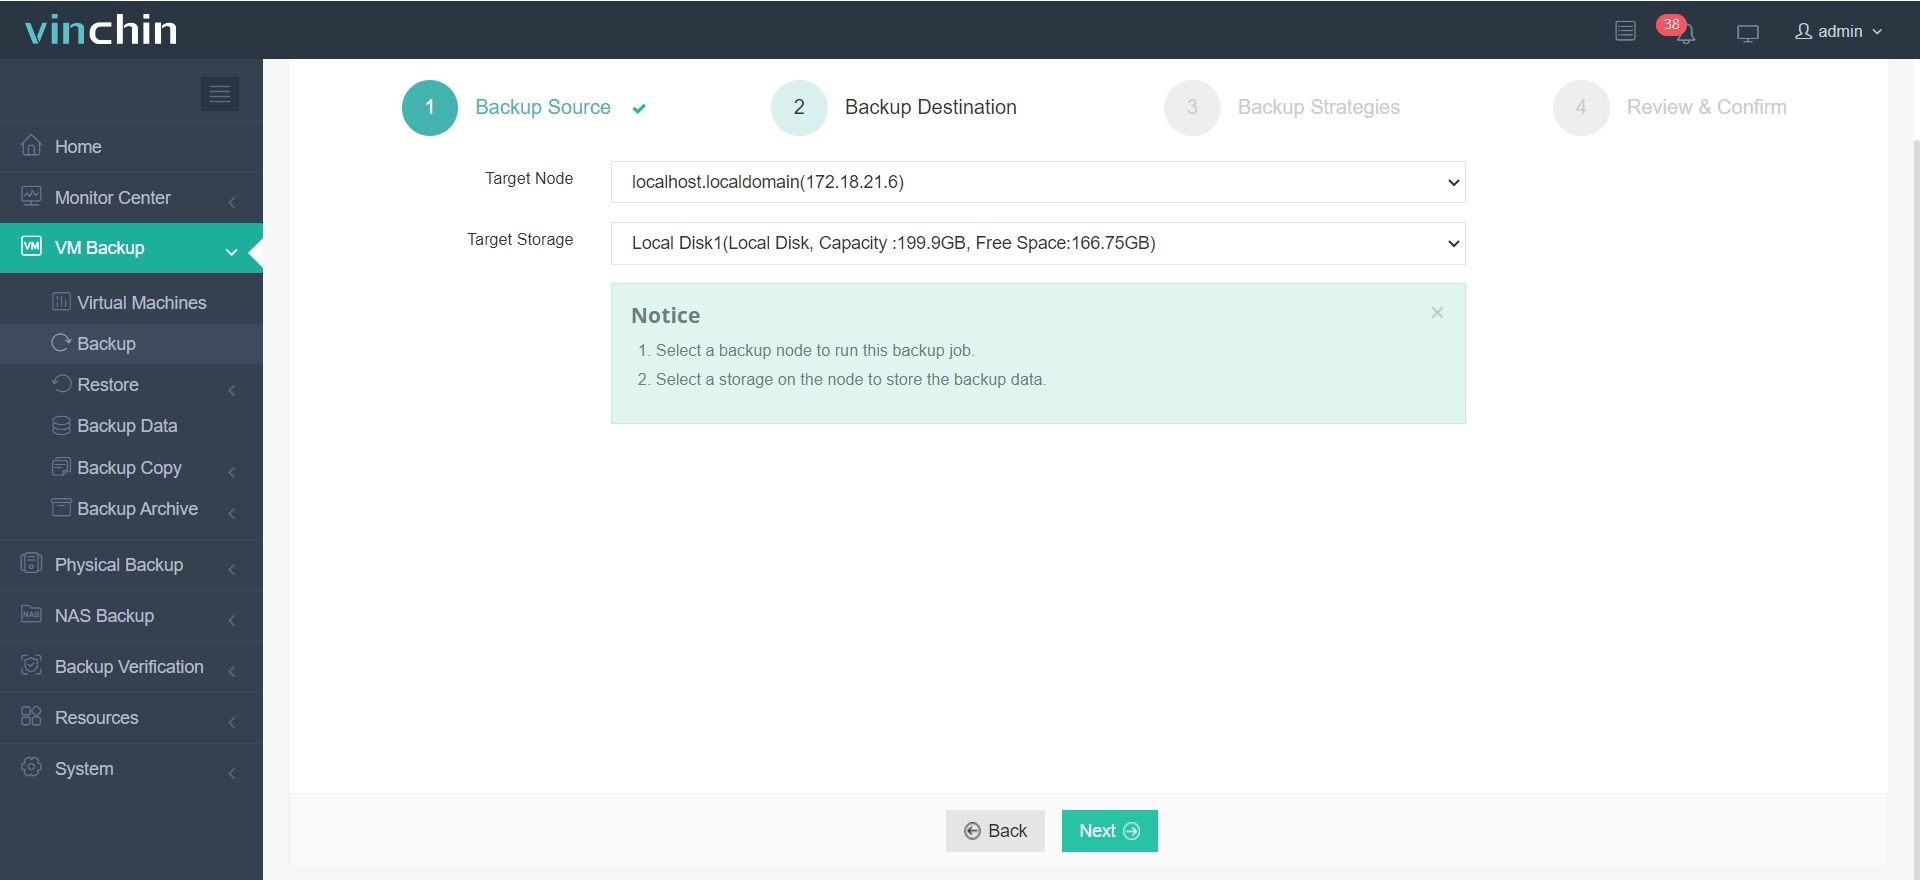
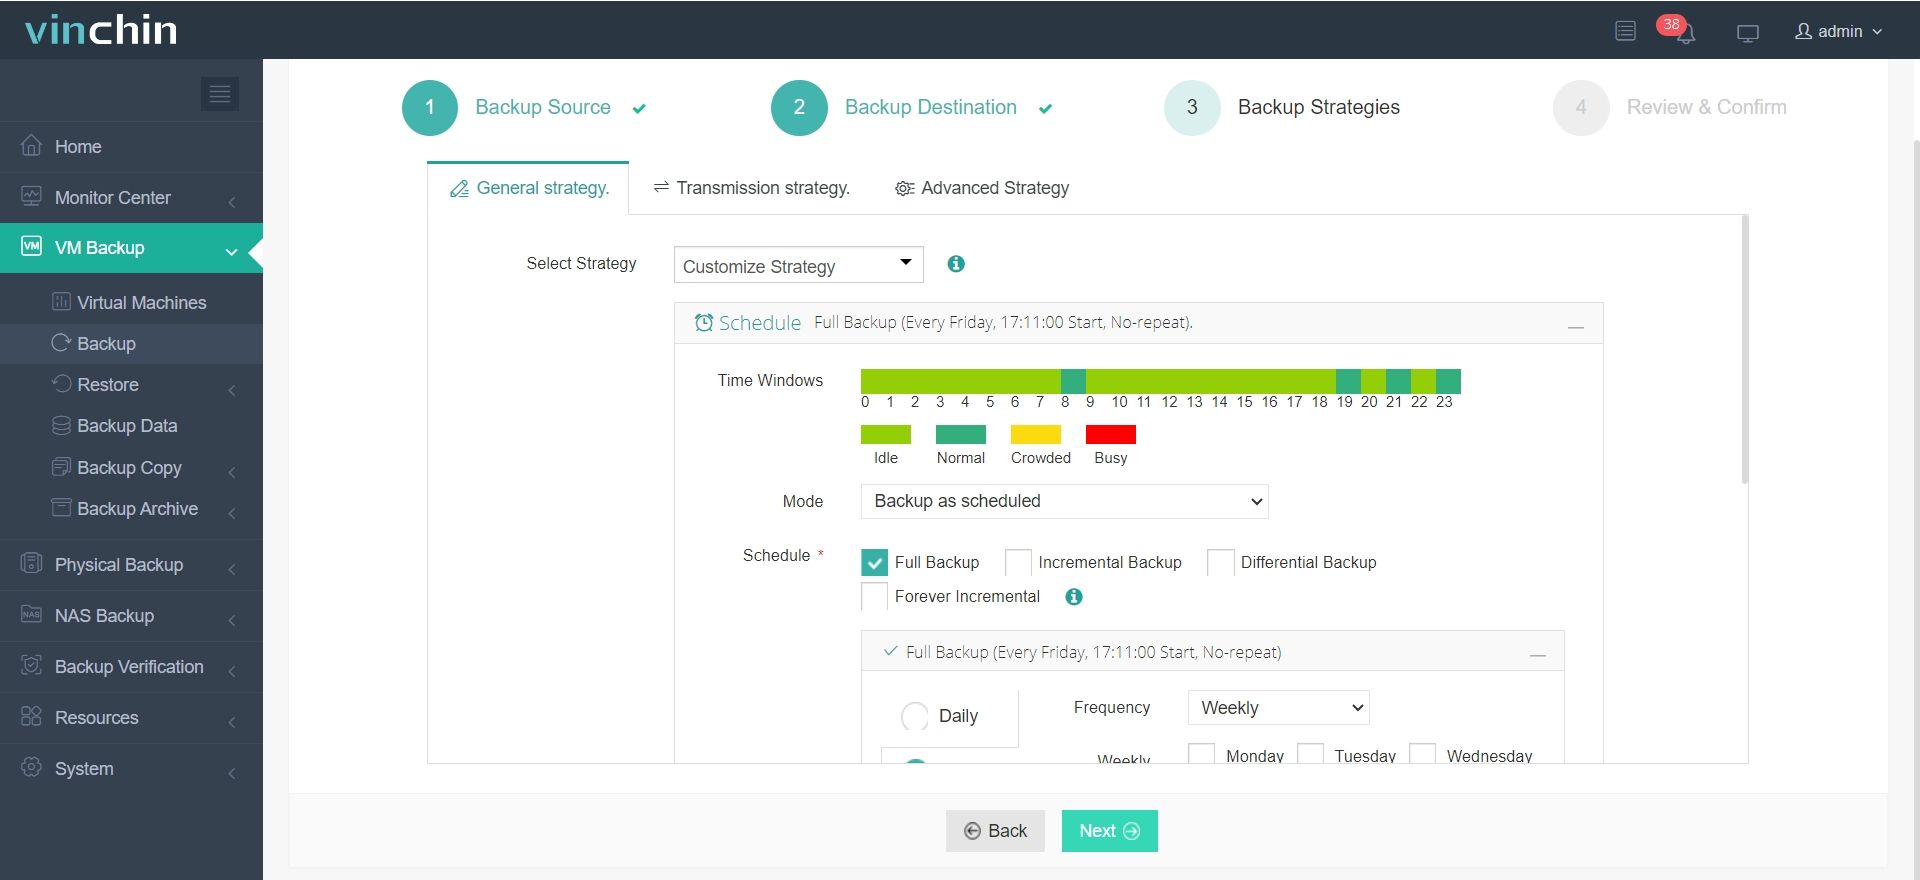
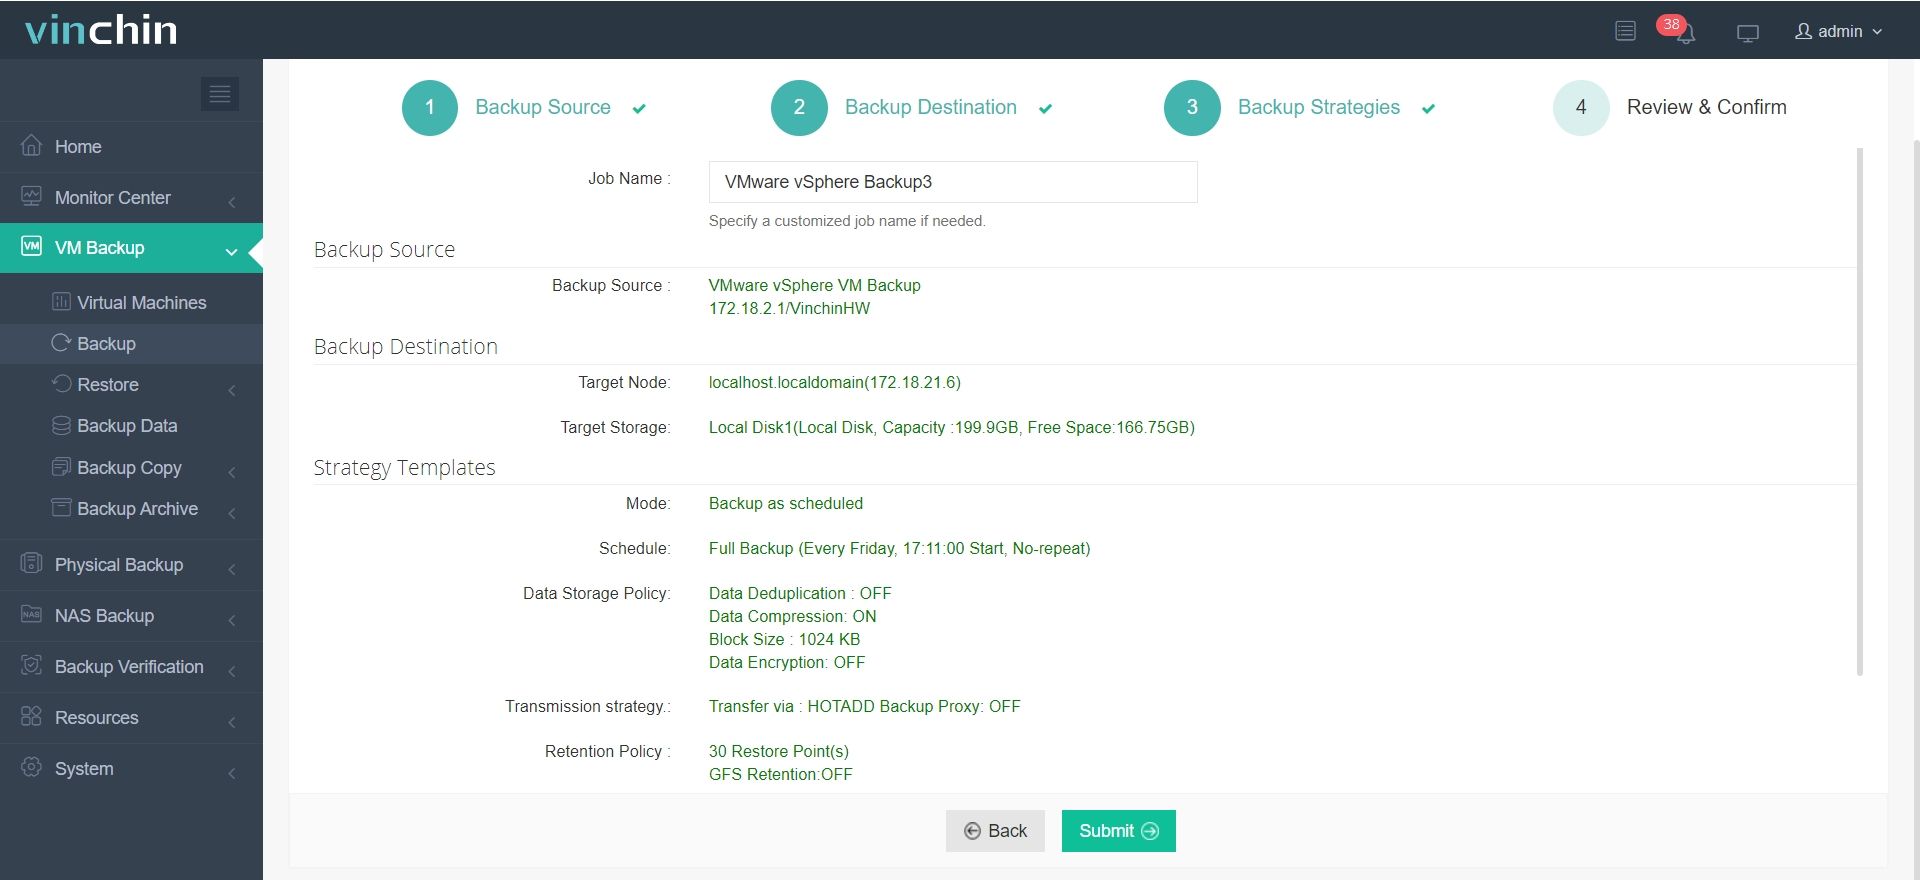
The intuitive web console makes backing up VMware VMs straightforward:
Step 1: Select the VMware VM to back up.

Step 2: Choose the backup storage.

Step 3: Configure the backup strategy.

Step 4: Submit the job.

With global recognition among enterprise users across 100+ countries—and top ratings for reliability—Vinchin Backup & Recovery offers a fully featured free trial for 60 days. Experience comprehensive data protection today by clicking download below.
VMware Hypervisor Recovery FAQs
Q1: My server boots but shows “No Previous Version Found”—what now?
A1: You’ll need to reinstall ESXi from scratch using latest installer ISO then restore configuration backups if available before resuming normal operations.
Q2: After rolling back my host network adapters stopped working—how do I fix this?
A2: Log into vSphere client > check NETWORKING section > reassign physical NICs/vSwitches matching prior setup > test connectivity before powering up production VMs again.
Q3: Can I recover my environment if both primary/backup boot devices fail simultaneously?
A3: Replace faulty hardware > install fresh copy of ESXi > import saved config/profile files > register existing VMs from datastore browser menu afterward—all done via vSphere client UI steps horizontally as follows:
INSTALL NEW DEVICE > RESTORE CONFIGURATION > REGISTER VM FILES
Conclusion
Mastering vmware hypervisor recovery keeps your virtual infrastructure resilient against unexpected failures while minimizing costly downtime risks overall. With reliable built-in tools plus proactive backups powered by Vinchin Backup & Recovery you’re ready face whatever tomorrow brings head-on—start protecting smarter today!
Share on:


