-
Why use VHDX format?
-
What are the differences between Shrink and Compact VHDX?
-
How to Shrink the VHDX disk efficiently?
-
How to compact a VHDX?
-
Professional Hyper-V VM backup solution
-
Hyper-V VHDX FAQs
-
Conclusion
When creating virtual machines using Microsoft Hyper-V, it is common to choose dynamically expanding disks, which have the advantages of occupying less physical hard disk space and faster creation times. However, there is also a drawback: the inability to automatically reclaim space. For instance, if a 5GB file is copied into the virtual machine, the physical VHD/VHDX file will increase by 5GB. When this 5GB file is deleted, the physical VHD/VHDX file size does not decrease. Over time, the physical VHD file can expand to the maximum size of the virtual disk, which is a significant waste of storage space. To solve this, Hyper-V settings include a disk optimization feature within the Edit Disk section, which can help you to manage your VHDX size.
Why use VHDX format?
VHDX is a virtual disk format introduced by Microsoft with Windows Server 2012. VHDX expands upon the capabilities of the previous VHD format, including improved performance, better mechanisms for preventing data corruption, and support for disk sizes up to 16TB, with a creation process similar to that of VHD. Compared to the older VHD format, the VHDX format has the following new features:
Supports virtual hard disk capacities of up to 64TB.
Protects against data corruption during power failures by logging updates to the VHDX metadata structures.
Optimizes the alignment of dynamic and differencing disks to work better on large sector disks.
What are the differences between Shrink and Compact VHDX?
Shrink VHDX: Shrinking a VHDX file is the process of reducing the maximum capacity of the virtual hard disk. This operation is typically used when you’ve over-allocated space for a virtual hard disk and you want to reduce its size without affecting the data contained within it. For example, if you have a 500 GB VHDX file but are only using 100 GB, you might be able to shrink it to a smaller size like 200 GB to better match the actual data usage. However, you cannot shrink a VHDX to a size smaller than the actual data it contains. The shrink operation involves reducing the logical size of the disk.
Compact VHDX: Compacting a VHDX file is the process of removing unused space from the virtual disk. This is useful for dynamically expanding disks, which grow in size as data is added but do not automatically shrink when data is deleted. Compacting the VHDX file will reduce the physical file size on the host system without changing the logical size of the disk within the virtual machine.
In summary, “shrink” is about reducing the logical size of the virtual disk (how big the disk appears to be within the virtual machine), while “compact” is about reducing the physical file size on the host system (how much space the VHDX file actually takes up on the physical storage). Compacting is typically done on dynamically expanding disks to reclaim space on the host system, whereas shrinking adjusts the maximum capacity of the disk itself.
How to Shrink the VHDX disk efficiently?
1. In the virtual machine, open the Disk Management tool. Find the disk partition you want to shrink, right-click it and select “Shrink Volume”.
Enter the amount of space you want to compress and click “Shrink”. This will free up unallocated space.
2. Shut down the virtual machine in preparation for editing the virtual hard disk in Hyper-V Manager.
3. In Hyper-V Manager, find and select your virtual machine. In the right operation panel, click “Settings”.
4. In the virtual machine’s settings window, find the virtual hard disk (usually under IDE Controller or SCSI Controller). Click “Hard Drive” and select “Edit”.
5. Select the shrink option and specify the new size
6. Complete the remaining steps of the wizard to shrink the virtual hard disk.
Shrink operations in Hyper-V can also be performed through commands:
Launch PowerShell with administrator privileges and execute the following code:
Resize-VHD -Path “C:Windows 11 To Go.vhdx” -ToMinimumSize
Replace the path with the VHDX path you wish to reduce.
Once executed, you can access the system within your virtual hard disk and open Disk Management to verify if the compressed free space has been eliminated.
PS: To expand the disk:
If you want to expand the VHDX file to 16GB you can use the following command
Resize-VHD -Path “C:Windows 11 To Go.vhdx” -SizeBytes 16GB
How to compact a VHDX?
1. In the Hyper-V Manager, click on the VM that you want to compact.
2. Right-click on the VM and select “Settings”.
Under the “Hardware” section, select the hard drive you want to compact.
Click “Edit” which is found on the right side of the Virtual Hard Disk.
3. Choose the “Compact” option
The “Edit Virtual Hard Disk Wizard” will open. Click “Next”.
Select “Compact” and click “Next”.
Review your choices and click “Finish” to start the compaction process.
Alternatively, you can compact a VHDX file using PowerShell:
Optimize-VHD -Path “C:path oyourvhdx-file.vhdx” -Mode Full
Replace “C:path oyourvhdx-file.vhdx” with the actual path to your VHDX file.
Professional Hyper-V VM backup solution
Before performing these operations, it is recommended to back up your Hyper-V VMs in case something goes wrong and results in data loss.
Vinchin Backup & Recovery is a professional solution which supports data backup of VM like VMware vSphere, Hyper-V, XenServer, XCP-ng, oVirt, RHV, OpenStack, Proxmox, etc. and other data like database, NAS, file server, Linux & Windows Server, etc.
Tailored for virtual environments, it offers automated backups, agentless backup, LAN/LAN-Free options, offsite copying, instant recovery, data deduplication, and cloud archiving. By following the 3-2-1 backup rule, Vinchin ensures robust data security. With data encryption and ransomware protection, it provides dual insurance for Hyper-V VM backups and supports easy migration between Hyper-V and other platforms.
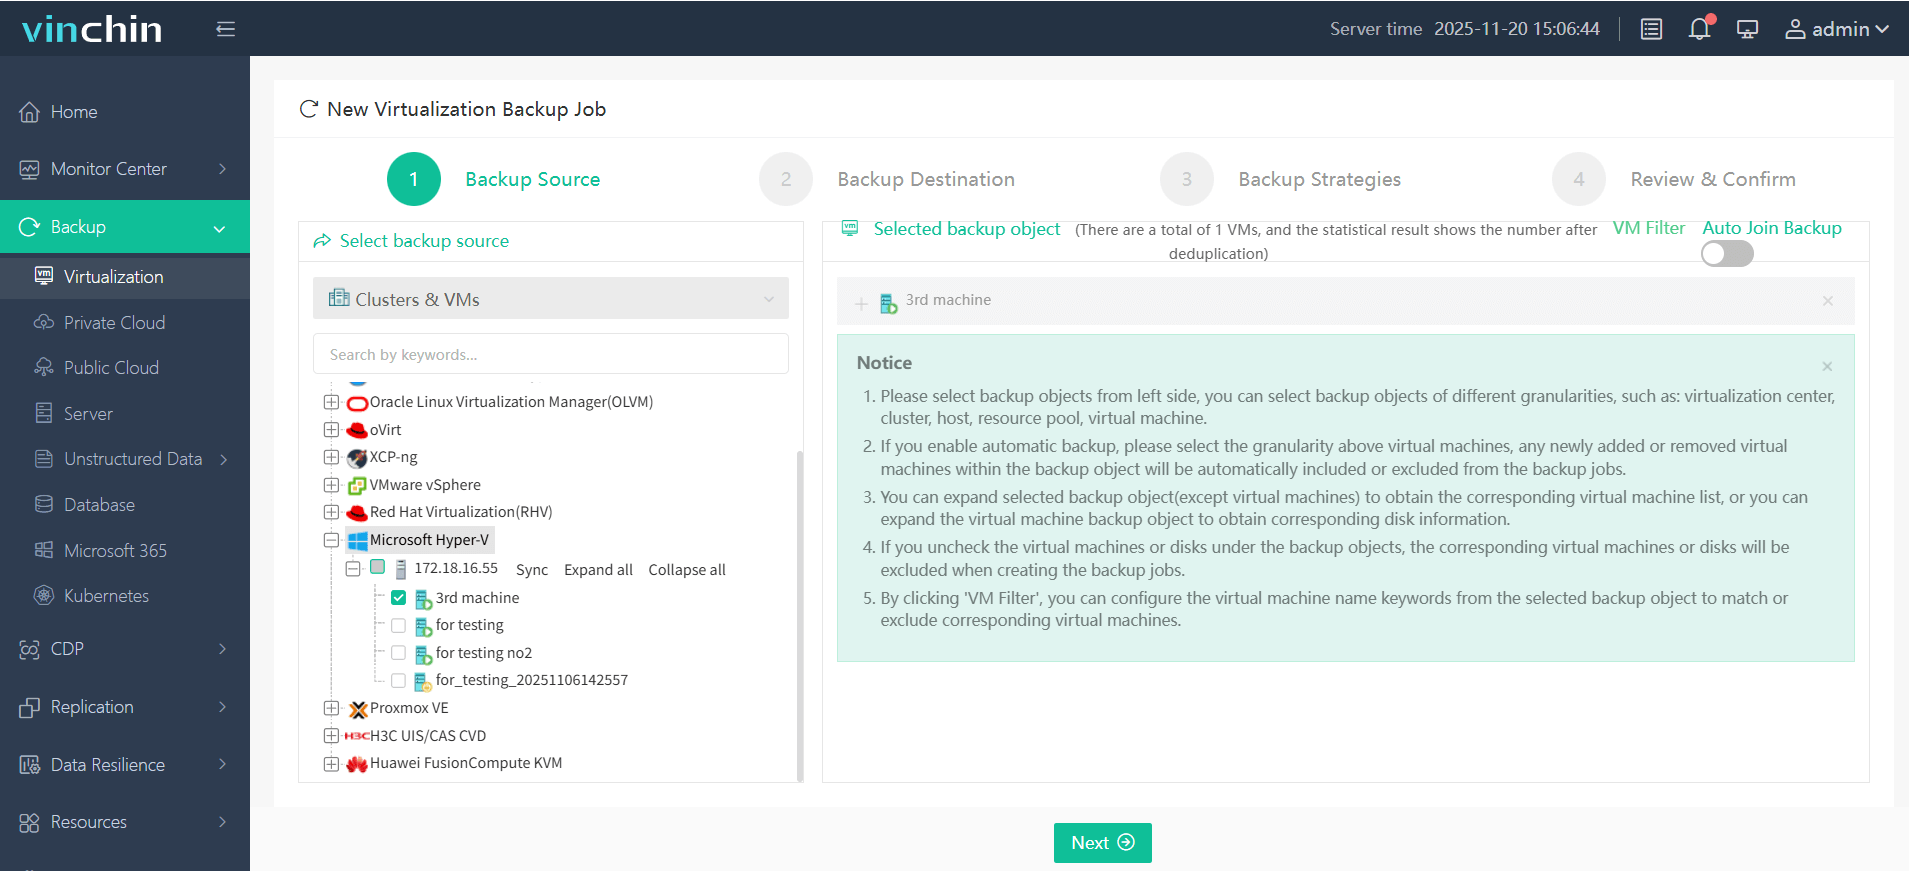
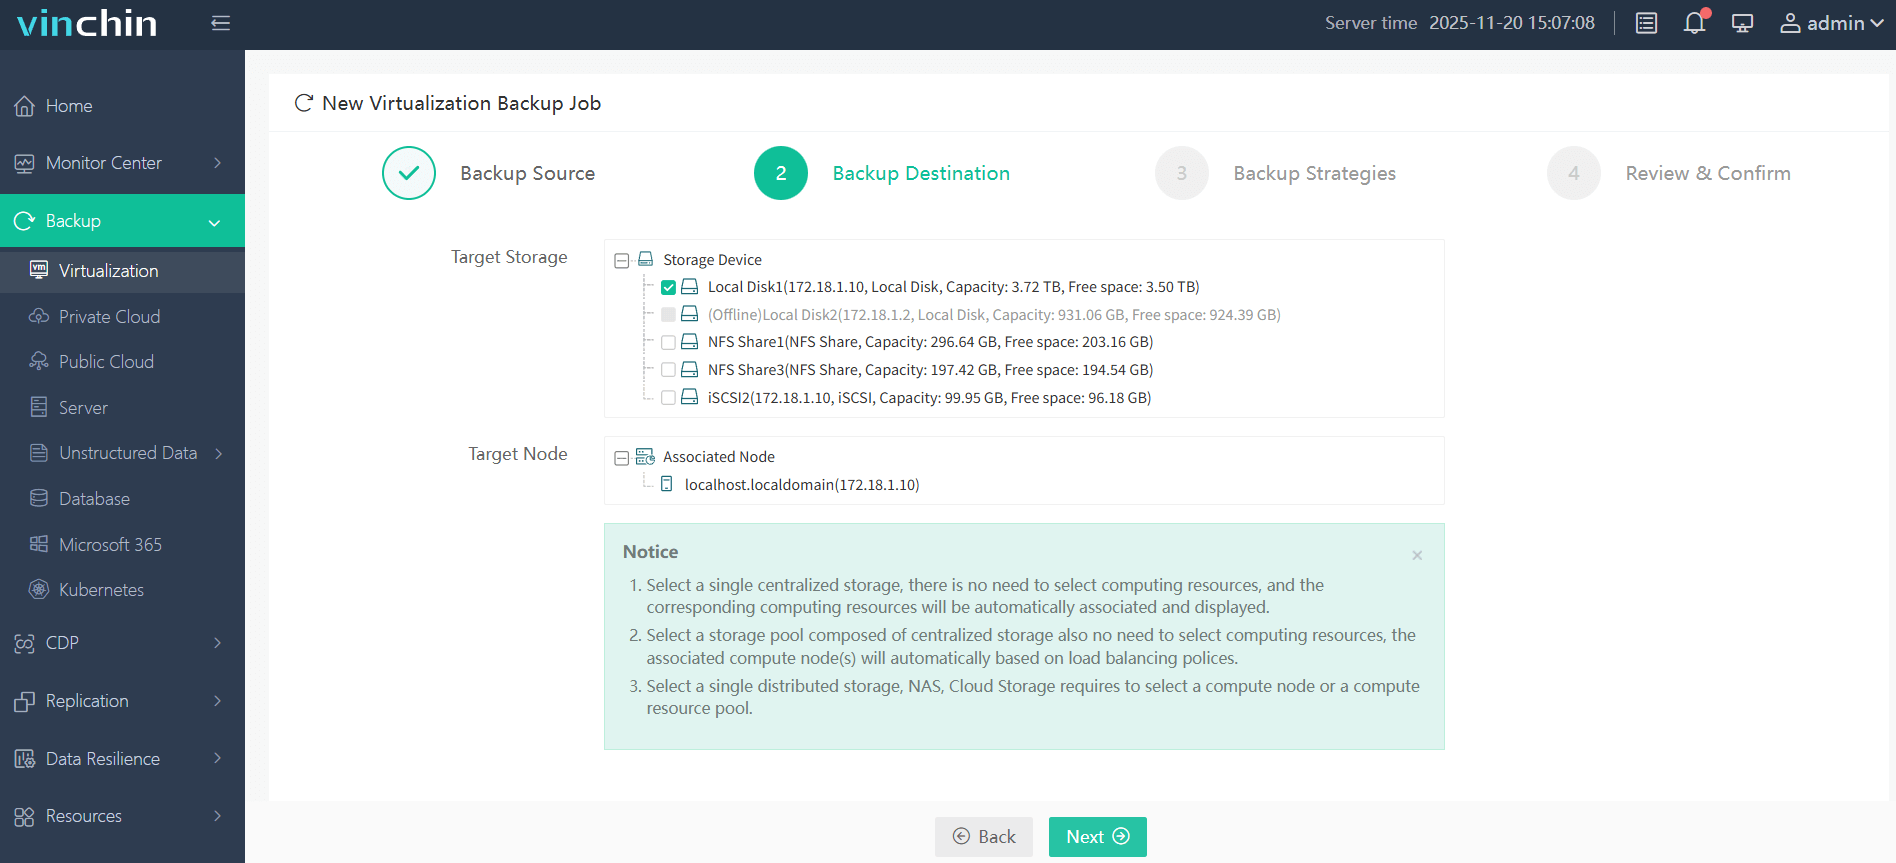
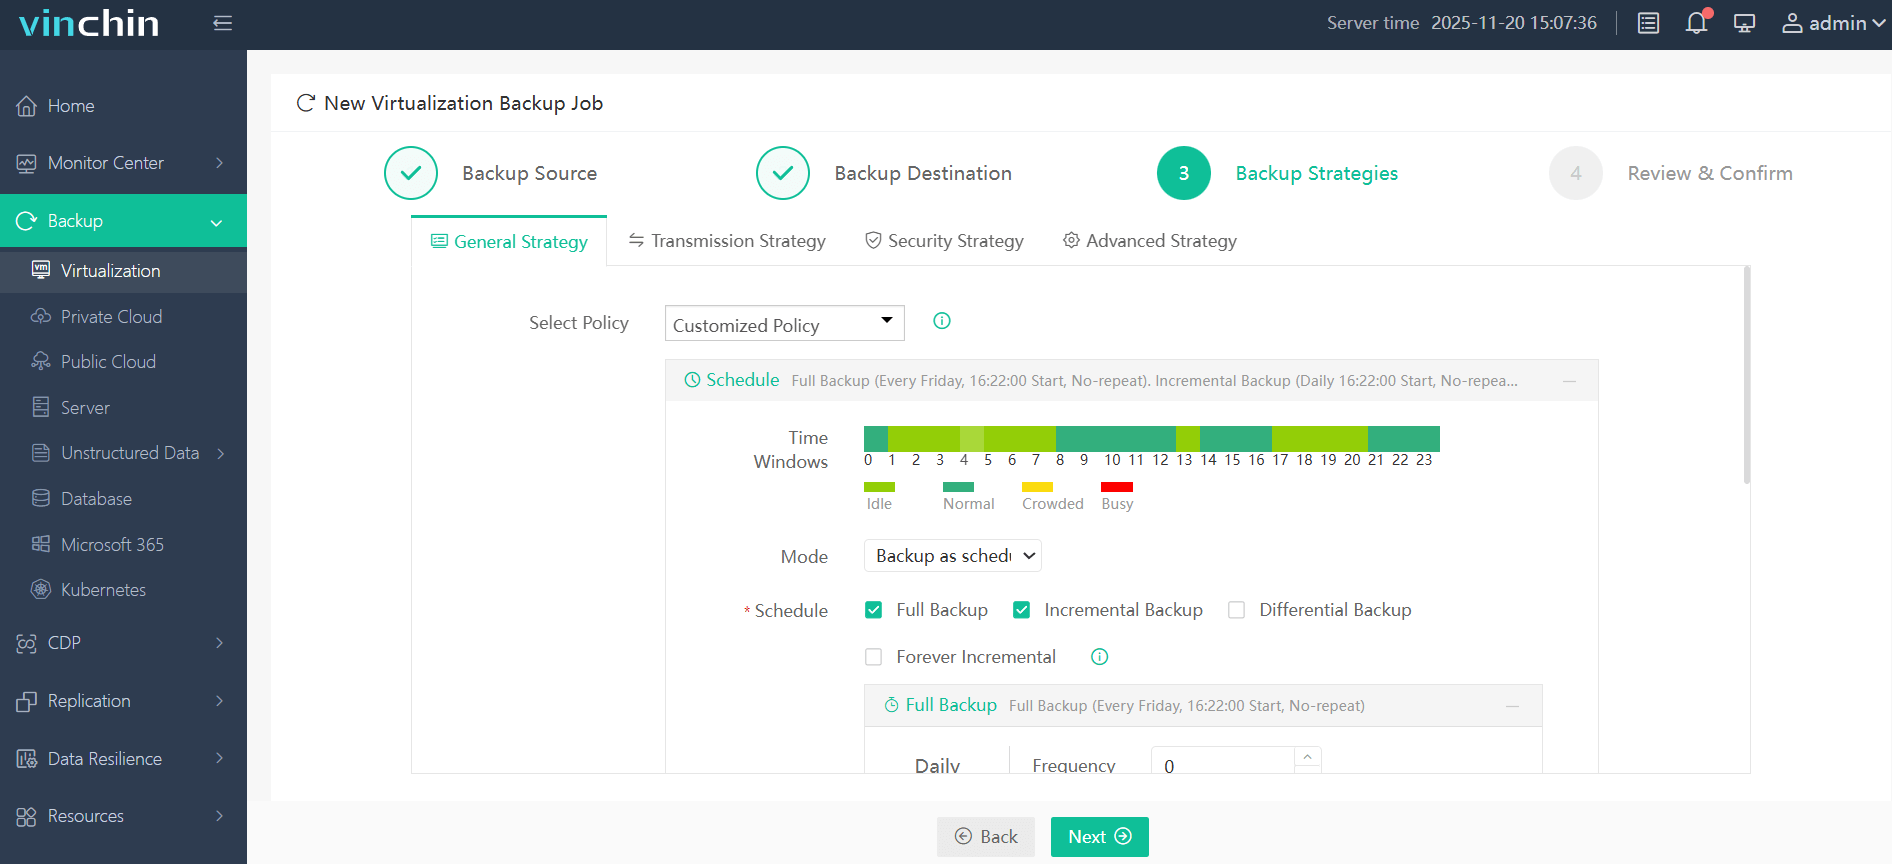
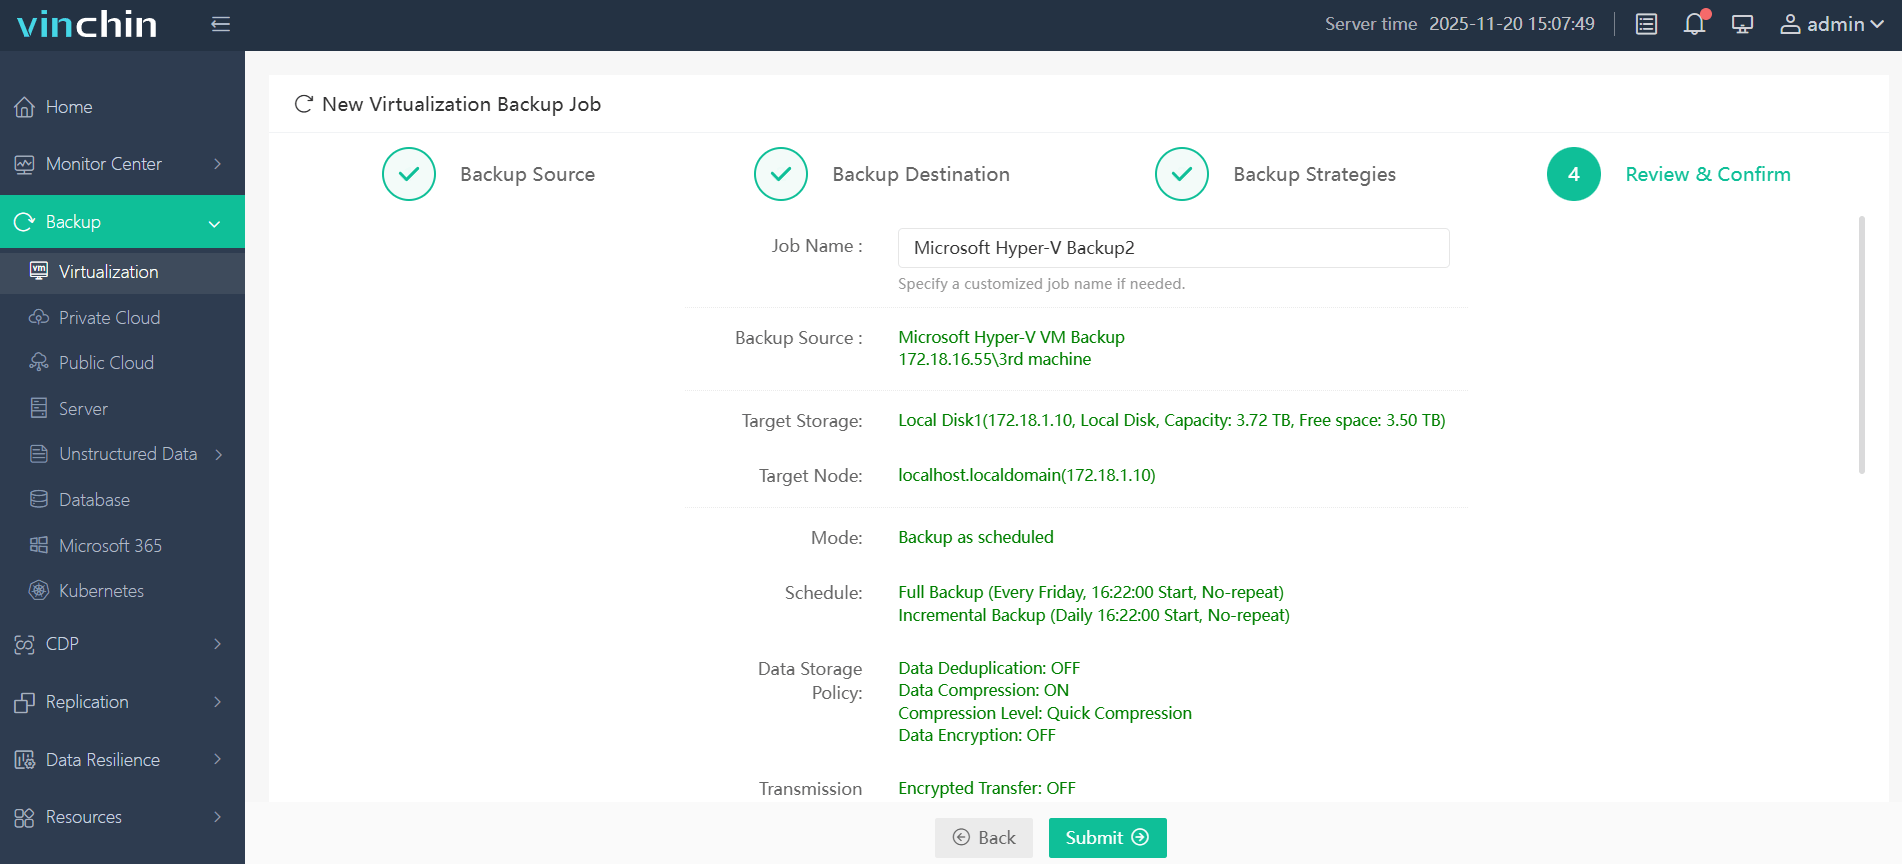
It only takes 4 steps to backup Hyper-V VMs with Vinchin Backup & Recovery:
1. Select the backup object.

2. Select backup destination.

3. Select backup strategies.

4. Review and submit the job.

Vinchin Backup & Recovery has been selected by thousands of companies and you can also start to use this powerful system with a 60-day full-featured trial! Also, contact us and leave your needs, and then you will receive a solution according to your IT environment.
Hyper-V VHDX FAQs
1. Q: How to Convert VMDK to VHD/VHDX to Migrate to Hyper-V?
A: If you want to just convert the virtual disk, you can try Qemu-img. Install this application on a local machine and then convert the virtual disk with command lines. You can also use Microsoft Virtual Machine Converter or Vinchin Backup & Recovery to move VM from VMware to Hyper-V.
2. Q: How to import VHDX into Proxmox?
A: VHDX is primarily used by Microsoft Hyper-V, while QCOW2 is associated with QEMU and KVM hypervisors. By converting VHDX to QCOW2, you can effectively import and use existing virtual machines from Hyper-V or migrate them to Proxmox for management and deployment.
Conclusion
The VHDX format offering large disk capacities and better data protection. To manage storage effectively, shrinking reduces a VHDX file’s logical size, while compacting decreases its physical size on the host. Both operations can be easily executed via the Hyper-V Manager or PowerShell, allowing for efficient use of storage and optimal virtual machine performance.
Share on:


