In PVE, besides the drive where PVE is installed, other hard drives need to be manually mounted. This is less convenient than ESXi, but the process of mounting a hard drive is not difficult. Let’s look at how to add a new hard drive in PVE, whether it’s mechanical or solid-state, the steps are the same.
What Does Mounting a Disk Means in Proxmox
In Linux-based systems such as Proxmox VE, mounting a disk means attaching a storage device to the file system so it becomes accessible to the operating system.
Without mounting:
The disk exists physically.
The system can detect it.
Applications and virtual machines cannot use it.
After mounting:
The disk becomes accessible through a directory path.
Storage can be assigned to virtual machines.
Backup repositories can be created.
ISO images and containers can be stored.
Think of mounting as connecting a storage device to a usable location within the operating system.
Why Add Disks to Proxmox Virtual Machines?
Administrators typically mount disks for several practical reasons:
Expanding VM Storage Capacity
As virtual machines grow, additional storage is often required for:
Databases
File servers
Media repositories
Application data
Creating Dedicated Backup Storage
Many organizations separate backup storage from production VM storage to improve resilience.
Reusing Existing Drives
After reinstalling Proxmox or migrating servers, administrators often need to reconnect existing disks without reformatting them.
Improving Performance
Adding SSDs or NVMe drives allows workloads to be distributed across multiple storage devices, reducing I/O bottlenecks.
Building Storage Pools
Advanced users frequently combine disks using:
ZFS Mirrors
RAID Configurations
LVM Volume Groups
for improved performance and redundancy.
Mount a New Disk in Proxmox VE
Before starting, verify that Proxmox detects the drive.
Run:
lsblk
or
fdisk -l
You should see devices such as:
/dev/sdb
/dev/sdc
/dev/nvme0n1
Step 1: Create a Partition
Launch fdisk:
fdisk /dev/sdb
Create a new partition:
n
Save changes:
w
The new partition will typically appear as:
/dev/sdb1
Step 2: Format the Disk
Format the partition with ext4:
mkfs.ext4 /dev/sdb1
For XFS:
mkfs.xfs /dev/sdb1
For ZFS deployments, create a ZFS pool instead of formatting traditionally.
Step 3: Create a Mount Point
Example:
mkdir /mnt/storage01
Step 4: Mount the Disk
Execute:
mount /dev/sdb1 /mnt/storage01
Verify:
df -h
The new storage should now appear in the system.
Step 5: Configure Persistent Mounting
Find the disk UUID:
blkid
Example output:
UUID="1234-abcd"
Edit:
nano /etc/fstab
Add:
UUID=1234-abcd /mnt/storage01 ext4 defaults 0 2
Test:
mount -a
If no errors occur, the disk will automatically mount after reboot.
Add the Mounted Disk to Proxmox Storage
1. Once mounted, open Proxmox Web GUI
2. Navigate to Datacenter > Storage
3. Click Add > Directory
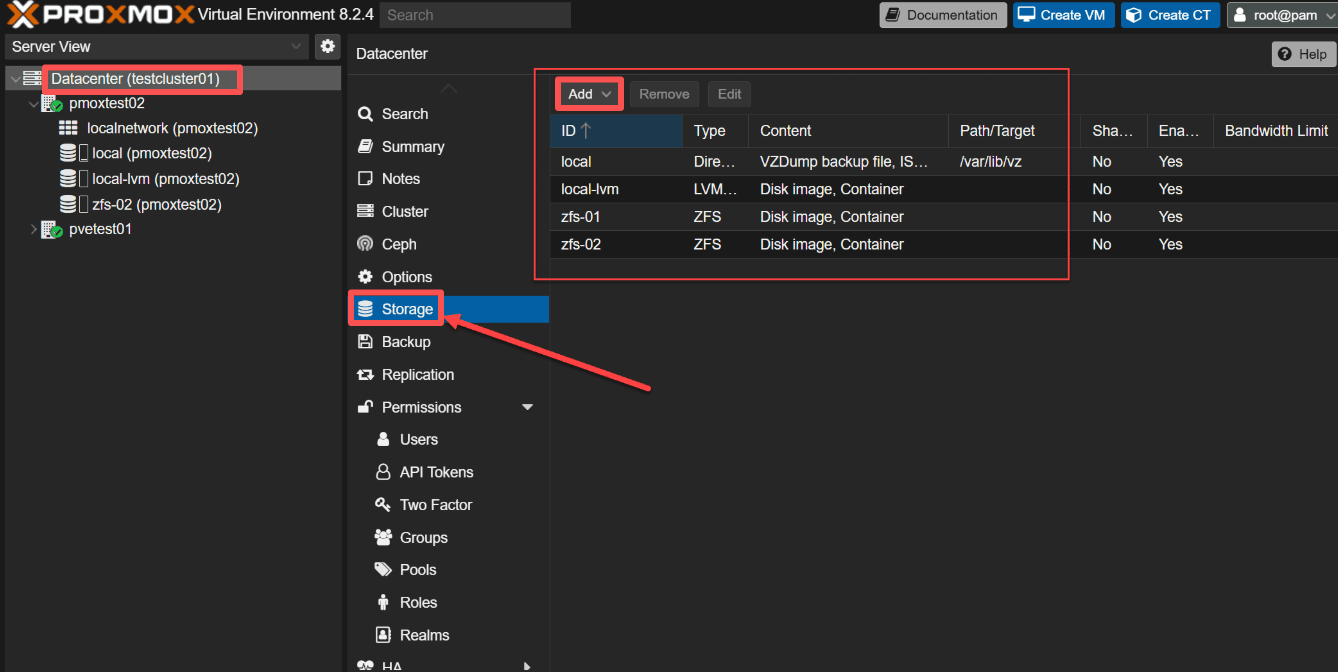
4. Configure the ID, directory path, and content types
Mount an Existing Disk Without Formatting
A common scenario occurs after:
If the disk already contains data:
First identify the partition:
lsblk
Create a mount point:
mkdir /mnt/recovery
Mount the existing partition:
mount /dev/sdc1 /mnt/recovery
Check contents:
ls /mnt/recovery
If the data appears correctly, add the UUID to /etc/fstab for persistent mounting. This approach allows recovery of VM backups and disk images without wiping the drive.
Attach an Existing Virtual Disk to a VM
Sometimes administrators need to reuse:
qcow2 disks
raw images
migrated VM disks
Proxmox allows existing virtual disks to be attached to a VM.
Common methods include:
qm rescan
or manually editing the VM configuration file:
/etc/pve/qemu-server/<VMID>.conf
After rescanning, Proxmox may detect orphaned disks and list them as "Unused Disk" in the VM hardware configuration.
Physical Disk Passthrough to a Virtual Machine
In some cases, a VM needs direct access to a physical HDD or SSD.
Example:
qm set 100 -scsi2 /dev/sdb
This passes the physical disk directly to VM 100.
Typical use cases include:
NAS virtual machines
Backup appliances
Storage gateways
Database servers
Always verify the correct device before passthrough to prevent accidental data loss.
Protecting Mounted Storage with the Vinchin Backup & Recovery
Adding storage increases flexibility, but it also increases the amount of critical data that must be protected.
Many Proxmox administrators discover that storage expansion often creates new backup challenges:
More virtual machines
Larger backup repositories
Multiple storage locations
Cross-platform migrations
This is where Vinchin Backup & Recovery becomes valuable!
Vinchin Backup & Recovery provides agentless backup and recovery for Proxmox VE environments, helping organizations protect virtual workloads without disrupting production operations.
Key capabilities include:
Agentless Proxmox VM backup
Incremental backup
Global deduplication
Instant VM recovery
Cross-platform VM migration
Offsite disaster recovery
Centralized backup management
For organizations running production Proxmox clusters, combining proper storage management with reliable backup protection creates a stronger foundation for business continuity.
It only takes 4 steps for you to backup Proxmox VE VMs:
1.Select the backup object.

2.Select backup destination.

3.Configure backup strategies.

4.Review and submit the job.

It offers a wide range of features, including V2V migration, allowing seamless transfers between different virtual platforms. Click the button below to download a 60-day free trial and experience it for yourself!
Proxmox mount disk FAQs
Q1: How do I mount an NFS share in Proxmox?
A: Install NFS utilities (apt install nfs-common), create a mount point (mkdir /mnt/nfs), and mount the NFS share with mount -t nfs <NFS_Server_IP>:/share /mnt/nfs. For persistence, add it to /etc/fstab.
Q2: How can I mount a ZFS dataset?
A: If you have ZFS set up, use zfs mount poolname/datasetname to mount the dataset. Normally, ZFS automatically handles mounting at boot.
Q3: Can I attach an existing qcow2 disk to a VM?
Yes. Existing virtual disks can be attached through VM configuration files or detected using:
qm rescan
depending on the storage type.
Conclusion
Whether you're adding a brand-new SSD, reconnecting an existing backup drive, attaching a virtual disk, or implementing physical disk passthrough, understanding the correct mounting process helps prevent configuration issues and data loss.
As storage infrastructure grows, protecting that data becomes equally important. Combining proper Proxmox storage management with a dedicated backup solution such as Vinchin Backup & Recovery can help ensure that virtual machines remain recoverable even when hardware failures, accidental deletions, or unexpected outages occur.


