When using Proxmox VE, you can conveniently back up your virtual machines with its built-in backup function, making VM backup simple and efficient. What's more, Proxmox VE's backup feature is very flexible, allowing you to choose to store your backup files on a variety of devices connected to the host computer. A USB drive is one of the most popular choices because it offers portability, affordability, and offline protection against data loss. This post will tell you how to backup Proxmox VM to USB drive for data storage and protection.
Benefits of Backing up Proxmox VM to USB Drive
Proxmox backup VM to USB drive has the following advantages:
Data security: Data in virtual machines can be secured by backing up Proxmox VM to usb drives. In the event of a system failure, hardware failure, or other catastrophic event, VMs can be restored quickly, reducing the risk of data loss.
Portability and flexibility: USB drives are portable and can be easily connected to different systems. This makes it simple to transfer and share backup files, as well as easy to take backups off-site, increasing the flexibility of backing up data.
Cost effectiveness: Backing up Proxmox virtual machines to USB storage is often a cost-effective option, particularly for smaller virtualized environments. This approach provides a relatively low-cost backup solution.
Independence and offline backups: Backing up Proxmox VM to USB drives means that backups can run independently of the network, reducing the impact of network failures on backups. This helps improve the stability and security of your backups and prevents network attacks from damaging backup data.
How to Backup Proxmox vm to USB Drive?
Before starting, make sure you have:
A USB drive with sufficient free space
Administrative access to the Proxmox host
A mounted USB storage device
A supported file system such as ext4 or XFS
Note: FAT32 is not recommended because it has a maximum file size limit of 4GB, which is often insufficient for VM backups.
This process for Proxmox backup VM to USB drive consists of two main steps:
Create backup folders and associate USB drive: First, create a folder on the Proxmox server dedicated to backups. Next, connect a USB drive to the Proxmox server and associate it with the newly created backup folder. This ensures that the backup files are safely stored on the USB drive and provides a reliable basis for backup and recovery operations.
Backup and restore Proxmox VMs: Backup and restoration of Proxmox VMs can be performed using the Proxmox VE console or Proxmox's command line tools. During the backup process, the VM's configuration, disk state and other information is saved as a backup file and stored in a pre-created backup folder. These backup files are stored offline via a mounted USB drive. Such a backup process ensures that VMs can be restored quickly and reliably when needed, providing an effective layer of protection for data security.
To backup Proxmox virtual machines to USB storage, follow these steps:
Step 1. Create a Backup Folder on a USB Drive
Insert the USB external drive into the Proxmox host system, making sure that the drive has enough free space to store Proxmox containers and virtual machines.
If the USB drive is not automatically mounted, verify that the system detects it:
lsblk
The example filename is My_Proxmox_Backups, and the directory path is:
/media/ostechnix/SK_Ostechnix1/My_Proxmox_Backups
Step 2. Create New Proxmox Storage for Backups
1. In Proxmox VE, hit Datacenter > click Storage > click Add > choose Directory
2. In Directory, enter the actual path to the backup directory created on the external USB drive:
/media/ostechnix/SK_Ostechnix1/My_Proxmox_Backups
3. choose VZDump backup file under Content > click Add
Step 3. Backup Proxmox Virtual Machines
In Proxmox VE, hit Datacenter > click Backup > choose the backup > click Add > define your backup job > hit Create
Step 4. Run the Backup Manually
In Proxmox VE, hit Datacenter > click Backup > choose the backup > hit Run now
Alternatively, you can perform a backup from the command line:
vzdump 100 --storage My_Proxmox_Backups --mode snapshot
Replace 100 with your VM ID.
Step 5. View backup
In Proxmox VE, click My_Proxmox_Backups > Backups to view the backup files.
You can also browse the USB drive directly and navigate to:
dump/
to locate the backup archives.
Step 6. Recover Proxmox VM
Click on the VM you need to recover > hit Backup > choose Restore.
Choose the backup file stored on the USB backup storage, specify the target VM ID and destination storage, and then click Restore.
You can also restore a VM from the command line:
qmrestore vzdump-qemu-100.vma.zst 101
This command restores the backup and creates VM ID 101.
Limitations of Backing up Proxmox Vms to USB Drives
Although USB backups are simple and inexpensive, there are some limitations:
Storage capacity is limited compared to NAS or backup servers
Backup and restore performance depends on USB speed
USB drives can be disconnected accidentally
A single USB drive may become a single point of failure
Less suitable for large production environments with many VMs
Reliable VM Backup Solution for Proxmox: Vinchin Backup & Recovery
By successfully backing up your Proxmox virtual machine to a USB drive following the steps described above, you have achieved a secure and portable data protection solution. Although Proxmox has built-in backup functionality, in some cases you may need more advanced features to regularly monitor and manage your backup policy to ensure the security and availability of your VMs in case of any unforeseen circumstances.
Vinchin Backup & Recovery provides a powerful backup solution for virtual machine environments. The software supports multiple media, including USB and disk, and spans multiple virtualization platforms, such as Proxmox, VMware, Hyper-V and more. With comprehensive and flexible features such as agentless backup, instant recovery and V2V migration, enterprises can customize their backup strategy to ensure that critical data is reliably protected and efficiently managed in virtualized environments.
Vinchin Backup & Recovery’s operation is very simple, just a few simple steps.
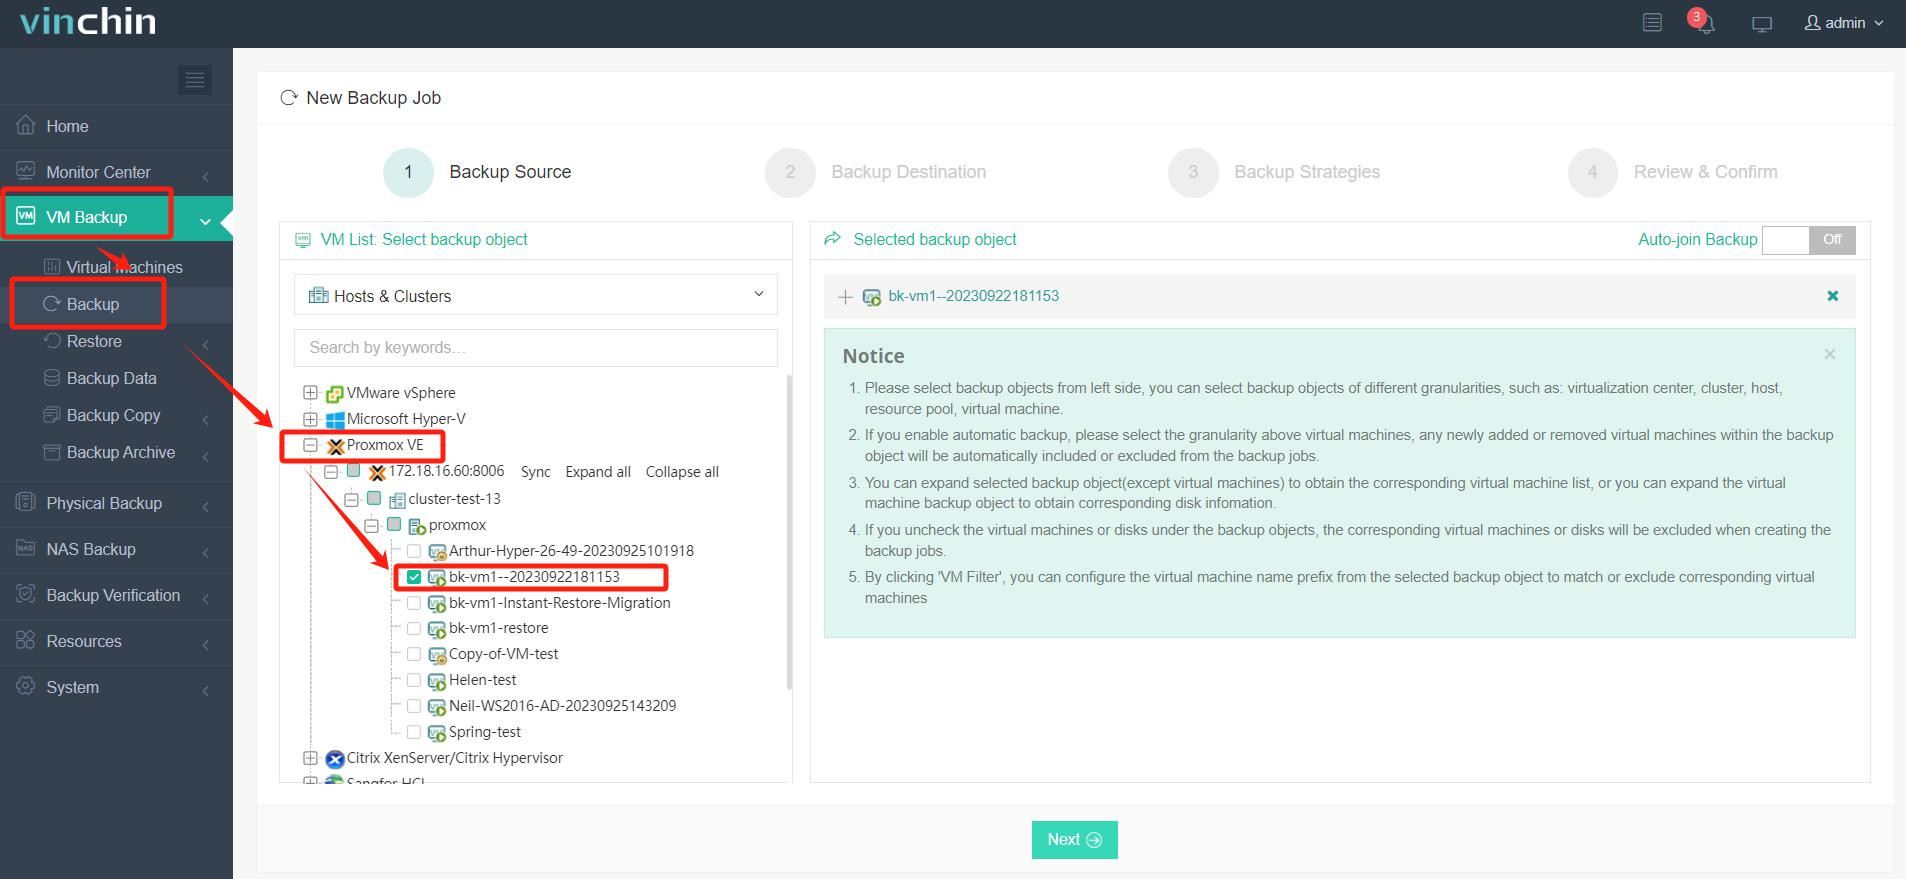
1. Go to VM Backup > Backup and select the Proxmox VM host from the expanded list as the backup source.
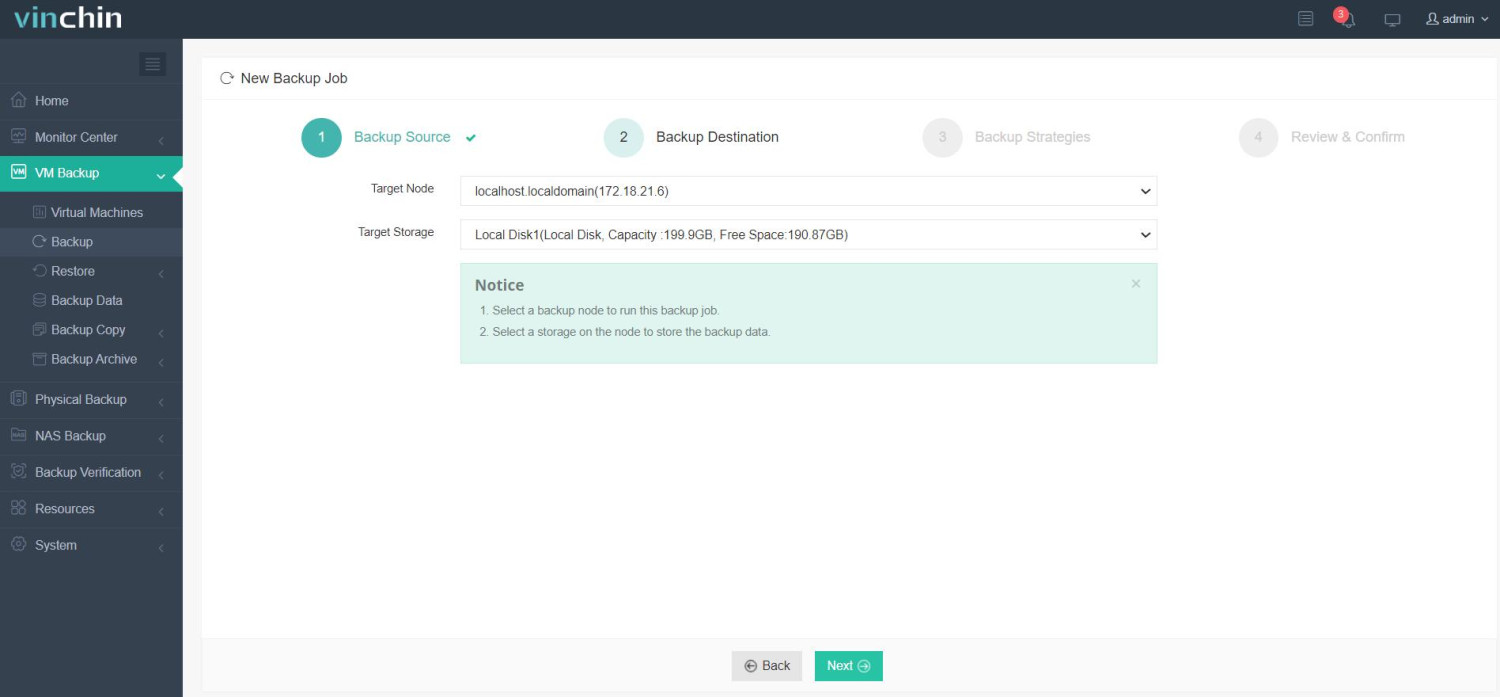
2. Choose the target backup node and storage devices to accomplish the backup destination setting.
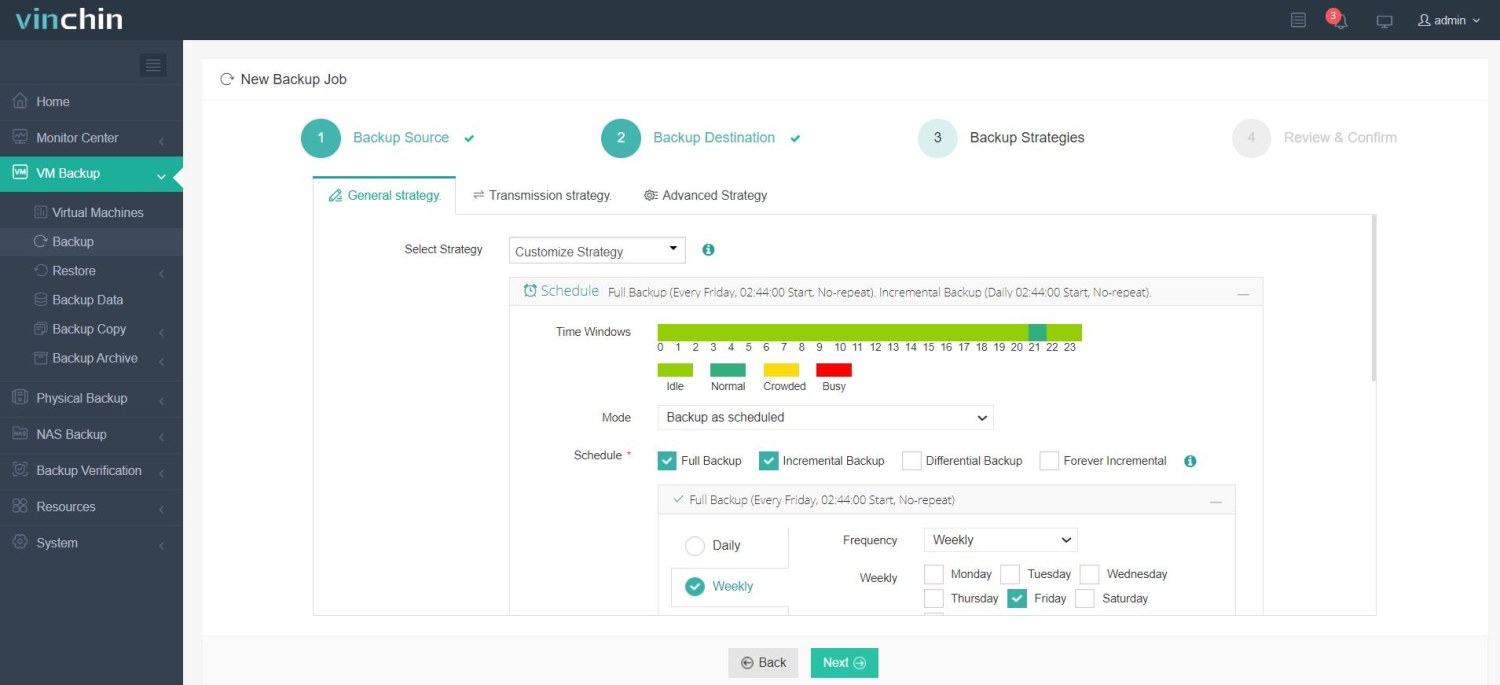
3. Customize the backup strategies, run the job right away or schedule it daily, weekly, or monthly using full, incremental, or differential backups.
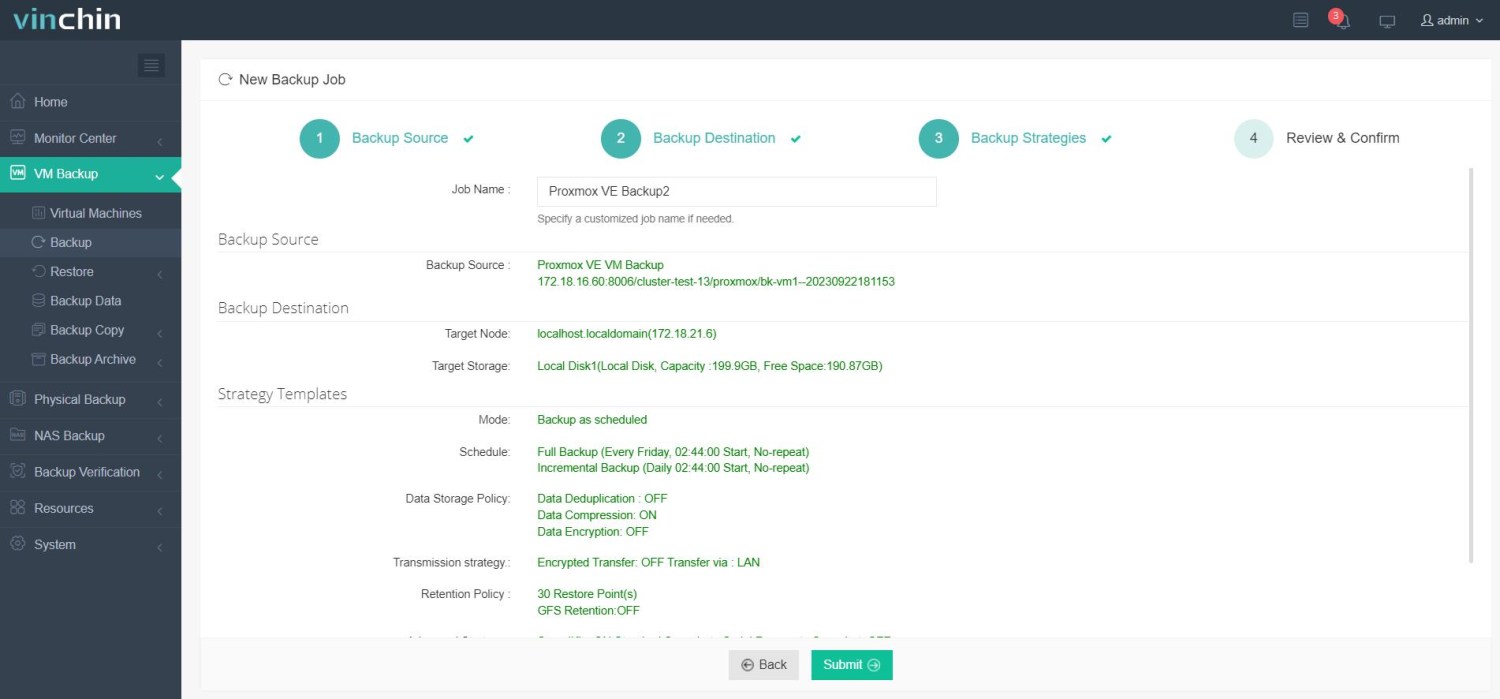
4. Review the entire settings, and click Submit to initiate the backup task.
Vinchin provides users with the opportunity to explore the full functionality through a complimentary 60-day trial in a real-world environment. This trial allows users to experience the robust features of Vinchin Backup & Recovery firsthand. For additional details or inquiries, feel free to reach out directly to Vinchin or connect with our local partners.
Proxmox backup VM to usb drive FAQs
Q1: How do you select a USB drive for Proxmox VM backup, and what considerations should you keep in mind?
A1: Choose a USB drive with sufficient capacity for your VMs. Ensure compatibility with Proxmox and consider factors like USB drive speed for optimal performance. Format the USB drive to a compatible file system.
Q2: How do you verify the integrity of your Proxmox VM backups on a USB drive?
A2: Periodically test the restoration process by recovering a VM from the backup on the USB drive. Check logs for any errors and ensure that the restored VM functions correctly.
Q3: Are there any performance considerations when running backups to a USB drive in Proxmox?
A3: USB drive speed and system load during backup processes can impact performance. Schedule backups during low-traffic periods, and consider using faster USB drives for improved backup speed.
Conclusion
Proxmox backup of VMs to USB drives offers advantages in terms of data security, portability, and more. The process consists of creating a virtual machine backup and storing it on a USB drive connected to the Proxmox host. Consider taking advantage of the more advanced features offered by Vinchin Backup & Recovery to achieve a comprehensive backup solution for effective management and protection of VMs across various virtualization platforms.


