Many IT administrators want to store Proxmox Backup Server backups on network shares for better flexibility and centralized management. Samba, also known as SMB or CIFS is a popular protocol that makes this possible across different operating systems. But how do you connect Proxmox Backup Server to Samba storage safely and reliably? Let’s walk through each step together.
What Is Proxmox Backup Server?
Proxmox Backup Server (PBS) is a dedicated backup solution built for virtual machines, containers, and even physical hosts. It works closely with Proxmox Virtual Environment but can also serve other backup needs. PBS offers deduplication, compression, encryption, fast incremental backups, and easy recovery options. These features help protect your data from loss or corruption while keeping storage use efficient.
What Is Samba Storage?
Samba is an open-source implementation of the SMB/CIFS protocol used for sharing files over networks. With Samba storage, you can create shared folders accessible from Windows, Linux, macOS and of course from your backup servers like PBS. Many NAS devices use Samba to provide shared storage space that’s easy to manage across mixed-OS environments.
Why Use Samba With Proxmox Backup Server?
Using Samba with PBS gives you several advantages:
Centralized backup storage lets you separate backups from production servers.
Shared access means multiple systems can write backups to one location.
Compatibility with many NAS devices makes it easy to scale or migrate your backup targets.
This approach is ideal if you want flexible storage that works well in diverse IT environments or need off-server protection against local hardware failures.
How to Set Up Proxmox Backup Server to Use Samba Storage
Connecting proxmox backup server to samba involves mounting an SMB share on your PBS server before adding it as a Datastore in PBS’s web interface. Here’s how you do it step by step:
First, ensure you have root access on your PBS server running Debian or another compatible Linux distribution.
1. Install CIFS Utilities
PBS needs cifs-utils installed so it can mount SMB shares:
apt install cifs-utils
This package enables support for mounting remote SMB/CIFS file systems.
2. Create a Mount Point
You’ll need a directory where the SMB share will be mounted:
mkdir /mnt/backup
This creates /mnt/backup, which will act as your local access point for the remote share.
3. Store SMB Credentials Securely
Keep your credentials out of plain sight by storing them in a protected file:
nano /etc/samba/.smbcreds
Add these lines (replace with real values):
username=your_smb_user
password=your_smb_password
Now secure this file so only root can read/write it:
chmod 600 /etc/samba/.smbcreds
Using 600 allows future edits while keeping credentials safe from other users.
4. Mount the SMB Share
Mount your network share using this command—replace //server/share with your actual path:
mount -t cifs -o vers=3.0,credentials=/etc/samba/.smbcreds,uid=34,gid=34 //server/share /mnt/backup
Here’s what matters:
vers=3.0 specifies using SMB version 3; if your device doesn’t support this version try vers=2.0 or vers=1.0.
uid=34,gid=34 ensures ownership matches PBS’s internal backup user/group so permissions work correctly.
Test write access by creating or copying a small file into /mnt/backup.
5. Automate Mounting at Boot
To make sure mounts persist after rebooting:
Edit /etc/fstab and add this line (adjust paths as needed):
//server/share /mnt/backup cifs credentials=/etc/samba/.smbcreds,uid=34,gid=34,x-systemd.automount 0 0
Make sure there’s a clear space between options (x-systemd.automount) and the final two zeros (0 0). This tells Linux not only how but when to mount—using systemd automount helps avoid timing issues during boot when network services may not be ready yet.
After saving changes test with:
mount -a
6. Add Your Mounted Share as a Datastore in PBS
Open up the Proxmox Backup Server web interface:
Your new datastore now points directly at your mounted Samba share! You’re ready to start backing up VMs, containers or anything else supported to this central location.
Troubleshooting Common Samba Mount Issues
Even experienced admins run into problems connecting proxmox backup server to samba shares now and then! Here are some common issues and quick ways to resolve them:
If you see “Permission denied (os error 13)” when trying to add or use your datastore, double-check that both UID/GID are set correctly (uid=34,gid=34) in both mount commands and fstab entries; mismatched permissions are often the culprit here.
If mounts don’t appear after rebooting, verify that x-systemd.automount is present in fstab options, this helping handle cases where networking isn’t ready right away at boot time.
Check status using:
systemctl status mnt-backup.mount
For protocol errors (“mount error(112): Host is down”), try changing vers= option between 3.0, 2.0, or even 1.0, depending on what versions are supported by your NAS/server device.
Always confirm connectivity first. Can you ping or otherwise reach the host? If not, resolve basic network issues before troubleshooting further!
Finally, ensure that /mnt/backup exists before adding it as a datastore path inside PBS GUI. The directory must be present AND actively mounted via CIFS/Samba before being recognized by PBS itself.
How to Automate Backups From Proxmox Backup Server to Samba
Once your SMB share is set up as described above, you’ll want regular automated backups, not just manual ones!
PBS provides built-in scheduling via its web interface specifically for VM/container jobs managed through Proxmox VE:
1. Go into Datacenter within PVE, select Backup, then click Add;
2. Choose which VMs/containers should be backed up,
3. Pick your newly created PBS datastore pointing at samba storage;
4. Set frequency (daily/weekly/etc.), then hit Create.
That’s all there is!
Note: The built-in scheduler handles VM/container jobs only; if you need custom scripts, for example backing up specific files outside normal VM/container snapshots, you’ll need cron jobs or systemd timers instead:
To schedule such tasks nightly at 2 AM via cron add this line using crontab editor (crontab -e):
0 2 * * * /usr/local/bin/your-backup-script.sh
Systemd timers offer more robust logging/recovery if desired; see Proxmox documentation for details about advanced automation strategies.
Vinchin: Enterprise-Level VM Protection for Proxmox Environments
For organizations seeking advanced capabilities beyond native tools, Vinchin Backup & Recovery delivers professional enterprise-grade virtual machine protection across more than fifteen mainstream virtualization platforms, including robust support for Proxmox environments alongside VMware, Hyper-V, oVirt, OLVM, RHV, XCP-ng, XenServer, OpenStack, ZStack and others.
Key features available on every supported platform include forever-incremental backup strategies for optimal efficiency; powerful data deduplication and compression; seamless V2V migration between hypervisors; granular restore capabilities; and comprehensive ransomware-resistant storage protection, all designed to maximize reliability while minimizing resource consumption and risk exposure.
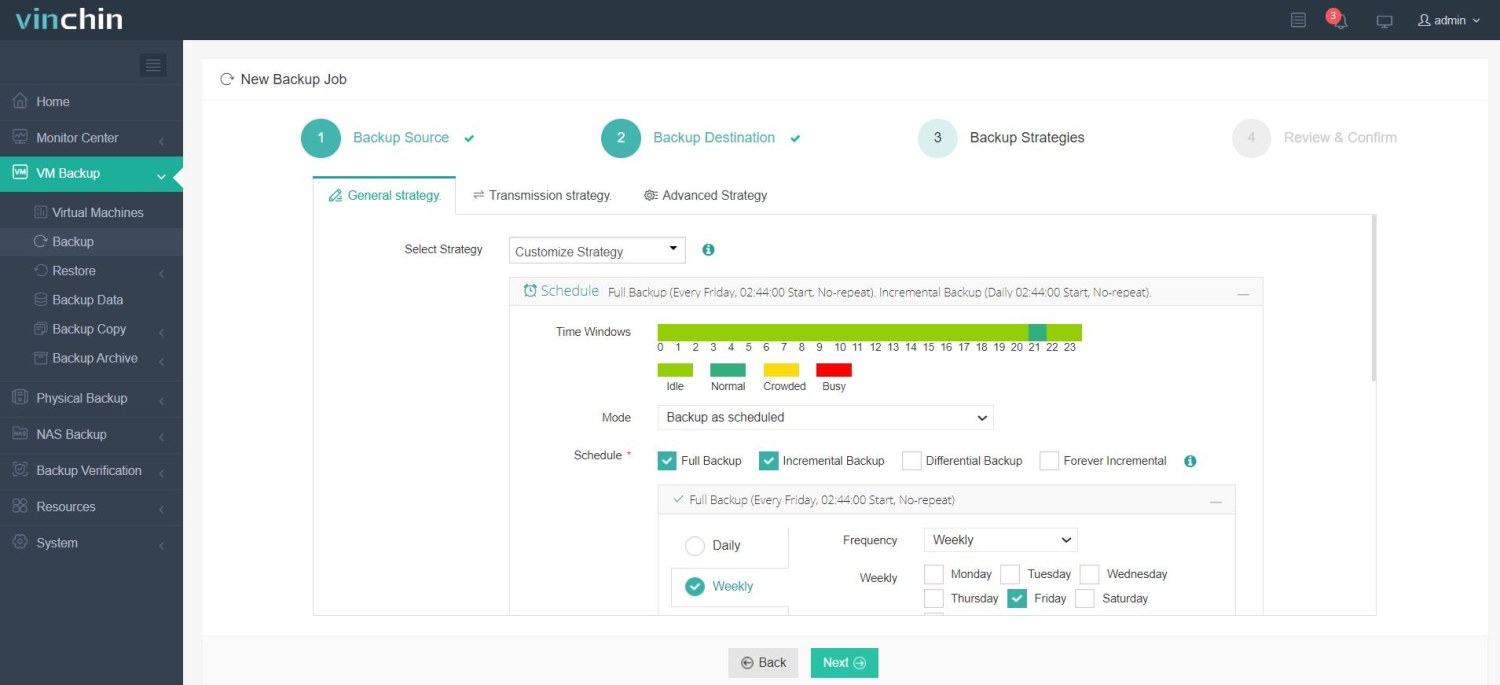
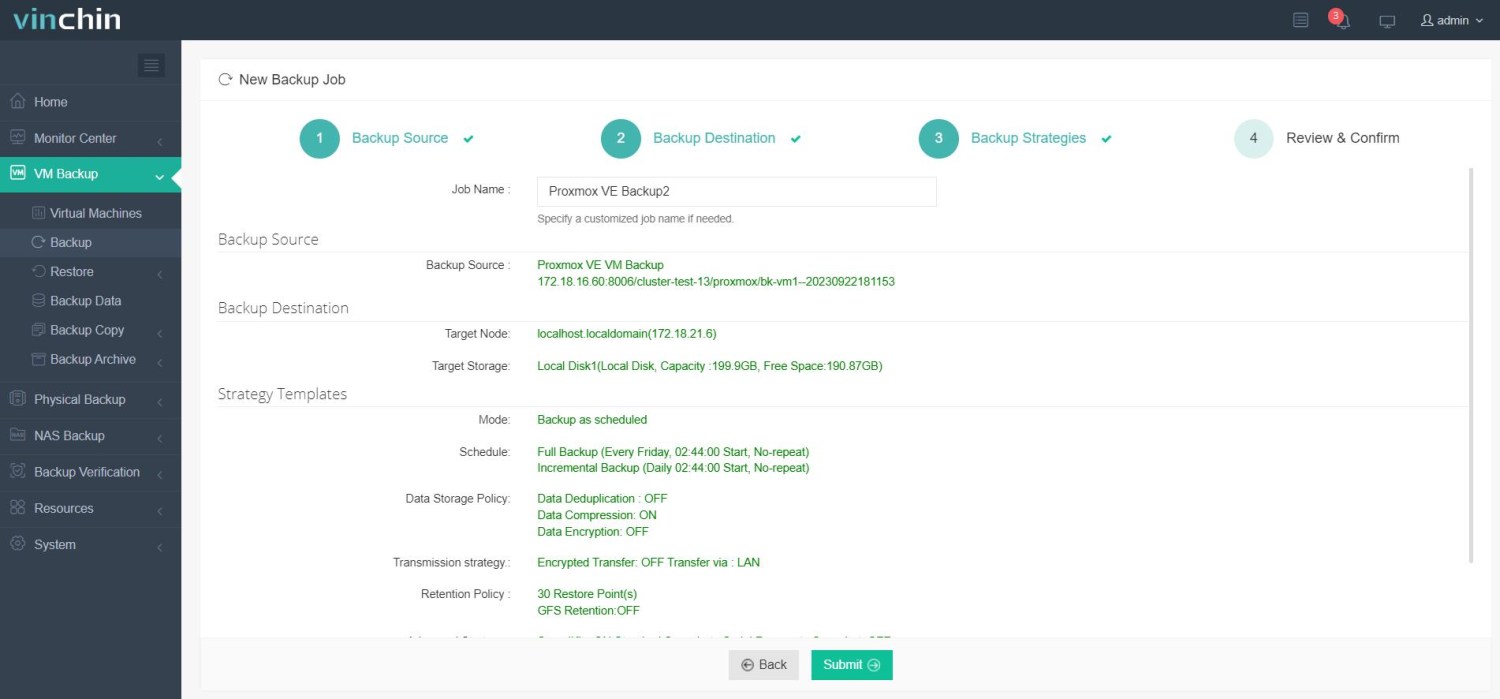
With its intuitive web console interface, backing up a Proxmox VM using Vinchin Backup & Recovery takes just four steps:
Step 1: Select the Proxmox VM to back up
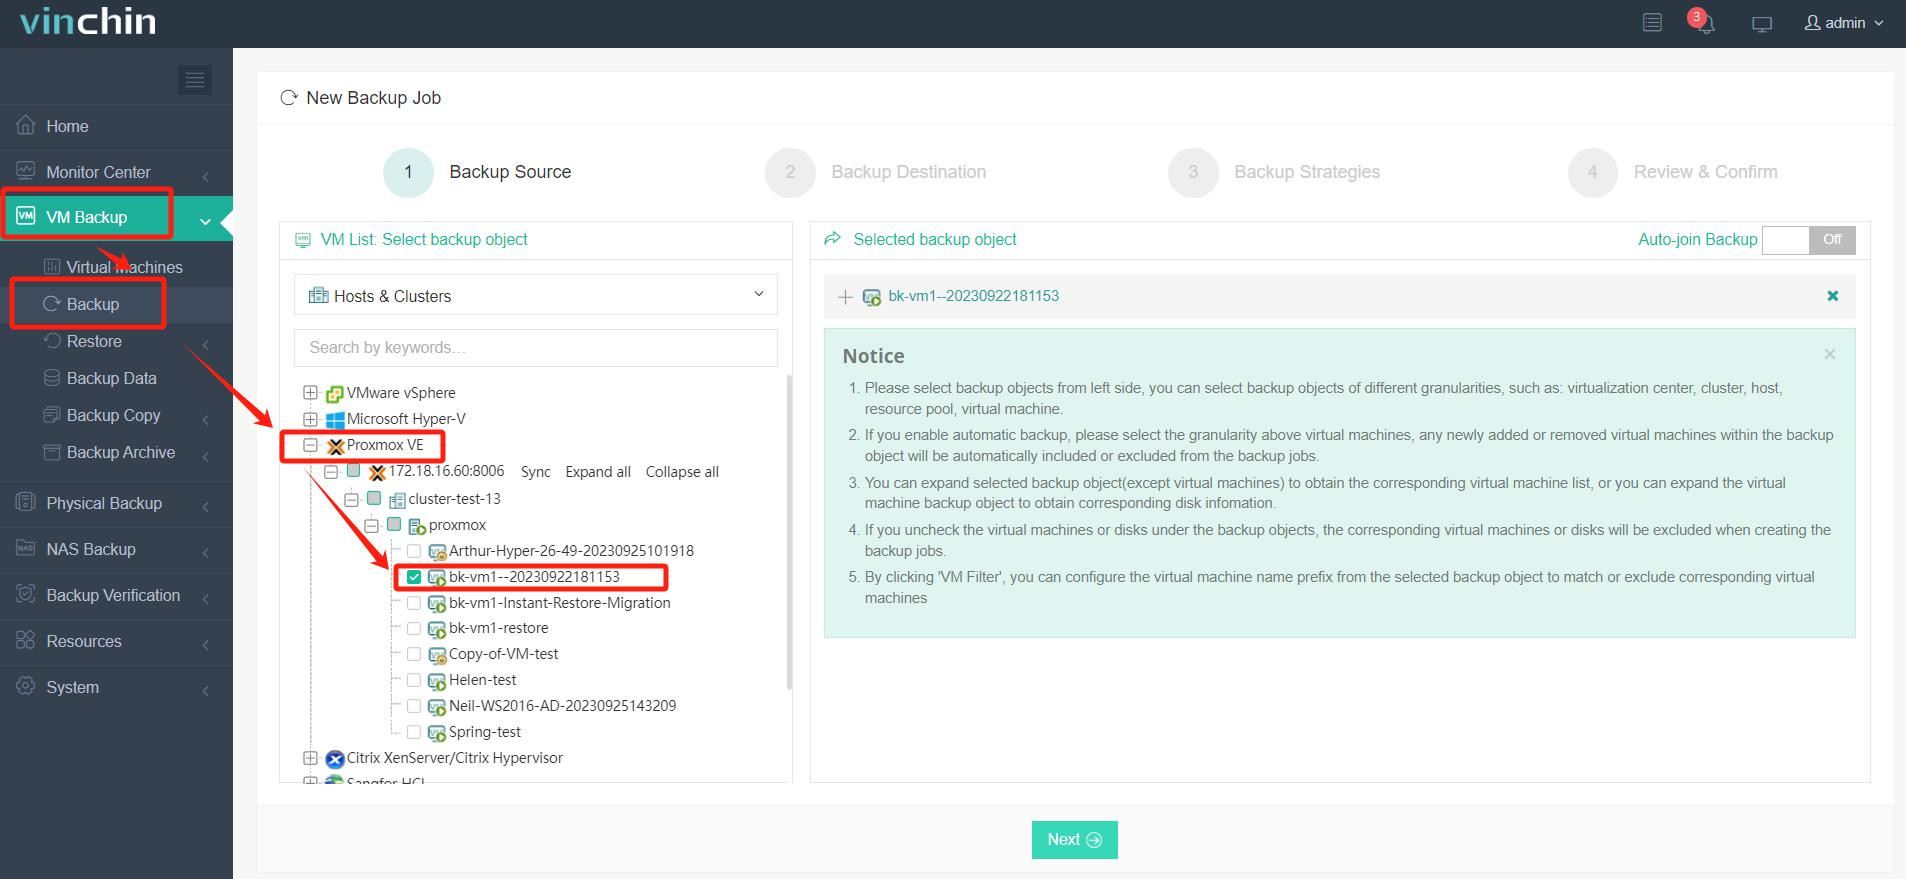
Step 2: Choose the backup storage destination (such as an attached Samba share)
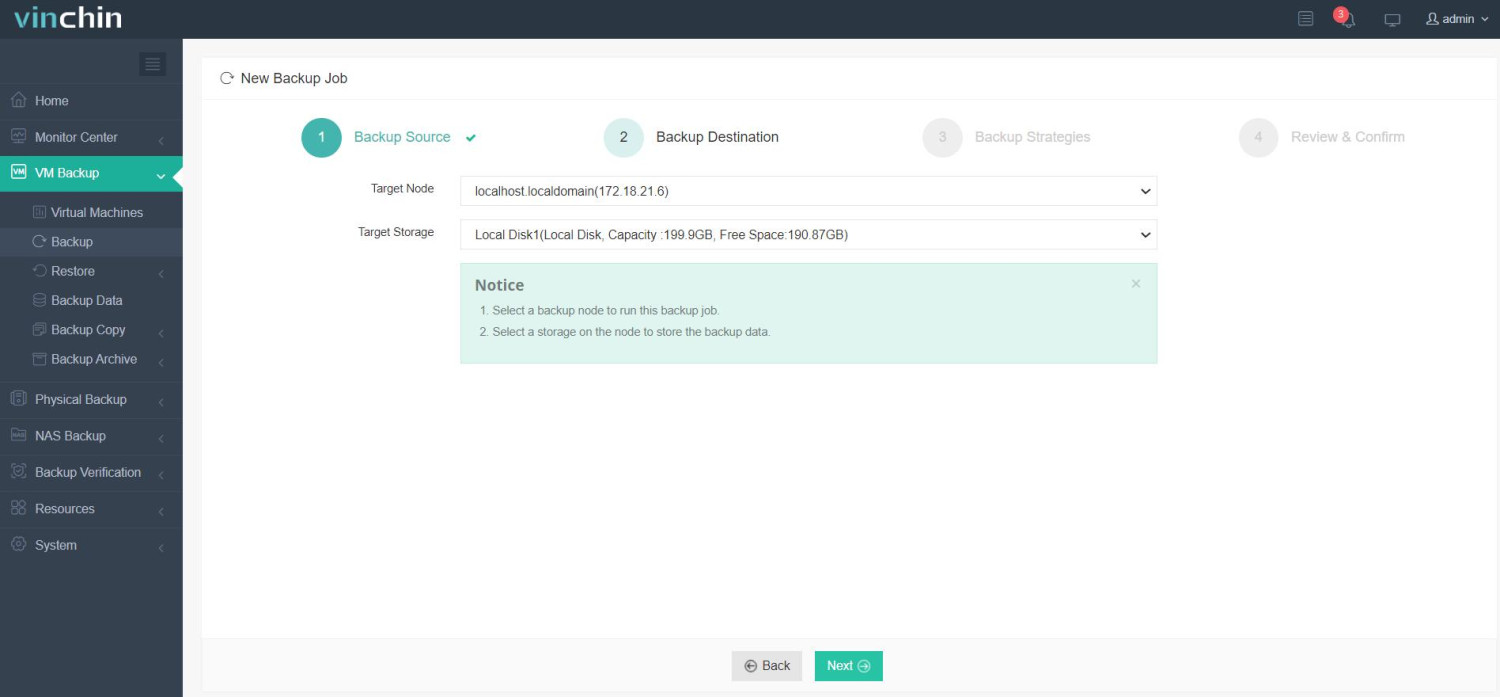
Step 3: Configure the desired backup strategy
Step 4: Submit the job
Recognized globally by thousands of enterprises with top industry ratings,Vinchin Backup & Recovery offers a fully featured free trial valid for sixty days.Click below now and experience leading-edge data protection firsthand!
Proxmox Backup Server to Samba FAQs
Q1: Can I use my Windows-based Samba share directly with PBS?
Yes; as long as correct credentials are provided during mounting on PBS side using cifs-utils.
Q2: My mount does not appear after reboot, what should I check?
Ensure x-systemd.automount appears in fstab entry; check status with systemctl status mnt-backup.mount; verify network/server availability too.
Q3: Why do I get "Permission denied" errors when writing backups?
Usually because uid/gid aren’t set properly during mount; always specify uid=34,gid=34 so PBS ‘backup’ user has write rights.
Conclusion
Setting up proxmox backup server to samba storage gives reliable centralized backups across platforms when done right.Follow these steps carefully,and automate jobs for peace of mind.For advanced protection,Vinchin delivers enterprise-grade solutions tailored for modern IT teams worldwide!