-
What Is Nested Virtualization in Hyper-V?
-
Why Enable Nested Virtualization in Hyper-V?
-
Prerequisites for Enabling Nested Virtualization
-
How to Enable Nested Virtualization via PowerShell?
-
How to Enable Nested Virtualization via Hyper-V Manager?
-
Backup Your Hyper‑V Environment with Vinchin Backup & Recovery
-
Hyper-V Enable Nested Virtualization FAQs
-
Conclusion
Nested virtualization lets you run a hypervisor inside a virtual machine on your Hyper-V host. This means you can create VMs within another VM—a powerful tool for labs, testing, or development environments where hardware is limited or flexibility is key. But how do you enable it? Let’s break down the process from basic concepts to advanced troubleshooting so you can get started with confidence.
What Is Nested Virtualization in Hyper-V?
Nested virtualization in Hyper-V allows a VM to act as a hypervisor itself by exposing hardware virtualization extensions from the host to the guest VM. In simple terms, this means you can install Hyper-V inside a VM that runs on your main Hyper-V server—and then create more VMs inside that guest system. This opens up many possibilities for building complex test environments without extra physical servers.
Why Enable Nested Virtualization in Hyper-V?
Enabling nested virtualization gives IT teams flexibility they never had before on single hosts. You can build multi-tier labs or simulate production-like setups without buying more hardware. Developers use it to test cloud scenarios or containers safely isolated from live systems. It’s also essential if you want to run features like Windows Subsystem for Linux 2 (WSL2) or deploy containerized workloads inside VMs during training sessions or proof-of-concept projects.
Prerequisites for Enabling Nested Virtualization
Before enabling nested virtualization in Hyper-V, make sure your environment meets these requirements:
Your host must run Windows Server 2016 or later—or Windows 10/11 Pro, Enterprise, or Education.
The physical CPU must support Intel VT-x (with EPT) or AMD-V (with RVI).
For Intel CPUs: Supported on Windows Server 2016/Windows 10 and newer.
For AMD CPUs: Requires Windows Server 2022/Windows 11 with VM configuration version 9.3+.
Hardware virtualization must be enabled in BIOS/UEFI of the host.
The target VM must be powered off before enabling nested virtualization.
Dynamic Memory should not be enabled on the guest VM running as a hypervisor; use static memory instead.
Want to check if your CPU supports hardware-assisted virtualization? Open PowerShell as administrator on your host and run:
Get-WmiObject -Class Win32_Processor | Select-Object -ExpandProperty VirtualizationFirmwareEnabled
If this returns True, your system supports it.
How to Enable Nested Virtualization via PowerShell?
PowerShell offers precise control when enabling nested virtualization in Hyper-V—ideal for admins who prefer scripting or need repeatable processes across multiple hosts.
First things first: ensure your target VM is shut down completely—not paused or saved state but powered off—otherwise changes won’t apply correctly.
To expose hardware virtualization extensions to your guest VM (which lets it act as its own hypervisor), open PowerShell as administrator on your host machine and enter:
Set-VMProcessor -VMName "YourVMName" -ExposeVirtualizationExtensions $true
Replace "YourVMName" with the actual name of your virtual machine. This command tells Hyper-V to pass through CPU-level instructions needed by other hypervisors running inside this VM.
To confirm settings applied correctly:
Get-VMProcessor -VMName "YourVMName" | Format-List *
If you ever need to turn off nested virtualization later:
Set-VMProcessor -VMName "YourVMName" -ExposeVirtualizationExtensions $false
Remember: Always power off the VM before making these changes!
How to Enable Nested Virtualization via Hyper-V Manager?
While PowerShell handles most of the heavy lifting when enabling nested virtualization itself, some networking features require configuration through Hyper-V Manager's graphical interface—especially if you want full connectivity between parent and child VMs.
For example, MAC address spoofing often needs activation so that network packets flow properly between layers of virtual machines—a common stumbling block when setting up complex lab topologies!
Here’s how:
1. Launch Hyper-V Manager on your host system.
2. Right-click your chosen VM; select Settings from the menu.
3. In the left pane under Hardware options, click Network Adapter.
4. Click Advanced Features below Network Adapter settings.
5. Check the box labeled Enable MAC address spoofing.
6. Click OK at bottom right to save changes.
Note: Enabling MAC address spoofing isn’t required just to activate nested virtualization—but it’s often necessary if child VMs need direct network access outside their parent environment (for example DHCP requests).
For full support of nested hypervisors—including passing through CPU instructions—you still need PowerShell commands described above!
Backup Your Hyper‑V Environment with Vinchin Backup & Recovery
After configuring “hyper-v enable nested virtualization,” robust backup becomes essential for safeguarding both production and lab workloads against data loss or corruption events. Vinchin Backup & Recovery stands out as an enterprise-grade solution supporting Microsoft Hyper‑V alongside VMware, Proxmox VE, oVirt/RHV/OLVM, XCP-ng/XenServer, OpenStack, ZStack and more—covering over 15 mainstream platforms found in modern data centers.
With Vinchin Backup & Recovery, administrators benefit from features such as incremental backup, forever-incremental backup, LAN-free backup, granular restore capabilities, and advanced data deduplication/compression—all designed for efficient protection and rapid recovery across diverse environments while minimizing storage usage and operational overheads.
The intuitive web console makes protecting critical workloads straightforward:
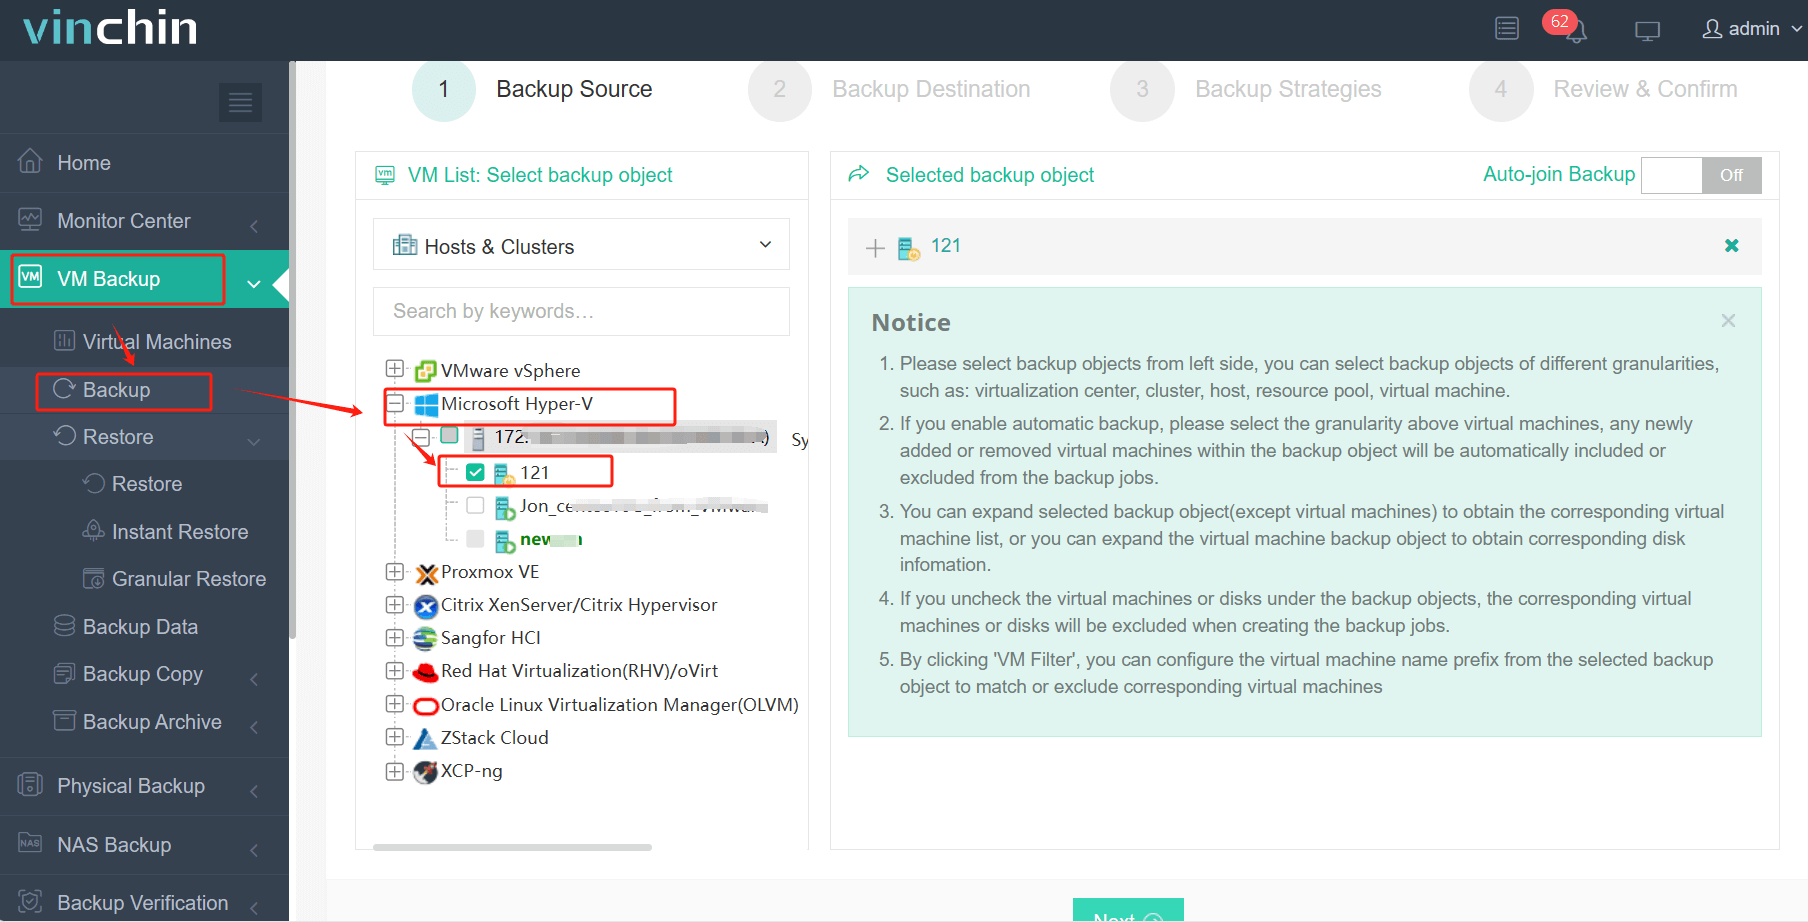
Step 1: Select the Hyper‑V VM(s) you wish to back up

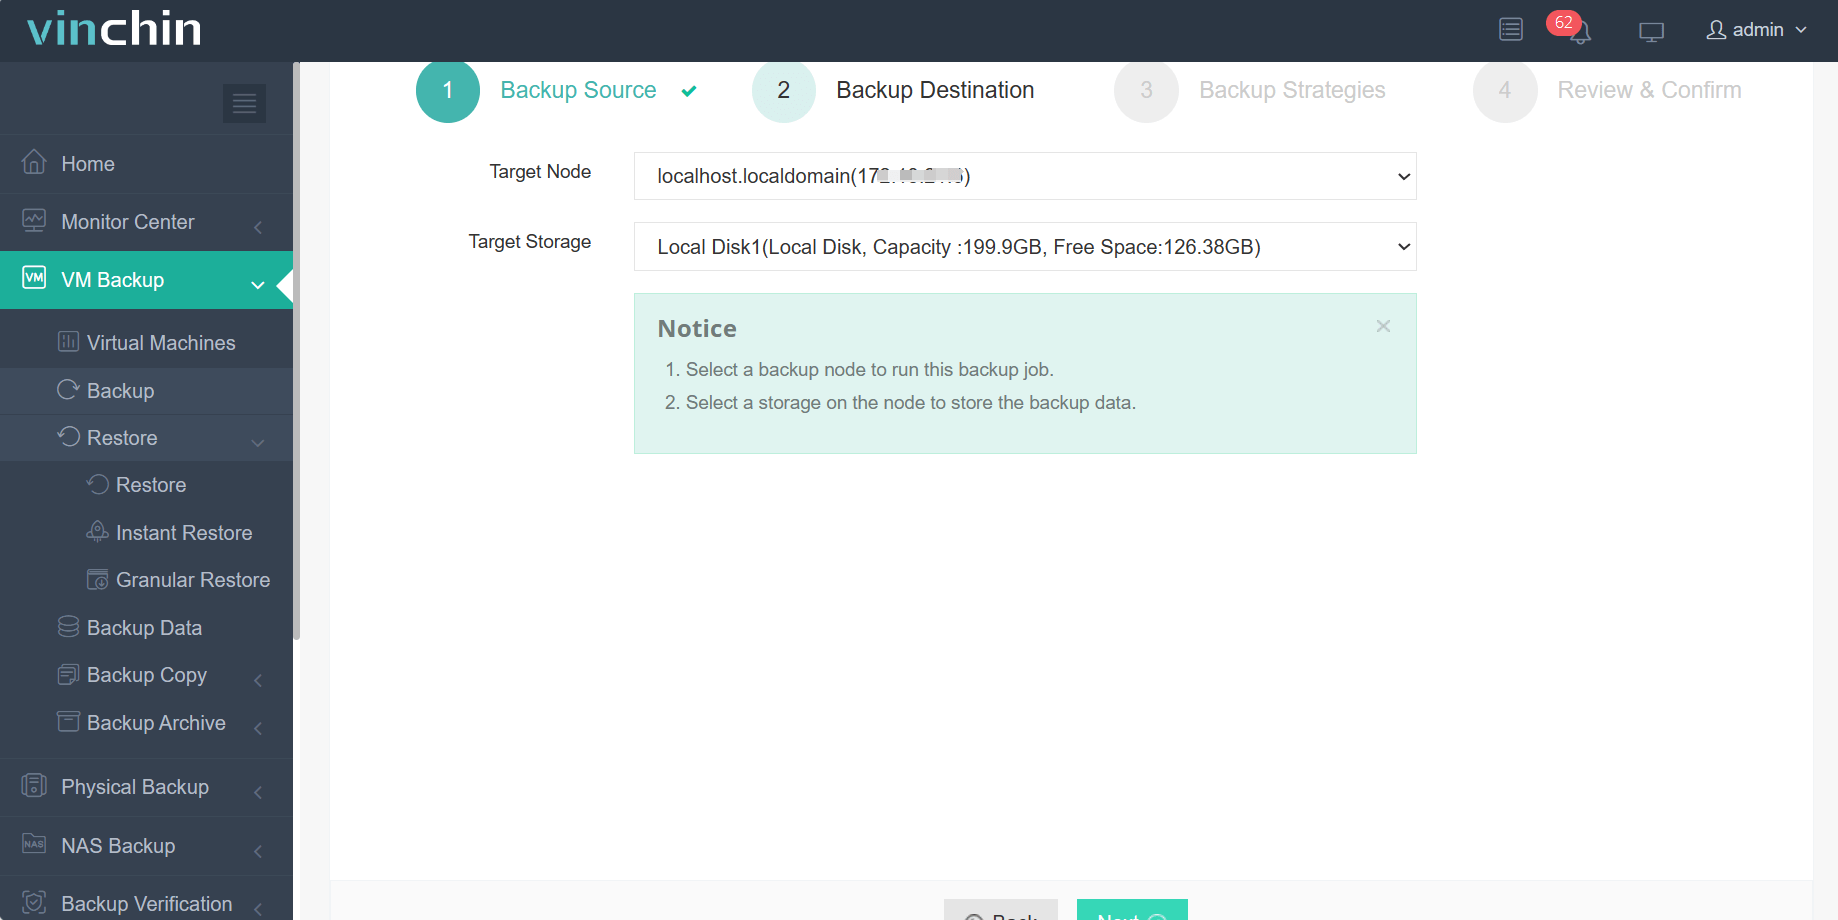
Step 2: Choose appropriate backup storage

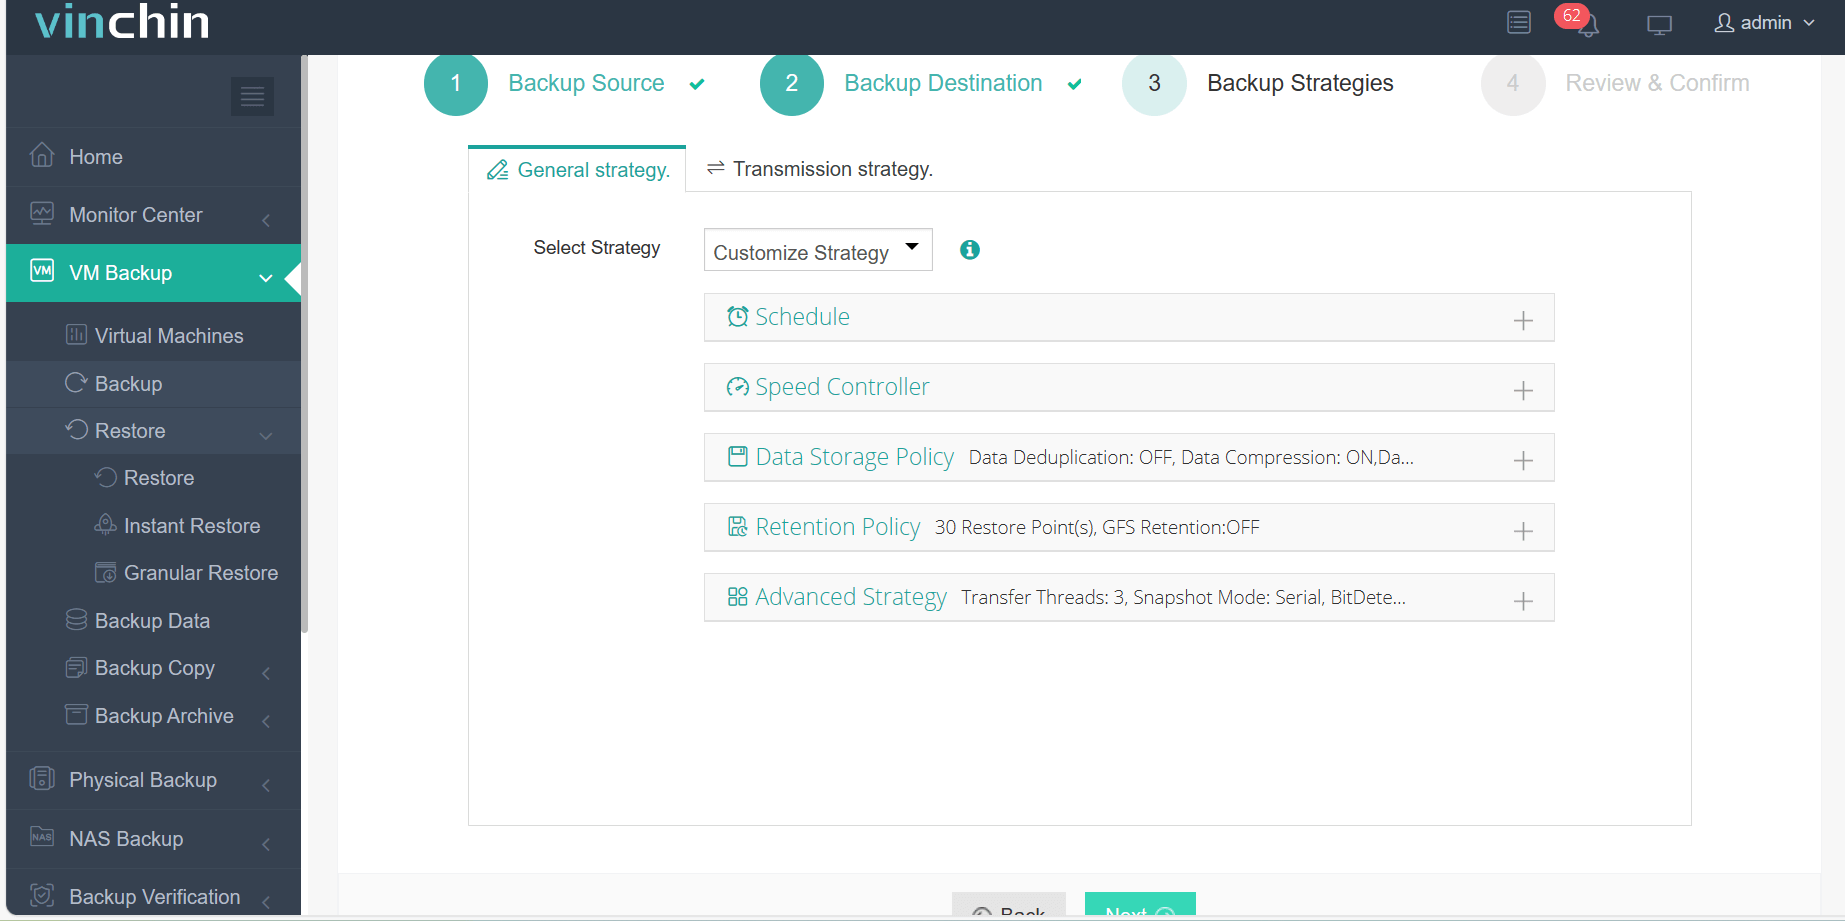
Step 3: Configure scheduling and retention policies according to business needs

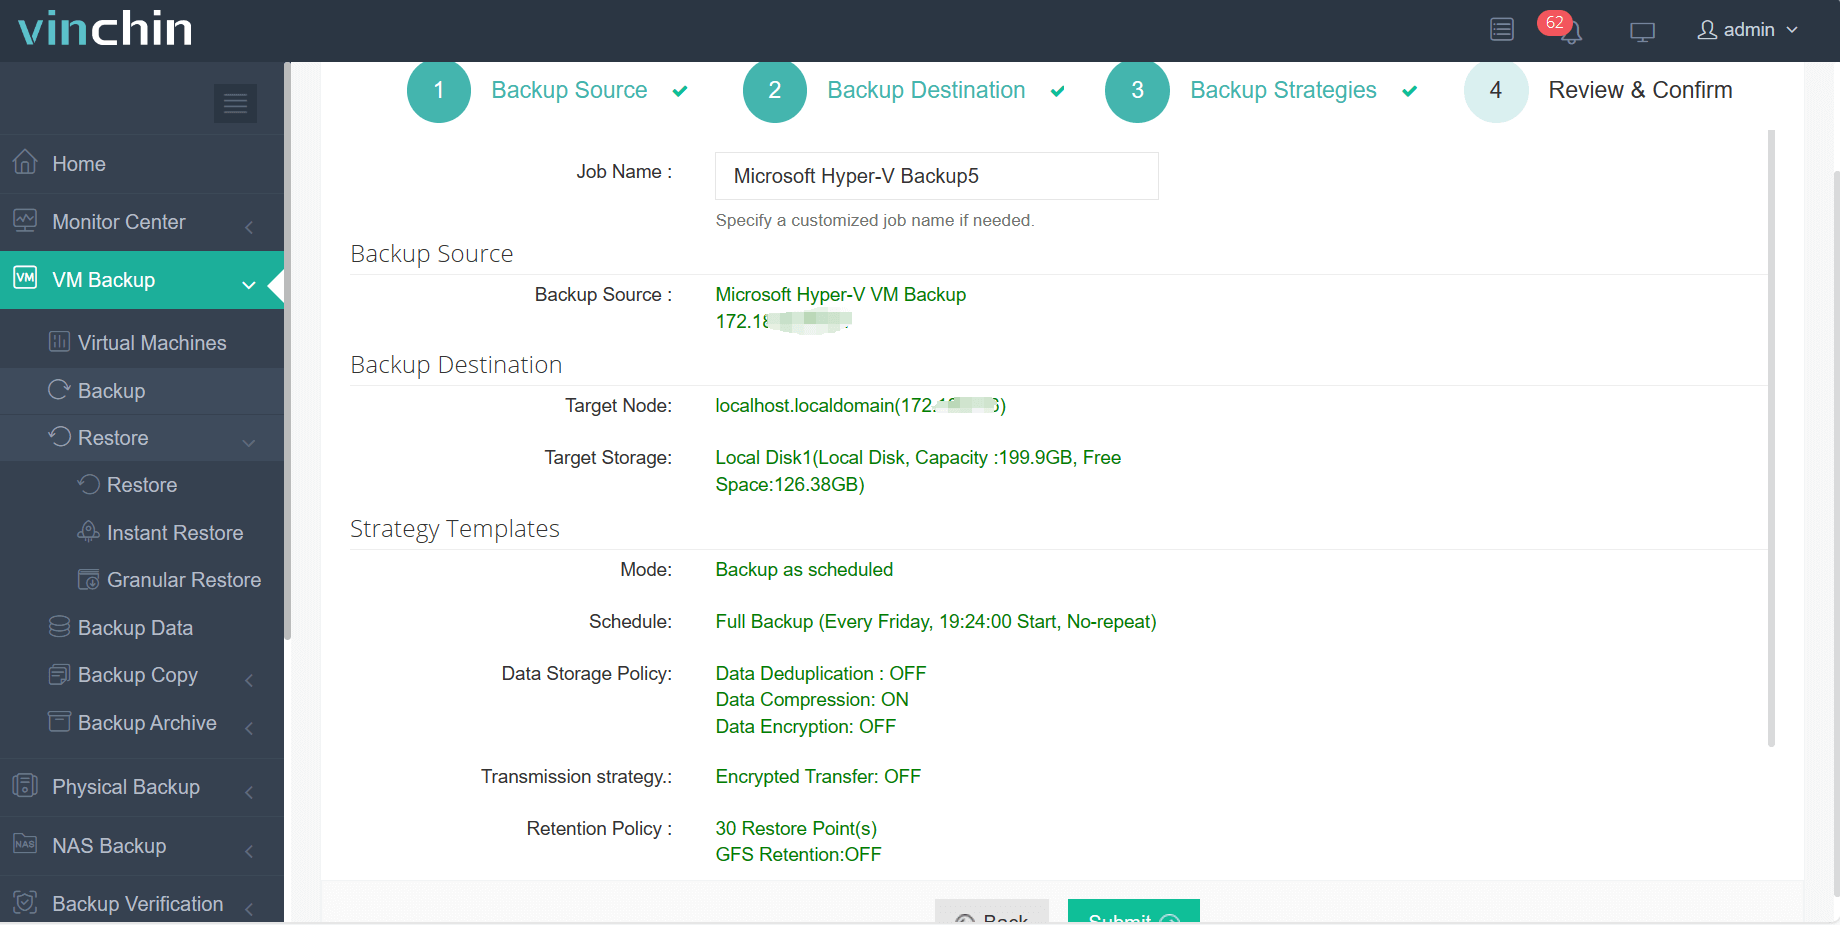
Step 4: Submit the job

Recognized globally by thousands of organizations—with top ratings among enterprise users—Vinchin Backup & Recovery offers a fully-featured free trial valid for 60 days; click below to experience comprehensive data protection firsthand.
Hyper-V Enable Nested Virtualization FAQs
Q1: Can I enable nested virtualization while my target VM stays online?
A1: No—the target virtual machine must always be powered OFF before changing processor extension settings via either GUI or script commands.
Q2: My inner-most guest cannot reach external networks after setup—is there an easy fix?
A2: Yes—enable MAC address spoofing on outermost parent adapter AND configure NAT routing rules using internal switches/NAT cmdlets.
Q3: Are checkpoints/snapshots safe alongside deep nesting?
A3: Yes—you may use checkpoints but avoid relying heavily upon them outside lab/test scenarios due potential stability/performance impacts especially under high load conditions.
Conclusion
Nested virtualization unlocks powerful lab setups right inside existing infrastructure—with careful planning around resources/networking most challenges are easy fixes along way! For reliable backups across all levels—including deeply-nested environments—Vinchin delivers robust protection trusted globally by IT professionals everywhere.
Share on:


