-
What Is Disk2VHD and Hyper-V?
-
Why Disk2VHD Hyper V Boot Failure Happens?
-
How to Fix Boot Issues Using Windows Recovery Tools?
-
How to Repair Virtual Machine Configuration in Hyper-V?
-
How To Backup Hyper‑V Virtual Machine With Vinchin Backup & Recovery?
-
Disk2vhd Hyper V Boot Failure FAQs
-
Conclusion
Migrating a physical machine to a Hyper-V virtual machine with Disk2VHD can be a lifesaver. But what if your new VM refuses to boot? Many administrators face a black screen, a blinking cursor, or cryptic error messages after conversion. Let’s walk through why this happens and how to fix it, step by step.
What Is Disk2VHD and Hyper-V?
Disk2VHD is a free tool from Microsoft Sysinternals. It lets you create a virtual hard disk (VHD or VHDX) from a running Windows system. This file can then be attached to a virtual machine. Hyper-V is Microsoft’s built-in virtualization platform, available on Windows Server and some Windows desktop editions. Together, they make physical-to-virtual (P2V) migration possible without much downtime.
Why Disk2VHD Hyper V Boot Failure Happens?
Boot failure after using Disk2VHD with Hyper-V is common. The reasons are technical but not mysterious. Often, the problem is a mismatch between the original system’s boot method (BIOS/MBR or UEFI/GPT) and the VM’s configuration. Disk2VHD may not capture all necessary boot partitions, especially on UEFI systems. Other causes include using the wrong VM generation, Secure Boot incompatibility, or missing boot records. Sometimes, the VHDX is in GPT format but attached to a Generation 1 VM, which only supports MBR. These issues can leave you staring at a black screen or a blinking cursor.
How to Fix Boot Issues Using Windows Recovery Tools?
When your VM fails to boot, Windows Recovery Tools can help. These tools repair boot records and rebuild the boot configuration. Here’s how to use them:
First, attach a Windows installation ISO to your VM’s DVD drive. Boot the VM from this ISO. When prompted, press any key to boot from the DVD. Select your language and keyboard, then click Next. Choose Repair your computer. In the recovery menu, select Troubleshoot, then Command Prompt.
At the command prompt, type the following commands to make the system partition active (for MBR/BIOS systems):
diskpart
list disk
select disk 0
list partition
select partition 1
active
exit
Next, repair the boot records:
bootrec /fixmbr
bootrec /fixboot
bootrec /scanos
bootrec /rebuildbcd
If prompted to add the installation to the boot list, type y and press Enter. Remove the ISO and reboot the VM. This process often restores bootability for MBR-based systems.
For UEFI/GPT systems, you may need to recreate the EFI boot partition. In the recovery command prompt, use:
diskpart
sel disk 0
list vol
sel vol <number of EFI partition>
format fs=fat32 quick
assign letter=A
exit
bcdboot C:\Windows /s A: /f UEFI
Replace C:\Windows with your actual Windows directory if different. Then reboot. This command copies boot files to the EFI partition and sets up UEFI boot.
How to Repair Virtual Machine Configuration in Hyper-V?
Sometimes, the problem is not with the disk, but with the VM’s configuration. Hyper-V supports two VM generations: Generation 1 (BIOS/MBR) and Generation 2 (UEFI/GPT). If your VHDX is GPT, use a Generation 2 VM. If it’s MBR, use Generation 1. You cannot change a VM’s generation after creation.
To check or change these settings, open Hyper-V Manager. Right-click your VM and select Settings. Under Firmware (for Gen 2), ensure the boot order is correct. For Gen 2 VMs, go to Security and uncheck Enable Secure Boot if your OS does not support it. For older systems like Windows Server 2003 or 2008, always use Generation 1 and VHD format, not VHDX.
If you need to convert a GPT disk to MBR, mount the VHDX in Windows, use Disk Management or a partition tool, and convert the disk. Then create a new Generation 1 VM and attach the converted VHD.
How To Backup Hyper‑V Virtual Machine With Vinchin Backup & Recovery?
Before performing significant configuration changes, it’s essential to protect critical data through reliable backups tailored specifically for Microsoft Hyper‑V environments and beyond—including VMware, Proxmox VE, oVirt, OLVM, RHV, XCP-ng, XenServer, OpenStack, ZStack, and over fifteen mainstream virtualization platforms worldwide—all supported by Vinchin Backup & Recovery as an enterprise-grade solution designed for professional IT operations across diverse infrastructures.
Among its robust capabilities are incremental backup strategies such as forever-incremental backup and differential backup; granular restore options; LAN-free backup; instant recovery; CBT acceleration; deduplication/compression; scheduled backup automation—and more—all aimed at maximizing efficiency while minimizing storage costs and downtime risk during disaster recovery scenarios or migration projects alike.
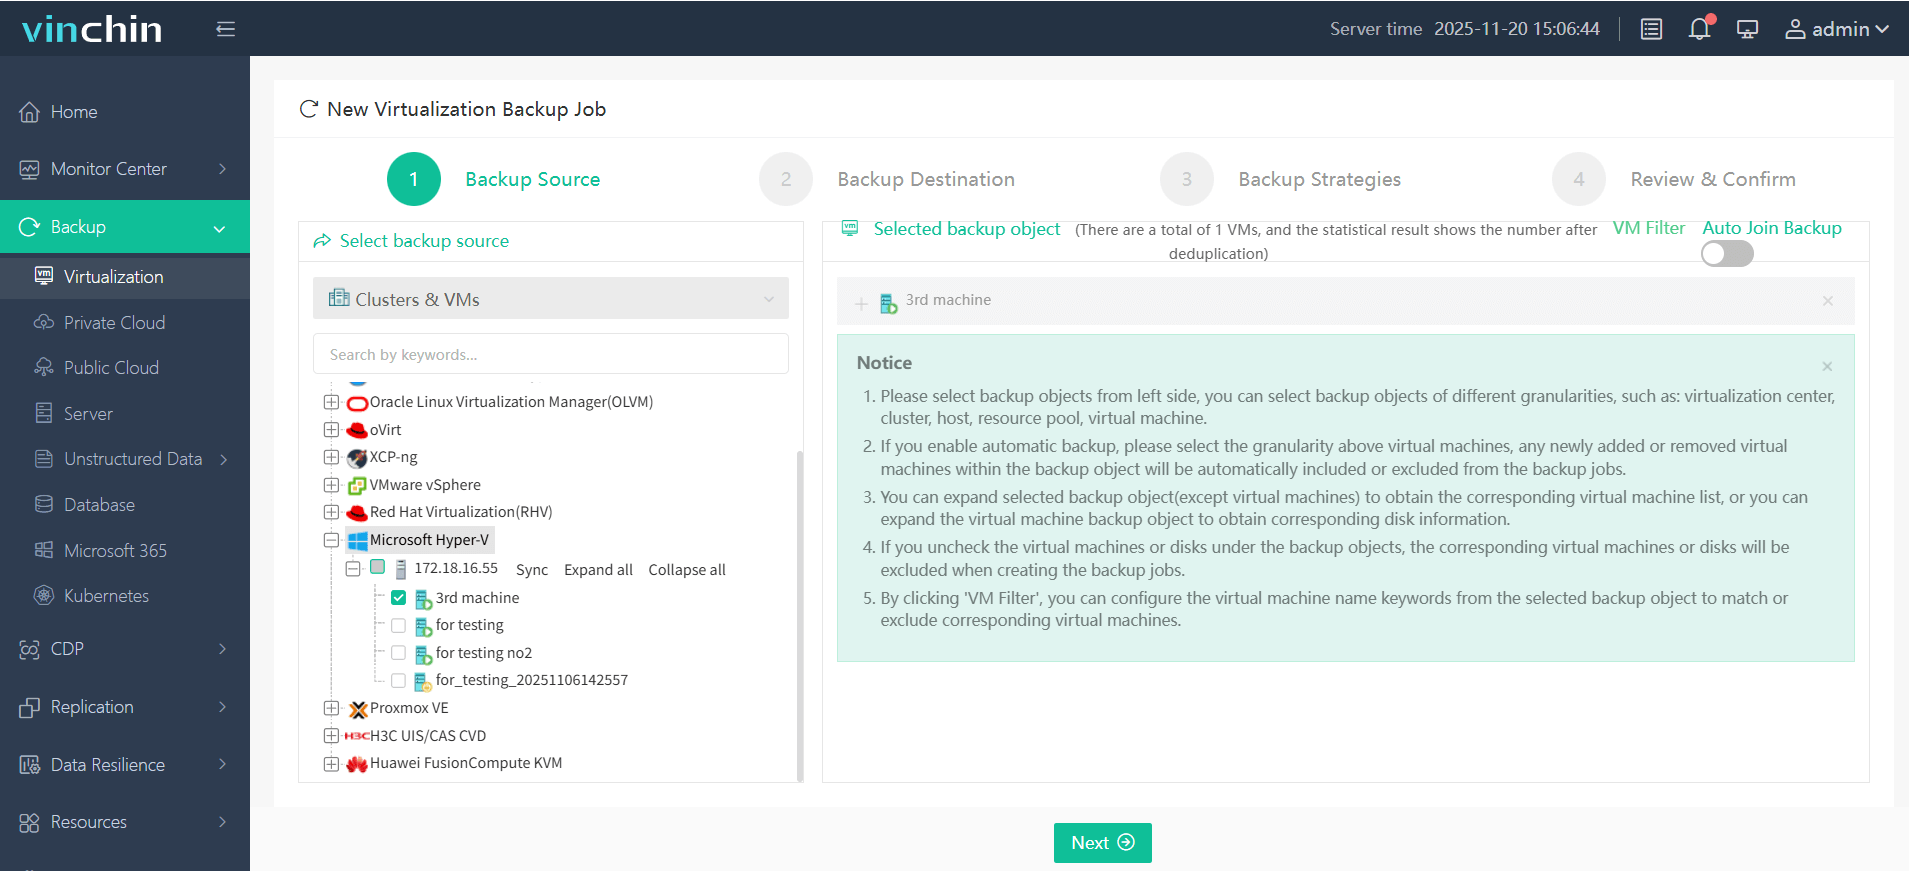
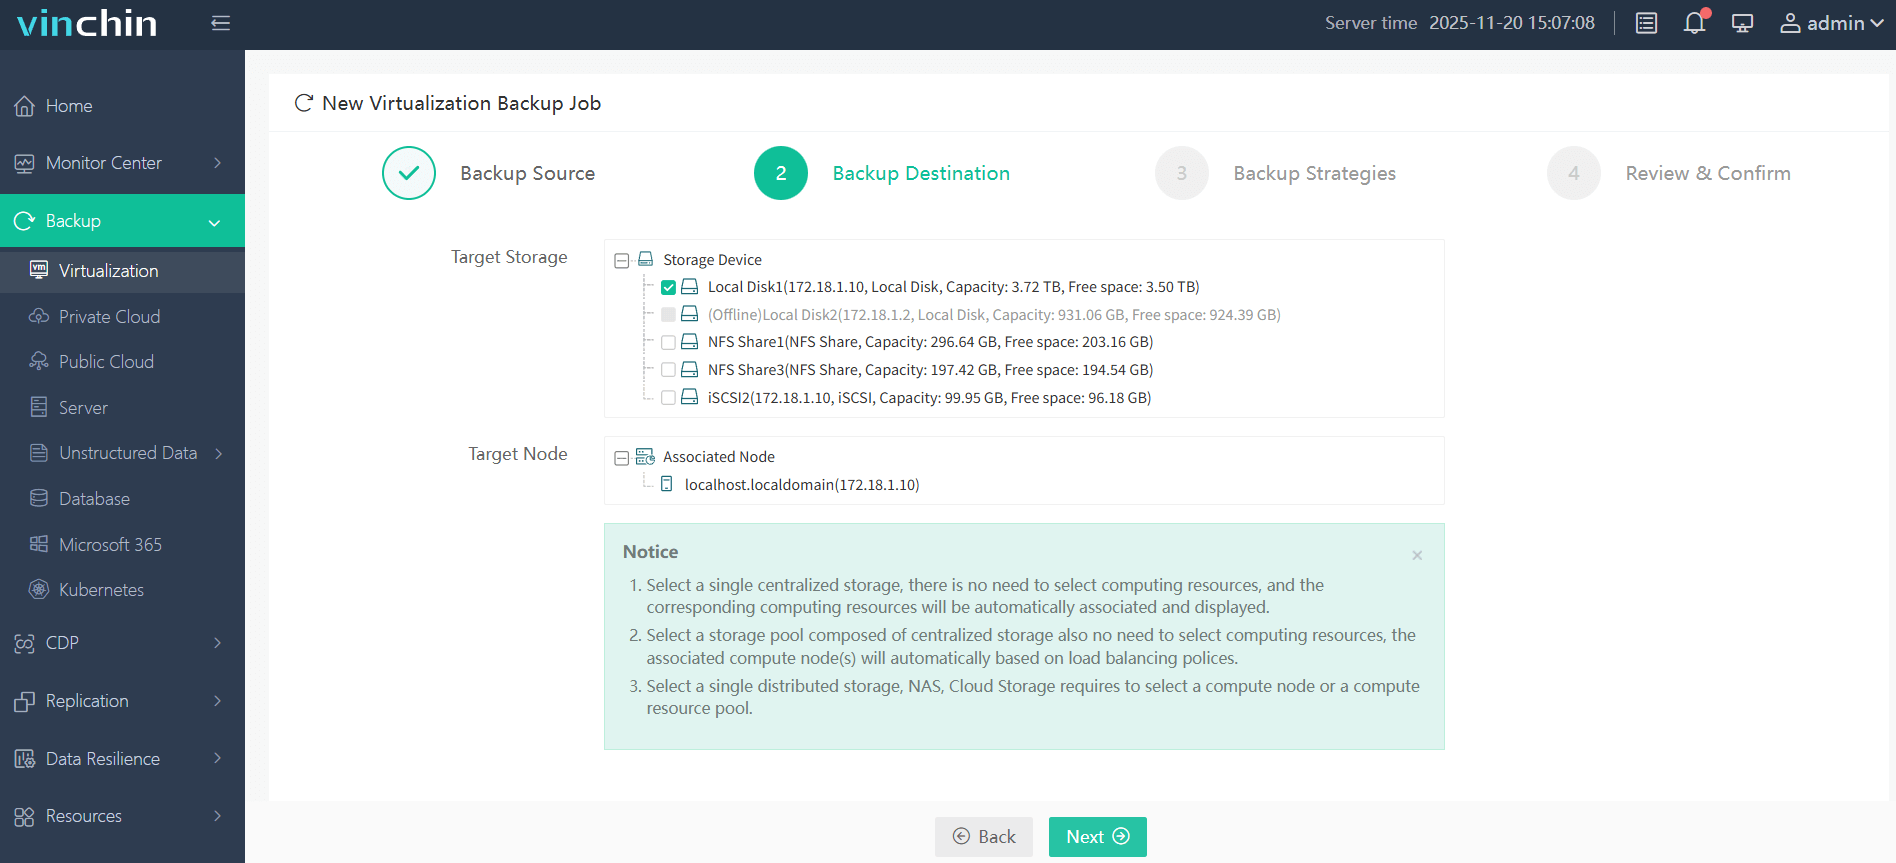
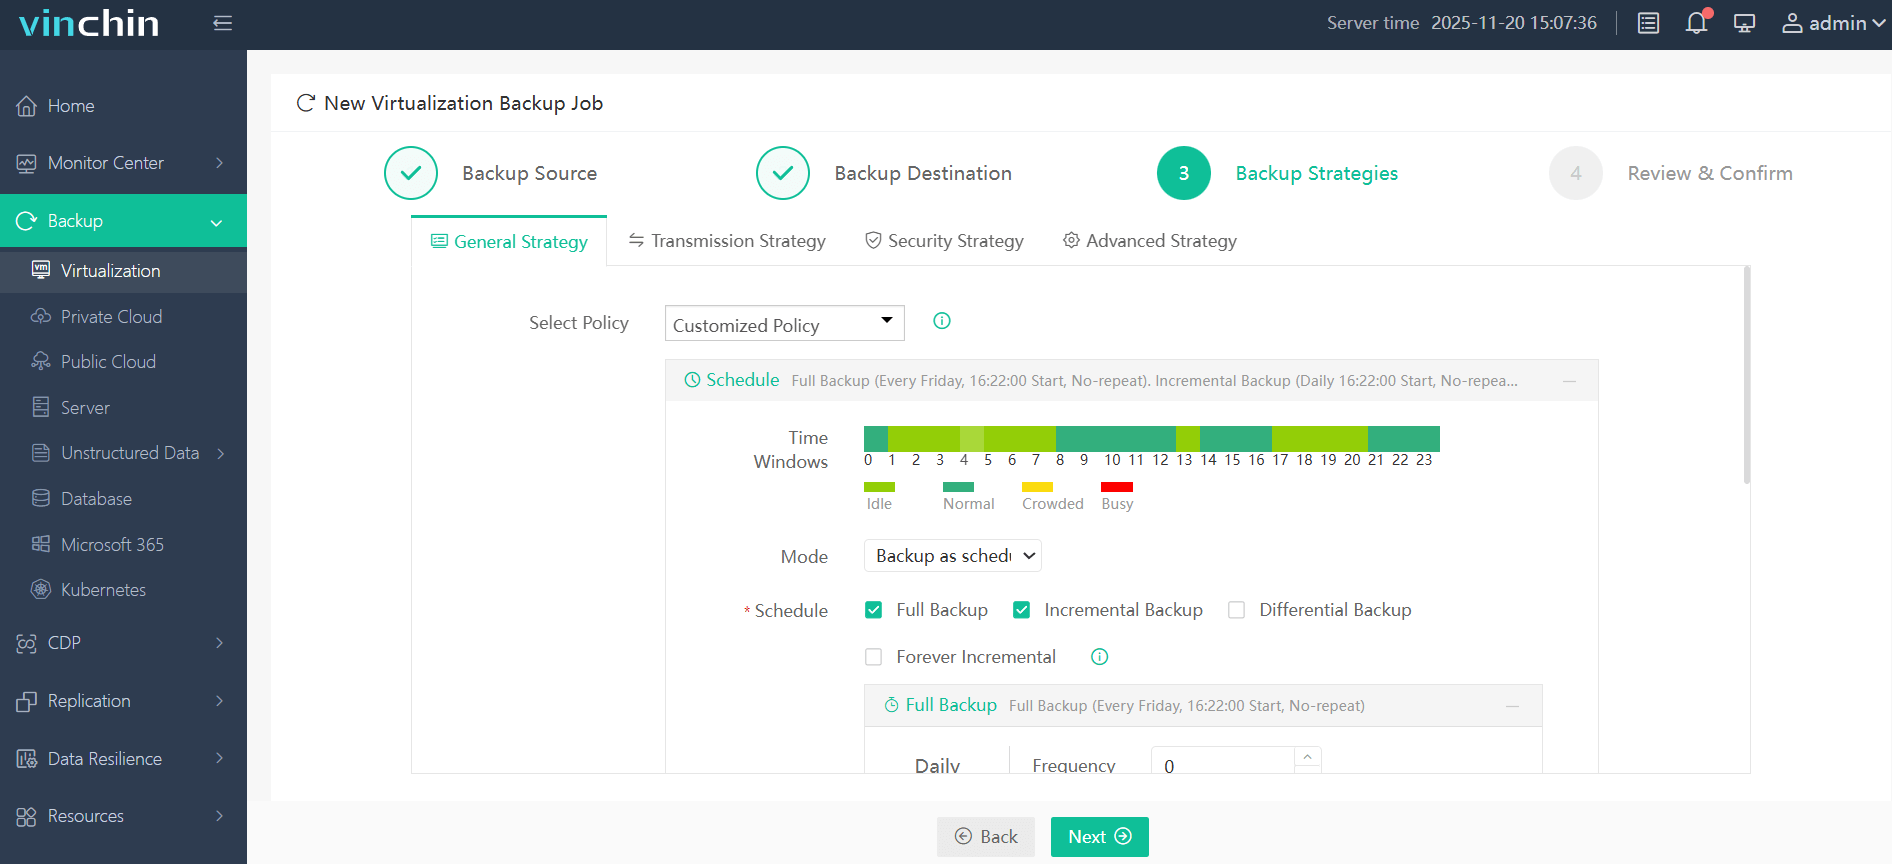
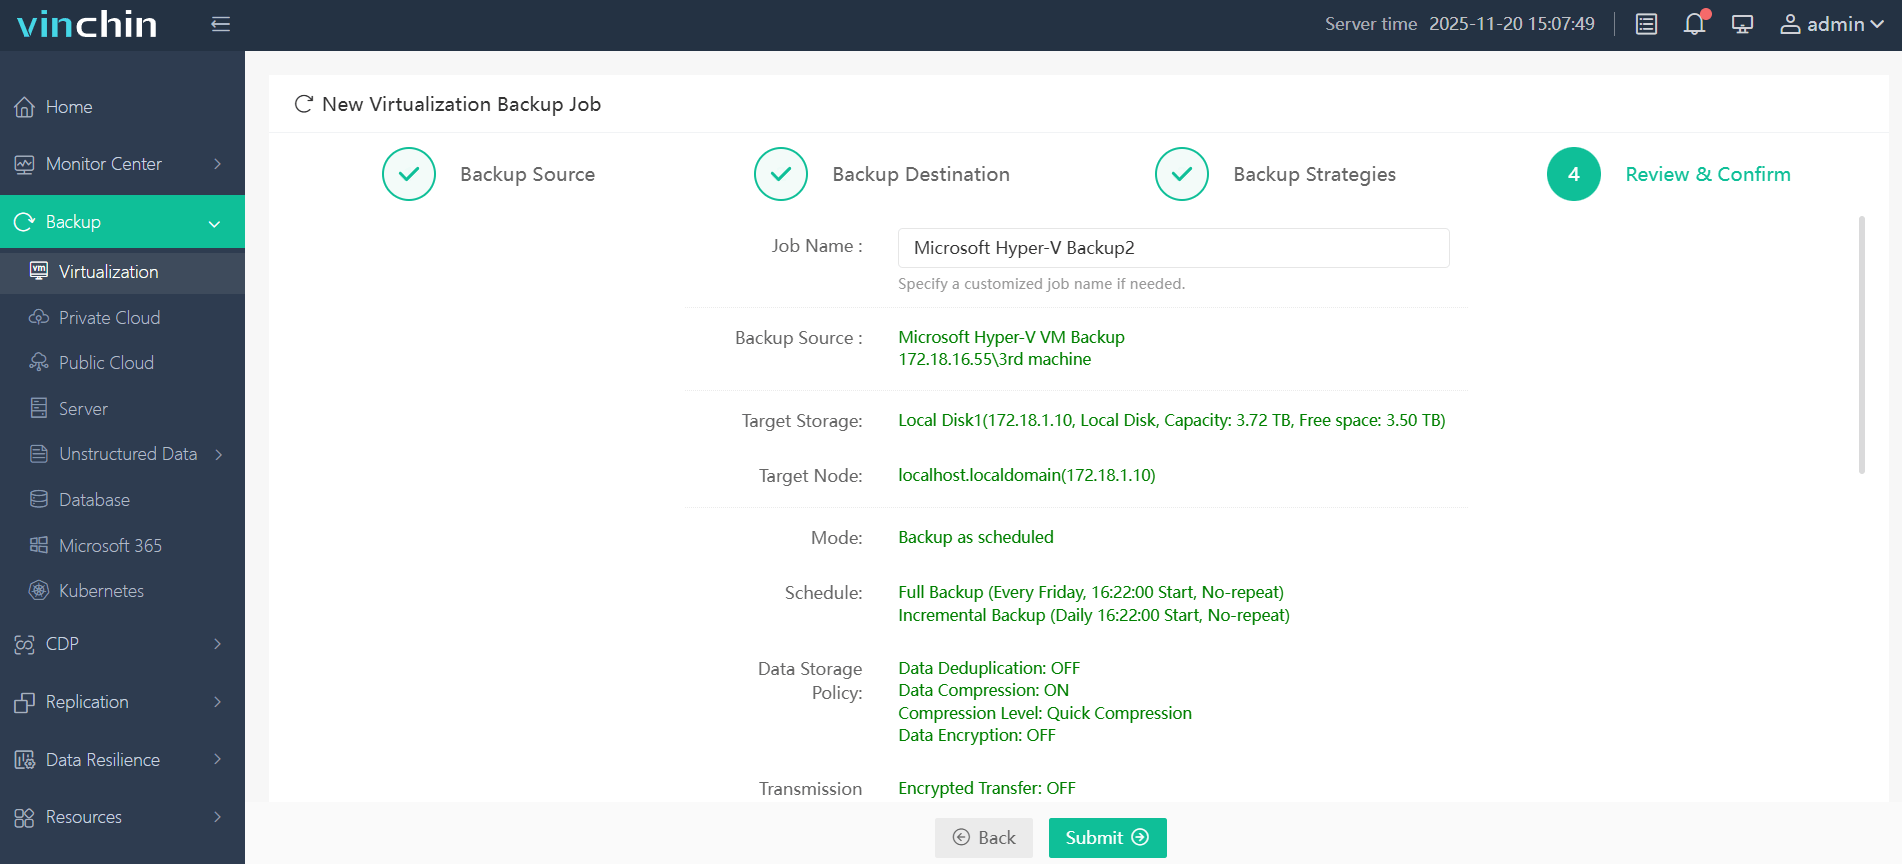
With Vinchin Backup & Recovery’s intuitive web console interface, backing up any supported Hyper‑V virtual machine involves four straightforward steps:
Step 1: Select the Hyper‑V virtual machine(s) you wish to back up;

Step 2: Choose appropriate backup storage;

Step 3: Configure backup strategy according to business needs;

Step 4: Submit the job.

Trusted globally by thousands of organizations—with top ratings among enterprise data-protection solutions—Vinchin Backup & Recovery offers a free full-featured trial valid for sixty days so you can evaluate its power firsthand before deployment.
Disk2vhd Hyper V Boot Failure FAQs
Q1: My VM boots to a black screen with a blinking cursor. What should I check first?
Check if the VM generation matches the disk format: Generation 1 for MBR, Generation 2 for GPT.
Q2: How do I fix “No x64-based UEFI boot loader was found” in Hyper-V?
Boot from a Windows ISO, open Command Prompt, and run bcdboot C:\Windows /s A: /f UEFI.
Q3: Can I convert a GPT VHDX to MBR for Hyper-V?
Yes—mount the VHDX in Windows, use Disk Management to convert to MBR, then attach it to a Generation 1 VM.
Q4: My converted VM blue screens with INACCESSIBLE_BOOT_DEVICE. What now?
Boot from Windows ISO; open Command Prompt; run bootrec /fixmbr, bootrec /fixboot, and bootrec /rebuildbcd.
Q5: How do I disable Secure Boot in Hyper-V?
Right-click on your VM in Hyper-V Manager, select Settings, go under Security tab—and uncheck “Enable Secure Boot”.
Conclusion
Disk2VHD and Hyper-V are powerful tools but P2V migrations often encounter post-conversion issues like failed boots due primarily to misconfigurations or missing partitions/filesystems—but these are resolvable through careful troubleshooting as described above.
For seamless migration management consider leveraging Vinchin Backup & Recovery—try its comprehensive capabilities risk-free today!
Share on:


