-
What Is VMware ESXi 6.7?
-
Why Update VMware ESXi 6.7?
-
Preparing for an ESXi 6.7 Update
-
Method 1: Updating VMware ESXi 6.7 via CLI
-
Method 2: Updating VMware ESXi 6.7 Using vSphere Update Manager
-
Method 3: Manual Update of VMware ESXi 6.7 with ISO
-
How to Migrate Virtual Machines with Vinchin?
-
Update VMware ESXi 6.7 FAQs
-
Conclusion
Updating your VMware ESXi 6.7 hosts is not just a routine task—it’s essential for keeping your virtual infrastructure secure, stable, and high-performing. Outdated hosts are more likely to suffer from security breaches or compliance failures that can disrupt business operations or expose sensitive data. In this guide, you’ll learn what ESXi 6.7 is, why updates matter so much, how to prepare for an update safely, and three proven ways to update VMware ESXi 6.7: using the command line interface (CLI), vSphere Update Manager (VUM), or manual ISO installation.
Whether you’re just starting out with virtualization or have managed hundreds of hosts before, this guide walks you through each step in plain language—so you can update with confidence.
What Is VMware ESXi 6.7?
VMware ESXi 6.7 is a bare-metal hypervisor that installs directly on server hardware without needing an underlying operating system. As part of the vSphere suite, it powers many enterprise data centers by running multiple virtual machines (VMs) on one physical server.
ESXi 6.7 supports advanced features like vMotion for live VM migration, High Availability for automatic failover if hardware fails, and Distributed Resource Scheduler to balance workloads across hosts automatically. You manage it through either the vSphere Client or the web-based VMware Host Client.
Why Update VMware ESXi 6.7?
Regularly updating VMware ESXi 6.7 protects your environment from known vulnerabilities while improving reliability and performance. Updates often include critical security patches that close loopholes exploited by attackers; they also fix bugs that could cause crashes or instability.
Staying current ensures compatibility with new hardware models and software integrations—important as vendors phase out support for older versions. If you skip updates too long, you risk exposing your systems to threats or losing vendor support altogether.
Preparing for an ESXi 6.7 Update
Preparation makes all the difference when planning to update VMware ESXi 6.7 hosts safely.
Start by backing up both your host configuration settings and all virtual machines—never skip this step! Use built-in tools like host profile exports or third-party backup solutions if available.
Next, check the VMware Product Interoperability Matrix online to confirm your hardware platform—and any connected vCenter Server—is compatible with your target version of ESXi. Review release notes carefully; look out for prerequisites such as minimum firmware levels or required BIOS settings.
Before proceeding further:
Place each host into maintenance mode so no VMs are running during the update
Migrate active VMs elsewhere using vMotion if possible
Download required patch files from official site
Validating Hardware and Software Compatibility
It’s easy to overlook compatibility checks—but skipping them can lead to failed updates or unstable systems later on.
First, visit the official VMware Compatibility Guide online:
Search by server model number
Confirm supported network adapters (NICs), storage controllers (HBAs), GPUs
Check firmware versions against those listed as compatible with ESXi 6.7
Don’t forget about software compatibility:
Make sure VM hardware versions meet requirements after updating
Plan ahead if upgrading vCenter Server; always upgrade vCenter before updating any managed hosts
Verify installed drivers are up-to-date; outdated drivers may cause issues after rebooting
By validating these points now, you avoid surprises during maintenance windows when time is tight.
Method 1: Updating VMware ESXi 6.7 via CLI
The command line interface offers flexibility when updating standalone hosts—or those not managed by vCenter Server.
Begin by enabling either ESXi Shell or SSH access on your target host through its direct console user interface (DCUI) or web client settings menu (Host > Manage > Services).
Once enabled:
1. Place host in maintenance mode using either web client (Host > Actions > Enter Maintenance Mode) or CLI (vim-cmd /hostsvc/maintenance_mode_enter)
2. Upload patch ZIP file onto a datastore accessible by this host
3. Connect via SSH client (like PuTTY) using root credentials
4. Run:
esxcli software vib update -d /vmfs/volumes/[datastore]/[patch_file].zip
5. Wait until process completes successfully—watch output closely!
6. Reboot host (reboot)
7. Exit maintenance mode after confirming services start normally
Afterward verify build number in VMware Host Client > Help > About matches latest release notes.
Troubleshooting Tips
If you see errors such as “VIB dependencies not satisfied,” run:
esxcli software vib list | grep -i [problematic_vib]
This helps identify conflicting packages so you can remove them first (esxcli software vib remove -n [vib_name]). Always double-check syntax before executing commands!
Method 2: Updating VMware ESXi 6.7 Using vSphere Update Manager
vSphere Update Manager (or Lifecycle Manager in newer releases) streamlines patching across multiple hosts at once—a big advantage in larger environments where consistency matters most.
To begin:
1. Log into vSphere Client
2a.For vSphere 6.x: Select Menu > Update Manager
2b.For newer versions: Select Menu > Lifecycle Manager
3. Import downloaded patch ISO/ZIP under ESXi Images
4. Create new baseline linked to imported image (Baselines > New Baseline)
5. Attach baseline(s) to desired cluster(s) or individual host(s)
6. Place affected hosts into maintenance mode (Host > Actions > Enter Maintenance Mode)
7. Scan selected objects for compliance (Scan for Updates)
8. Remediate non-compliant items (Remediate)—this applies patches automatically
9. Reboot when prompted then exit maintenance mode afterward
This workflow automates pre-checks like dependency validation—and provides rollback options if something goes wrong mid-process.
Method 3: Manual Update of VMware ESXi 6.7 with ISO
Manual ISO installation works well when network access is limited—or if other methods fail due to environmental restrictions.
Here’s how it works:
1. Download latest supported ISO file from Broadcom Support Portal
2. Burn ISO onto USB stick using tools like Rufus—or create bootable CD/DVD media
3. Insert media into physical server then power cycle machine
4. Boot from external device; follow prompts until installer detects existing installation on local disk(s)
5. Choose correct disk then select option labeled Upgrade
6. Let installer finish copying files/updating components per on-screen instructions
7. Remove media then reboot system normally at end of process
Your VM configurations remain intact—but always back up first just in case unexpected issues arise!
How to Migrate Virtual Machines with Vinchin?
When planning post-update migrations between different virtualization platforms—including VMware vSphere/ESXi, Hyper-V, Proxmox VE, oVirt, OLVM (Oracle Linux Virtualization Manager), RHV (Red Hat Virtualization), XCP-ng, XenServer/Citrix Hypervisor, OpenStack—or others supported by Vinchin Backup & Recovery—a streamlined solution becomes essential for minimizing disruption during transitions between environments.
Vinchin Backup & Recovery delivers professional-grade backup capabilities alongside agentless virtual machine migration features designed specifically for enterprises seeking seamless movement of workloads without impacting production systems’ availability or performance. It enables organizations to migrate VMs flexibly according to evolving IT strategies—even across heterogeneous infrastructures where needed.
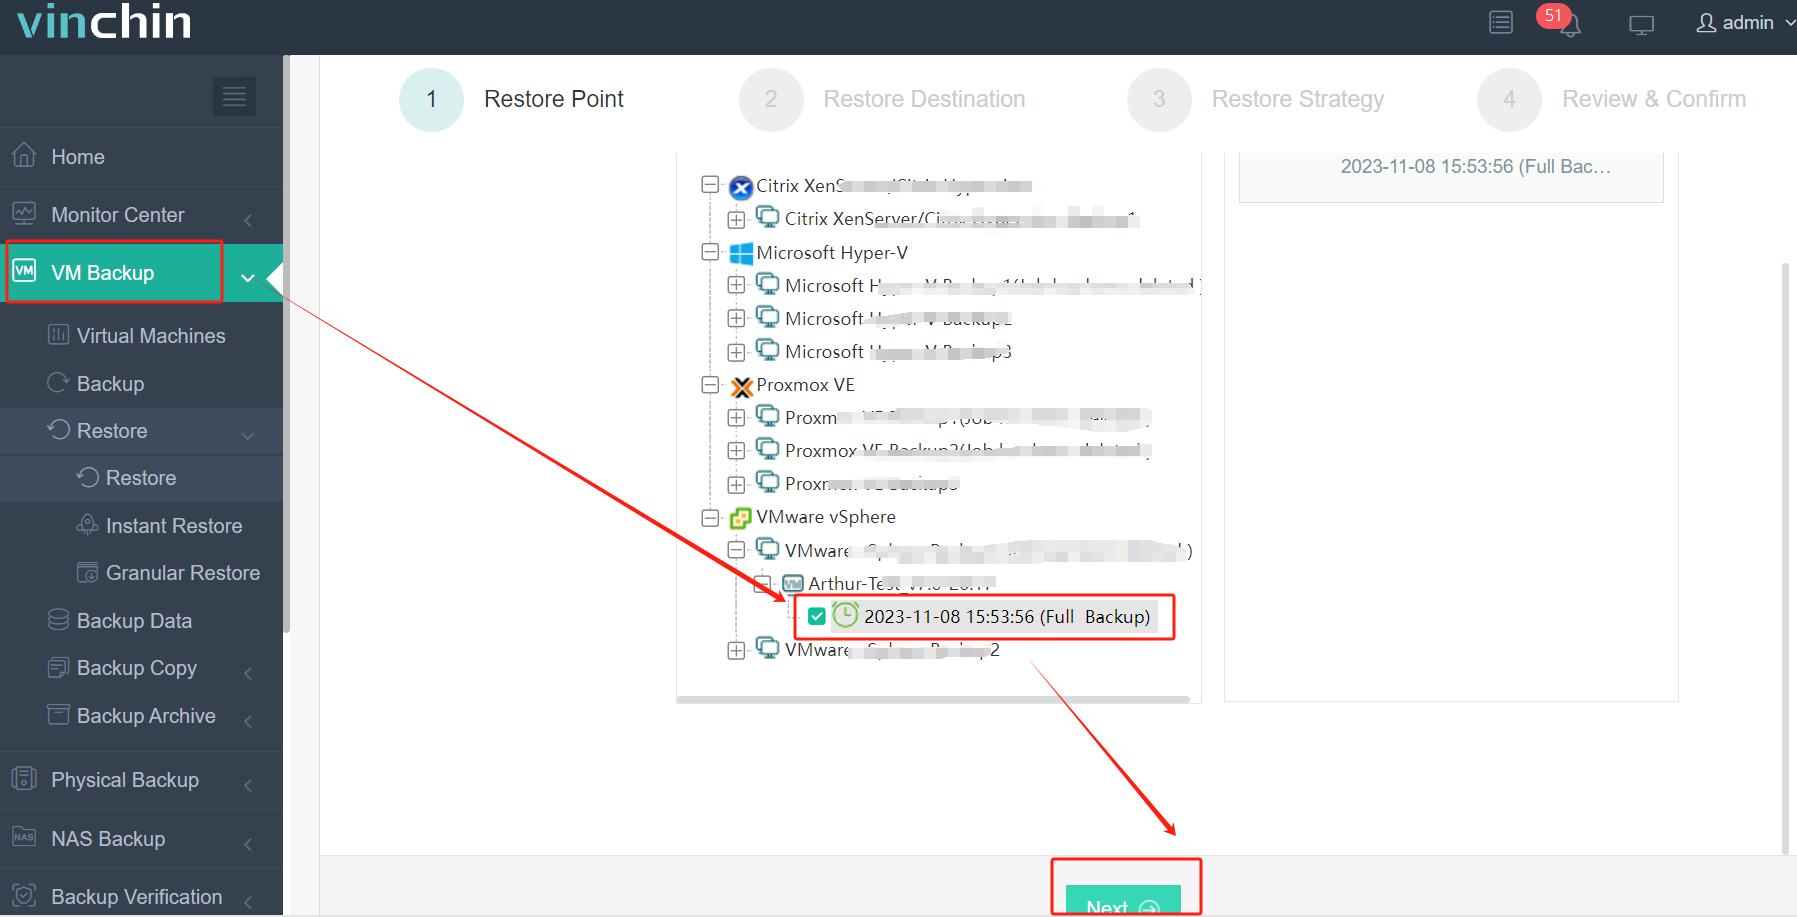
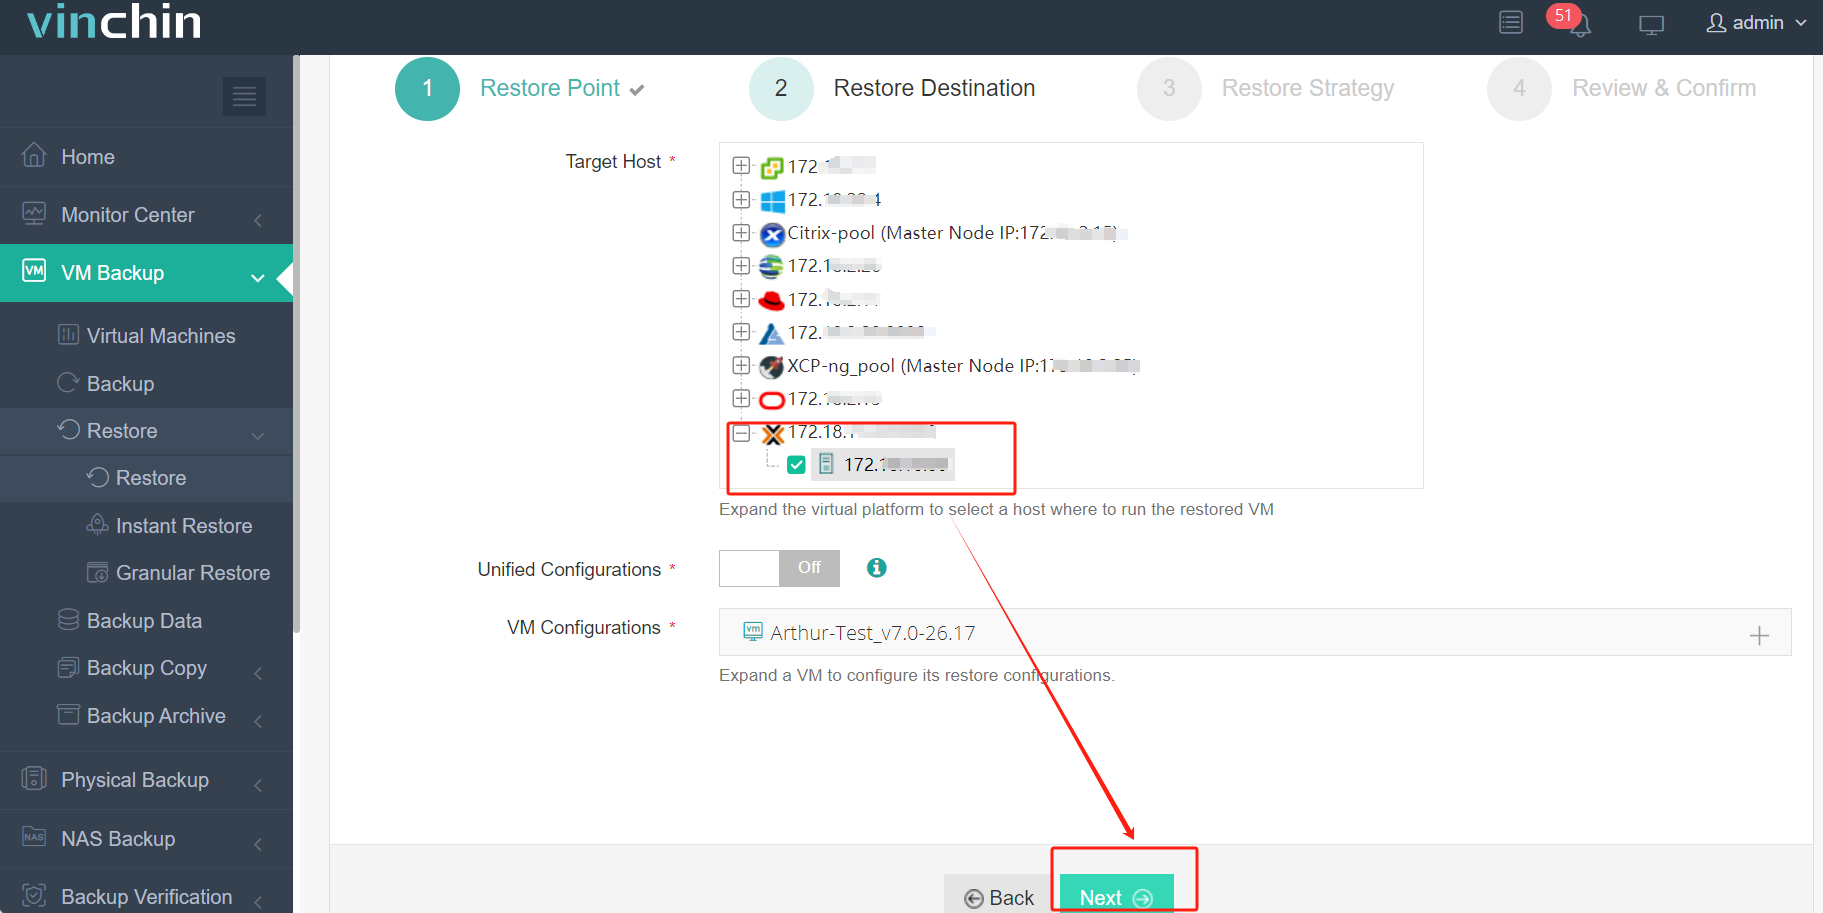
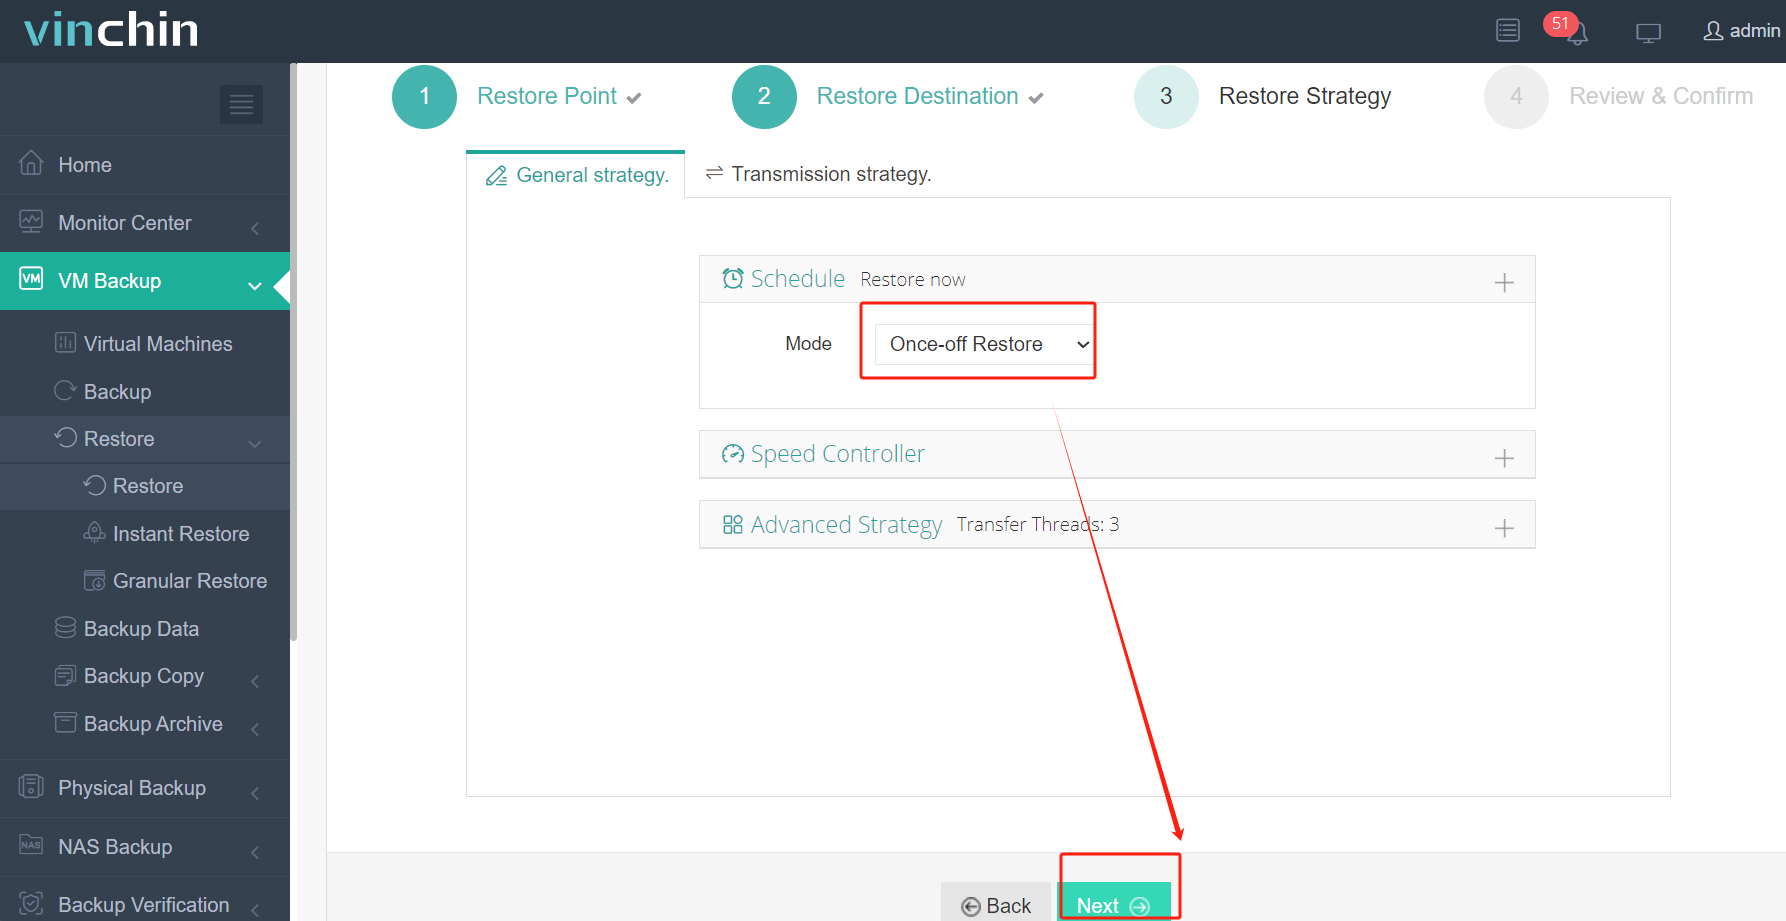
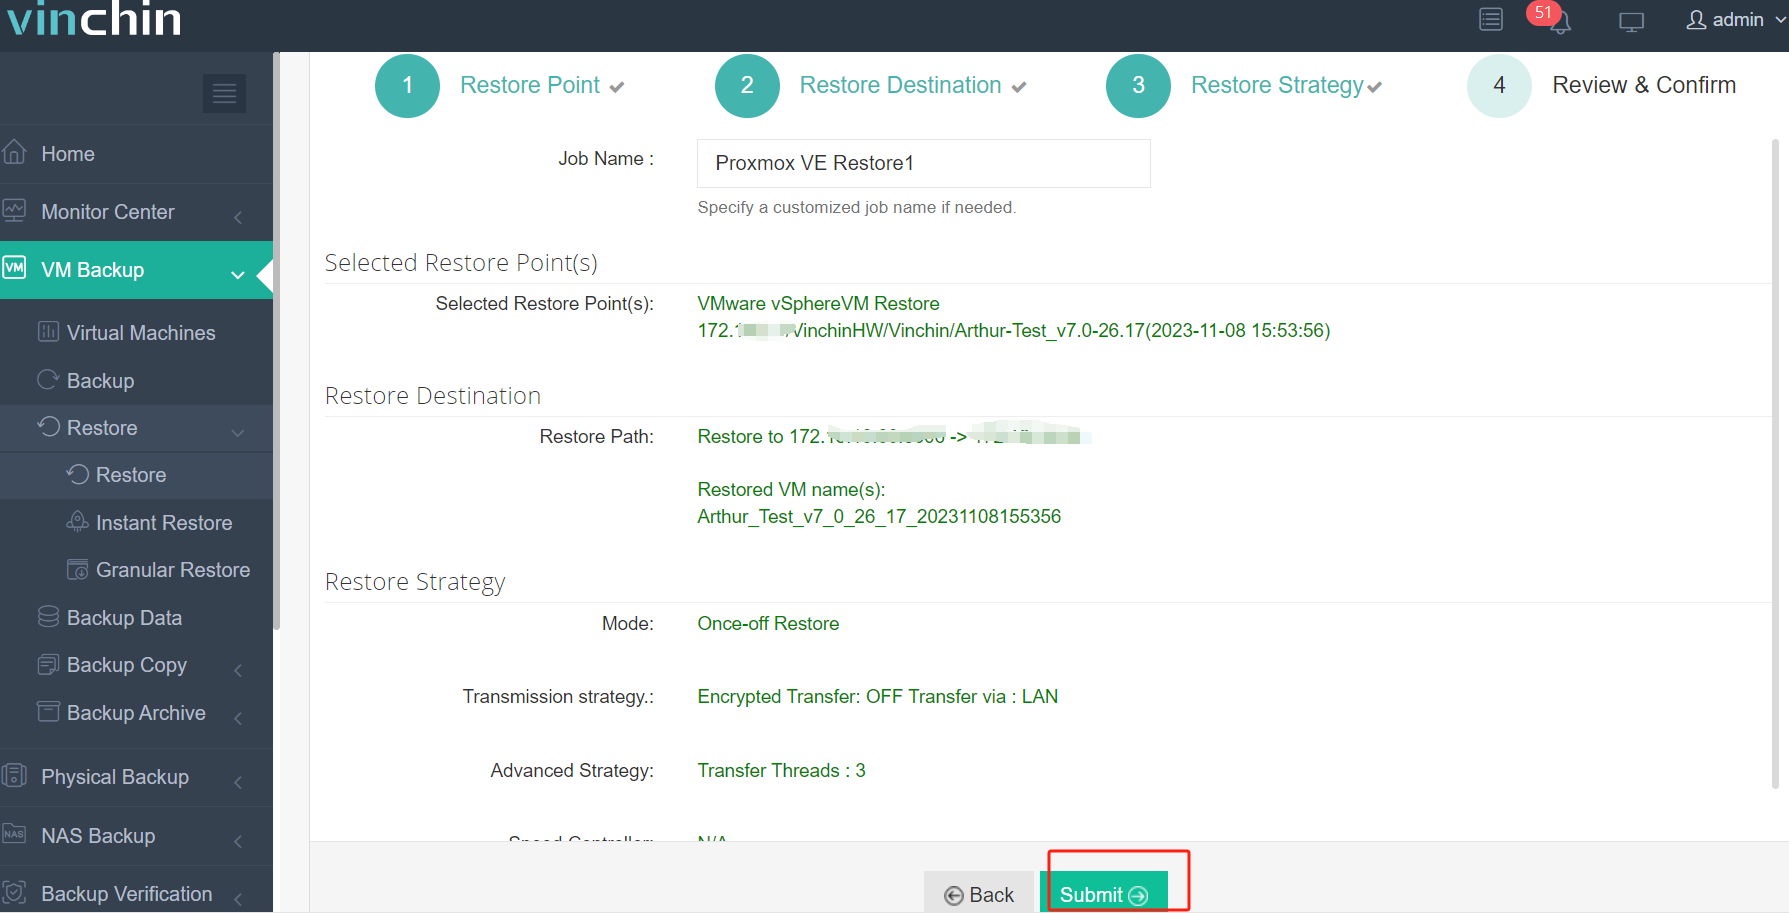
The migration workflow is straightforward: simply back up the source VM first and restore it directly onto your chosen destination hypervisor—all orchestrated through Vinchin Backup & Recovery’s intuitive web console interface which allows easy creation of backup tasks followed by rapid restoration/migration jobs targeting any supported platform within minutes:
1. Select the backed-up source virtual machine type (e.g., select a backed-up VMware VM).

2. Choose the desired destination hypervisor as target host (e.g., Proxmox VE).

3. Set preferred migration strategies.

4. Submit job request.

With thousands of global customers relying on Vinchin Backup & Recovery—and consistently high product ratings—you can confidently experience its full feature set free for sixty days! Download the installer now for quick deployment in your own environment.
Update VMware ESXi 6.7 FAQs
Q1: Can I schedule automated updates outside business hours?
A1: Yes—you can use scheduled tasks within Lifecycle Manager/Update Manager interfaces so updates occur during planned downtime windows only.
Q2: What should I do if my custom drivers stop working after an update?
A2: Download compatible driver versions from vendor sites then reinstall manually through SSH shell access post-update completion.
Q3: How do I minimize downtime during large-scale upgrades?
A3: Stagger updates across clusters; migrate VMs off each host sequentially so only one node at a time enters maintenance mode.
Conclusion
Keeping your infrastructure safe means learning how—and when—to update VMware ESXi 6.7 properly using CLI tools, graphical managers like VUM/Lifecycle Manager, or manual ISOs depending on needs at hand.
Always validate compatibility first; verify results afterward before returning systems live!
For seamless migrations post-upgrade try Vinchin’s agentless solution trusted worldwide today.
Share on:


