Microsoft Hyper-V Core is a top choice for running virtual machines securely and efficiently on Windows platforms. Many IT teams rely on it because of its small footprint, strong security model, and cost-effectiveness. But how do you actually install Hyper-V Core? Whether you’re setting up one server or many, this guide walks you through every step—from prerequisites to backup—so you can deploy with confidence.
What Is Hyper-V Core?
Hyper-V Core is a streamlined version of Windows Server designed specifically for virtualization workloads. Unlike full Windows Server editions, it runs without a graphical user interface (GUI) or extra roles that aren’t needed for hosting virtual machines. You manage Hyper-V Core using command-line tools like PowerShell or remote management consoles such as Hyper-V Manager or Windows Admin Center.
This minimal approach reduces resource usage while increasing security by limiting the attack surface area—a key reason why many organizations choose it for production environments.
Why Install Hyper-V Core?
Why should operations administrators consider installing Hyper-V Core instead of other hypervisors? The answer lies in its efficiency and security benefits:
With fewer installed components, there are fewer vulnerabilities exposed to attackers.
It uses less memory and CPU compared to GUI-based servers, leaving more resources available for your virtual machines.
Patch cycles are shorter since only essential components need updates.
As a free standalone hypervisor from Microsoft, it offers enterprise-grade features at no extra cost.
These advantages make Hyper-V Core ideal for data centers where uptime and reliability matter most.
Prerequisites for Installing Hyper-V Core
Before you begin the process to install hyper-v core, check that your hardware meets all requirements:
A 64-bit processor supporting Second Level Address Translation (SLAT), such as Intel VT-x or AMD-V
At least 4 GB RAM (more recommended depending on VM workload)
Virtualization support enabled in BIOS/UEFI settings—look for options labeled Intel Virtualization Technology or AMD SVM
Data Execution Prevention (DEP) enabled—often called XD bit or NX bit in BIOS
Sufficient disk space based on planned VM storage needs
To verify these prerequisites inside Windows, open Command Prompt and run systeminfo. Review the “Hyper-V Requirements” section at the bottom; all items should say “Yes.” If any requirement is missing—for example if SLAT isn’t enabled—you must adjust BIOS settings before proceeding.
It’s also wise to update your server firmware before installation to avoid compatibility issues later.
Method 1: Manual Installation of Hyper-V Core Using ISO File
Manual installation is often chosen when setting up just one or two hosts—or when you want maximum control over each step.
Start by downloading the official ISO image from Microsoft’s Evaluation Center or Volume Licensing Service Center. Use Rufus or another tool to create a bootable USB drive from this ISO file.
Insert your USB stick into the target server and power it on. Enter BIOS/UEFI setup by pressing the appropriate key during startup (usually F2, DEL, ESC). Set USB as the primary boot device under Boot Order settings.
When prompted by the installer:
1. Select your preferred language and region
2. Accept license terms
3. Choose Custom: Install Windows only (advanced)
4. Pick an empty disk partition—or delete existing partitions if starting fresh—and click Next
The installer copies files then reboots automatically several times during setup.
Method 2: Automated Installation of Hyper-V Core Using Windows Deployment Services (WDS)
Automated deployment becomes essential when rolling out multiple servers across an organization—saving time while ensuring consistency everywhere.
First set up WDS on an existing Windows Server machine within your environment:
1. Add WDS role via Server Manager (Add roles and features > Role-based > Windows Deployment Services)
2. Configure WDS following prompts; point image store location to ample storage space
3. Import downloaded ISO as new boot/install image (Right-click Boot Images > Add Boot Image...)
On target servers:
1. Enable PXE/network boot in BIOS (Boot Order > Network/PXE First)
2. Connect server physically via Ethernet cable—Wi-Fi isn’t supported here!
3. Power up; press required key when prompted (“Press F12 for network service boot”)
Server contacts WDS host automatically over LAN thanks to DHCP/PXE protocols—but note! Your DHCP scope must authorize WDS traffic OR routers must have IP Helper addresses configured pointing PXE requests toward WDS host IP address—a common stumbling block that halts deployments if missed!
Method 3: Automated Installation of Hyper-V Core Using Microsoft Deployment Toolkit (MDT)
MDT takes automation even further than WDS alone—ideal when deploying dozens of hosts needing custom drivers/scripts/settings baked right into their builds!
Begin by installing MDT plus required ADK components onto any management workstation/server:
1. Launch MDT Workbench application (Deployment Workbench)
2. Create new deployment share (right-click Deployment Shares > New Deployment Share...)
3. Import downloaded ISO under Operating Systems node
4. Build Task Sequence tailored specifically for “Install hyper-v core”—include driver injection steps relevant per hardware type
Initial Hyper-V Role Configuration and Network Setup
With operating system installed successfully—and first login complete—it’s time to confirm that the actual virtualization layer is ready!
By default after installing hyper-v core edition OS images from Microsoft today—the “Hyper-V” role comes pre-installed out-of-the-box! No need to add features manually unless working off custom/minimal images built differently elsewhere;
However before spinning up any guest VM workloads—you MUST create at least one external virtual switch so those guests can reach outside networks:
Open PowerShell window locally;
Type:
Get-NetAdapter # Find correct physical NIC name first!
New-VMSwitch -Name "External vSwitch" -NetAdapterName "Ethernet0" -AllowManagementOS $true
Replace "Ethernet0" above with whatever adapter name matches output seen earlier;
This creates an external-type switch bound directly atop physical NIC—which allows both host AND future guest VMs access through same uplink port;
Want internal-only testing? Use New-VMSwitch -Name "Internal vSwitch" -SwitchType Internal instead;
Remember: Always test connectivity afterward (ping, etc.) before moving production workloads onto new hosts!
Backup Virtual Machines on Hyper-V Core with Vinchin Backup & Recovery
After completing installation and configuration of Hyper-v core, safeguarding virtual machines becomes critical for business continuity and compliance needs. Vinchin Backup & Recovery stands out as a professional enterprise-level solution supporting over 15 mainstream virtualization platforms—including robust support for Microsoft Hyper‑V alongside VMware, Proxmox VE, oVirt, OLVM, RHV, XCP-ng, XenServer, OpenStack, ZStack, and others—making it highly versatile across hybrid environments.
Vinchin Backup & Recovery delivers comprehensive protection through features such as forever-incremental backup strategies that minimize storage consumption; advanced deduplication and compression technologies; granular restore capabilities down to individual files within VM backups; seamless cross-platform migration (V2V); scheduled backup automation; instant recovery options; cloud/tape archiving integration; multi-thread transmission; GFS retention policy enforcement; data encryption; throttling policies; repetitive backup scheduling; VM backup data verification—and more—all managed centrally through an intuitive web console interface designed for operational efficiency at scale.
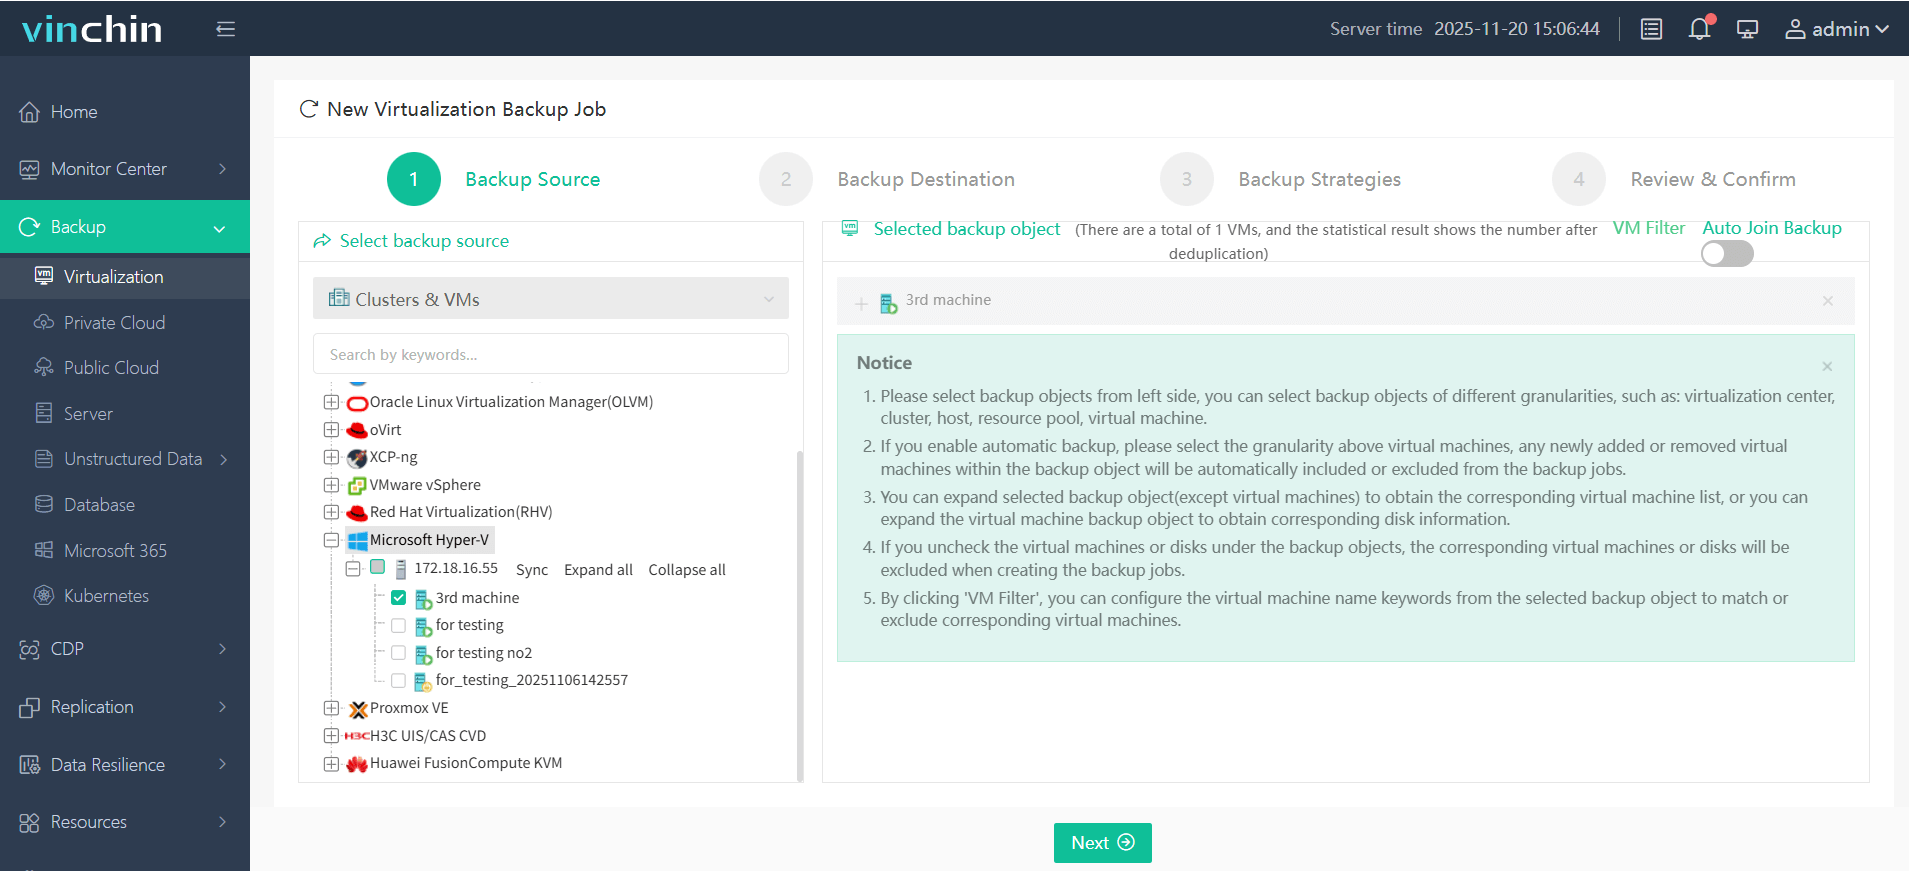
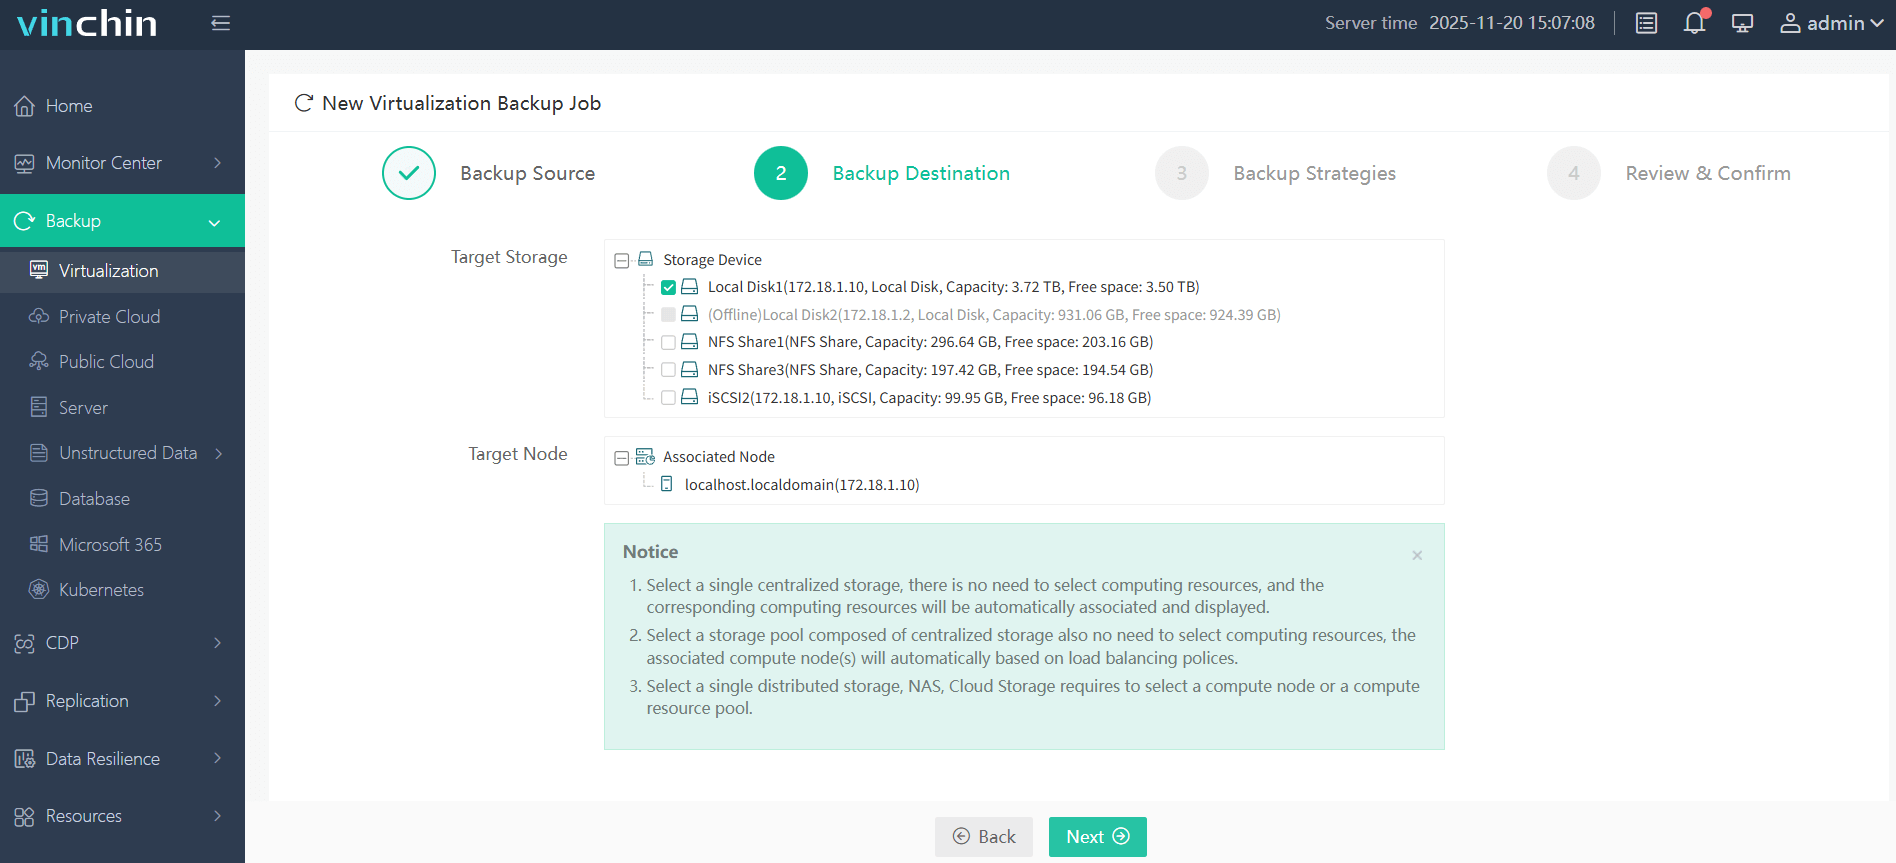
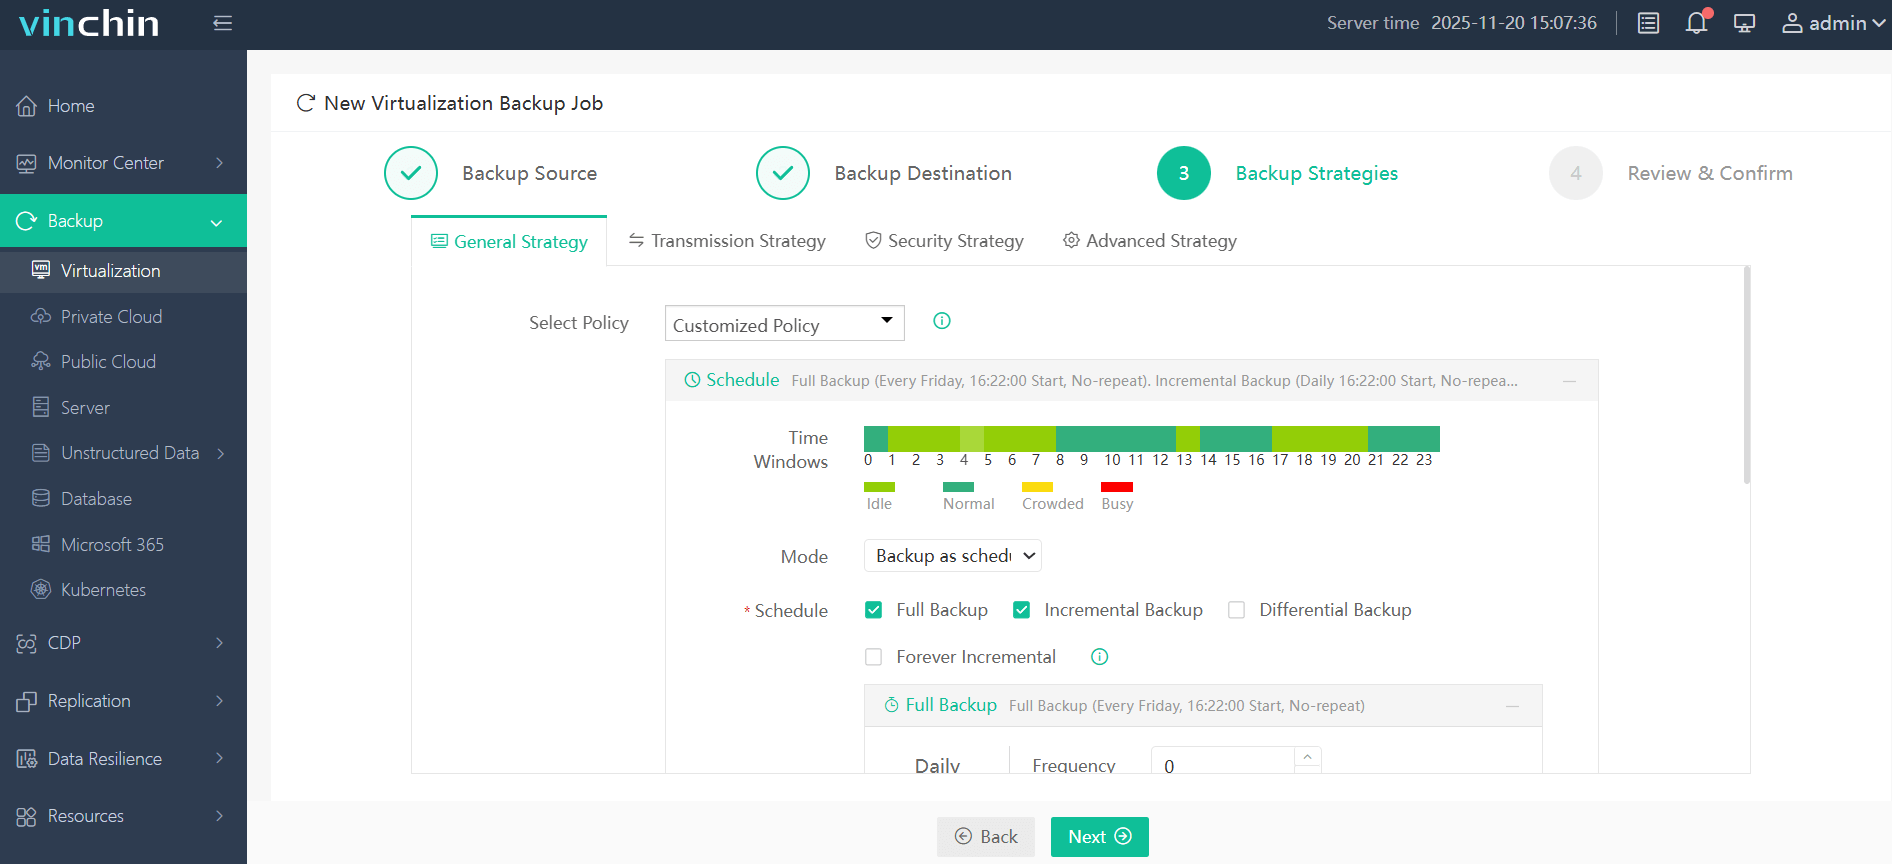
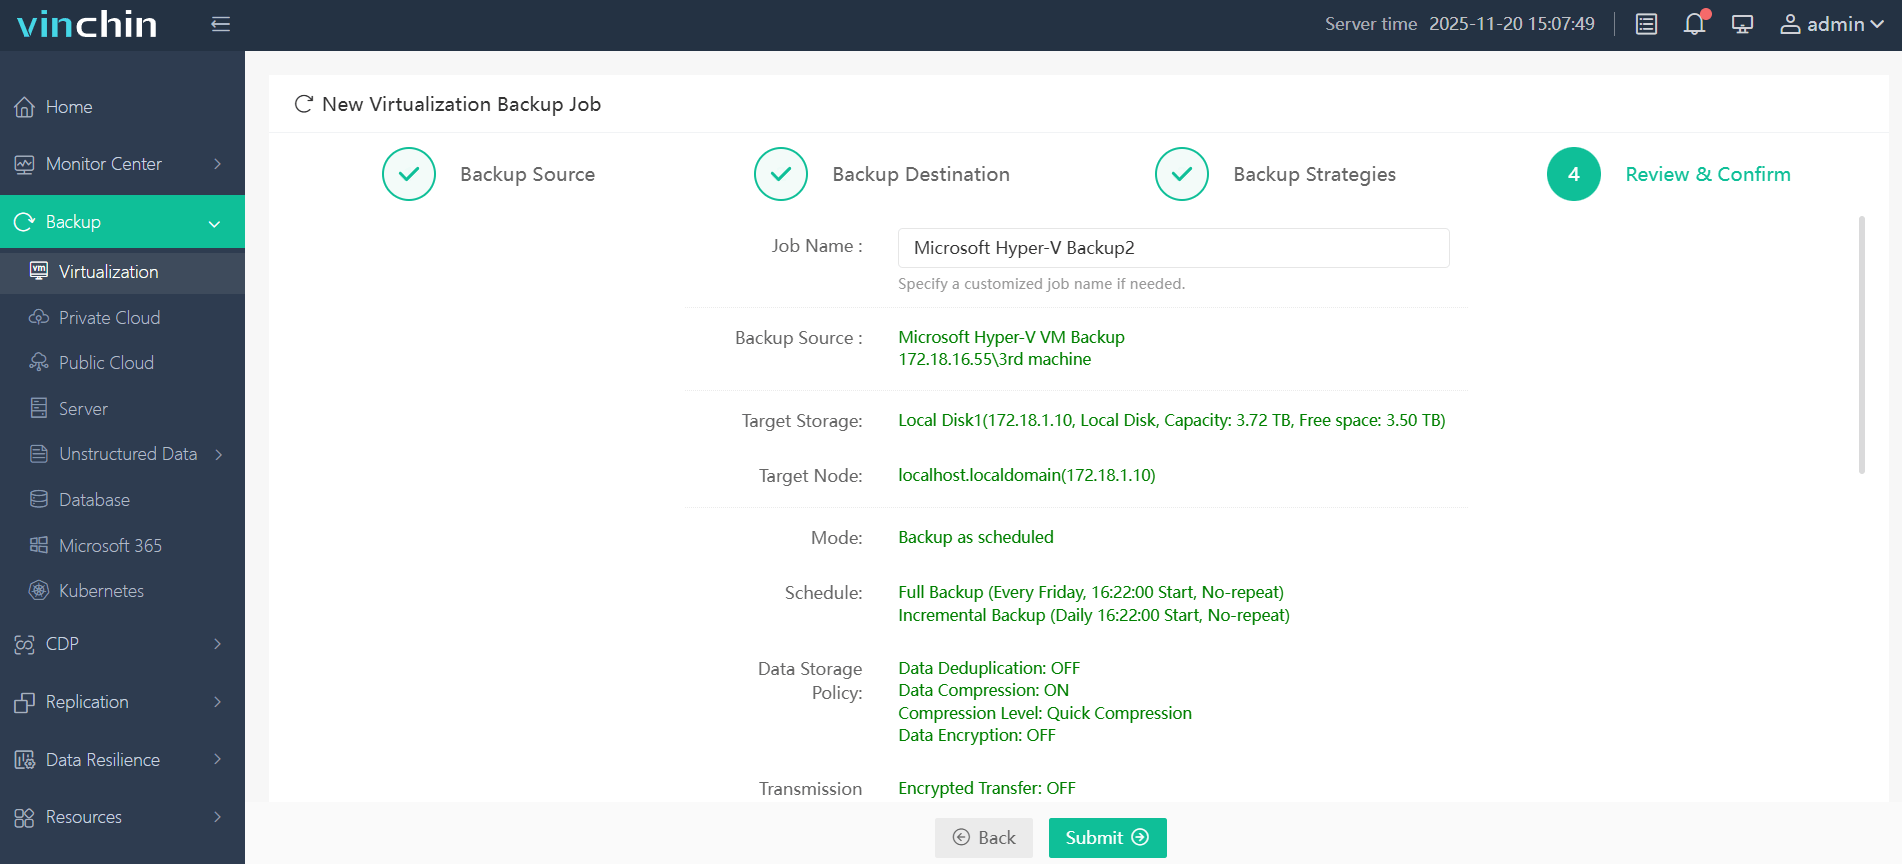
To back up a virtual machine hosted on Hyper-v core using Vinchin Backup & Recovery is straightforward thanks to its user-friendly web console:
Step 1: Select the Hyper-V VM to back up.
Step 2: Choose the backup storage.
Step 3: Configure the backup strategy.
Step 4: Submit the job.
Recognized globally among enterprise users—with high customer satisfaction ratings—Vinchin Backup & Recovery offers a fully featured 60-day free trial so you can experience powerful data protection firsthand before committing long-term.
Install Hyper-V Core FAQs
Q1: Can I automate post-installation tasks after deploying multiple hosts?
A1: Yes—use PowerShell Desired State Configuration scripts triggered remotely once base OS finishes installing across all nodes.
Q2: What should I do if my server hangs during initial reboot after install?
A2: Check latest firmware/BMC updates are applied beforehand; try swapping RAM modules/drives if persistent hardware errors occur repeatedly.
Q3: How do I allow secure remote administration without exposing RDP externally?
A3: Enable WinRM over HTTPS using self-signed certificates internally; restrict firewall rules tightly so only trusted admin subnets gain access.
Conclusion
Installing Hyper-v core delivers secure virtualization quickly whether manually or at scale—with proper planning every step runs smoothly start-to-finish! For reliable ongoing protection of those vital workloads consider trying Vinchin backup today—it makes safeguarding data simple yet powerful no matter what challenges arise next.


