-
What causes VMware removable devices not showing?
-
Method 1. Fixing device connection settings in VMware
-
Method 2. Updating VMware tools and drivers
-
How to backup VMware virtual machine with Vinchin Backup & Recovery?
-
VMware removable devices not showing FAQs
-
Conclusion
Have you ever plugged in a USB drive or another removable device but found it missing inside your VMware virtual machine? This can be frustrating—especially when you need quick access to files or tools stored on external media. When VMware does not show your removable devices, it can disrupt workflows or even halt important tasks. Let’s break down why this happens and how you can fix it step by step.
What causes VMware removable devices not showing?
Several factors can cause VMware to hide your removable devices from view inside a VM. Sometimes the solution is simple; other times you need to dig deeper into system settings or configuration files.
At the most basic level, your VM must have a USB controller enabled in its hardware settings. If this controller is missing or set to an incompatible version (like USB 3.0 instead of 2.0), your device will not appear at all inside the guest operating system.
Another common cause is that the VMware USB Arbitration Service—which manages connections between host USB ports and VMs—is not running on your host computer. Without this service active, no VM can claim control of attached USB devices.
Outdated or missing drivers also play a role here. If VMware Tools are out-of-date or improperly installed within your guest OS, device detection often fails completely.
In some cases, advanced configuration issues block device visibility by default—a line like usb.restrictions.defaultAllow = "FALSE" in your VM’s .vmx file prevents any USB passthrough unless manually changed. Bugs like these are more common than you might think!
Understanding these root causes helps you choose the right fix without wasting time on guesswork.
Method 1. Fixing device connection settings in VMware
Before trying advanced fixes, always check your VM’s hardware setup first—this solves most “removable devices not showing” problems quickly.
Start by powering off your virtual machine completely (not just suspending). Open VMware Workstation or Player on your host PC, right-click on your VM name, then select Settings from the menu that appears. Under the Hardware tab look for an entry called USB Controller—if it’s missing entirely click Add, pick USB Controller, then confirm addition.
Next check which version of USB compatibility is selected: if you plan to connect modern drives use USB 3.0; if older hardware gives trouble try switching back to USB 2.0 instead using the drop-down menu provided under controller options.
Save changes before closing out of Settings! Now power up your VM again—often this alone restores access to external drives through the familiar VM > Removable Devices menu at top of screen during runtime.
If nothing shows up still—or if everything remains greyed out—the problem may lie deeper within configuration files themselves…
Editing the .vmx File: Advanced Configuration
Sometimes hidden restrictions inside a VM’s .vmx file block all attempts at connecting new hardware—even when everything else looks correct! Editing this file safely requires care:
First make sure your virtual machine is powered off—not suspended—and close all open instances of VMware software before proceeding further (to avoid corruption).
Locate where your VM files live:
On Windows hosts:
C:\Users\<username>\Documents\Virtual Machines\<VM_name>On Linux hosts:
/home/<username>/vmware/<VM_name>/On macOS hosts:
/Users/<username>/Documents/Virtual Machines.localized/<VM_name>.vmwarevm/
Find <VM_name>.vmx within that folder (for example Windows10.vmx). Before making any changes create a backup copy—just duplicate it as Windows10_backup.vmx so you can restore later if needed!
Open .vmx with Notepad (Windows) or nano/vim (Linux/macOS). Search for any line containing usb.restrictions.defaultAllow = "FALSE". If found either delete this line entirely or change "FALSE" to "TRUE" so it reads:
usb.restrictions.defaultAllow = "TRUE"
Save changes then exit editor.
Reopen VMware application now; start up affected virtual machine once more; check under VM > Removable Devices—your external drives should finally appear ready for connection!
Always remember: never edit .vmx files while VMs are running; doing so risks data loss or corruption.
Handling USB Passthrough Permissions
Even after fixing hardware settings and editing config files correctly some users still face permission-related blocks when connecting certain types of external media—especially smart cards or security dongles used in enterprise environments!
Inside VMware Workstation go up top bar click on Edit > Preferences, then switch over to tab labeled USB—here adjust global rules about which user accounts have authority over new device connections during active sessions (helpful if multiple admins share same workstation).
For advanced filtering needs consider adding custom lines directly into .vmx, such as:
usb.generic.allowHID = "TRUE"
usb.autoConnect.device0 = "vid:pid"
Replace vid:pid with actual vendor/product IDs matching target device—you can find these values using Device Manager (Windows) or lsusb command (Linux).
These tweaks override default restrictions letting specific peripherals pass through even when others remain blocked by policy.
Method 2. Updating VMware tools and drivers
If all physical connections seem fine but removable devices still do not show up inside guest OSes chances are high outdated drivers—or disabled background services—are responsible!
Begin by ensuring latest version of VMware Tools runs within every affected guest environment:
With target VM powered ON select its window then click top menu item labeled VM > Install VMware Tools (or sometimes shown as Update VMware Tools) depending upon current status.
Follow prompts appearing inside guest operating system until installation completes fully.
Reboot virtual machine afterwards so new drivers load properly next session begins.
Resolving USB Arbitration Service Failures
The heart of successful passthrough lies with one critical background process—the “VMware USB Arbitration Service.” If stopped—or worse yet missing altogether—even perfect configs won’t help!
On Windows hosts press keyboard shortcut (Windows + R) type services.msc, hit Enter key; scroll list until finding entry named exactly as "VMware USB Arbitration Service" (sometimes listed as "VMUSBArbService").
Check its status column—it must read “Running.” If stopped right-click entry choose option marked "Start." For automatic startup at boot double-click row set field labeled "Startup type" to "Automatic."
Advanced users may prefer PowerShell commands instead:
Restart-Service -Name "VMUSBArbService"
If service fails repeatedly—or cannot be found at all—you likely face corrupted install files! In such cases navigate via Control Panel (Settings > Apps) locate main “VMware” product listing click "Change/Repair," follow wizard instructions carefully until repair completes successfully without removing existing VMs.
Troubleshooting Service Dependencies
Sometimes related services like "VMware Host Agent" must run alongside arbitration process itself; verify both appear active together under Services panel before testing again!
If errors persist review log entries located at path <your_VM_folder>\vmware.log; search text strings like "USB: Claim FAILED" which indicate underlying driver conflicts tied directly back toward host-side controller issues rather than anything wrong inside guest OS itself.
Driver Checks Outside Guest OS
Don’t forget about base-level host drivers either! Open Device Manager on Windows machines expand section called "Universal Serial Bus controllers"; look for yellow warning icons next any listed items indicating malfunctioning chipsets needing update/reinstall from manufacturer site—not just generic Microsoft-provided versions!
How to backup VMware virtual machine with Vinchin Backup & Recovery?
After resolving issues with removable devices in VMware, safeguarding data becomes essential for business continuity and compliance. Vinchin Backup & Recovery stands out as a professional enterprise-level solution supporting over 15 mainstream virtualization platforms—including comprehensive support for VMware environments alongside Hyper-V, Proxmox, oVirt, OLVM, RHV, XCP-ng, XenServer, OpenStack, ZStack and more.
Key features available for protecting VMware workloads include quiesced snapshot creation for consistent backups, HotAdd transport mode for efficient data transfer during backup operations, CBT-based incremental backups for speed and storage savings, granular restore capabilities enabling precise recovery down to individual files or folders within VMs, and robust data deduplication plus compression technologies that optimize storage usage while maintaining performance—all designed to streamline protection across diverse infrastructures.
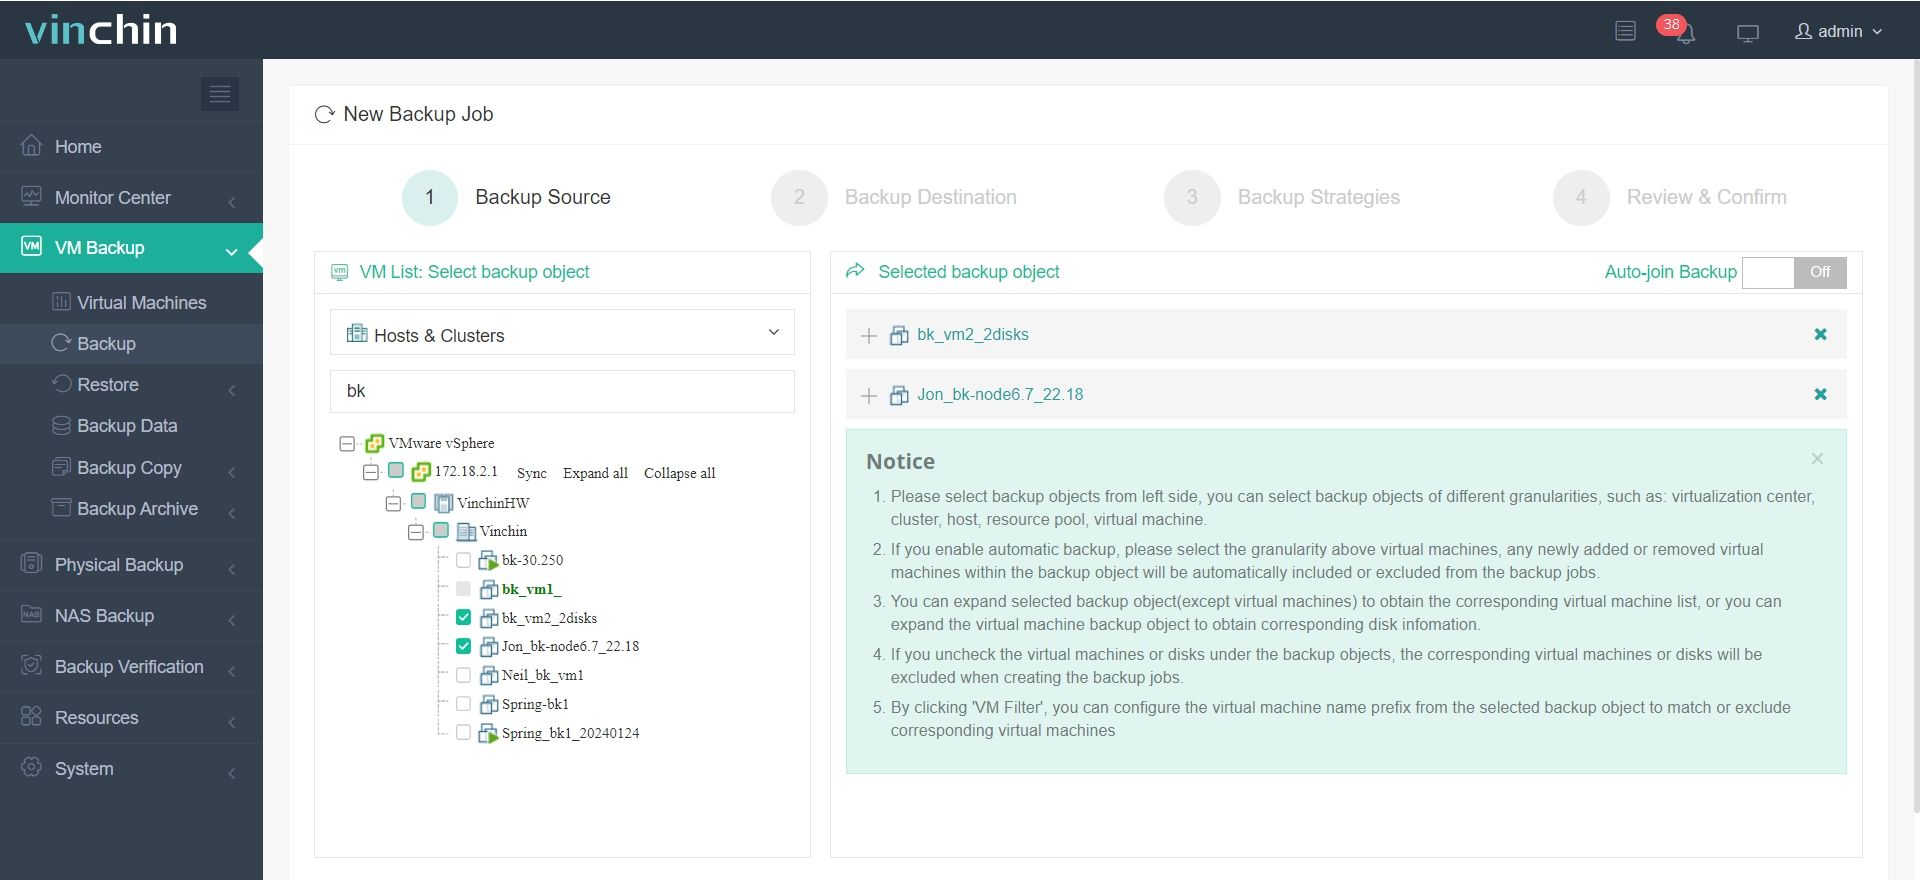
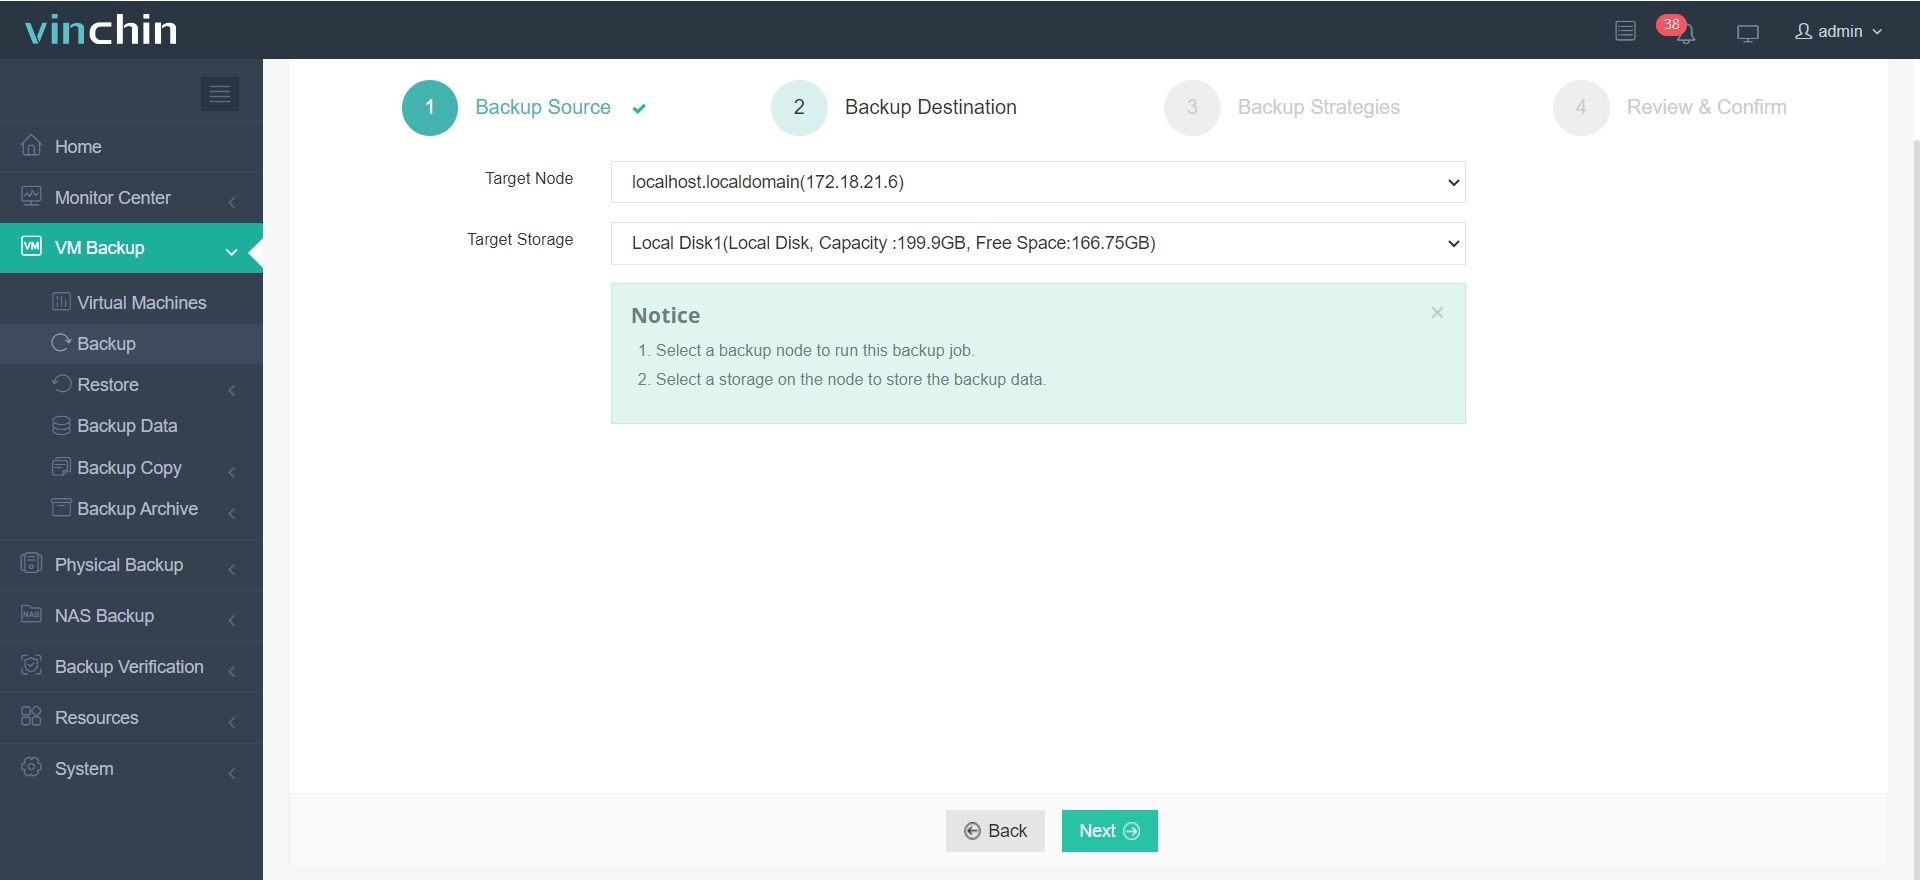
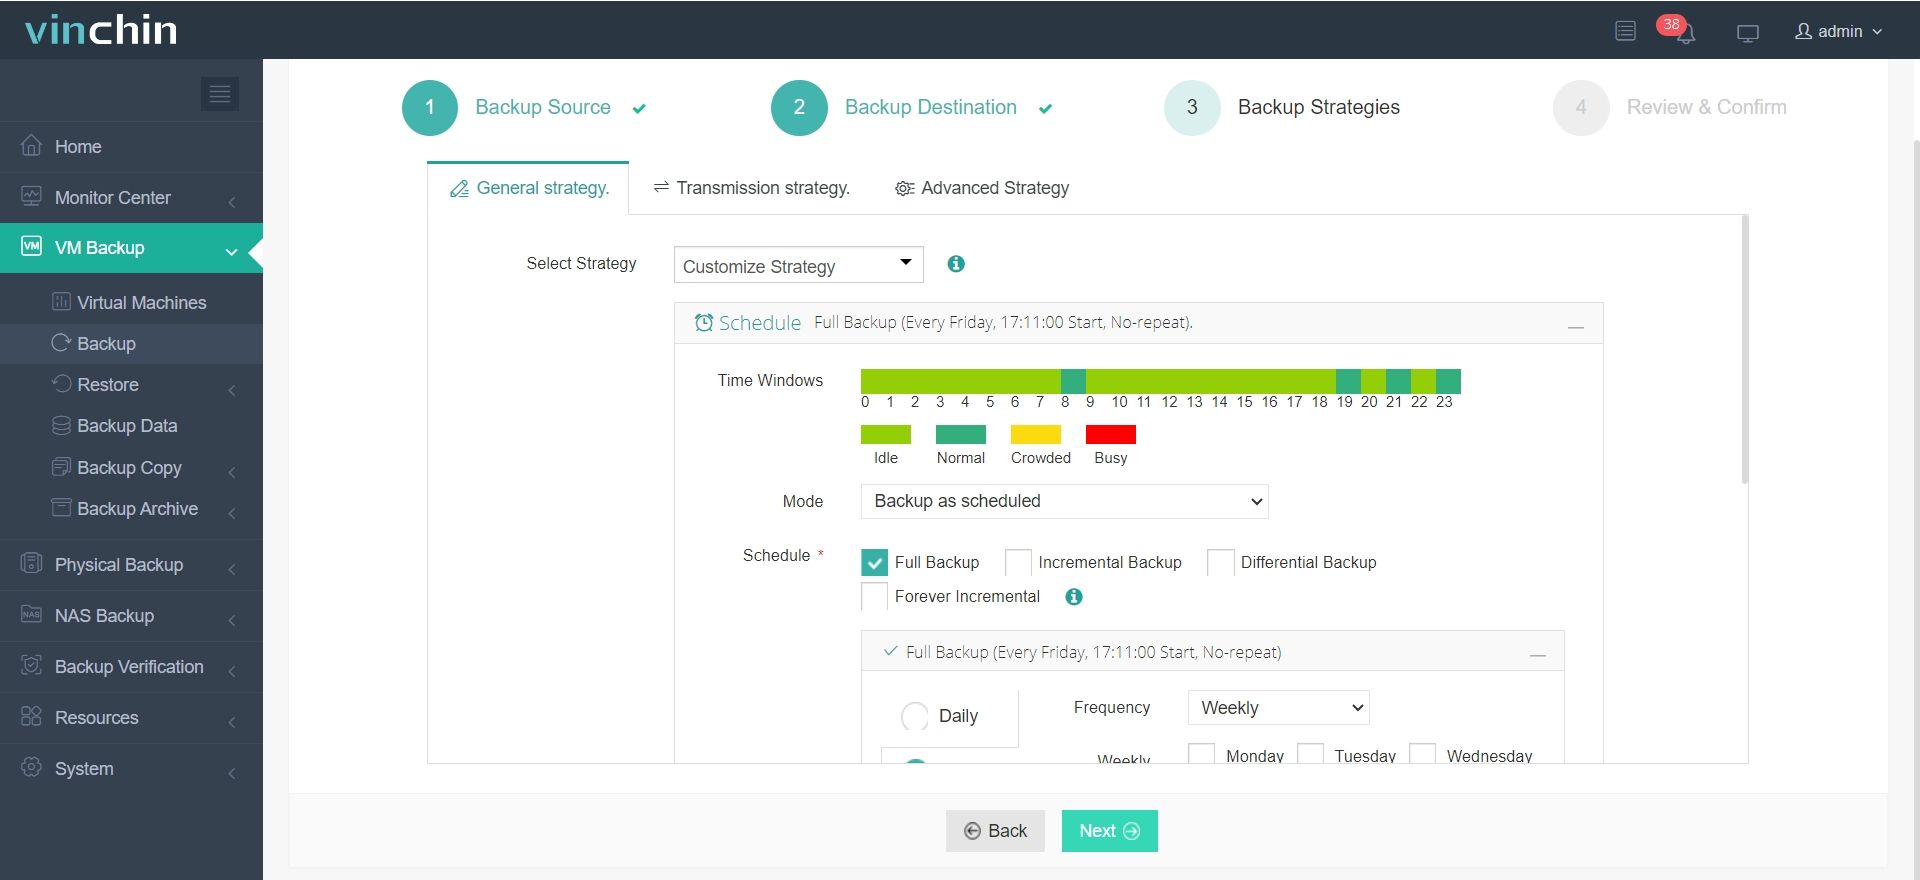
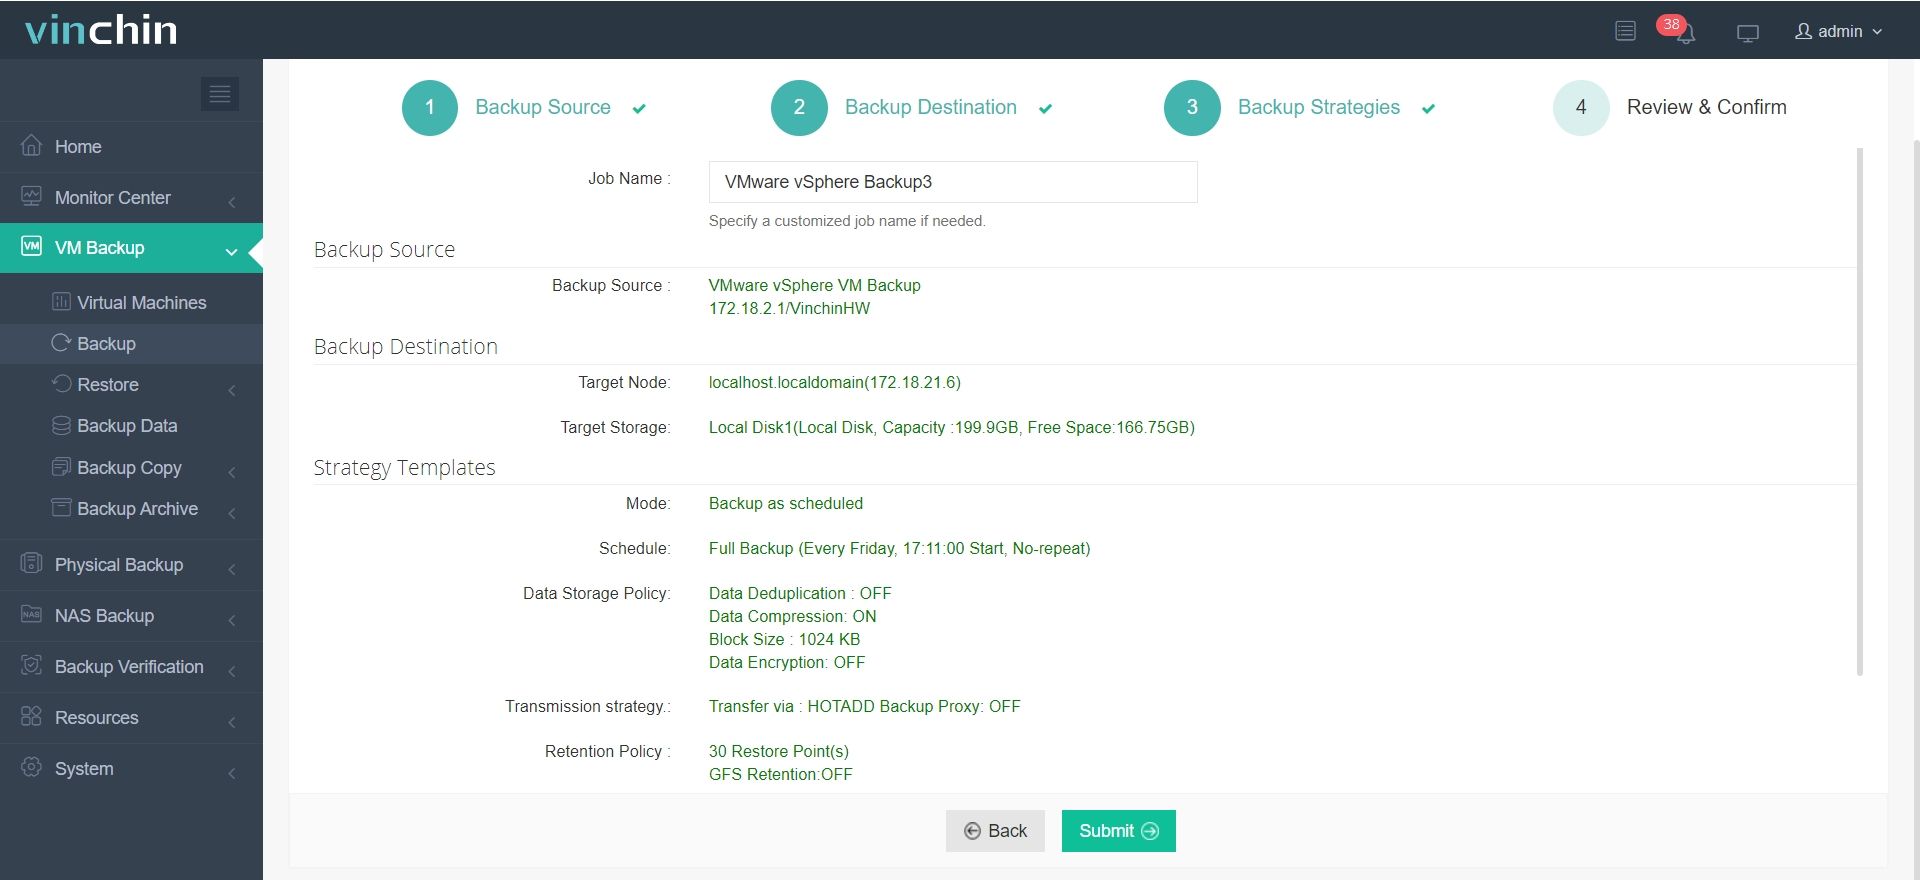
Using Vinchin Backup & Recovery's intuitive web console makes backing up a VMware VM straightforward:
Step 1: Select the VMware VM to back up.

Step 2: Choose backup storage.

Step 3: Configure backup strategy.

Step 4: Submit the job.

Vinchin Backup & Recovery enjoys global recognition among enterprises for reliability and ease-of-use—with thousands of satisfied customers worldwide and top industry ratings. Experience full functionality free for 60 days by clicking below to download now.
VMware removable devices not showing FAQs
Q1: Why does my USB device show up on my computer but not inside my virtual machine?
A1: Your virtual machine may lack an enabled USB controller, or required services like “VMware USB Arbitration Service” might be stopped; check both before reconnecting any external drive.
Q2: Can I safely edit my .vmx file while my virtual machine runs?
A2: No; always power off every affected VM fully before changing configuration files—editing live risks corruption.
Q3: What should I do if my host says my external drive is already busy?
A3: Disconnect drive from host via Removable Devices menu first; close any open applications using same disk outside guest OS; then reconnect through desired virtual machine interface.
Conclusion
When vmware removable devices are not showing, the fix usually involves checking connection settings, updating drivers, or editing configuration files safely—all steps covered above help restore normal function fast! Regular backups matter too; Vinchin makes protecting critical workloads easy across platforms—try their free trial today!
Share on:


