-
What is Mac OS on VMware?
-
Why Run Mac OS on VMware?
-
Prerequisites and System Requirements
-
Method 1: Installing Mac OS with ISO File
-
Method 2: Using Pre-Built Virtual Machines
-
How to Backup VMware Virtual Machine with Vinchin Backup & Recovery
-
Mac OS on VMware FAQs
-
Conclusion
Running Mac OS on VMware opens up new possibilities for testing, development, and cross-platform workflows without needing extra Apple hardware at every desk. Whether you’re an operations administrator managing diverse environments or a developer building apps for multiple platforms, this guide shows you how to deploy macOS in VMware efficiently—and keep it protected from disaster.
Disclaimer: This guide is intended for educational purposes only. Apple’s End User License Agreement restricts running macOS as a virtual machine to Apple-branded hardware unless otherwise permitted by law or specific agreements. Always check your organization’s compliance requirements before proceeding.
What is Mac OS on VMware?
Mac OS on VMware means running Apple’s macOS operating system as a virtual machine inside VMware Workstation (Windows/Linux), VMware Fusion (Mac), or VMware ESXi (enterprise). This setup lets you access macOS features without dedicating physical Apple devices to every user or test case—a big win for flexibility in labs or support teams.
However, there’s an important caveat: Officially, both Apple and VMware only support running macOS VMs on genuine Apple hardware using products like VMware Fusion or ESXi installed directly on Macs. Running macOS as a guest VM on non-Apple hosts requires community-developed patches—these workarounds can introduce risk but are widely used in IT labs worldwide.
Why Run Mac OS on VMware?
Running Mac OS on VMware brings flexibility that traditional setups can’t match. You can test software updates safely before rolling them out company-wide or develop cross-platform apps without switching between machines all day long. Many IT teams use this approach to train staff who support users relying on macOS—even if their main infrastructure runs Windows or Linux servers underneath.
Isn’t it handy to have a ready-to-go Mac VM when troubleshooting user issues? With virtualization tools like VMware Workstation or Fusion paired with careful configuration steps below—you get just that: A portable lab environment that saves time while reducing hardware costs.
Prerequisites and System Requirements
Before diving into installation methods for mac os on vmware, make sure your host system meets key requirements:
Enable Intel VT-x/EPT (for Intel CPUs) or AMD-V/RVI (for AMD CPUs) in BIOS/UEFI settings.
Use at least 8GB RAM (16GB+ recommended if running multiple VMs).
Reserve at least 80GB free disk space per VM.
For best results: Use SSD storage instead of spinning disks.
Install the latest stable version of your chosen hypervisor—VMware Workstation Pro 17+, Player 17+, Fusion 13+, or ESXi 7+.
If installing macOS Monterey (12.x) or newer as your guest OS: Download the official installer from the Apple Support page.
If you plan to run these VMs outside of supported Apple hardware—for example using Windows/Linux hosts—you must apply an unlocker patch described below so that “Apple Mac OS X” appears as an installable option within the New Virtual Machine wizard.
Method 1: Installing Mac OS with ISO File
This method uses a clean ISO image of macOS to build your VM from scratch—the most flexible way to customize settings along the way while ensuring maximum compatibility with future updates.
Step 1: Prepare the macOS ISO File
You need a valid ISO file containing your desired version of macOS—Monterey works well for most modern workflows but older versions may be required by legacy apps:
1. On an existing Mac device:
Download the installer from App Store
Use Terminal commands like
hdiutilto convert.appfiles into bootable ISOs
2. On other platforms:
Obtain ISOs from trusted sources only—verify checksums before use
Never download images from unknown forums due to malware risk
Step 2: Install Your Preferred Version of VMware
Download either VMware Workstation Pro, VMware Player (Windows/Linux), or VMware Fusion (Mac). Complete installation using default options then close all open instances before proceeding further—this ensures later patches apply correctly across all components.
Step 3: Apply Unlocker Patch (Non-Mac Hosts Only)
By default “Apple Mac OS X” won’t appear as an option unless you’re using genuine Apple hardware—or unless you patch your hypervisor:
1. Download Auto-Unlocker from its official GitHub repository
2. Extract files locally
3. Right-click win-install.cmd (Windows) or run Unlocker.exe (Linux) choosing Run as administrator
4. Wait until completion message appears
Warning: Unlockers modify core program files! Always scan downloads with antivirus tools first—and never run untrusted scripts in production environments where sensitive data resides!
Step 4: Create Your New Virtual Machine
Open your hypervisor then click Create a New Virtual Machine:
1. Choose Typical (recommended) setup path
2. Select I will install the operating system later
3. Under Guest Operating System select Apple Mac OS X, picking exact version matching your ISO
4. Name your VM clearly (“macos-monterey-test”) then pick storage location
5. Set disk size minimum at 80GB; single-file format preferred for performance
6. Click Finish
Step 5: Attach ISO Image & Adjust Hardware Settings
With VM selected go into settings:
1. Under CD/DVD drive choose Use ISO image file, browsing directly to prepared .iso file
2. Increase memory allocation up to at least 8GB; assign two CPU cores minimum if available
3. Optionally increase video memory via advanced display settings if smooth graphics are needed
Step 6: Edit .vmx File for Compatibility
Shut down any running instance of this VM first! Then navigate into its folder structure:
1. Open .vmx config file using Notepad/TextEdit
2a.For Intel CPUs add lines:
smc.version = "0"
smbios.reflectHost = "TRUE"
hw.model = "MacBookPro14,3"
board-id = "Mac-551B86E5744E2388"
2b.For AMD CPUs also add:
cpuid.* entries listed above...
These parameters spoof essential SMBIOS values so that macOS believes it’s running atop authentic Apple silicon—a requirement enforced by recent installers!
Save changes then close editor completely before relaunching anything else related!
Step 7: Boot Up & Begin Installation Process
Start up newly created VM:
1.Select language preference when prompted
2.Open Disk Utility tool inside installer menu bar
3.Highlight target drive labeled “VMware Virtual SATA Hard Drive Media”
4.Click Erase button; name volume (“Macintosh HD”), format type APFS + GUID Partition Map scheme
5.Close Disk Utility window once formatting completes successfully
6.Proceed through standard Install macOS workflow following onscreen prompts until finished
Installation may take some time depending upon host resources allocated earlier!
Step 8: Install & Configure VMware Tools Inside Guest OS
Once logged into desktop interface:
1.In top menu select Player > Manage > Install VMware Tools
2.Mount resulting disk image within Finder sidebar
3.Launch installer package provided
4.Follow prompts—including approving security requests under System Settings > Privacy & Security tab
5.Restart guest system after completion
This step enables clipboard sharing plus improved mouse/video integration between host + guest systems!
Method 2: Using Pre-Built Virtual Machines
Some admins prefer starting with pre-built VMDK images rather than fresh installs—they save time but come with serious tradeoffs around trustworthiness/security compliance!
Warning: Pre-built VMs sourced online may contain hidden malware/backdoors—or simply break after updates due incompatibility issues! Never deploy such images onto production networks without thorough vetting/scanning first. When possible always build from scratch using known-good media instead!
Step 1: Download Trusted Pre-Built VMDK Image
Locate reputable source offering correct version/build number required by internal policies—always verify cryptographic hashes prior usage wherever possible! Avoid torrents/unverified forums entirely due high infection rates reported industry-wide.
Step 2: Create New Blank Virtual Machine Shell
Inside hypervisor click through familiar wizard sequence again—but skip actual install process this round:
1.Select Typical mode
2.Pick “I will install operating system later”
3.Set Guest Type = “Apple Mac OS X”, matching downloaded image version exactly!
4.Assign unique name/location per usual standards
5.Complete wizard leaving blank disk attached temporarily
Step 3: Attach Existing Pre-Built Disk Instead Of Default Blank One
Go back into Edit virtual machine settings dialog box now visible under summary pane:
Remove placeholder hard disk entry altogether
Click Add > Hard Disk > SATA > Use existing virtual disk option instead!
Browse filesystem until correct .vmdk found/downloaded earlier
Confirm selection then finish adding device
Step 4: Edit Associated .vmx Configuration File As Needed
Repeat same process outlined previously regarding SMBIOS/cpuid spoofing lines based upon underlying CPU architecture detected during initial planning phase!
Step 5: Boot Up And Finalize Setup Steps
Power up imported appliance image next—with luck everything boots straight away allowing immediate login/configuration tasks ahead:
If networking fails try toggling ethernet controller type (ethernet0.virtualDev = "e1000e" vs "vmxnet3") within config script until reliable DHCP lease obtained.
Install latest edition of integrated tools suite just like fresh builds above—for seamless copy/paste/file drag-and-drop functionality across platforms!
How to Backup VMware Virtual Machine with Vinchin Backup & Recovery
To ensure ongoing protection and rapid recovery for vital workloads such as those running mac os on vmware, enterprise administrators require robust backup strategies beyond basic snapshots alone. Vinchin Backup & Recovery is a professional, enterprise-level solution designed specifically for virtual machine backup across more than fifteen mainstream virtualization platforms—including comprehensive support for VMware environments alongside Hyper-V, Proxmox, oVirt, OLVM, RHV, XCP-ng, XenServer, OpenStack, ZStack and others.
Vinchin Backup & Recovery delivers essential features such as quiesced snapshot capability for consistent backups in live environments; HotAdd technology enabling efficient data transfer; CBT-based incremental backups minimizing backup windows; LAN-free backup options reducing network load; and instant recovery functionality ensuring minimal downtime—all tailored specifically for supported platforms like VMware and more.
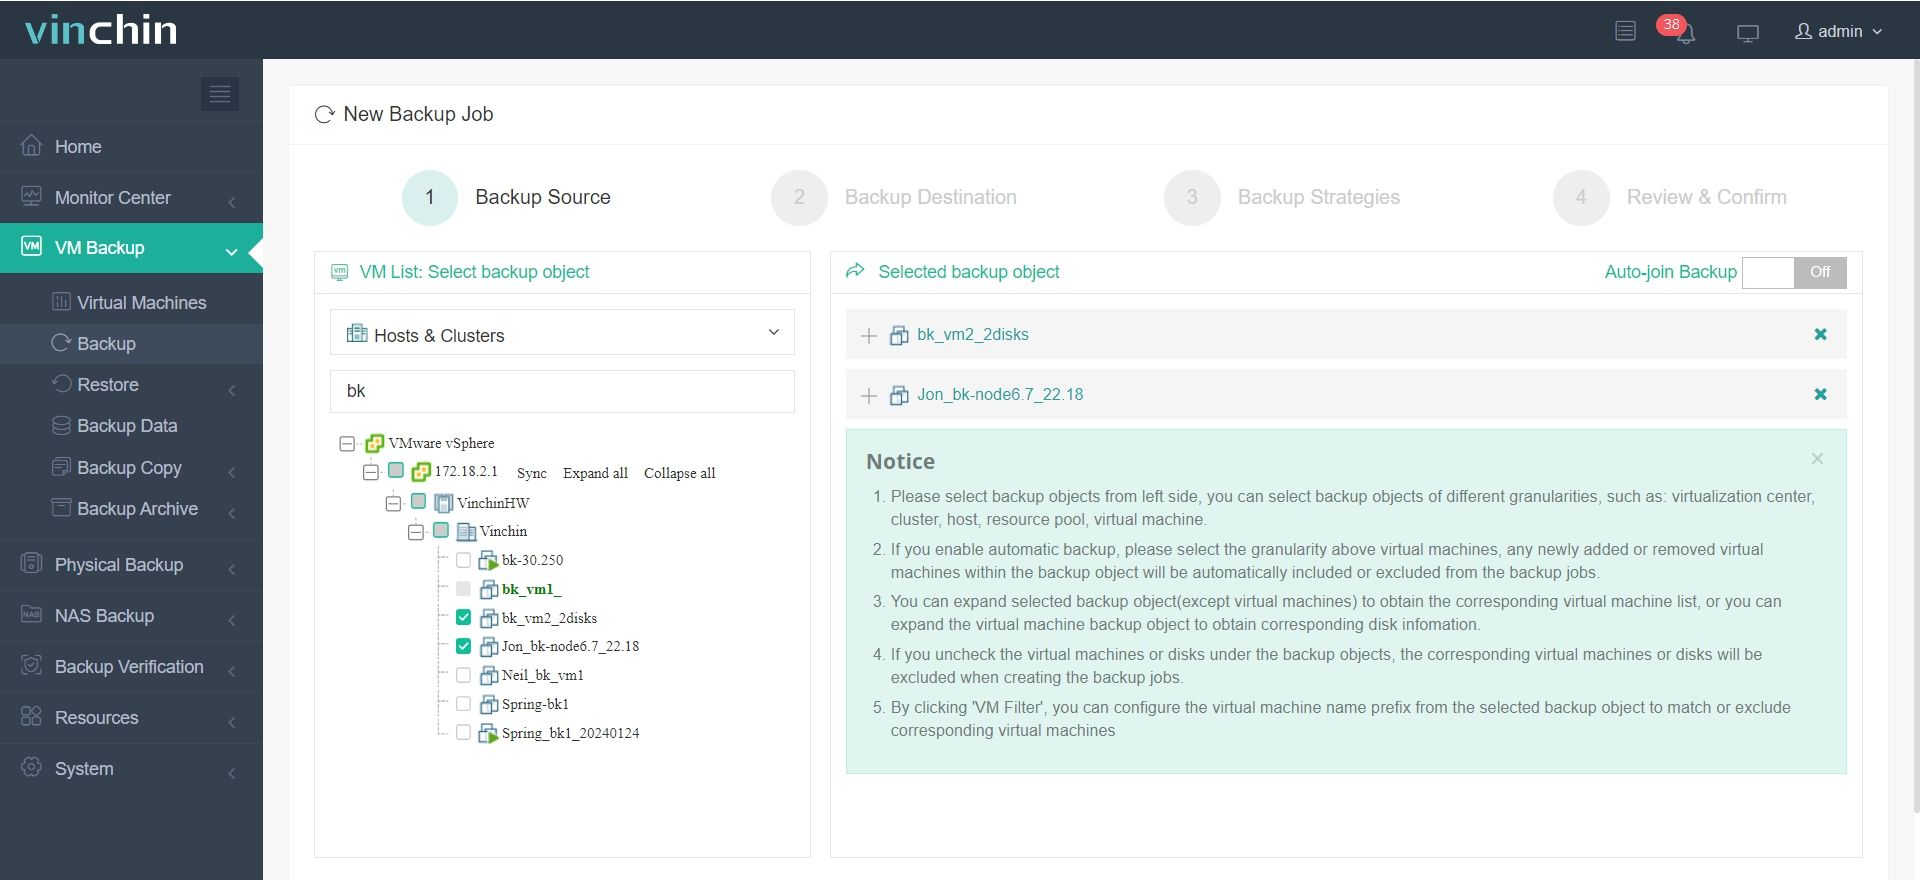
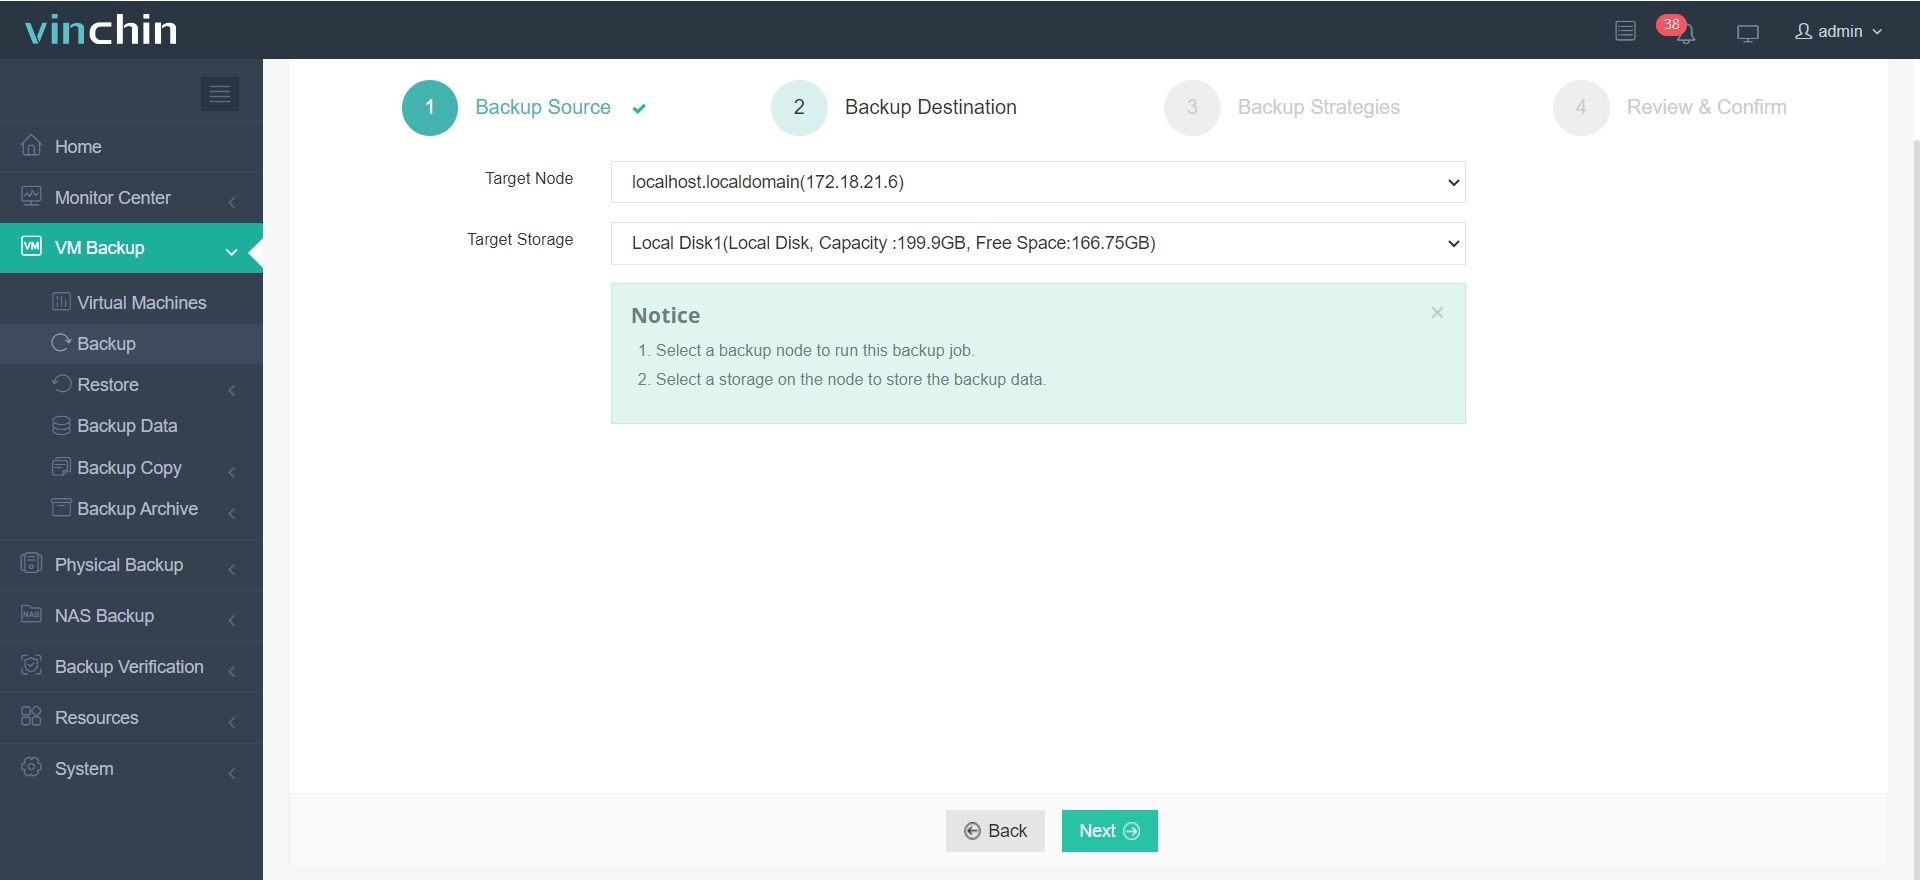
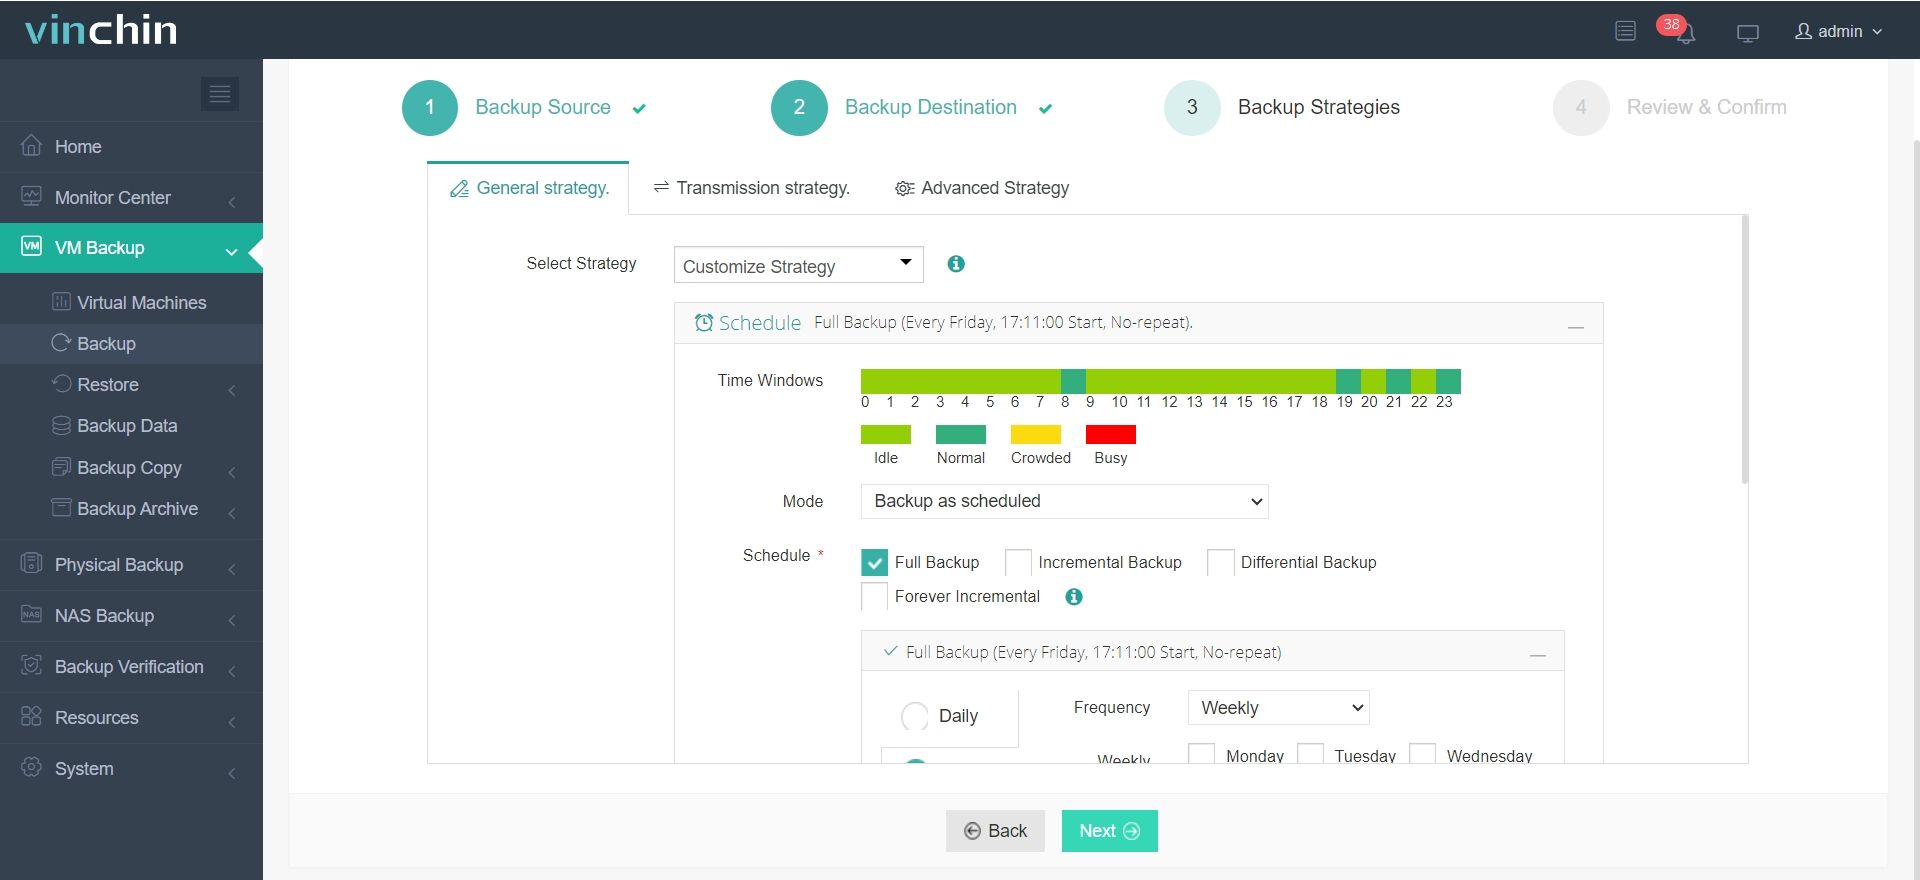
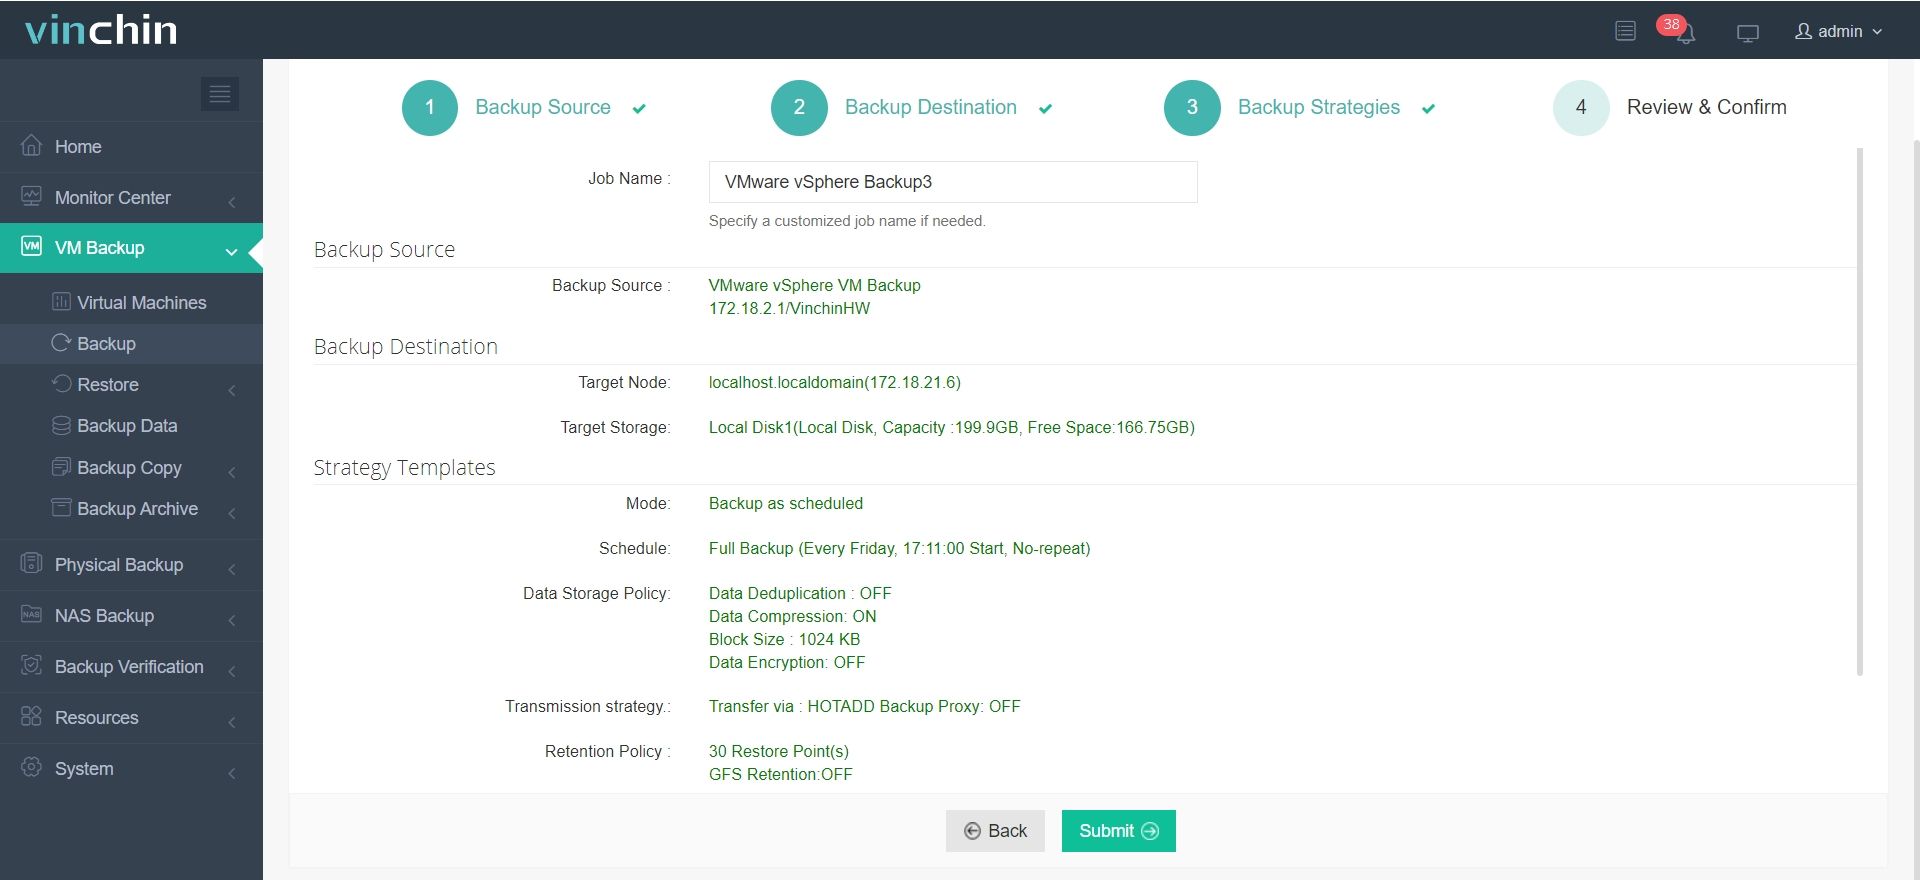
The intuitive web console makes protecting your environment straightforward:
Step 1: Select the VMware VM to back up

Step 2: Choose the backup storage

Step 3: Configure the backup strategy

Step 4: Submit the job

With global recognition among thousands of enterprises and consistently top-rated customer satisfaction scores worldwide, Vinchin Backup & Recovery offers a fully featured free trial valid for sixty days—click below to experience secure enterprise-grade protection firsthand.
Mac OS on VMware FAQs
Q1 Can my team safely upgrade installed version of macos inside vm environment?
A1 Yes—but always snapshot OR perform full backup beforehand since major upgrades sometimes break patched configurations unexpectedly.
Q2 How do we restore lost network connectivity after importing prebuilt vmdk?
A2 Edit associated .vmx file changing ethernet0.virtualDev value between e1000e/vmxnet3 types until DHCP lease acquired reliably.
Q3 What steps improve sluggish performance seen under heavy load conditions?
A3 Ensure latest edition vmtools loaded; allocate additional RAM/cpu cores if available; move backing store onto SSD tier whenever feasible.
Q4 Are snapshots enough protection compared dedicated backups?
A4 Snapshots help revert small mistakes quickly—but aren’t substitute full-featured backup solution like Vinchin especially when regulatory retention periods apply.
Q5 Is there way automate periodic backups without manual intervention each week?
A5 Yes—in Vinchin web console set recurring schedule under BACKUP JOBS tab selecting frequency/time window best fits maintenance windows.
Conclusion
Running Mac OS on VMware gives IT teams unmatched flexibility across testing/support/dev scenarios—with careful setup you achieve stable results even outside traditional hardware limits! For reliable backup/recovery beyond basic snapshots consider Vinchin’s enterprise-grade solution built specifically around modern hybrid cloud realities.
Share on:


