-
What is Hyper-V high availability?
-
Creating Cluster Shared Volumes
-
Configuring the Quorum Disk
-
Configuring virtual machine for high availability
-
Protect Hyper-V environment with a professional solution
-
Conclusion
Last blog has talked about Hyper-V faliover cluster and gives detailed steps to create a Hyper-V failover cluster. And this blog will help you configure Hyper-V High Availability to achive better performance.
What is Hyper-V high availability?
Hyper-V High Availability (HA) is a feature designed to provide the capability of achieving high availability in a virtualized environment. Hyper-V is Microsoft's virtualization platform, and High Availability refers to the ability of a system or service to automatically switch to a standby node or instance in the event of a failure, ensuring continuous availability and uninterrupted service.
Hyper-V HA combines multiple physical servers into a logical cluster using clustering technology, allowing virtual machines to run on different physical nodes. When a node fails, the virtual machines are automatically migrated to other available nodes, enabling failover and continuous service availability. This approach enhances the reliability and fault tolerance of the virtualized environment, ensuring business continuity.
Configuring virtual machine high availability enables the virtual machine system to provide continuous 7*24 service. When the host machine where the virtual machine resides encounters an issue, the failover feature automatically migrates the virtual machine to another node within the cluster. Throughout this process, the virtual machine service remains uninterrupted, with a maximum loss of only two ping packets.
Creating Cluster Shared Volumes
The previous blog outlined how to create a Hyper-V failover cluster. However, having the platform alone is not enough. To ensure optimal performance and high availability, you need to configure high availability. The first step is creating Cluster Shared Volumes, which enables each Hyper-V cluster node to create and access virtual machines on the storage.
1. Open the Failover Cluster Manager and connect to the previously created Hyper-V Failover Cluster.
2. Once the cluster is open, expand the “Storage” section and select “Disks.”
3. You will see all the disks recognized by the storage. Right-click on the cluster disk and choose “Add to Cluster Shared Volumes.”
4. The assigned status will now change to “Cluster Shared Volume.”
5. After sharing within the cluster, the shared storage will be mapped to C:ClusterStorageVolume1. Therefore, virtual machines configured before the cluster was set up may encounter disk not found issues. In such cases, you need to reconfigure the virtual machine's disk to point to C:ClusterStorageVolume1.
Configuring the Quorum Disk
The configuration of the quorum in a failover cluster determines the number of failures the cluster can tolerate. If additional failures occur, the cluster must cease operation. The allowed number of failures can be customized, with the default set to 1, meaning that as long as one node is functioning properly, the cluster will continue to operate. Now, let's configure the quorum disk.
1. Right-click on the Failover Cluster we created in the Failover Cluster Manager and expand the “More Actions” menu. Select “Configure Cluster Quorum Settings.”
2. In the popped-up configuration wizard, choose “Advanced Quorum Configuration.”
3. In the voting configuration selection, choose “All Nodes.”
4. Select “Configure a disk witness.” Alternatively, a shared folder can be used as the quorum disk.
5. Select the disk to serve as the quorum and click “Next.”
6. Confirm the information and proceed to configure by clicking “Next.”
7. Configuration completed. You can click “View Report” to check for any abnormalities during the quorum disk creation process.
8. Next, open the Failover Cluster Manager and verify that Disk 1 is now configured as the quorum disk.
Configuring virtual machine for high availability
1. Open the Cluster Manager and connect to the created cluster. Right-click on the cluster name and select "Configure Roles."
2. The overview of the wizard explains the functionality it can achieve. Click "Next."
3. On the "Select Roles" page, scroll down and choose "Virtual Machine" from the dropdown menu.
4. The wizard will automatically detect the virtual machines present on all cluster nodes. Select the virtual machine(s) that need to be configured for high availability and click "Next."
5. Then it lists the virtual machine categories that will be configured for high availability. Once confirmed, click "Next."
6. The configuration of high availability for the virtual machine is complete. You can click "View Report" to review the status of the virtual machine during the configuration process.
7. At this point, you can navigate to the Roles section in the Failover Cluster Manager and see the recently added virtual machine(s). To verify if the virtual machine(s) can be live migrated successfully, right-click on the virtual machine, select "Move," then "Quick Migration," and finally "Best Possible Node". The virtual machine will start the automatic migration process. Throughout this process, you can continuously ping the virtual machine to monitor the interruption of ping packets.
Protect Hyper-V environment with a professional solution
Hyper-V high availability provides a robust and reliable infrastructure for virtualization. However, to guarantee constant data protection and uninterrupted business performance, it is recommended to backup your critical data and virtual machines with a professional backup and recovery solution.
Vinchin Backup & Recovery is a professional solution which supports data backup of VM like VMware vSphere, Hyper-V, XenServer, XCP-ng, oVirt, RHV, OpenStack, etc. and other data like database, NAS, file server, Linux & Windows Server, etc.
Vinchin Backup & Recovery performs robust Hyper-V backup and recovery functionality including agentless incremental backup, effective data reduction, backup node expansion, offsite backup copy and more, to comprehensively secure Hyper-V environments.
Besides, Vinchin Backup & Recovery can migrate VMs across 10+ virtual platforms including VMware, XenServer, and most KVM-based hypervisors. You can easily switch your critical modern IT workloads from one to another to build your own highly flexible IT infrastructure.
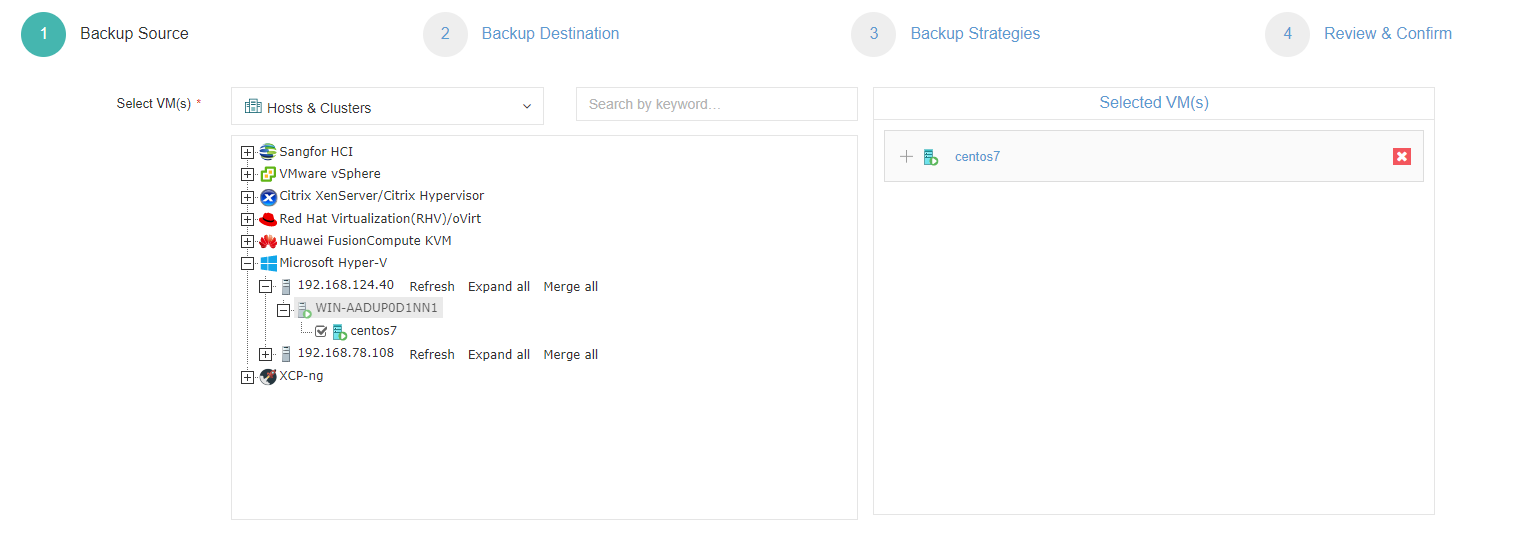
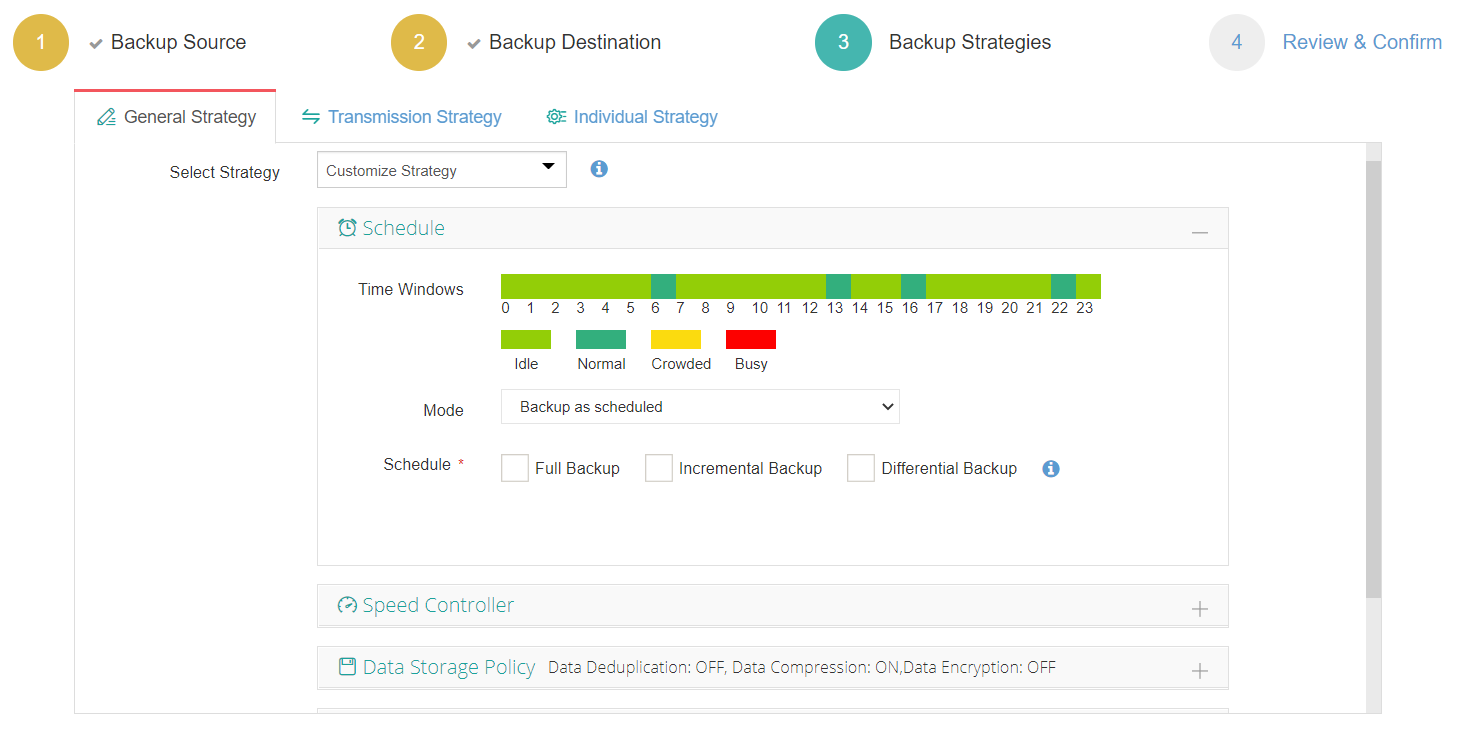
To backup Hyper-V VM, you just need to:
1. Select Hyper-V VM

2. Select backup storage

3. Select backup strategies

4. Submit the job
Vinchin Backup & Recovery has been selected by thousands of companies and you can also start to use this powerful system with a 60-day full-featured trial! Also, contact us and leave your needs, and then you will receive a solution according to your IT environment.
Conclusion
This blog gives you complete guide to deploy Hyper-V high availability, by implementing Hyper-V HA, organizations can enhance the reliability, availability, and scalability of their virtualized infrastructure. It enables seamless failover, minimizes downtime, and ensures business continuity for critical workloads running on virtual machines.
To efficiently protect Hyper-V environment, you can choose Vinchin Backup & Recovery to easily backup and recover your VMs. Don’t miss the free trial.
Share on:


