-
What Is Hyper-V Screen Resolution?
-
Why Change Screen Resolution in Hyper-V?
-
How to Change Screen Resolution via Guest OS Settings?
-
How to Use Enhanced Session Mode to Change Screen Resolution?
-
How To Change Hyper-V Screen Resolution With PowerShell?
-
How To Backup Hyper‑V Virtual Machine With Vinchin Backup & Recovery
-
Hyper V Change Screen Resolution FAQs
-
Conclusion
Have you ever opened a virtual machine in Hyper-V only to find that everything looks too small or too large? Adjusting screen resolution inside Hyper-V can make your work smoother and help you see more at once. In this guide, we’ll cover beginner steps like using guest OS settings, move through intermediate methods such as Enhanced Session Mode, and finish with advanced techniques including PowerShell commands and Linux-specific tweaks.
What Is Hyper-V Screen Resolution?
Screen resolution in Hyper-V means how many pixels are displayed on your VM’s desktop—the width by height in pixels (like 1920x1080). This setting controls how much information fits on your screen at once and how sharp things look. In basic sessions (using standard VGA emulation), you might see limited choices—often just one low option like 1024x768. Enhanced sessions use Remote Desktop Protocol (RDP) technology to offer dynamic resizing and higher resolutions.
Understanding these modes helps you pick the right method when you want to change display size or clarity inside a VM.
Why Change Screen Resolution in Hyper-V?
Why bother changing screen resolution? First, comfort: A cramped workspace slows you down. Second, productivity: Higher resolutions let you multitask with multiple windows open side by side—a must for IT admins running scripts or monitoring logs while working elsewhere. Third, accessibility: Some users need larger icons or sharper text due to vision needs; others want maximum space for dashboards or code editors.
Matching your VM’s resolution to your monitor also gives a true full-screen experience without black bars or blurry scaling.
How to Change Screen Resolution via Guest OS Settings?
The simplest way to adjust screen size is from inside the guest operating system itself—just like on a physical PC.
For Windows guests:
Log into your VM.
Right-click anywhere on the desktop.
Select Display Settings.
Under Display, find Display resolution.
Pick your preferred value from the drop-down list.
Click Keep changes if prompted.
For Ubuntu or similar Linux guests:
Open Settings from the application menu.
Go to Devices, then choose Displays.
Select a new resolution from available options.
Apply changes when ready.
Note that this method depends on having up-to-date video drivers installed within the guest OS—especially important for Windows VMs running older versions or custom images. If only one low-resolution option appears (like 1024x768), try updating integration services first before moving on to advanced fixes.
How to Use Enhanced Session Mode to Change Screen Resolution?
Enhanced Session Mode is a powerful feature built into Hyper-V that lets you resize VM windows freely—almost like using Remote Desktop—but with extra perks such as device sharing and clipboard integration.
To enable Enhanced Session Mode:
1. Open Hyper-V Manager on your host machine.
2. Click Hyper-V Settings in the Actions pane.
3. Under Server, select Enhanced Session Mode Policy, then check Allow enhanced session mode.
4. Under User, select Enhanced Session Mode, then check Use enhanced session mode.
5. Click OK to save changes.
When starting your VM:
Launch it from Hyper-V Manager as usual.
When the connection window opens (VMConnect), a configuration wizard appears if Enhanced Session is active.
Drag the slider under display settings to set your desired resolution before connecting—or choose preset values matching your monitor size.
Click Connect when done.
Once inside Windows VMs supporting Enhanced Sessions (Windows 8/8.1/10/11), you can also go up top and click View, then select Full Screen Mode for an immersive experience without borders.
If you want Enhanced Session prompts again after saving settings:
1. Shut down the VM completely (not just restart).
2. Return to host’s Hyper-V Manager > disable then re-enable Enhanced Session Mode under settings above.
3. Start VM again; now use right-click > Edit Session Settings before logging in.
This approach works best with modern Windows guests but may not appear for all Linux distributions unless special drivers are present.
How To Change Hyper-V Screen Resolution With PowerShell?
Sometimes neither guest OS nor Enhanced Sessions give enough control—especially with custom Linux builds or headless servers where GUI tools aren’t available.
Before making changes:
> Note: The Set-VMVideo command requires that your VM be turned off—not paused or running—or else it will fail with an error message about state restrictions!
To set custom video output using PowerShell:
1. Shut down target VM fully via Hyper-V Manager (Action > Turn Off) or command line (Stop-VM -Name "YourVMName").
2. Open Windows PowerShell as administrator on host machine.
3. Run this command (replace "YourVMName" with actual name):
Set-VMVideo -VMName "YourVMName" -HorizontalResolution 1920 -VerticalResolution 1080 -ResolutionType Single
Here Single applies chosen size across all displays attached; omit ResolutionType if unsure—it defaults safely for most setups.
4. Restart VM normally; log back into guest OS and check display settings again—you should now see new sizes available!
How To Backup Hyper‑V Virtual Machine With Vinchin Backup & Recovery
Before performing significant configuration changes, it’s essential to protect critical data through reliable backups tailored specifically for Microsoft Hyper‑V environments and beyond—including VMware, Proxmox VE, oVirt, OLVM, RHV, XCP-ng, XenServer, OpenStack, ZStack, and over fifteen mainstream virtualization platforms worldwide—all supported by Vinchin Backup & Recovery as an enterprise-grade solution designed for professional IT operations across diverse infrastructures.
Among its robust capabilities are incremental backup strategies such as forever-incremental backup and differential backup; granular restore options; LAN-free backup; instant recovery; CBT acceleration; deduplication/compression; scheduled backup automation—and more—all aimed at maximizing efficiency while minimizing storage costs and downtime risk during disaster recovery scenarios or migration projects alike.
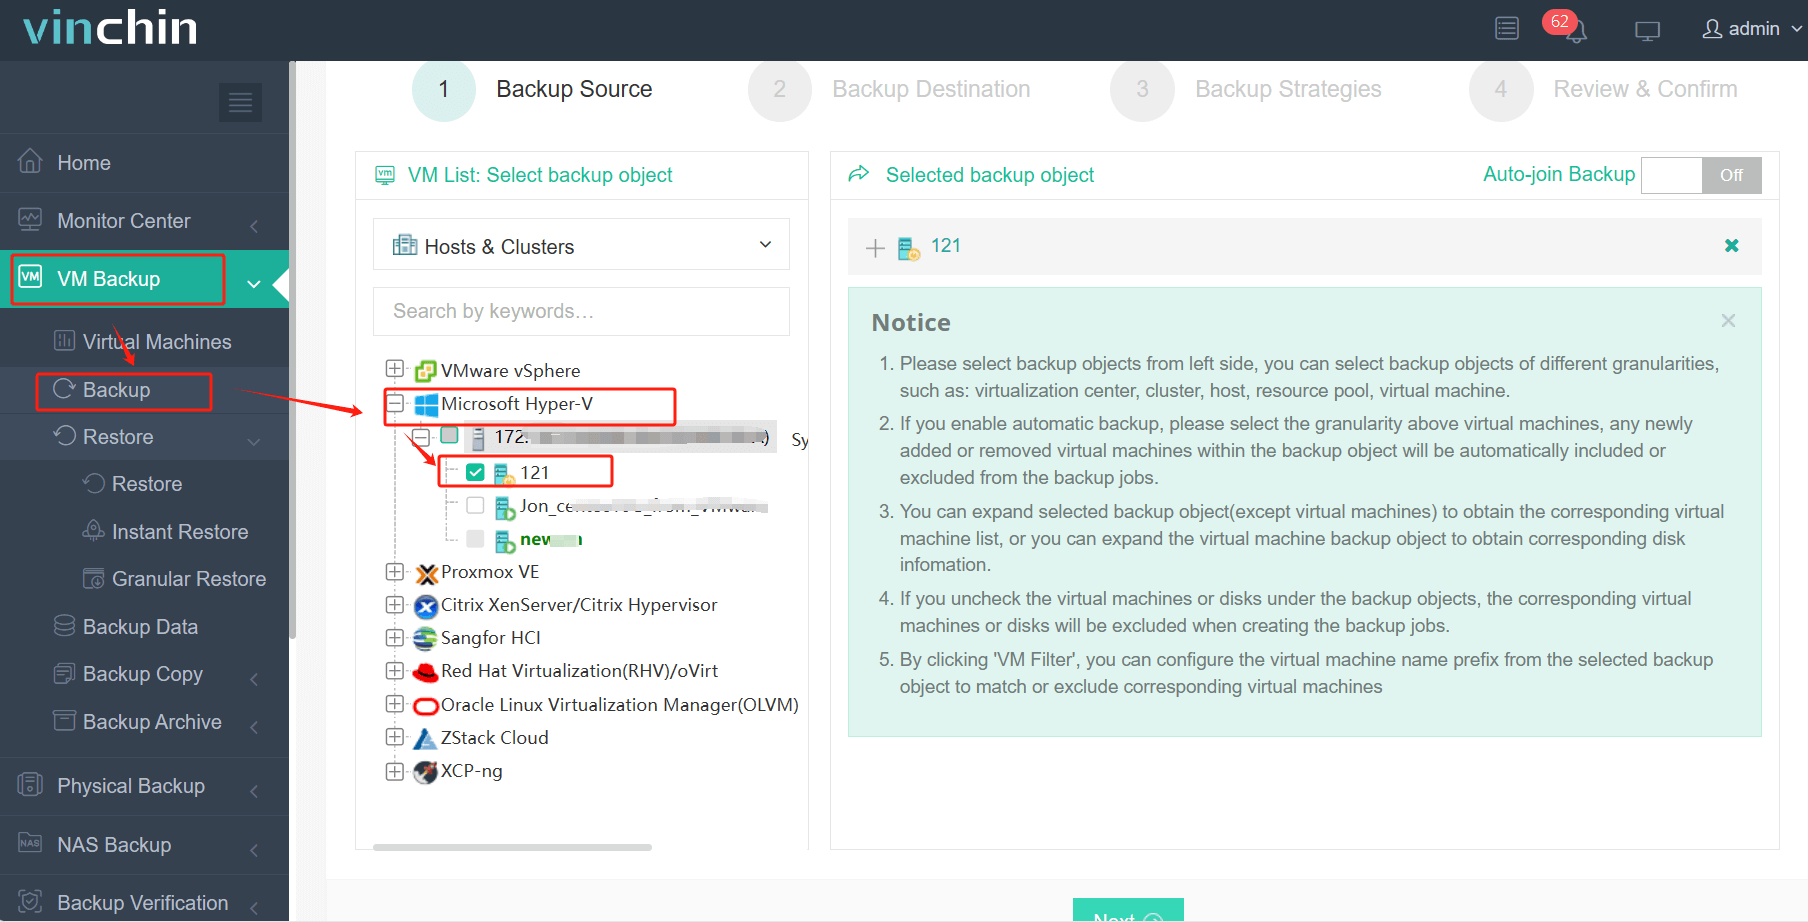
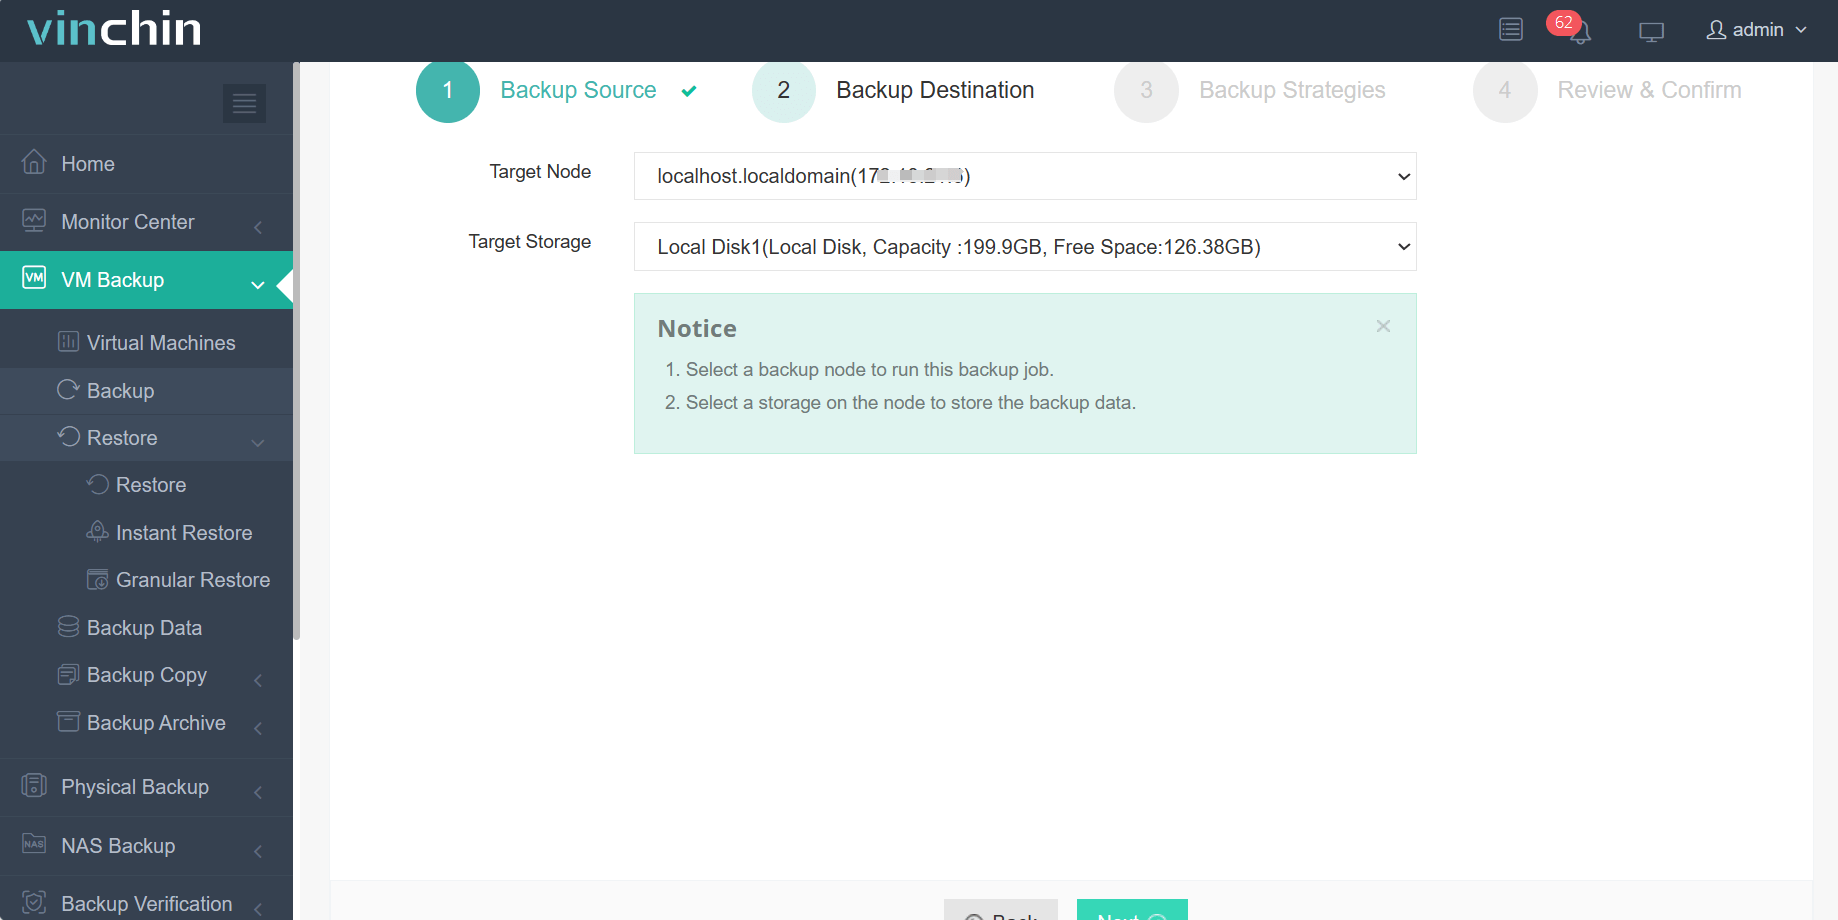
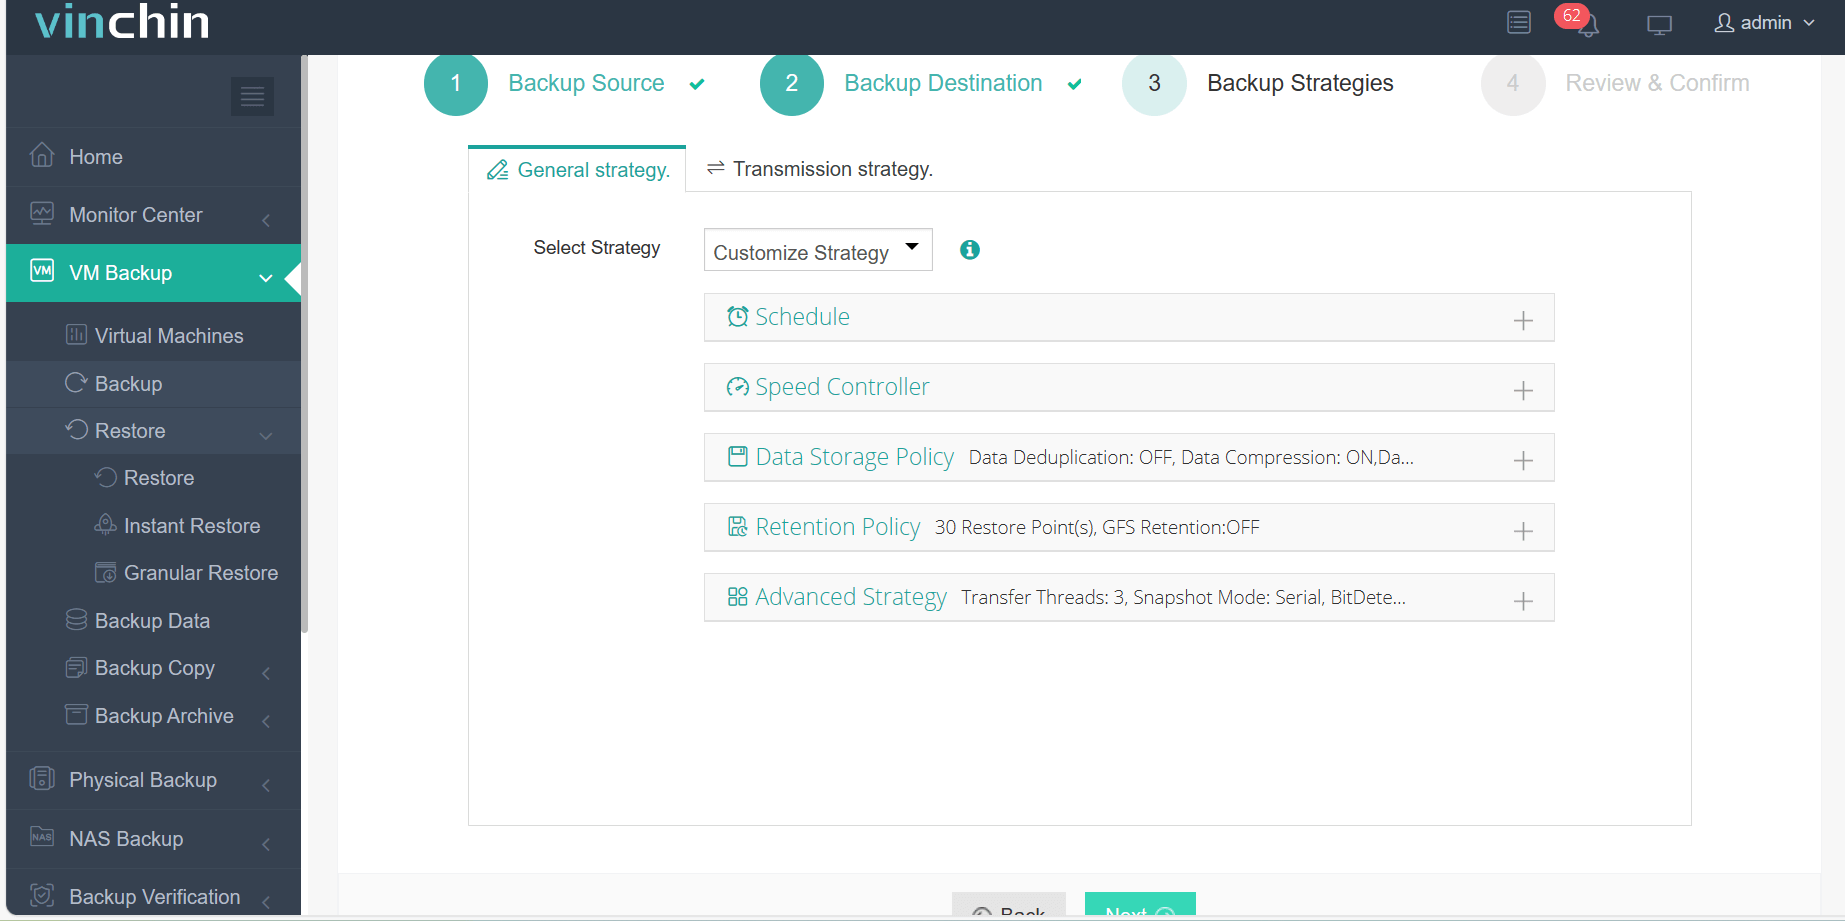
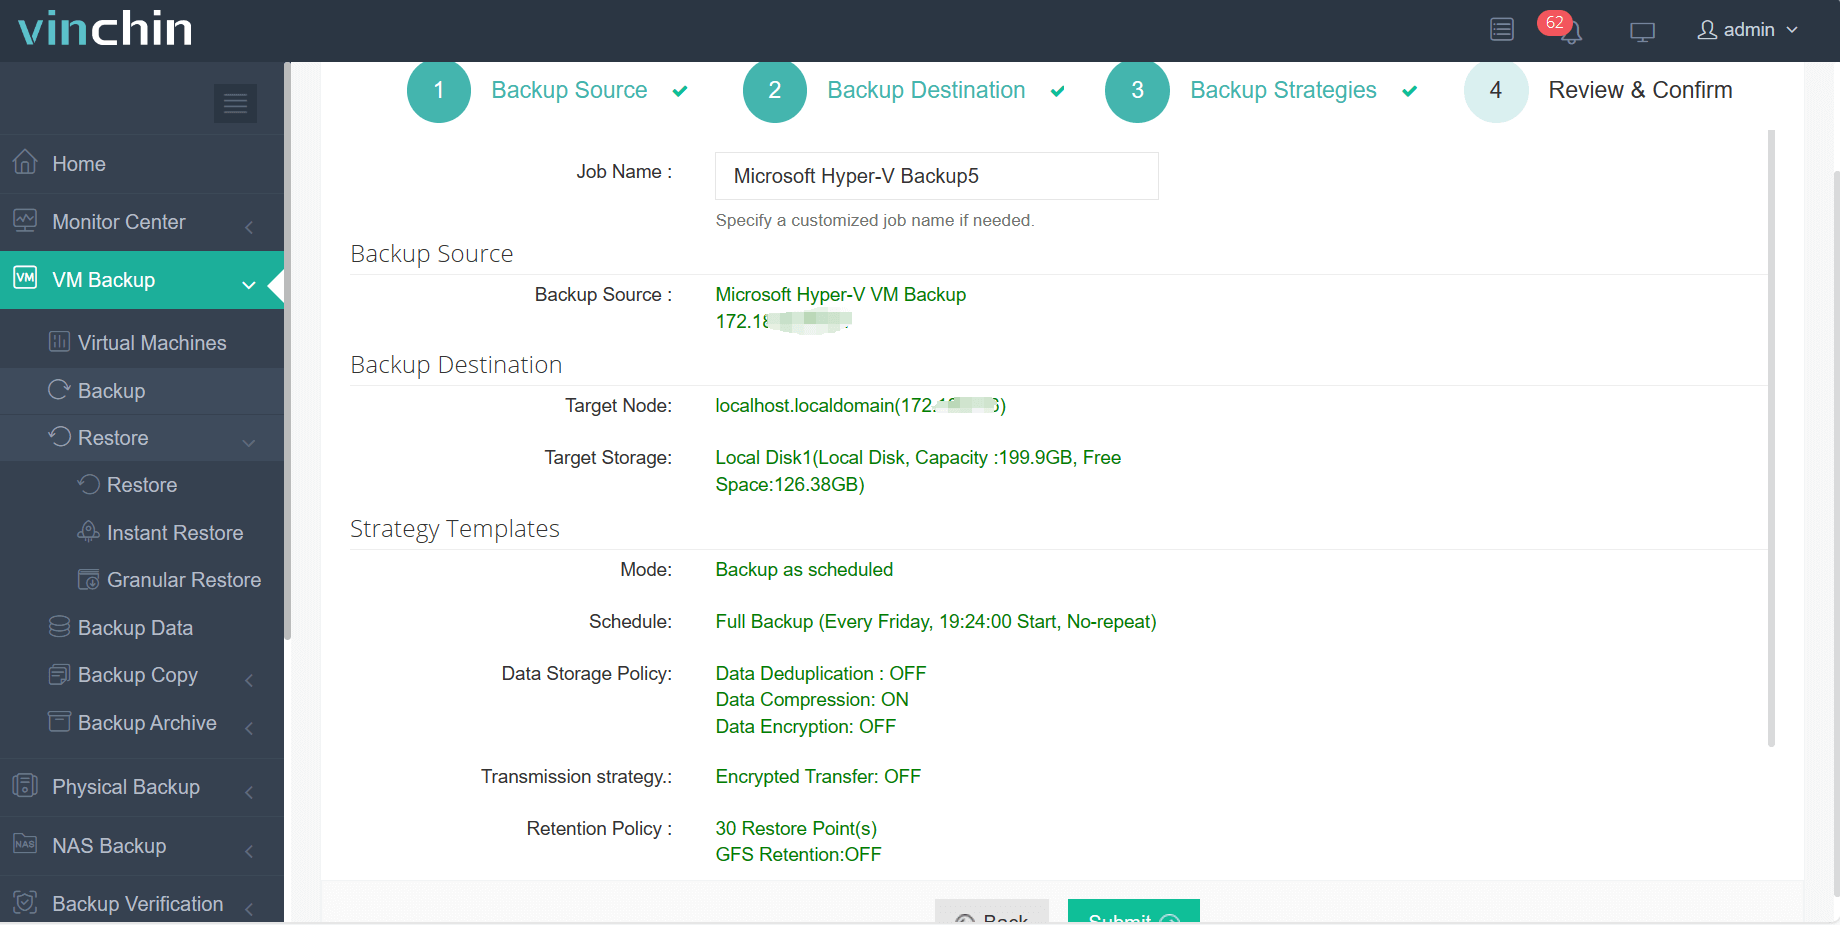
With Vinchin Backup & Recovery’s intuitive web console interface, backing up any supported Hyper‑V virtual machine involves four straightforward steps:
Step 1: Select the Hyper‑V virtual machine(s) you wish to back up;

Step 2: Choose appropriate backup storage;

Step 3: Configure backup strategy according to business needs;

Step 4: Submit the job.

Trusted globally by thousands of organizations—with top ratings among enterprise data-protection solutions—Vinchin Backup & Recovery offers a free full-featured trial valid for sixty days so you can evaluate its power firsthand before deployment.
Hyper V Change Screen Resolution FAQs
Q1: My mouse pointer disappears when switching resolutions—is there a fix?
A1: Try toggling mouse integration off/on via View menu in VMConnect window; update integration services within guest if problem persists.
Q2: Why do some monitors show black bars even after setting correct full HD?
A2: Check physical monitor aspect ratio matches chosen virtual output exactly; mismatches cause letterboxing/pillarboxing regardless of software-side adjustments.
Conclusion
Changing screen resolution in Hyper‑V ranges from quick fixes inside Windows/Linux guests up through expert-level tweaks involving PowerShell scripts and X Server configs—but every admin can master it step by step! Always protect production workloads by backing up regularly with Vinchin before experimenting further.
Share on:


