-
What Are XenServer Tools?
-
Why Install XenServer Tools?
-
Prerequisites for Installing XenServer Tools
-
Method 1: Install XenServer Tools on Windows VM
-
Method 2: Install XenServer Tools on Linux VM
-
Automating Installation with xe CLI
-
How to Backup XenServer Virtual Machines with Vinchin Backup & Recovery?
-
Install XenServer Tools FAQs
-
Conclusion
Running virtual machines on XenServer? If you want top performance and easy management features like live migration or clean shutdowns from your hypervisor console, you need to install XenServer Tools on every VM. Without these tools, your VMs run in generic emulated mode—slower and missing key functions that make life easier for operations teams worldwide.
This guide explains what XenServer Tools are, why they matter so much, how to install them on both Windows and Linux VMs (with all prerequisites), how to automate installation at scale using the xe CLI, ways to validate success—including checking actual performance improvements—and how to troubleshoot common problems by OS type. We finish with backup best practices for your environment.
What Are XenServer Tools?
XenServer Tools are a set of drivers and agents that bridge your guest operating system with the XenServer hypervisor. For Windows guests, they include paravirtualized (PV) drivers for storage/networking plus a Management Agent; for Linux guests they provide a guest agent reporting VM status back to XenCenter or other management consoles.
With these tools installed:
Your VM can communicate its state directly to the host.
You gain access to features like live migration (“hot” moves between hosts), memory snapshots without downtime, accurate resource monitoring inside the hypervisor UI.
Disk/network speeds improve dramatically because PV drivers bypass slow emulation layers.
Without them? Your VMs work—but slowly—and many advanced features simply disappear from your toolkit.
Why Install XenServer Tools?
Installing XenServer Tools is essential if you want reliable operations at scale:
You can shut down or reboot VMs cleanly from within XenCenter.
Live migration becomes possible—move running workloads between hosts without interruption.
Accurate CPU/memory/disk stats appear in your management console.
On Linux guests: adjust vCPUs on-the-fly; get correct time sync; see true disk/network usage.
If you skip this step? Expect degraded performance—sometimes up to 50% slower disk or network speeds—and limited control over your environment’s health.
Prerequisites for Installing XenServer Tools
Before installing anything, let’s make sure you’re ready:
For both Windows and Linux:
The VM must be powered on with an active network connection.
Always take a snapshot before major changes—you never know when you’ll need a rollback!
Windows-specific prerequisites:
Microsoft .NET Framework 4.0 or later must be installed.
Attach the
xs-tools.isofile as a virtual DVD drive in your VM via XenCenter (Insert XenServer Tools... option).Remove any older versions of XenServer Tools first using Add or Remove Programs in Windows Control Panel if upgrading.
Linux-specific prerequisites:
Ensure
perlandmakeare installed (yum install perl makeorapt install perl make).Kernel headers matching your running kernel must be present (
yum install kernel-devel-\$(uname -r)orapt install linux-headers-\$(uname -r)).Mounting ISO images may require root privileges; check that you have sudo access.
Using these steps avoids most failed installations due to missing dependencies—a common headache!
Method 1: Install XenServer Tools on Windows VM
Installing on Windows is straightforward if you follow each step carefully:
First confirm all prerequisites above are met—especially .NET Framework version—and take a snapshot just in case something goes wrong during installation or upgrade.
1. In XenCenter, right-click your target VM name > select Install XenServer Tools... This mounts the latest compatible xs-tools.iso as a DVD drive inside the guest OS automatically.
2. Inside the Windows VM desktop (via RDP/console), open “This PC” or “My Computer,” then double-click the new DVD drive labeled “XenServer Tools.”
3. Run either managementagentx64.msi (for 64-bit) or managementagentx86.msi (for 32-bit) by double-clicking it—or launch via command line:
Msiexec.exe /package managementagentx64.msi
4. Follow prompts in the setup wizard:
Accept license agreement
Choose installation folder
Review/update settings under Installation and Updates Settings
By default: Installs PV drivers now; allows automatic Management Agent updates; disables auto driver updates by agent; sends anonymous usage data unless opted out
5. Click Next, then Install—wait as files copy over
6. Reboot when prompted—even if multiple reboots are required!
7. After restart(s), open XenCenter, select your VM > check under its General tab that both I/O Drivers AND Management Agent show as installed
If updating from an old version: always uninstall previous tools first through Control Panel > Add/Remove Programs before starting fresh. Back up network settings beforehand since upgrades sometimes reset adapters!
Method 2: Install XenServer Tools on Linux VM
On Linux guests you’ll use command-line tools—but don’t worry! It’s still quick if dependencies are handled upfront:
1. In XenCenter, right-click your target Linux VM > choose Install XenServer Tools... This attaches xs-tools.iso as a CD/DVD device inside the guest automatically.
2. Log into your Linux guest via SSH/console as root user (or use sudo).
3. Mount CD/DVD device manually:
mount /dev/cdrom /mnt
4. Copy installer package locally:
    cp /mnt/LinuxGuestTools-* /tmp/
    cd /tmp/
    tar -zxvf LinuxGuestTools*.tar.gz
    cd LinuxGuestTools*
5. Make sure kernel headers/perl/make exist (yum install kernel-devel-\$(uname -r) perl make)
6. Run installer script as root:
./install.sh
7. When finished successfully (“Installation complete”), reboot:
reboot
8. After restart log back in—open XenCenter, select this VM > look under its General tab for Guest Agent status (“Installed”)
Some distributions may require mounting /dev/sr0, /dev/cdrom, or similar depending on hardware mapping—adjust mount commands accordingly based on output of lsblk.
Always consult official docs for distribution-specific tweaks!
Automating Installation with xe CLI
Managing dozens—or hundreds—of VMs? Automation saves hours! The xe CLI lets admins script tool installs across many machines quickly:
For any supported OS:
1. Find target VM UUIDs using:
xe vm-list name-label=<VM_NAME>
2a.To attach xs-tools.iso programmatically:
xe vm-cd-add uuid=<vm_uuid> cd-name=xs-tools.iso device=3
2b.To trigger installation remotely (Windows):
Use PowerShell remoting + msiexec commands after ISO attachment—or deploy via Group Policy/SCCM if managing fleets of servers.
2c.For Linux: Use scp/ssh batch scripts:
scp xs-tools.iso user@<linux_vm_ip>:/tmp/
ssh user@<linux_vm_ip> 'mount /tmp/xs-tools.iso /mnt && cd /mnt && tar -zxvf ... && ./install.sh'
Automating these steps ensures consistency across environments—and makes disaster recovery faster too!
How to Backup XenServer Virtual Machines with Vinchin Backup & Recovery?
Protecting critical data is vital once you've optimized performance by installing necessary integrations like XenServer Tools. Vinchin Backup & Recovery is an enterprise-grade solution designed specifically for virtual machine backup across more than 15 mainstream virtualization platforms—including full support for Citrix Hypervisor/XenServer, VMware, Hyper-V, Proxmox, oVirt, OLVM, RHV, XCP-ng, OpenStack, ZStack, and others used widely in modern IT environments.
Vinchin Backup & Recovery delivers robust capabilities tailored for enterprise needs such as CBT-based incremental backup (on supported platforms including Citrix Hypervisor/XenServer), LAN-free backup modes ensuring efficient data transfer without production LAN congestion, instant recovery options minimizing downtime during disaster scenarios (not available on Hyper-V), SpeedKit acceleration technology where applicable, and granular restore functionality enabling precise file-level recovery within backed-up VMs—all managed through one unified platform.
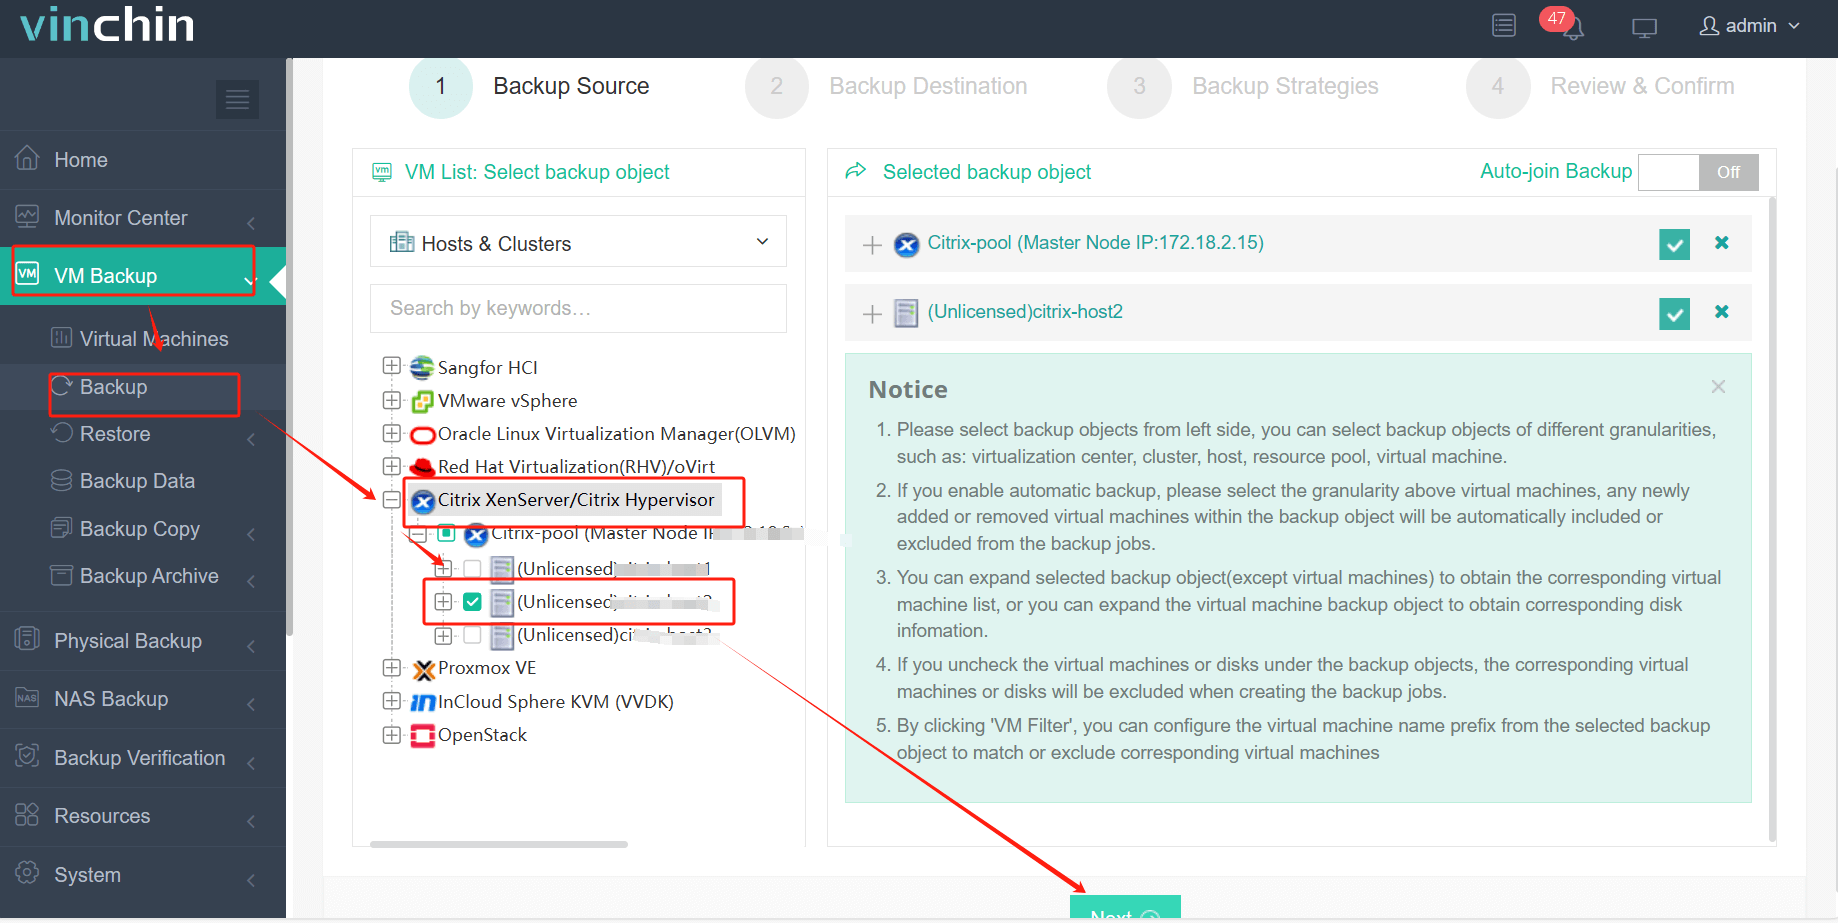
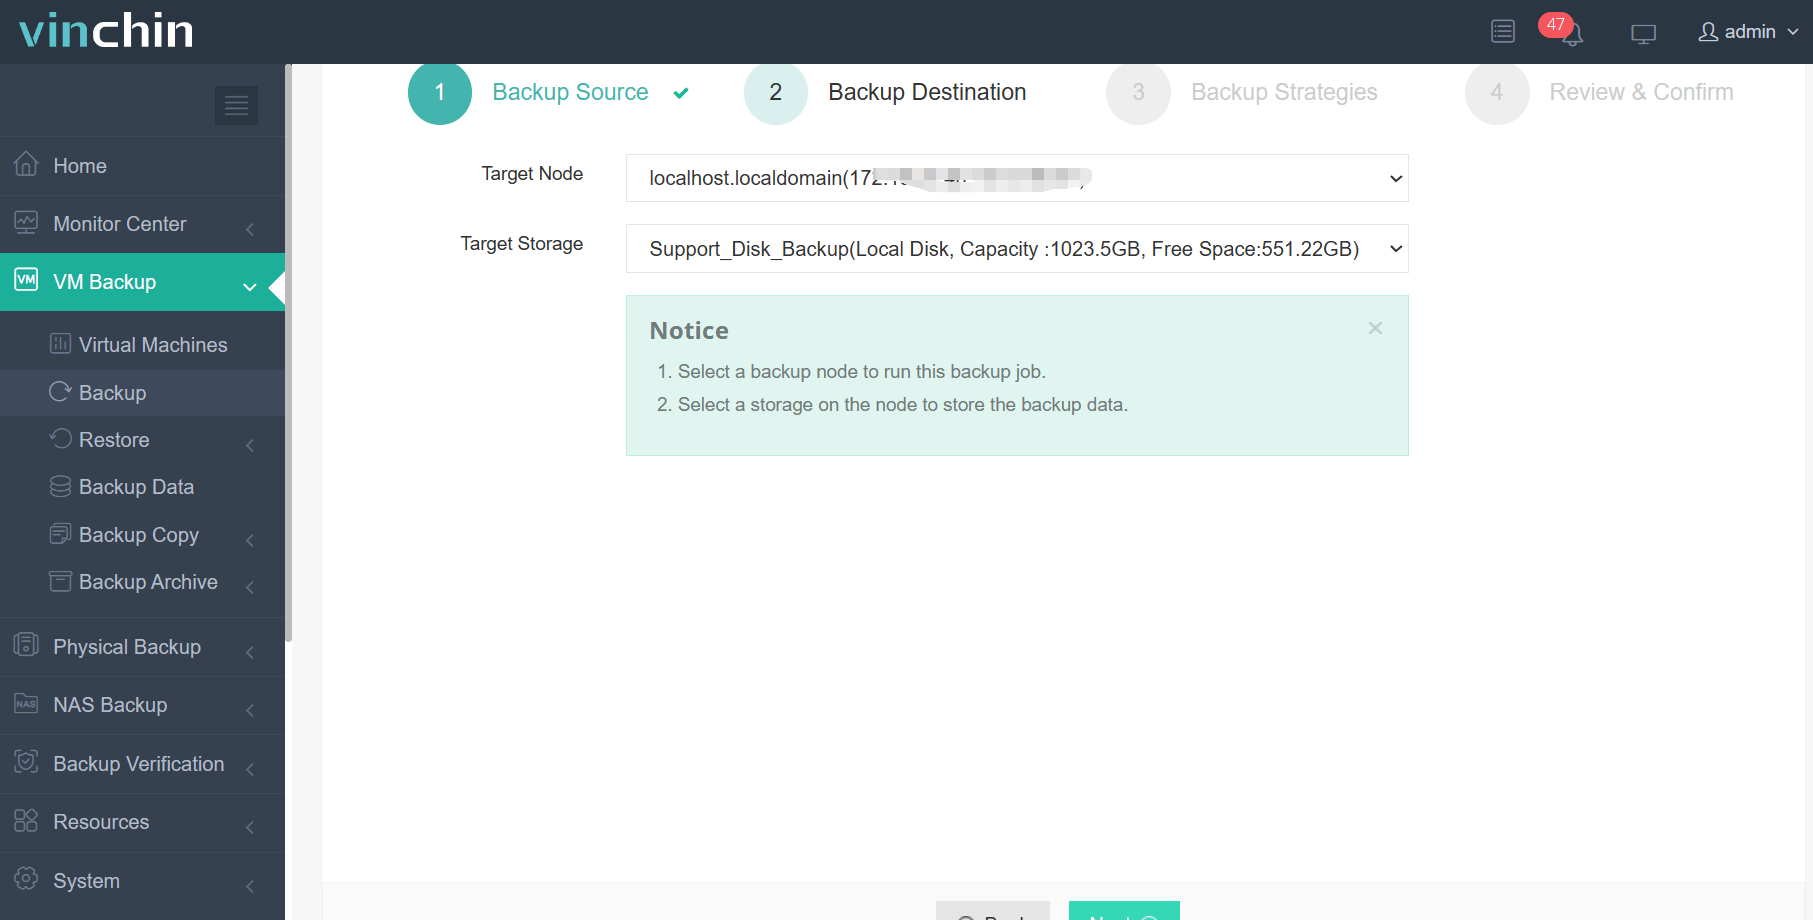
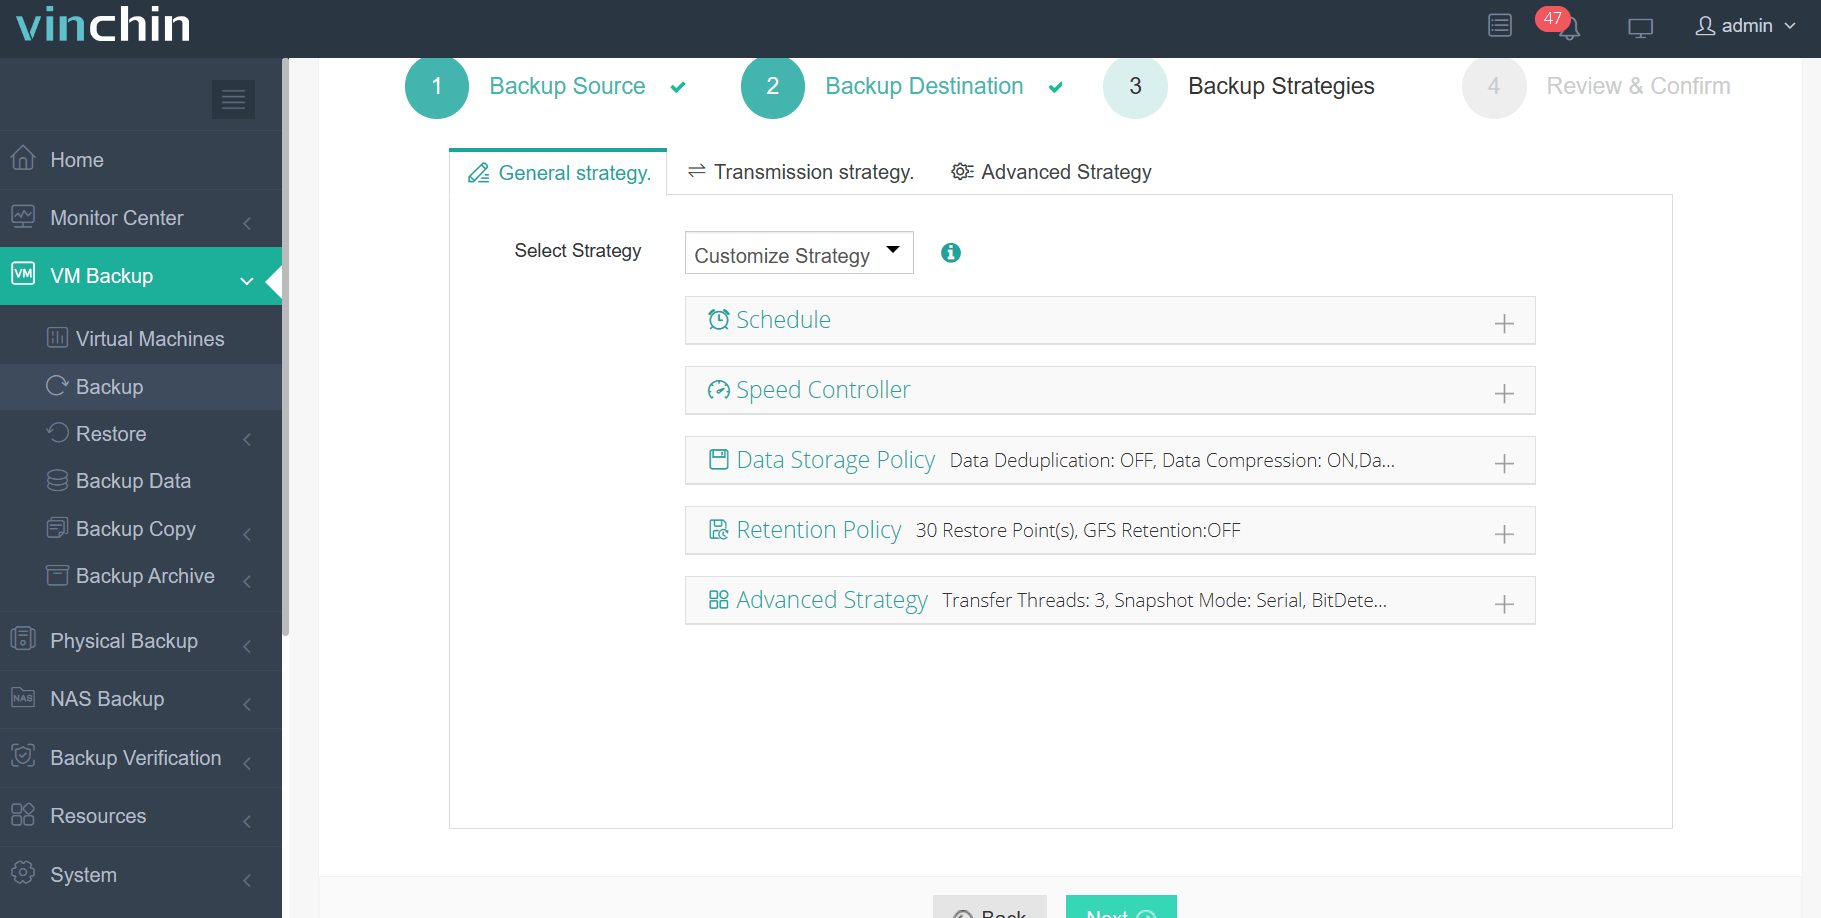
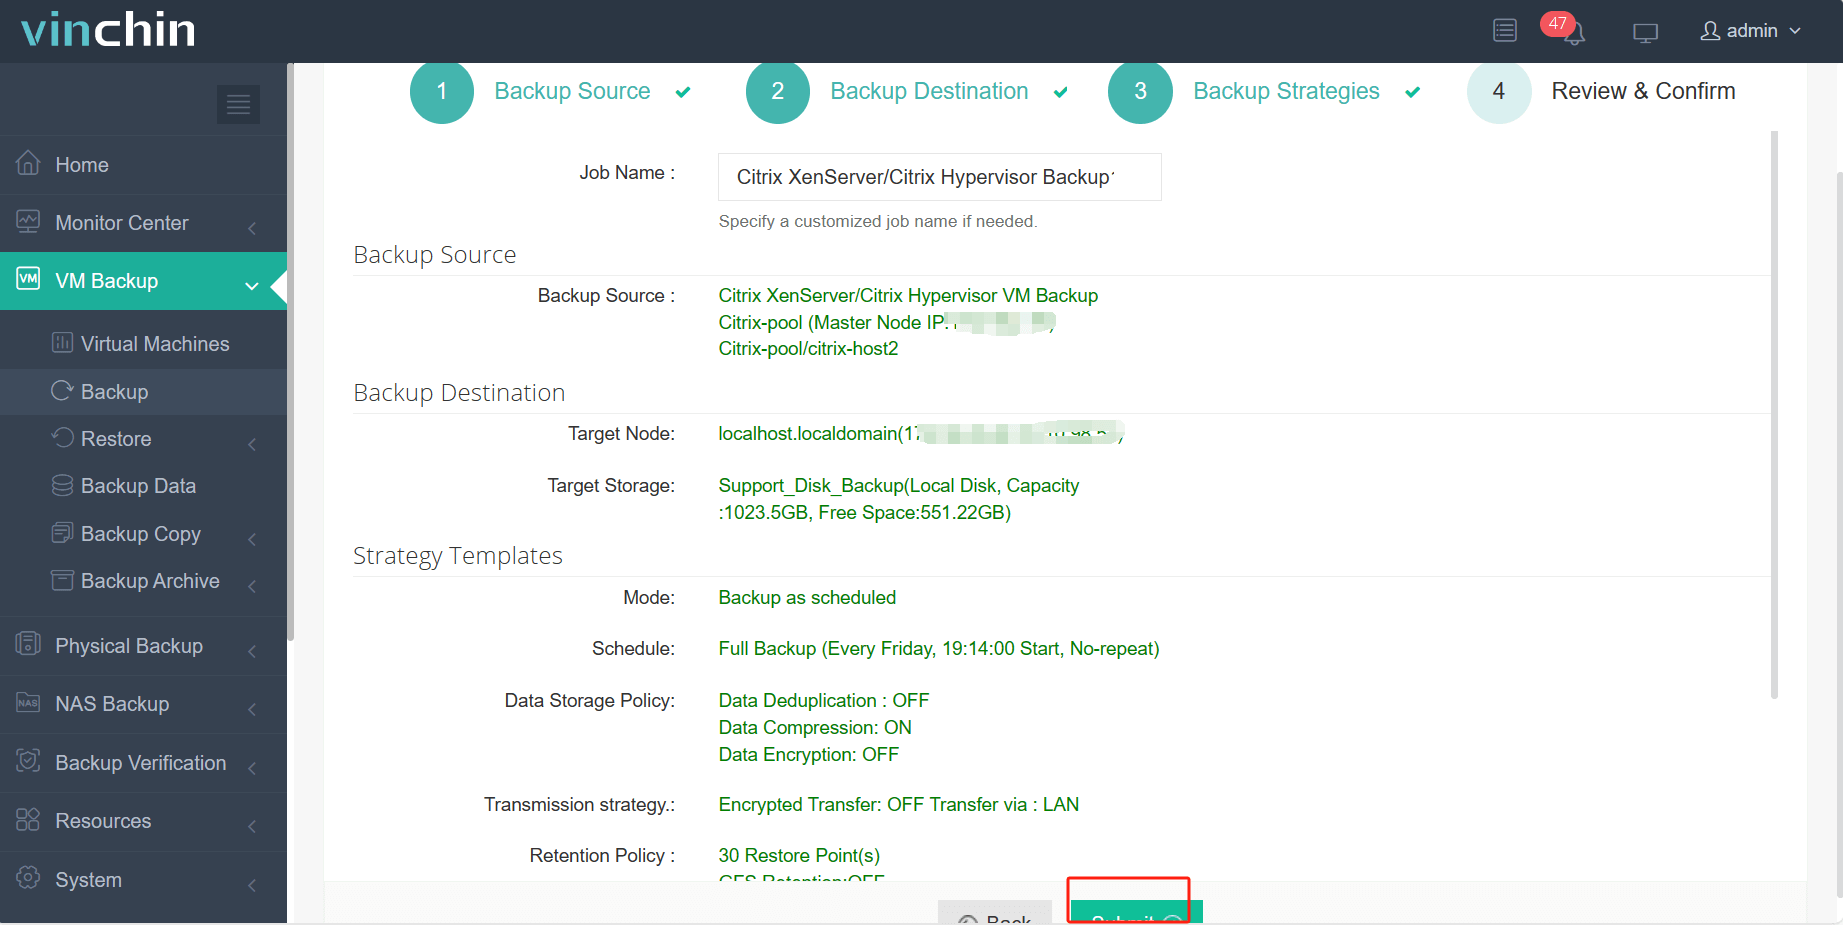
To back up a Citrix Hypervisor/XenServer virtual machine using Vinchin Backup & Recovery's intuitive web console takes just four steps:
Step 1: Select the Citrix Hypervisor/XenServer VM to back up

Step 2: Choose the backup storage

Step 3: Configure the backup strategy

Step 4: Submit the job

Vinchin Backup & Recovery is trusted globally by thousands of enterprises and consistently receives top ratings from industry analysts—try it risk-free today with a 60-day full-featured free trial by clicking below.
Install XenServer Tools FAQs
Q1: Can I automate installing/updating tools across many VMs?
A1: Yes—use scripts leveraging xe CLI commands plus remote execution utilities like PowerShell Remoting (Windows) or SSH/scp batch jobs (Linux).
Q2: Will installing/updating tools disrupt production workloads?
A2: Installation usually requires one reboot per guest but does not affect other running VMs unless shared resources reach capacity limits during mass upgrades.
Q3: How do I roll back if something breaks after installing?
A3: Restore from latest snapshot taken prior—or use built-in hypervisor revert functions available through Snapshots menu in XenCenter UI.
Conclusion
Installing XenServer Tools unlocks better speed, reliability, and manageability across all virtual machines in your environment—from basic tasks up through advanced automation workflows! With proper backup strategies powered by Vinchin’s robust solution suite, even large-scale deployments stay safe day-to-day.
Share on:


