-
What Is an ESXi Network Adapter?
-
Why Add a Network Adapter in ESXi?
-
Best Practices Before You Add an Adapter
-
Method 1: Add a Network Adapter Using vSphere Client
-
Method 2: Add a Network Adapter Using ESXi Shell/SSH
-
Validating Your New Adapter Configuration
-
Performance Tuning When Adding Adapters
-
How to Back Up ESXi Virtual Machines with Vinchin Backup & Recovery
-
FAQ – Real World Scenarios About Adding Adapters in ESXi
-
Conclusion
Configuring network adapters is a core task for any VMware ESXi administrator. Whether you want more bandwidth or better isolation between workloads, knowing how to add an adapter is essential. This guide explains everything from basic concepts to advanced troubleshooting so you can manage your ESXi environment with confidence.
What Is an ESXi Network Adapter?
An ESXi network adapter connects your host or virtual machines to physical networks or other VMs inside your infrastructure. There are two main types:
Physical NICs (pNICs): These are hardware cards installed in your server.
Virtual NICs (vNICs): These are software-defined adapters assigned to VMs.
Each type plays a key role in how data moves through your environment. For example, pNICs connect hosts to switches or routers outside the server rack; vNICs let VMs talk to each other or reach external networks via virtual switches inside ESXi.
Why Add a Network Adapter in ESXi?
Adding another network adapter can solve many problems or unlock new features:
Need more throughput? Extra adapters can boost total bandwidth.
Want redundancy? Multiple NICs allow failover if one link fails.
Require traffic separation? Assign different adapters for management, storage, or VM traffic.
Expanding workloads? New applications may need access to separate VLANs or networks.
Before making changes, always plan ahead—think about security zones, performance needs, and future growth.
Best Practices Before You Add an Adapter
Before you start the esxi add network adapter process, take time to review these best practices:
First, decide why you need another adapter—is it for redundancy (failover), load balancing (higher throughput), or isolating sensitive traffic? If so:
Use NIC teaming on vSwitches for automatic failover and load distribution across multiple links.
Plan VLAN tagging carefully; set VLAN IDs at the port group level unless guest OS tagging is required by policy.
Choose the right virtual adapter type: VMXNET3 offers high performance with low CPU overhead but requires VMware Tools; E1000 provides broad compatibility but less speed.
For security-sensitive environments, place management interfaces on dedicated vSwitches isolated from production VM traffic.
Proper planning now prevents headaches later when scaling up or troubleshooting issues down the road.
Method 1: Add a Network Adapter Using vSphere Client
The vSphere Client makes it easy for most users to add virtual adapters (vNICs) to VMs without touching command lines. Here’s how:
Start by powering off your target VM—hardware changes require this step. In the Virtual Machines list of vSphere Client, right-click your VM and select Edit Settings. In the window that opens:
1. Go to the Hardware tab
2. Click Add
3. Select Ethernet Adapter as device type
4. Click Next
5. Pick an Adapter Type—choose VMXNET3 for best performance if supported by your guest OS
6. Select which port group or vSwitch (Network Connection) this new adapter should join
7. Check that Connect at power on is enabled
8. Click Finish, then review settings and click OK
9. Power on your VM again
Once booted up inside the guest OS (Windows/Linux), check that it detects this new interface—it should appear as another Ethernet connection ready for configuration via DHCP or static IP assignment.
This method works whether you use standard switches (vSwitch) or distributed switches (vDS). Remember: This process adds virtual adapters only; adding physical hardware requires steps below.
Method 2: Add a Network Adapter Using ESXi Shell/SSH
For advanced admins—or when automating deployments—the esxi add network adapter task often happens at the command line using SSH or local shell access:
First install any new physical NIC hardware into your server chassis before booting into ESXi OS itself.
1. Enable SSH access if not already done (Host > Actions > Services > Enable Secure Shell (SSH))
2. Open an SSH session using tools like PuTTY
3. Run esxcli network nic list—this shows all detected physical adapters
4. If missing: Upload driver files (.VIB/.ZIP) onto local datastore using web UI/SCP
5. Place host into maintenance mode with esxcli system maintenanceMode set --enable true
6a.For ZIP drivers: esxcli software vib install -d /vmfs/volumes/datastore/driver.zip
6b.For VIB drivers: esxcli software vib install -v /vmfs/volumes/datastore/driver.vib
7.Reboot host (reboot)
8.After reboot run esxcli network nic list again—your new card should appear as vmnicX
9.Assign this NIC as uplink using either GUI (Networking > vSwitch > Edit Settings > Uplinks) OR CLI:
esxcli network vswitch standard uplink add --uplink-name=vmnicX --vswitch-name=vSwitch0
If you use Distributed Switches instead of Standard Switches:
Configure uplinks through vSphere Client under Distributed Switch menus (Networking > Distributed Switch > Manage > Topology) since CLI commands differ here.
This approach is ideal when working with USB-to-Ethernet dongles—which often need special drivers—or unsupported chipsets not natively recognized by vanilla ESXi builds.
Validating Your New Adapter Configuration
After completing esxi add network adapter steps above—whether via GUI or CLI—you must verify everything works as expected:
On the host side:
Run esxcli network nic get -n vmnicX replacing X with your actual device number; check link status (“Up”), speed (“1000Mbps”+), duplex (“Full”), MAC address matches what’s printed on card label/switchport config sheet.
Inside guest operating systems:
For Windows guests open Command Prompt (ipconfig /all)—look for extra Ethernet interface(s).
For Linux guests run ip addr show OR ethtool ethY where Y matches interface name assigned by kernel; confirm link state “UP” plus correct MAC/IP info received from DHCP/static config.
If anything looks wrong here stop before putting system back into production! Misconfigured links can cause outages.
Performance Tuning When Adding Adapters
Choosing which type of virtual NIC matters—a lot—for both speed and stability:
VMXNET3 delivers top throughput (~10Gbps+) with minimal CPU usage but needs VMware Tools installed inside every guest OS; it also supports jumbo frames/RSS/multiqueue features critical for modern apps. E1000/E1000e offer broader compatibility especially with older operating systems but cap out at lower speeds (~1Gbps).
Physical NIC selection also impacts results: Intel i350/i40E families have strong driver support while some Realtek/Broadcom models may require custom drivers—and sometimes lack full feature parity like SR-IOV/offload support.
When possible always test new configurations in staging first before rolling out widely!
How to Back Up ESXi Virtual Machines with Vinchin Backup & Recovery
To ensure ongoing protection of critical workloads after configuring networking in VMware environments such as ESXi, consider leveraging Vinchin Backup & Recovery—a professional enterprise-level backup solution supporting over 15 mainstream virtualization platforms including VMware, Hyper-V, Proxmox VE, oVirt, OLVM, RHV, XCP-ng, XenServer, OpenStack, ZStack and more.
Vinchin Backup & Recovery delivers robust capabilities tailored for enterprise needs such as instant recovery and LAN-free backup specifically optimized for VMware environments alongside features like CBT tracking and HotAdd transport mode support unique to this platform. Across all supported hypervisors—including those listed above—it provides incremental backup options including forever-incremental backup and differential backups; scheduled jobs; granular restore; Deduplication and compression; cloud/tape archiving; V2V migration; GFS retention policy; throttling policy; encryption and multi-thread transmission among others—all designed to maximize efficiency while minimizing risk and resource consumption.
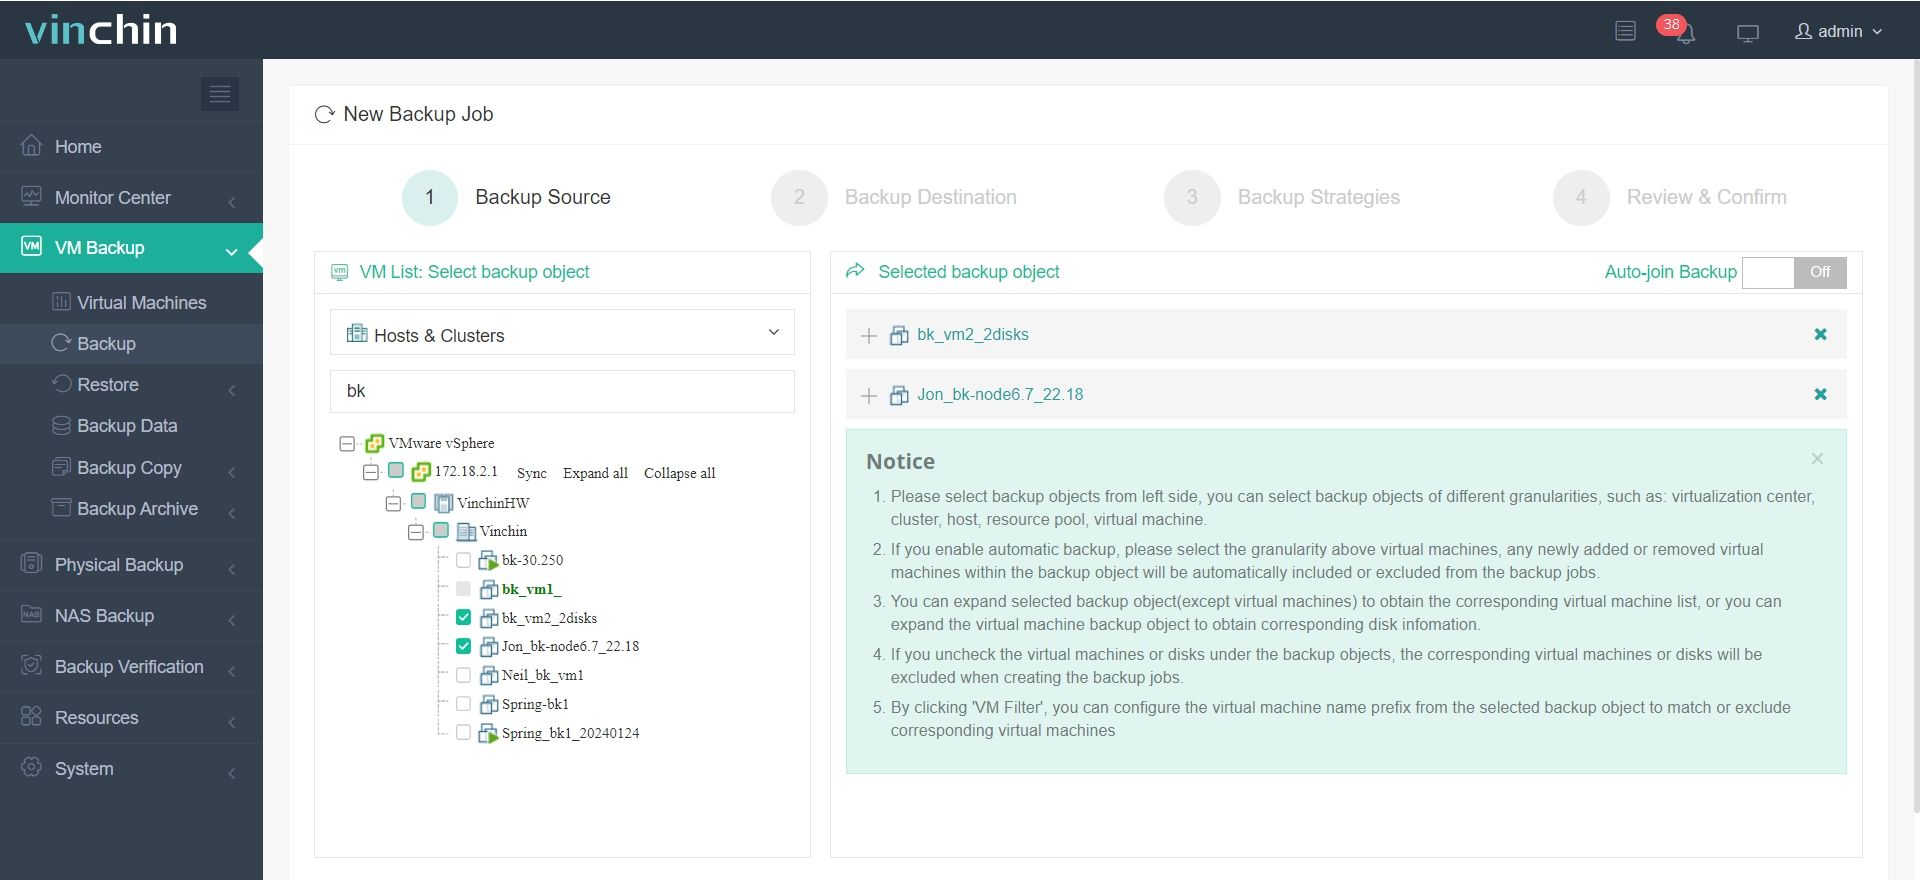
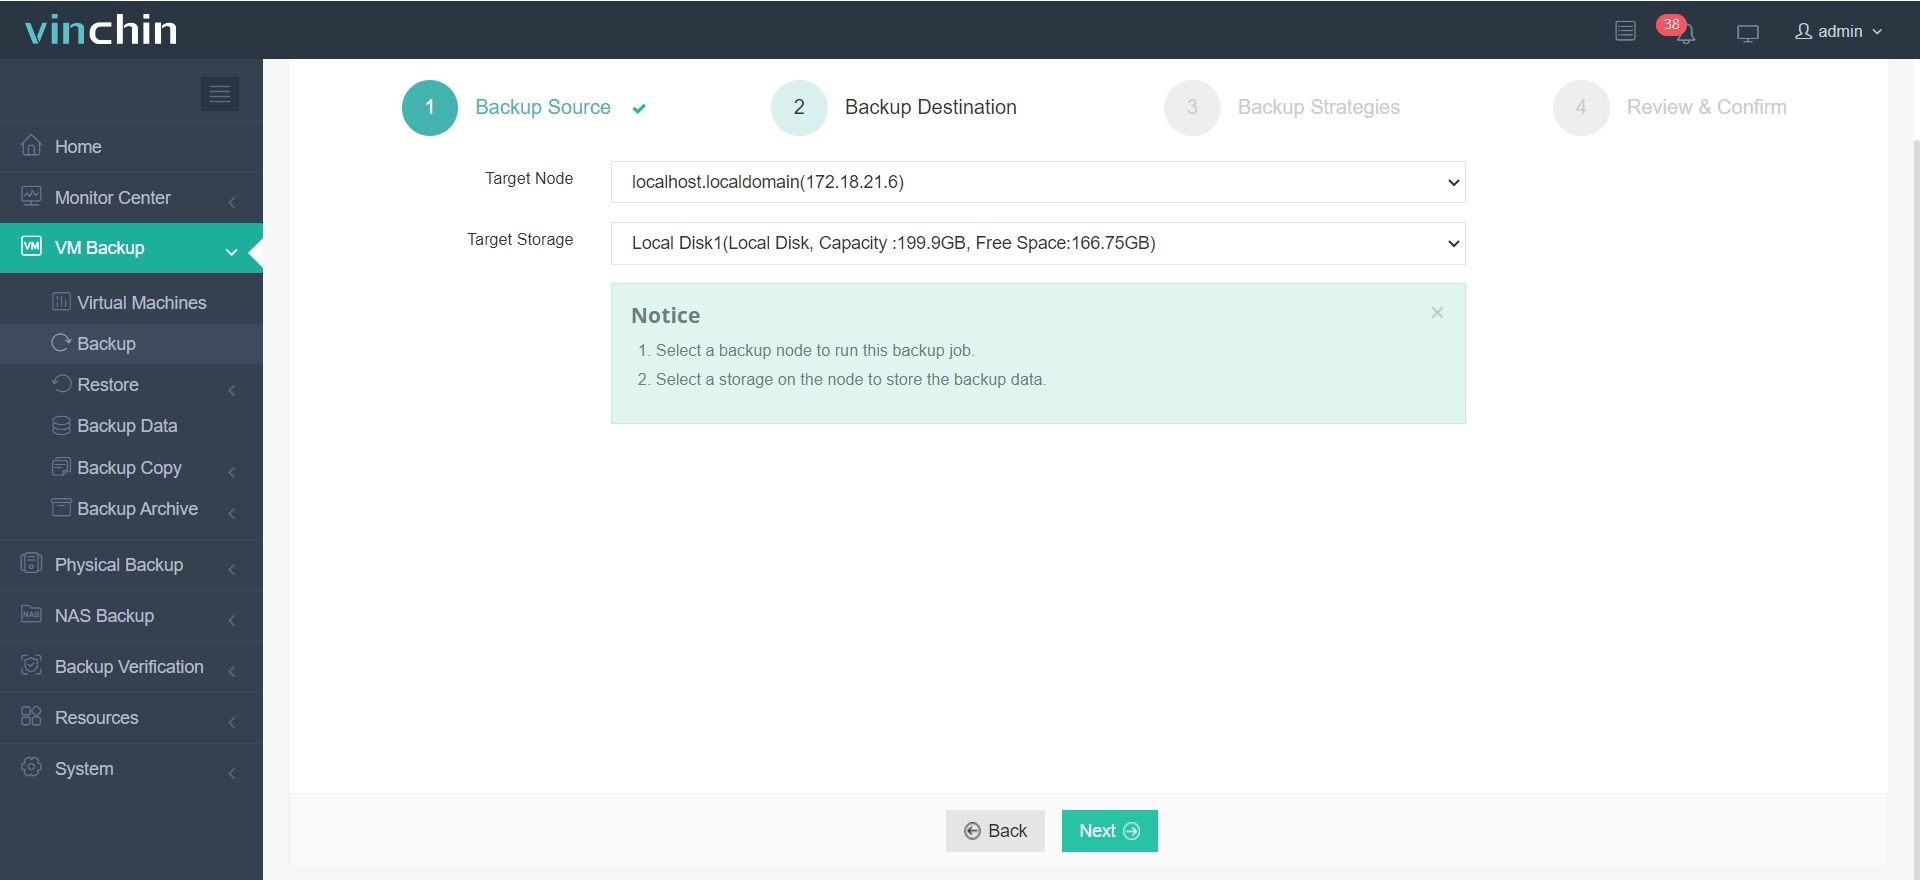
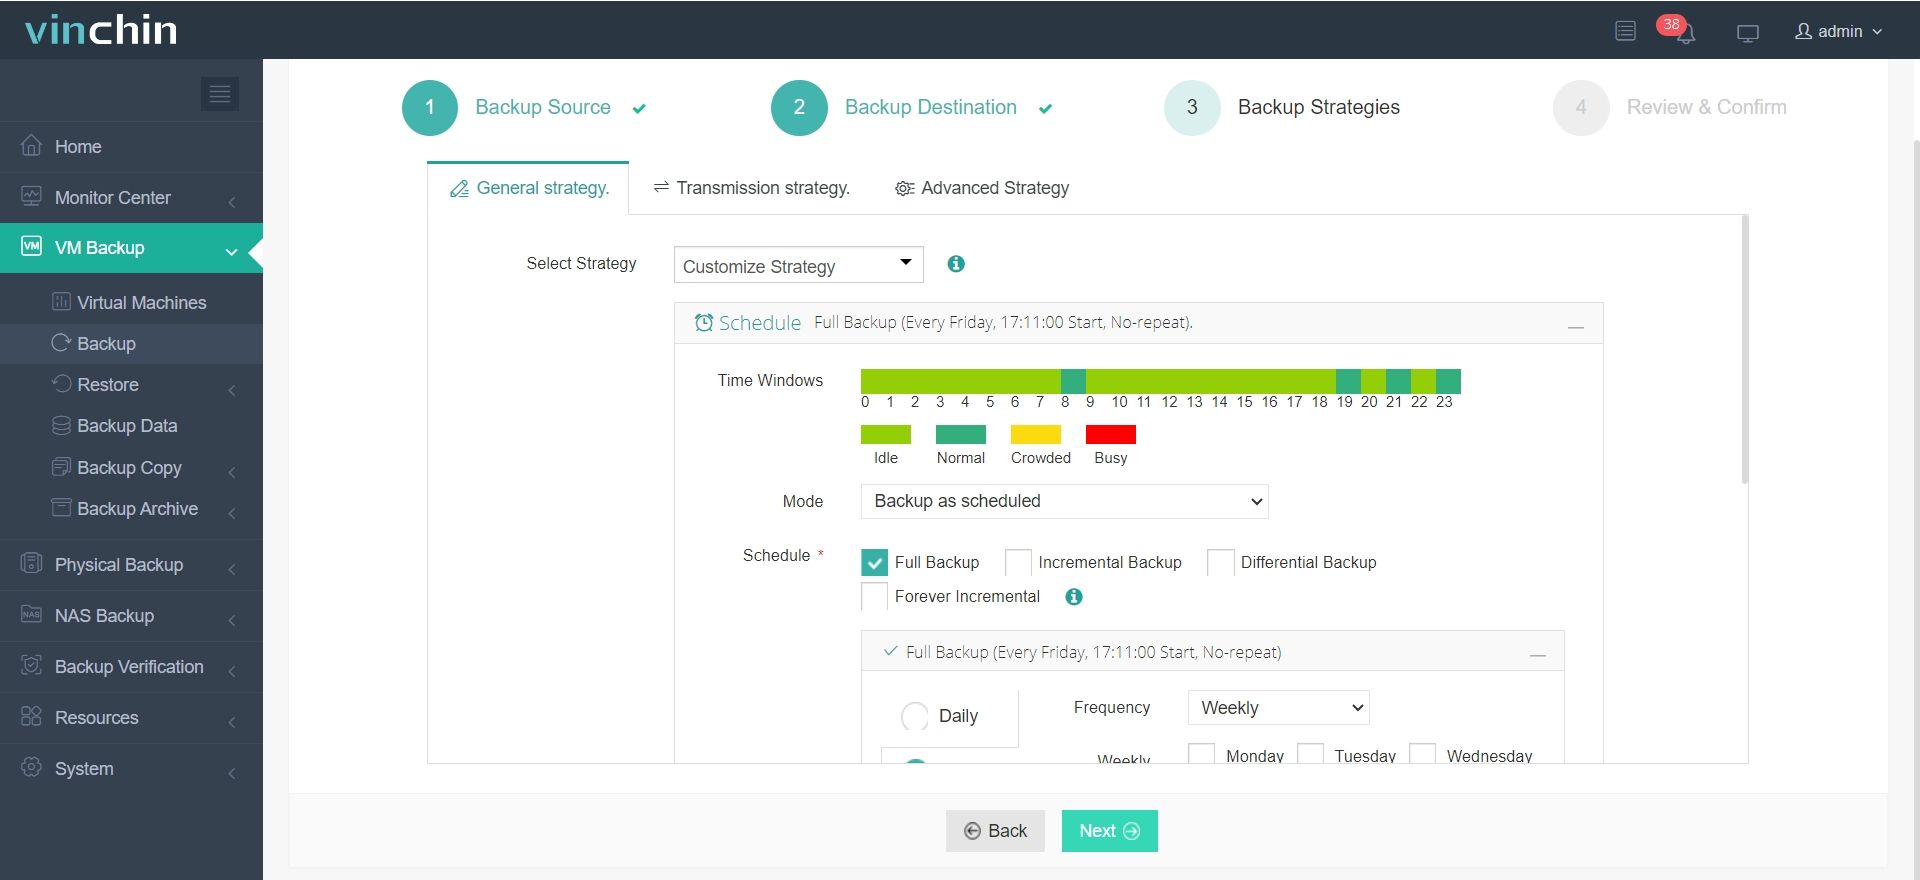
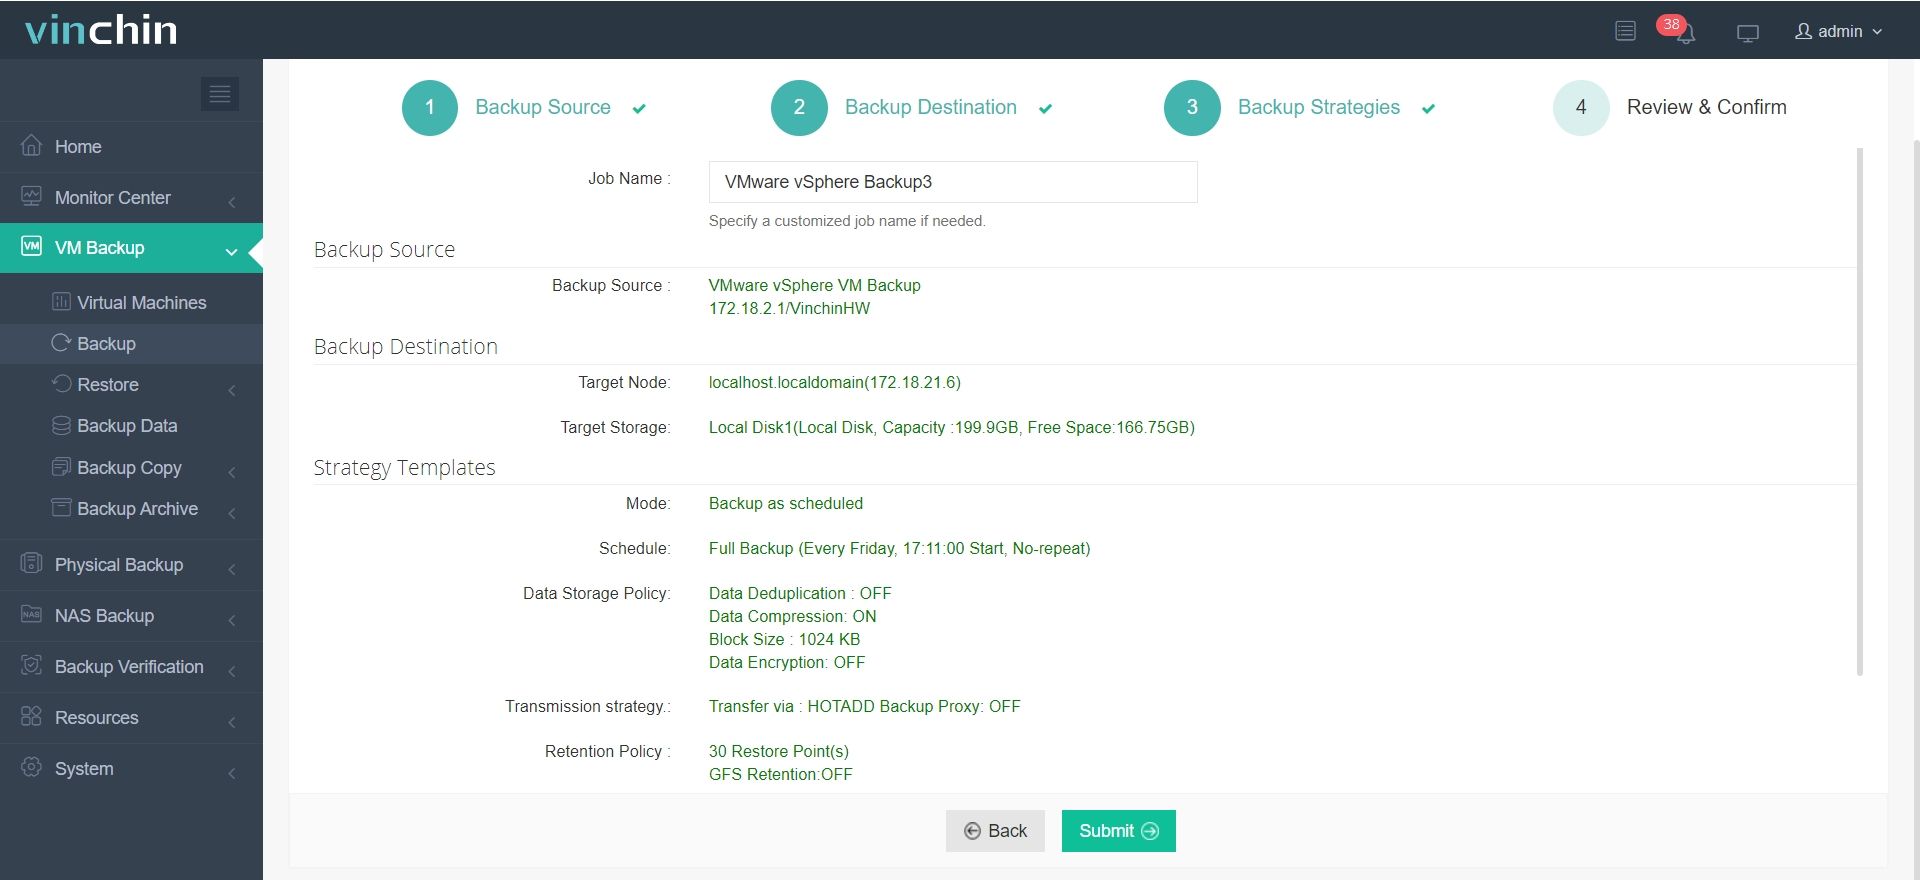
With Vinchin Backup & Recovery's intuitive web console interface backing up a VMware VM involves just four straightforward steps:
Step 1: Select the VMware VM to back up

Step 2: Choose backup storage

Step 3: Configure backup strategy

Step 4: Submit job

Recognized globally by thousands of organizations and rated highly by industry experts,Vinchin Backup & Recovery offers a 60-day full-featured free trial—click below to experience comprehensive enterprise data protection firsthand!
FAQ – Real World Scenarios About Adding Adapters in ESXi
Q1: Can I hot-add a virtual NIC without shutting down my production Linux VM?
No—you must power off any running VM before changing its hardware configuration through Edit Settings in vSphere Client.
Q2: How do I make sure my USB Ethernet dongle keeps same vmnic number after every reboot?
Set persistent binding using MAC address mapping within driver parameters via SSH shell commands—refer to official documentation provided with USB Native Driver package.
Q3: What should I do if my newly added pNIC shows “Up” but no packets flow?
Check switch port VLAN membership matches intended subnet, verify firewall rules aren't blocking traffic, and confirm correct uplink assignment under Networking settings in Host client UI.
Conclusion
Mastering esxi add network adapter tasks ensures smooth scaling of resources while maintaining uptime and security standards across all workloads—from test labs up through mission-critical clusters! For robust protection of those environments consider backing them up regularly using Vinchin’s powerful yet easy-to-use solution tailored specifically for modern virtualization platforms.
Share on:


