VMware is the most popular virtualization technology vendor that enjoys a long history, with a mature and well-established environment and a plethora of complementary yet practical services based on the VMware ecosystem. Its server virtualization suite VMware vSphere includes the type 1 bare-metal hypervisor ESXi in x86 architecture, the centralized control hub vCenter Server managing numerous ESXi hosts, and other incredible features.
XCP-ng, short for Xen Cloud Platform-next generation, is an enterprise-class turnkey open-source virtualization platform based on XenServer 7.4 for replacing XenServer as a fork when Citrix discontinued it as a free platform in 2017. XCP-ng supports creation of 64 hosts in a pool and control in a centralized web console Xen Orchestra. Many of the features that vendors charged a premium for are freely available in XCP-ng, such as live patching, live storage migration and so on. This makes XCP-ng a popular choice for cost-conscious enterprises.
Why migrate to XCP-ng?
Despite for the advantages in plain sight, VMware does have some drawbacks that shake users’ confidence. VMware vSphere doesn’t run on unsupported hardware. Its frequent device driver updates may cause the VM box to boot or initialize slowly. And a corrupt script or code may destruct the VMs or stall the severs, causing data loss. So drawn by the fully functional and free-of-charge XCP-ng, some VMware users who want to drive better performance of some applications may look for the means to migrate them to the platform.
In addition, after Broadcom acquired VMware, VMware’s license model has also changed. So, some users are looking for VMware alternatives. Obviously, XCP-ng is also among their choices.
Here are some potential advantages of XCP-ng over VMware:
1. Open source: XCP-ng is a completely open source project, which means that users can access the source code and freely modify and distribute it according to their own needs. This transparency is a significant advantage for organizations that want to customize virtualization solutions or have special requirements about the inner workings of the software.
2. No royalties or license fees: XCP-ng’s open source model means users can use all features for free without paying additional license fees for advanced features. This contrasts with VMware's business model, which typically requires purchasing a license to unlock certain advanced features.
3. Simplified product line: XCP-ng provides a simplified product line with all features included in one version, which makes the product selection and management process simpler compared to VMware’s multiple products and versions.
4. Avoid vendor lock-in: Using XCP-ng, enterprises can avoid being locked into a single vendor's solution, which provides enterprises with more flexibility and options.
How to migrate VM from VMware to XCP-ng?
One way is to use OVF tool to export OVA files, which is a command-line utility invented by VMware to import and export OVF packages to and from VMware products and then import the OVA template to XCP-ng. Thus, please install the tool before the process to save your time. After that, you need to login vSphere and export the VM as OVF files, now because vSphere doesn’t provide OVA export option any more as of 6.5 version, to obtain the OVA files, you can use the OVF tool to convert it and import the converted files into XCP-ng at last.
Here’s a general outline of the process:
1. Prepare the VMware VM
Power off the VM: Ensure the VM is not running in VMware.
Uninstall VMware tools: It’s usually a good idea to uninstall VMware-specific tools as they can cause issues on other hypervisors.
2. Export the VMware VM
Right click the VM and choose to export the VM as an OVF template through the vSphere client.
3. Convert the Disk
Convert the VMDK file to a format compatible with XCP-ng, which typically uses the VHD format. You can use qemu-img for this conversion:
qemu-img convert -f vmdk -O vpc sourcefile.vmdk destinationfile.vhd
4. Transfer the Converted Disk
Copy the Disk to XCP-ng: Transfer the converted disk image to a location accessible by your XCP-ng host. You can use SCP, SFTP, or any file transfer method you prefer.
5. Import the VM into XCP-ng
Using Xen Orchestra: If you’re using Xen Orchestra, you can import the VHD directly through the UI by creating a new VM and attaching the VHD as a disk.
Using xe Command-line Tool: You can also use the “xe” command-line tool to import the disk to XCP-ng:
xe vm-import filename=destination-disk.vhd
Create a VM: If the import doesn’t create a VM automatically, you’ll need to create a new VM in XCP-ng and attach the imported disk to it.
After importing the VM, don’t forget to install necessary tools and configure networking and then test the VM to ensure it's operating correctly in the new environment.
The best way to perform V2V migration
Apart from this method, there’s also another easy way to do the V2V migration. Vinchin Backup & Recovery is a virtual machine backup software delivering overall data protection solutions with V2V feature available, which supports 10+ mainstream virtualization platforms, containing VMware, XCP-ng, XenServer, Hyper-V, Proxmox, etc. It’s both a backup and V2V tool.
It also performs robust backup and recovery functionality including fast incremental backup, image-based, agentless backup, LAN-Free backup and recovery, offsite backup copy, multithreading transmission, ransomware protection and more, to comprehensively secure your critical data. Instant Restore will allowing restarting a failed VM in 15 seconds, greatly reducing RTO.
Vinchin Backup & Recovery simplifies data protection and migration tasks. Even for beginners, you can quickly get started with backup, recovery and management operations. Here’s how to effortlessly transform VMs from VMware to XCP-ng:
1.Backup your VMware VM, choose the backup destination and backup strategies, then submit it.

2.Choose the VM you want to restore.

3.Select the XCP-ng host to run the restored VM.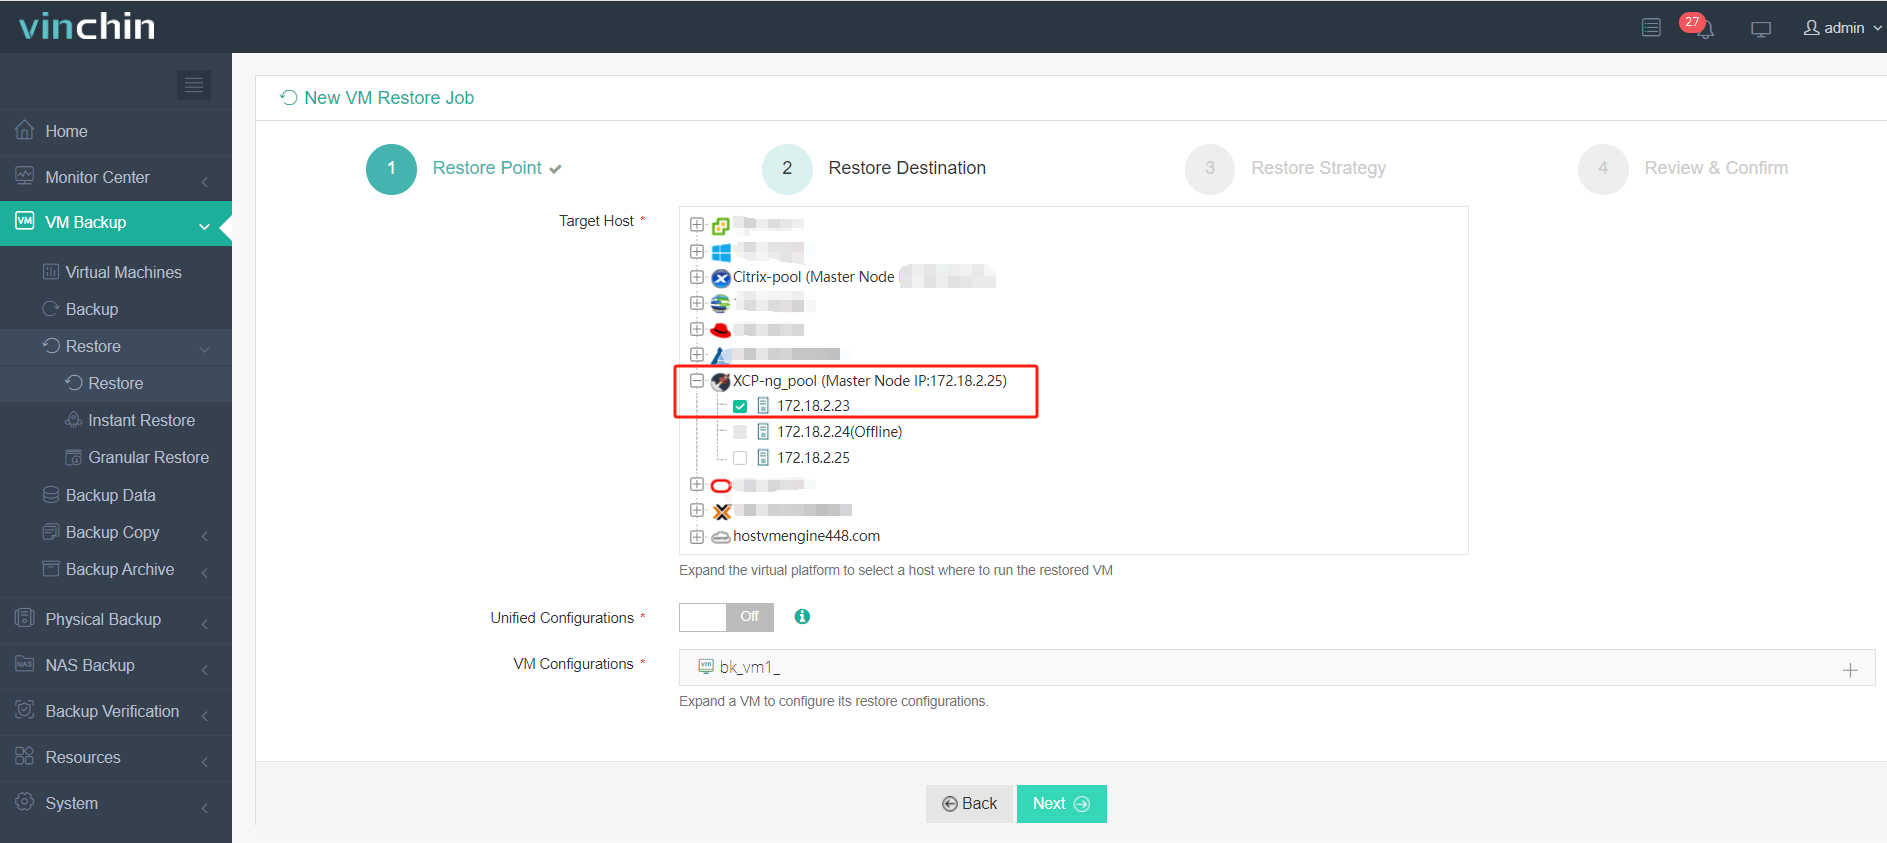
4.Select the restore strategy.

5.Review and submit the job.

Start the job and then you can check in your XCP-ng environment and find that the VM has been restored and running.
Vinchin Backup & Recovery has been selected by thousands of companies and you can also start to use this powerful system with a 60-day full-featured trial! Also, contact us and leave your needs, and then you will receive a solution according to your IT environment.
VMware to XCP-ng FAQs
1. Q: Can I migrate VMs with snapshots?
A: It’s recommended to consolidate snapshots before migration, as they may not be compatible or may complicate the migration process.
2. Q: Can XCP-ng coexist with VMware in a hybrid virtualization environment?
A: Yes, it is possible to run both XCP-ng and VMware in the same environment, although they will operate on separate hosts. A hybrid approach can be used for a gradual migration or to maintain legacy applications that require VMware-specific features.
Conclusion
VMware and XCP-ng, are both leading virtualization vendors in the industry, each of them has their own strong points and weakness as well. Either on account of cost saving or other reasons, the V2V migration between the two has never be easy involving the files conversion until the Vinchin Backup & Recovery launches the cross-platform V2V migration, which finishes the whole process in few steps on one platform.


