Why Move from XenServer to VMware?
Nowadays, companies gradually consider migrating XenServer to VMware. Compared to VMware, XenServer offers weaker centralized management, a smaller ecosystem, and lower hardware and software compatibility, along with a more limited talent pool in enterprise environments. Common migration scenarios include:
-
Centralized management: Move XenServer VMs to VMware for host, VM, storage, network, and permission management.
-
Third-party ecosystem: Migrate when backup, monitoring, security, or disaster recovery tools integrate better with VMware.
-
Compatibility: Choose VMware when new hardware, drivers, OS, or applications are better supported on VMware.
-
Talent pool: Move to VMware when VMware admins, consultants, and support resources are easier to find.
If you also need to migrate XenServer to VMware, the next sections will walk you through the key preparations, available migration methods, and practical steps.
Preparation Before Migrating XenServer to VMware
Before starting the migration, complete the following checks to improve the success rate and make rollback easier if the migrated VM cannot run properly:
-
Record the VM configuration, including CPU, memory, disk size, network settings, firmware mode, and so on.
-
For production workloads, confirm the application owner, approved maintenance window, and rollback point.
-
Back up the source VM, including virtual disks, snapshots, VM configuration, and critical application data.
-
Remove unused virtual hardware, unmount ISO images, delete redundant NICs, and disconnect unnecessary devices.
-
Clean up the guest OS by uninstalling Xen Tools, removing temporary files, and checking file system integrity.
How to Migrate Xen VM to VMware?
The following three methods have different advantages and limitations. You can quickly compare them first, locate the best suitable way for you, and click the title to view details directly.
|
Method
|
Best for
|
Pros
|
Limits
|
|
Export as OVA/OVF
|
Small numbers of XenServer VMs
|
Uses a standard package and is easy to understand
|
Can be slow and still requires VMware-side validation
|
|
Convert XVA to VMDK
|
Teams comfortable with manual disk conversion
|
Useful when the source VM is available only as an XVA export
|
More commands, more compatibility checks, and higher error risk
|
|
Use V2V migration Tool
|
Production workloads or multiple VMs
|
Guided backup and cross-platform restore workflow, less manual conversion
|
Requires plug deployment of the migration tool and target platform access
|
Method 1. Export Xen VM as OVA/OVF
The first method is to export a Xen VM as an OVA or OVF package and then import it into the VMware. XenServer documentation describes VM import and export as a way to create or move exported VMs, and it notes that UEFI-enabled VMs can be exported as OVA/OVF.
-
Open XenCenter, select the pool or server that contains the target VM, then go to "VM > Export".
-
Enter the export file name and destination folder, then choose "OVF/OVA Package" as the format.
-
Select the VMs you want to export, and add EULA files only if needed.
-
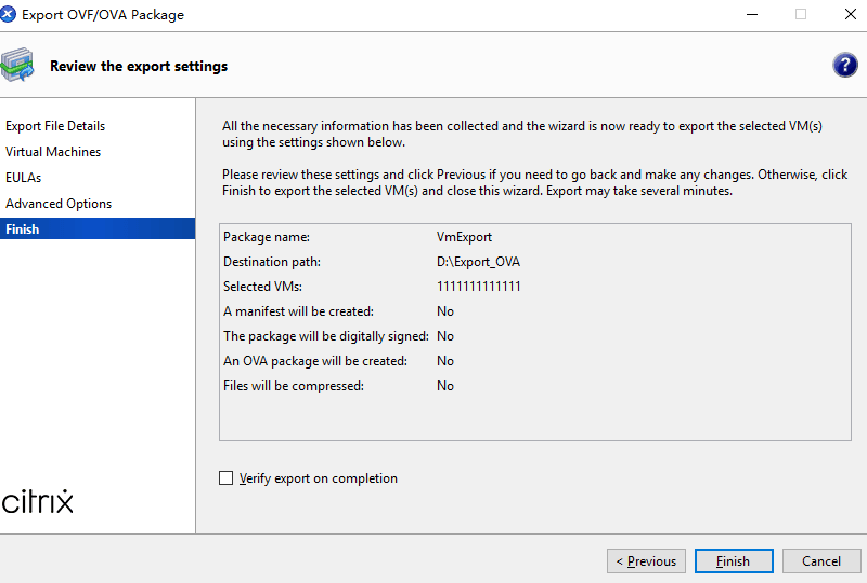
Configure optional advanced settings, such as a manifest, digital signature, OVA package creation, or disk compression.
-
Review the settings, optionally enable "Verify export on completion", then click "Finish" and wait for the export to complete.
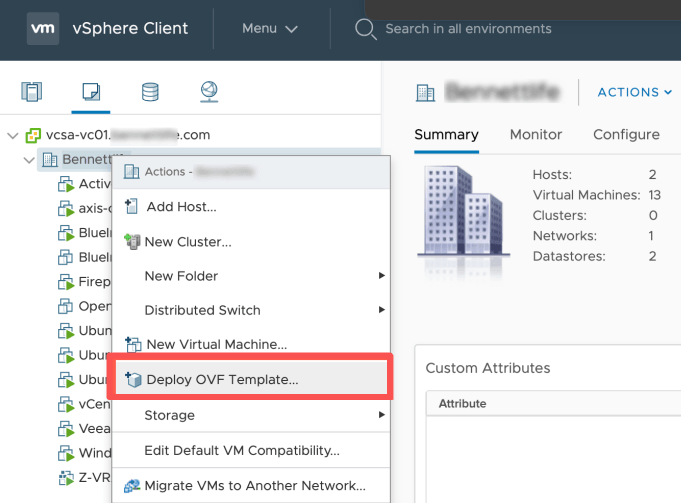
Once the export job finishes, open VMware ESXi or vSphere, choose Deploy OVF Template, upload the package, and review the hardware, network, and application settings.
This method works well for a small number of VMs, but it can become slow with large disks or batch migration projects. After import, still verify drivers, virtual NICs, boot mode, and applications.
Method 2. Convert Xen VM Disk to VMware VMDK
If the source VM is exported as XVA, VMware cannot use that package as a native VMware disk. Administrators often need to extract the virtual disk from the XVA package and convert it to VMDK format. Here are the detailed steps to convert XVA to VMDK:
1.Export the XenServer VM as an XVA file and copy it to a Linux machine with enough free disk space.
2.Extract the XVA package to access the virtual disk data.
mkdir xen-vm
3.Combine the disk chunks into a raw disk image. Replace Ref\:1 with the correct disk folder if the XVA contains multiple disks.
cat xen-vm/Ref\:1/[0-9]* > xen-vm.raw
4.Convert the raw disk image to VMDK format with qemu-img.
qemu-img convert -f raw -O vmdk xen-vm.raw xen-vm.vmdk
5.Create a new VMware VM, upload and attach the converted VMDK.
Tip: Manual conversion gives experienced administrators more control, but it also increases the risk of mistakes. The wrong controller type, a missing boot driver, or a mismatched firmware mode can prevent the migrated VM from starting. Use this method only when you understand the source VM layout and can test the result before production cutover.
Method 3. Use Professional VM Migration Software
Although manual export and disk conversion can work, they take time and introduce risk when many VMs must be moved. Using a professional migration tool can save time, reduce manual effort, and lower the chance of configuration errors during migration.
Vinchin Backup & Recovery provides a cross-platform V2V migration approach that supports XenServer to VMware migration. Instead of asking users to convert every disk manually, it helps you easily and quickly migrate VMs across platforms in several simple steps. Here are detailed process:
1. Go to Resources > Infrastructure > Virtual Platform, then add both the XenServer source and the VMware target to Vinchin.
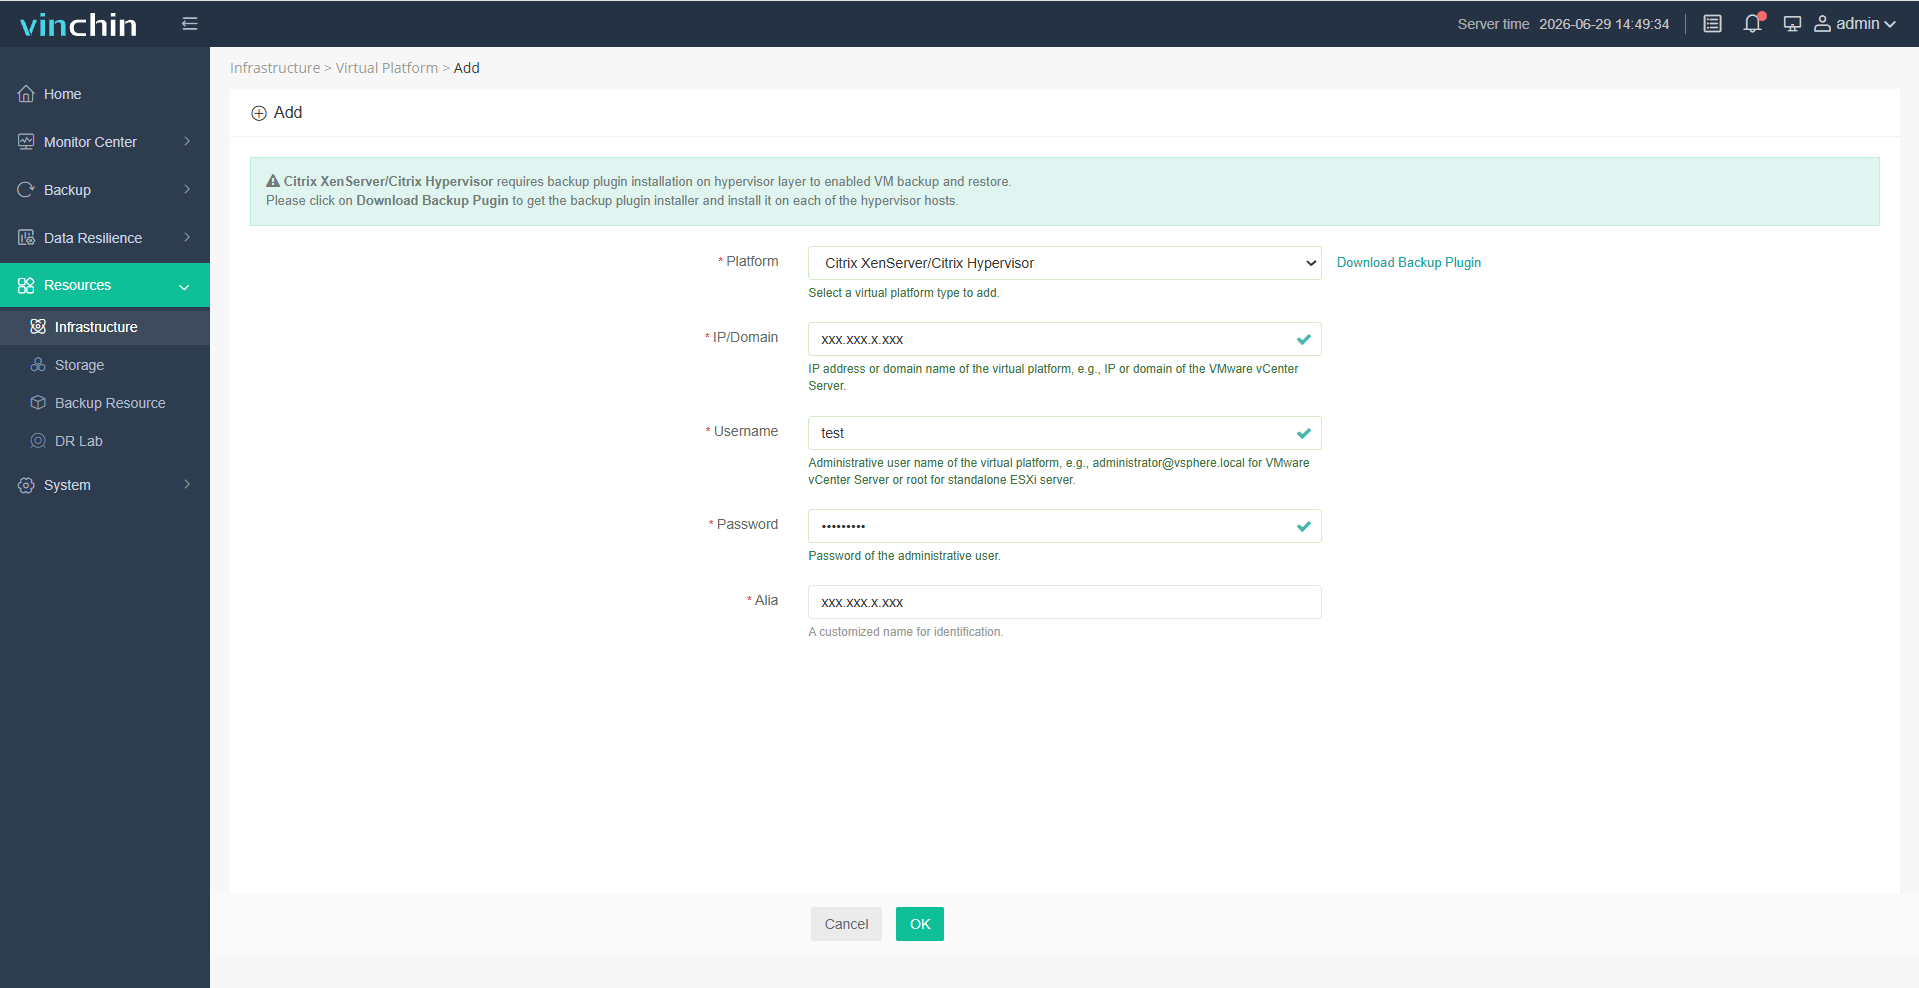
2. Click Backup > Virtualization to create a backup task for the XenServer VM, so the workload has a recoverable migration point.

3. Navigate to Data Resilience > Restore > Cross-Platform Restore, then select the restore point you just created.
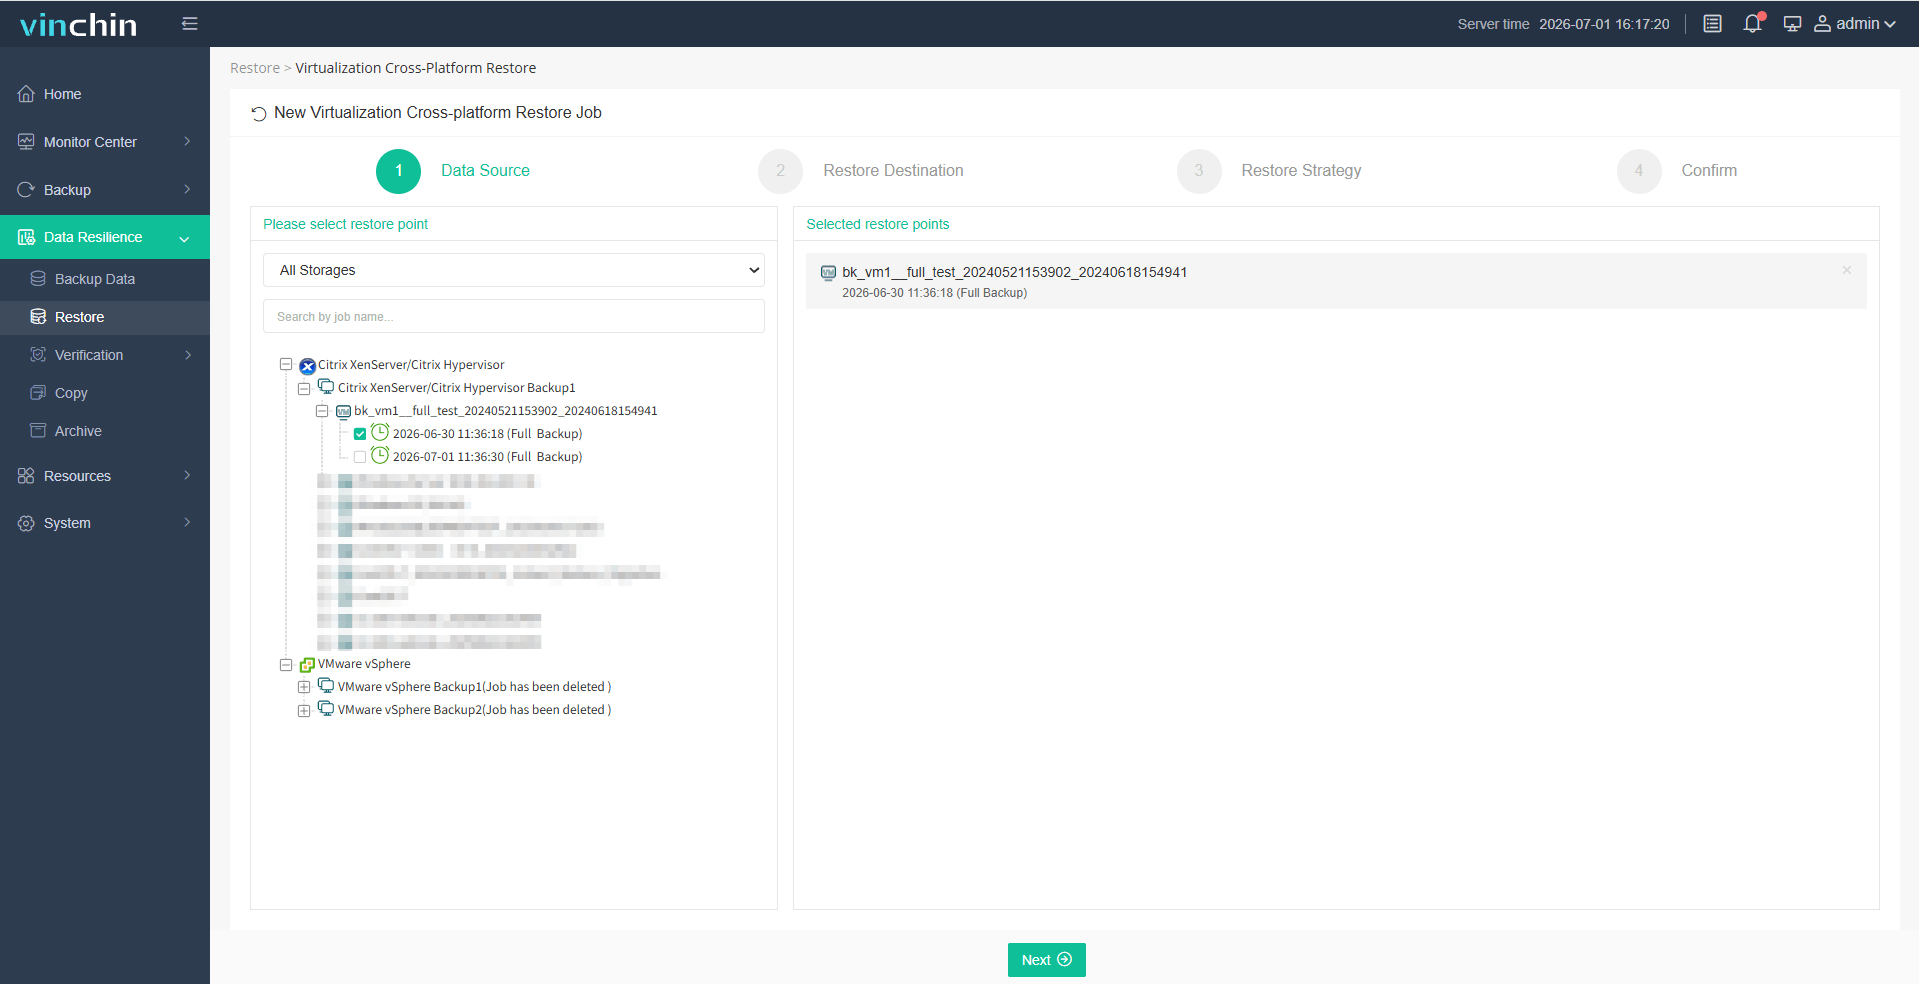
4. Select the target VMware environment for the restored VM.
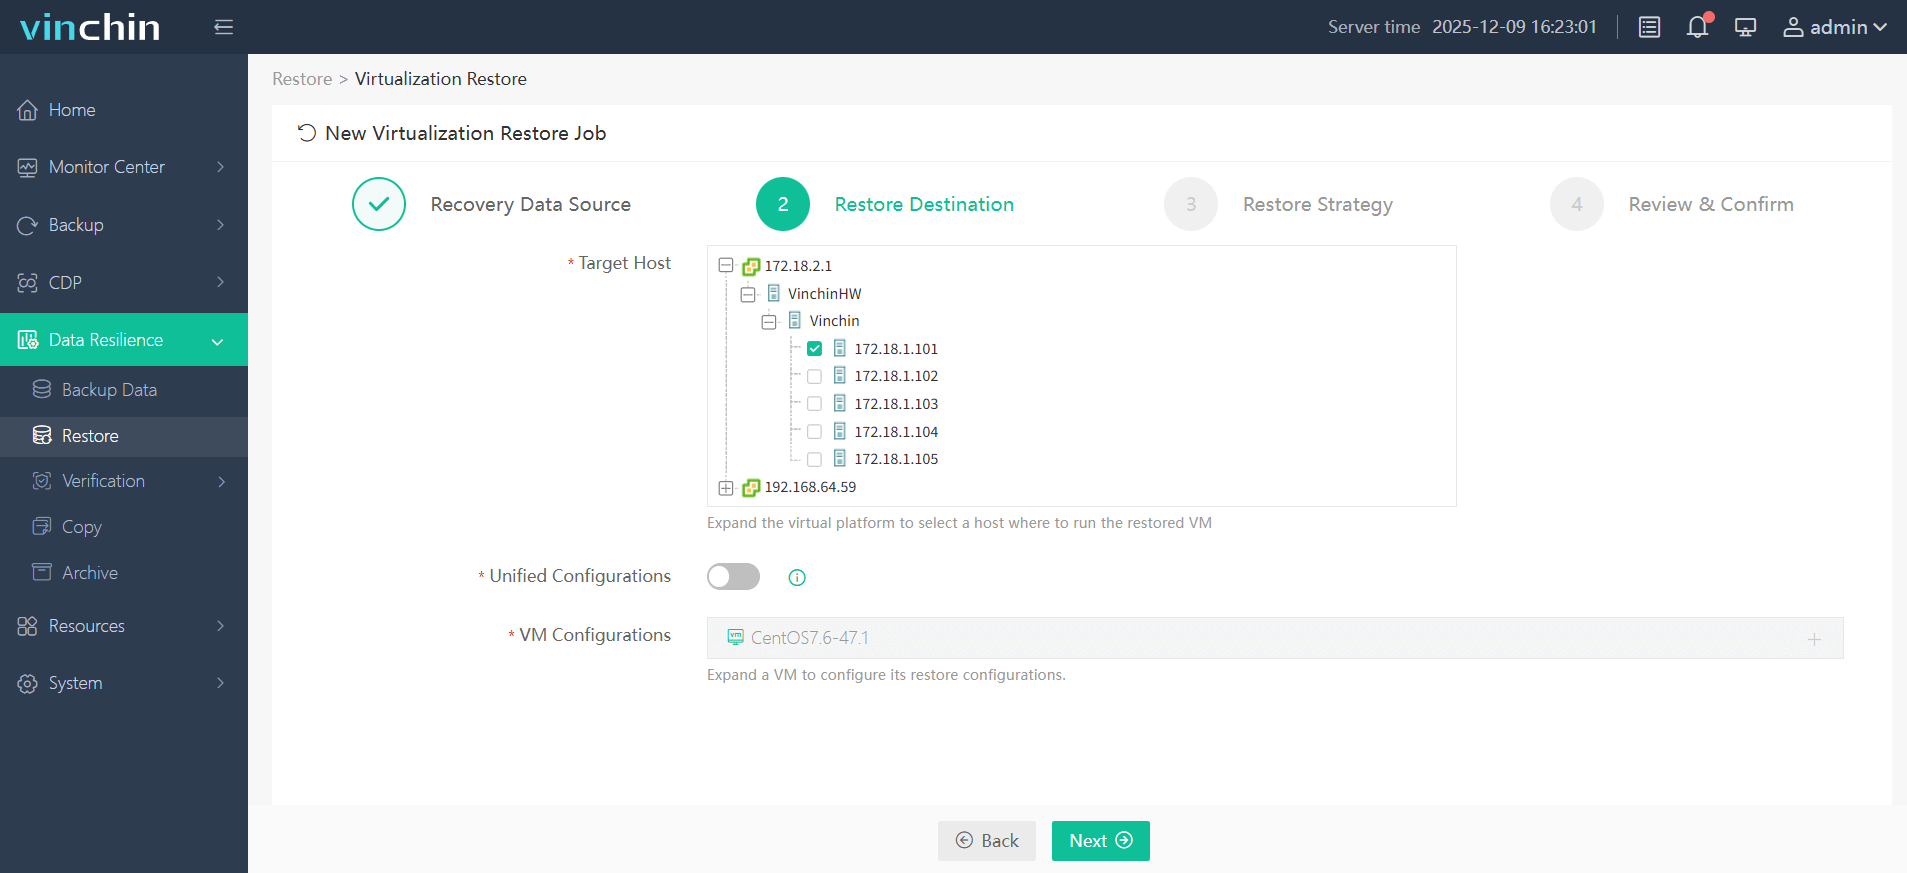
5. Configure the restore strategy and confirm the task.
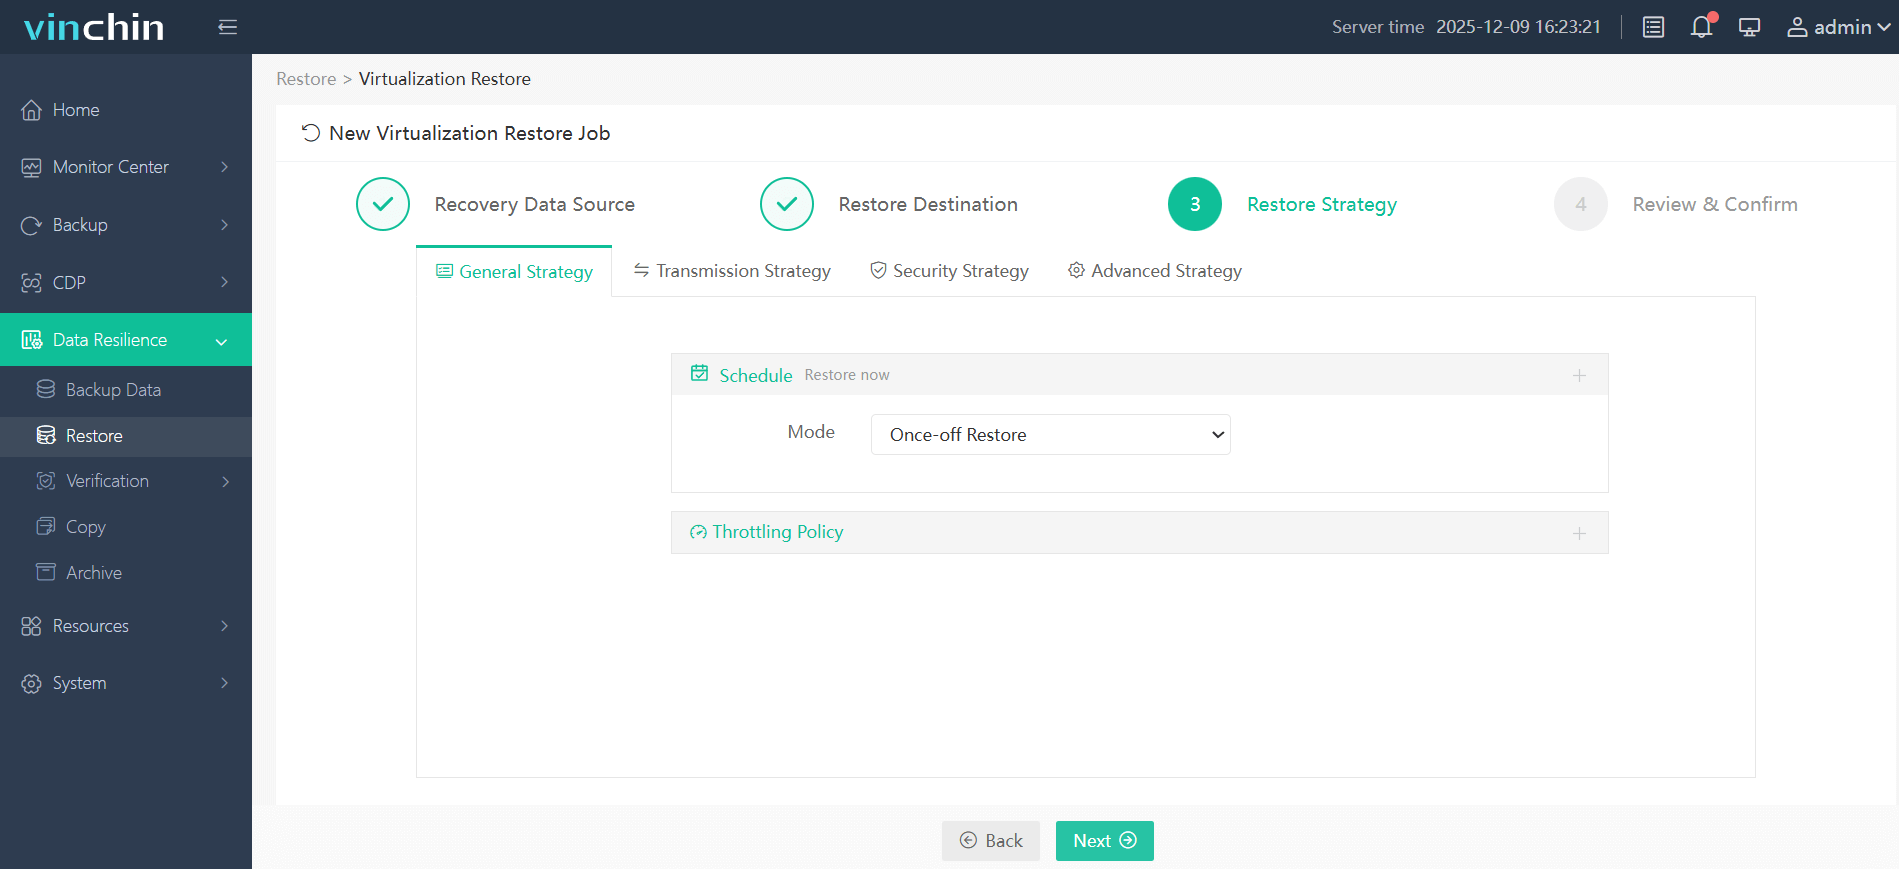
This method is useful for administrators who need a guided way to migrate VMs across different platforms. Besides XenServer and VMware, Vinchin Backup & Recovery also supports platforms such as Hyper-V, Proxmox, XCP-ng, oVirt, OpenStack, Red Hat Virtualization, and other KVM-based environments.
If you need VM migration and data protection for heterogeneous infrastructure or multi-platform environments, you can download the 60-day free trial of Vinchin Backup & Recovery to simplify migration, backup, and recovery management.
Fixes: Common Issues After XenServer to VMware Migration
1. The Migrated VM Cannot Boot
This issue is usually caused by a firmware mismatch, incorrect boot order, or an incompatible disk controller. To resolve it, ensure the VMware VM matches the source BIOS/UEFI mode, set the converted disk as the primary boot device, switch to a compatible SCSI or SATA controller if needed, and run OS boot repair if the bootloader is corrupted. Before the final cutover, having a reliable XenServer backup and fast recovery plan can also help you restore the source VM quickly if the migrated VM fails to boot.
2. The Network Adapter Is Missing or IP Settings Are Lost
After migration, the guest OS may detect a new virtual NIC, causing static IP settings to be lost or remain bound to the old Xen adapter. To resolve this, remove unused Xen devices, assign a compatible adapter type such as E1000E or VMXNET3, install VMware Tools or open-vm-tools, and reconfigure IP, DNS, gateway, and VLAN settings.
3. The Converted VMDK Cannot Be Attached or Powered On
Some VMDK files generated by conversion tools may not match the disk format expected by ESXi. Verify that the conversion completed successfully and ensure all descriptor and extent files are properly uploaded. If ESXi rejects the disk, clone it to a new datastore format using the following command:
vmkfstools -i source.vmdk -d thin target.vmdk
Then attach the newly created VMDK to the VMware VM and retry the boot process.
4. Performance or Driver Warnings Appear After Migration
Old Xen drivers and missing VMware Tools can cause device warnings, slow storage, clock drift, or lower network throughput. Uninstall Xen Tools if it remains in the guest, install VMware Tools or open-vm-tools, check storage and NIC drivers, and review system logs before returning the VM to production. For deeper troubleshooting, see this guide about VMware log analysis.
FAQs About Migrating Xen VM to VMware
Q1: Should I uninstall Xen Tools before migrating Xen VM to VMware?
A1: In many cases, yes. Xen Tools may leave drivers or services that are no longer needed after the VM runs on VMware. To avoid driver conflicts, uninstall Xen Tools before migration if possible, or remove them after the VM boots successfully on VMware.
Q2: Can I migrate a running XenServer VM to VMware without shutting it down?
A2: In most manual migration workflows, no. The VM should be powered off before export or disk conversion to keep the disk data consistent.
Q3: How much downtime is needed to migrate XenServer VM to VMware?
A3: Downtime depends on the VM size, disk amount, migration method, network speed, and post-migration validation. Manual export and disk conversion usually require longer downtime because the VM must be exported, converted, uploaded, and tested.
Q4: Can I migrate XenServer VM to VMware without manual conversion?
A4: Yes. A cross-platform migration tool such as Vinchin Backup & Recovery can simplify the process by using a backup and restore workflow instead of asking administrators to manually convert each disk.
Conclusion
When you need to migrate Xen VM to VMware, manual methods such as exporting Xen VMs as OVA/OVF or converting XVA to VMDK can be acceptable for one or two non-critical VMs.
For production workloads, batch migration, or tight maintenance windows, a V2V migration tool such as Vinchin Backup & Recovery can be a safer choice. It reduces repeated manual operations, keeps backup points available during the process, and provides a guided migration workflow to make VM migration easier and more reliable.