-
Method 1. Migrate ESXi VM with VMware cold migration
-
Method 2. Export VM from the old host and import VM to the new host
-
Method 3. Move VM to another ESXi host with Vinchin
-
Migrating ESXi VM without vMotion FAQs
-
Conclusion
VMware has served thousands of companies and organizations with its brilliant virtualization solution, vSphere, which provides powerful virtualization features and requires just simple operations.
vSphere suite contains all the software you need to deploy virtual environment. You can use ESXi to virtualize the hardware resources and create virtual machine and use vCenter to manage all virtual machines.
After virtual machine is created, it still needs continuous maintenance in daily job. VM migration is the common operation in datacenter. IT administrators could balance the load of hosts and maintain the server by moving VM from one host to another.
vMotion is one of the features in vSphere to allow users to perform live VM migration without shutting down the VM. It is brilliant but also has some requirements and limitations, like license, ESXi version, network condition, related configuration, etc.
When vMotion is not the best choice of VM migration solution, how to do you migrate VM from one host to another? You could have the alternative solutions.
Method 1. Migrate ESXi VM with VMware cold migration
vMotion is the advanced hot VM migration feature. If you can't perform hot migration in vCenter, you could still perform a cold migration, which means you need to shut down the VM during migration.
1. Make sure the VM has been powered off
2. Log into vCenter server > right-click the VM to migrate > click Migrate
3. Select Change both computer resource and storage as the migration type
4. Select a destination host in Datacenter
5. Select the destination storage for VM
6. Select the network
7. Review the job and click Finish
Then you could view the information of the VM that its host and datastore have been changed.
Method 2. Export VM from the old host and import VM to the new host
The logic is very simple. It is like "copy and paste". What you need to know is how to export and import VM in the right way. It is still a kind of cold migration, so you need to power off the target virtual machine.
1. Log into ESXi host > right-click the virtual machine you would like to migrate > select Export
2. You would be navigated to download the .ovf, .mf, .vmdk files, etc. Remember where you store the files.
3. Log into vCenter > right-click the target host > select Deploy OVF Template (if you saved the OVF files in vSphere Content Library, you would select New Virtual Machine here and then select Deploy from template as the creation type)
4. The deployment wizard would be open. Use URL or local files to upload the exported OVF template
5. Select the folder and type the name for the VM > click Next
6. Select the computer resource for the VM > click Next
7. Review the details > click Next
8. Select storage for the VM > click Next
9. Select networks for the VM > click Next
10. Review the whole information > click Finish
Now you could check whether the VM is running on the destination host.
Method 3. Move VM to another ESXi host with Vinchin
Except for the solutions provided by VMware, there is another VMware migration tool, Vinchin Backup & Recovery.
Compared with VMware's solution, it gives you more flexible choices during data migration. There would be fewer limitations on the hardware resources. In addition, Vinchin Backup & Recovery also allows you to perform V2V migration. It means VM can be moved between different virtualized platforms including VMware vSphere, Proxmox, Hyper-V, Citrix Hypervisor, RHV, oVirt, etc. (15+ mainstream virtual platforms supported) in a few simple steps of configurations.
Vinchin Backup & Recovery's another brilliant feature is Instant Recovery. If certain VM is down, you could quickly recover it on the original host or another host in 15 seconds to guarantee the continuity of business.
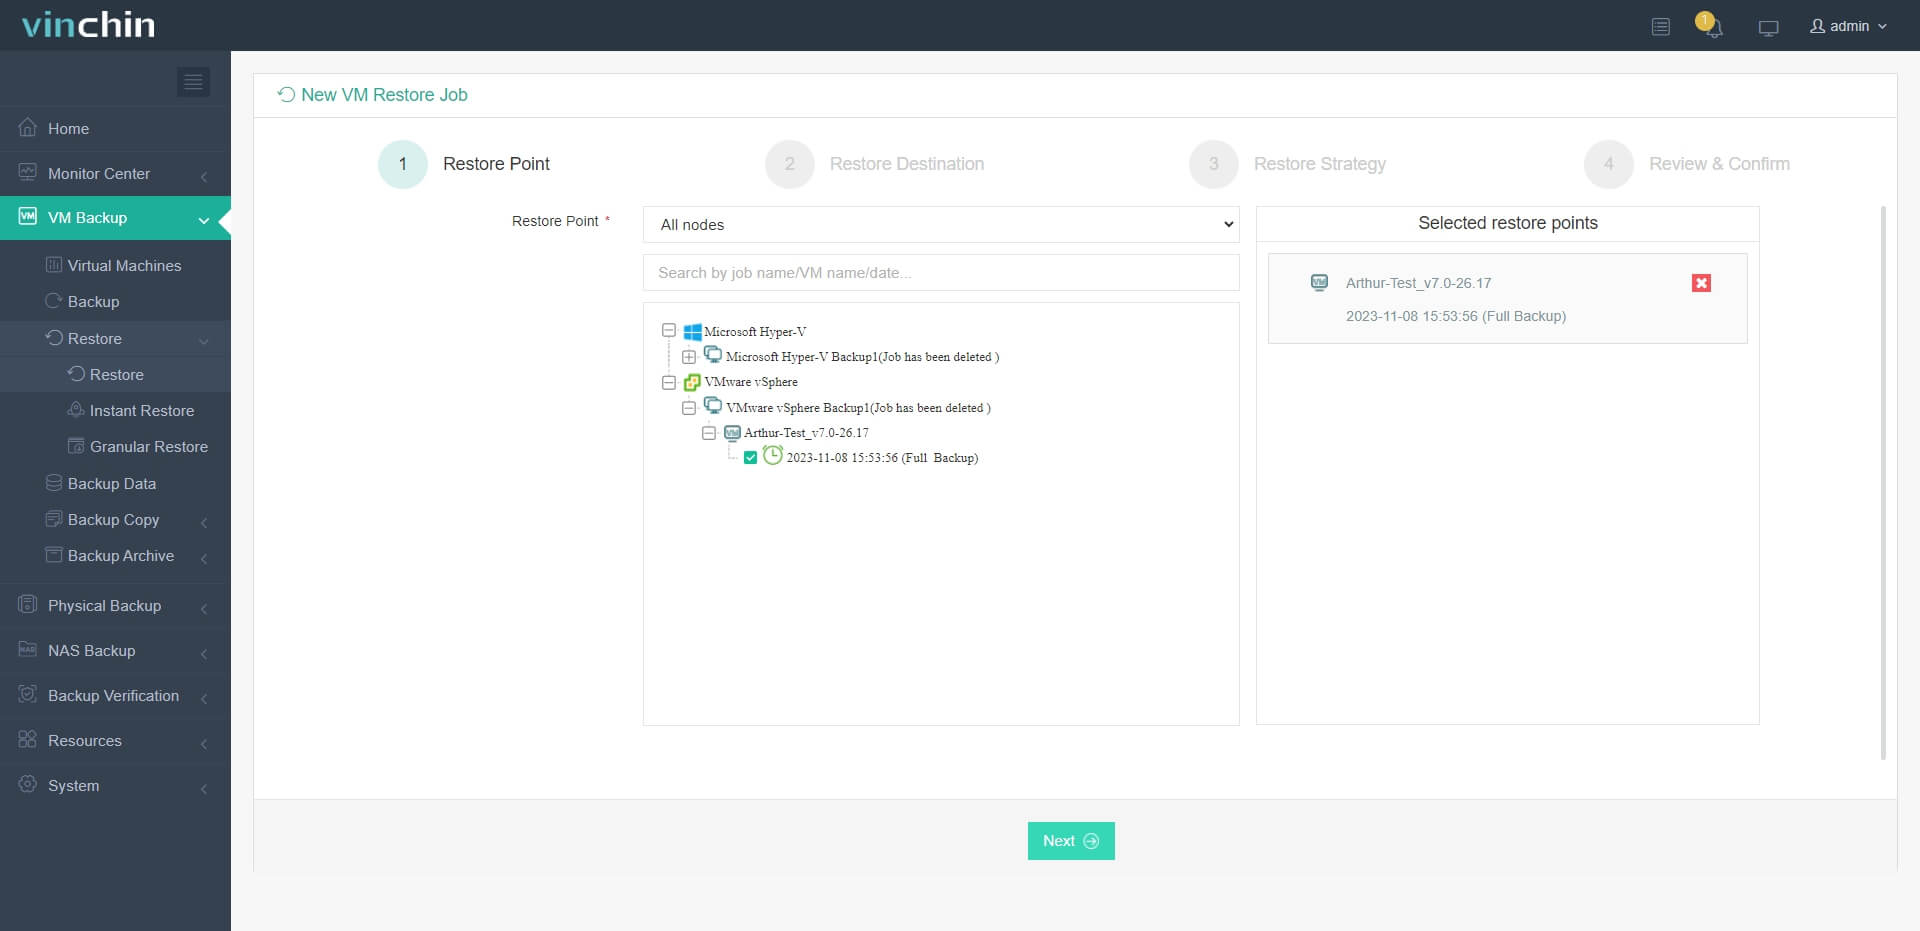
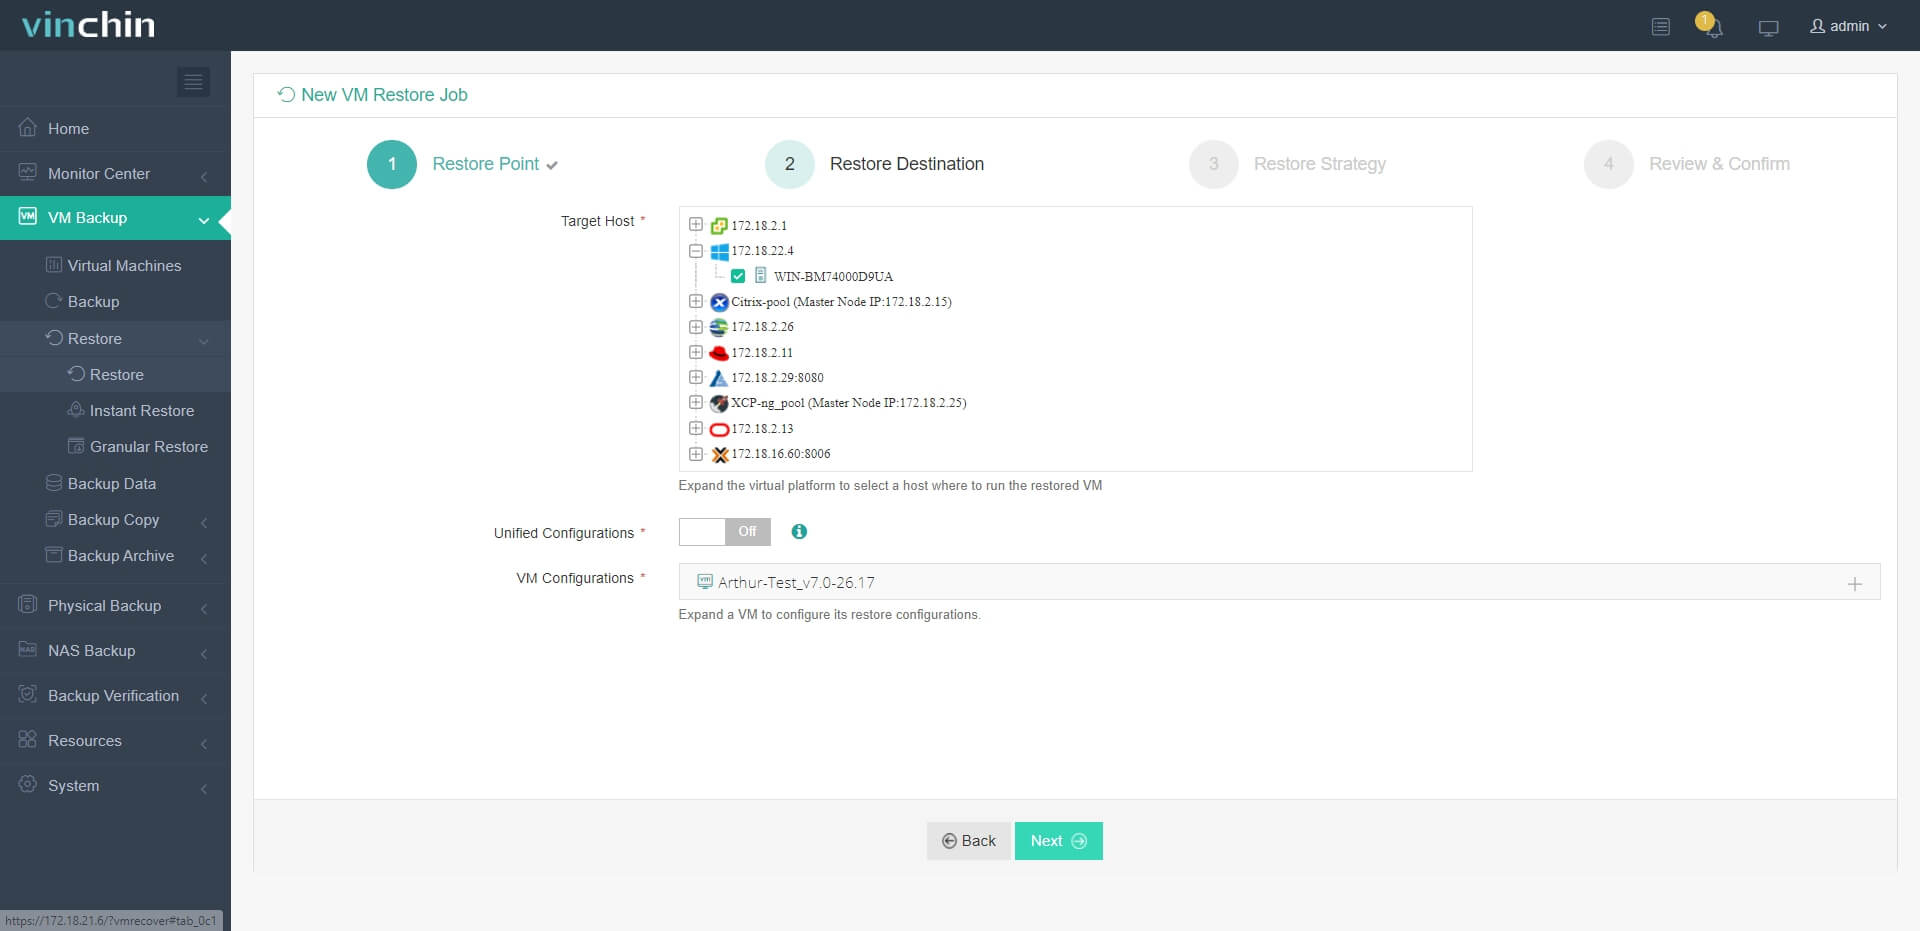
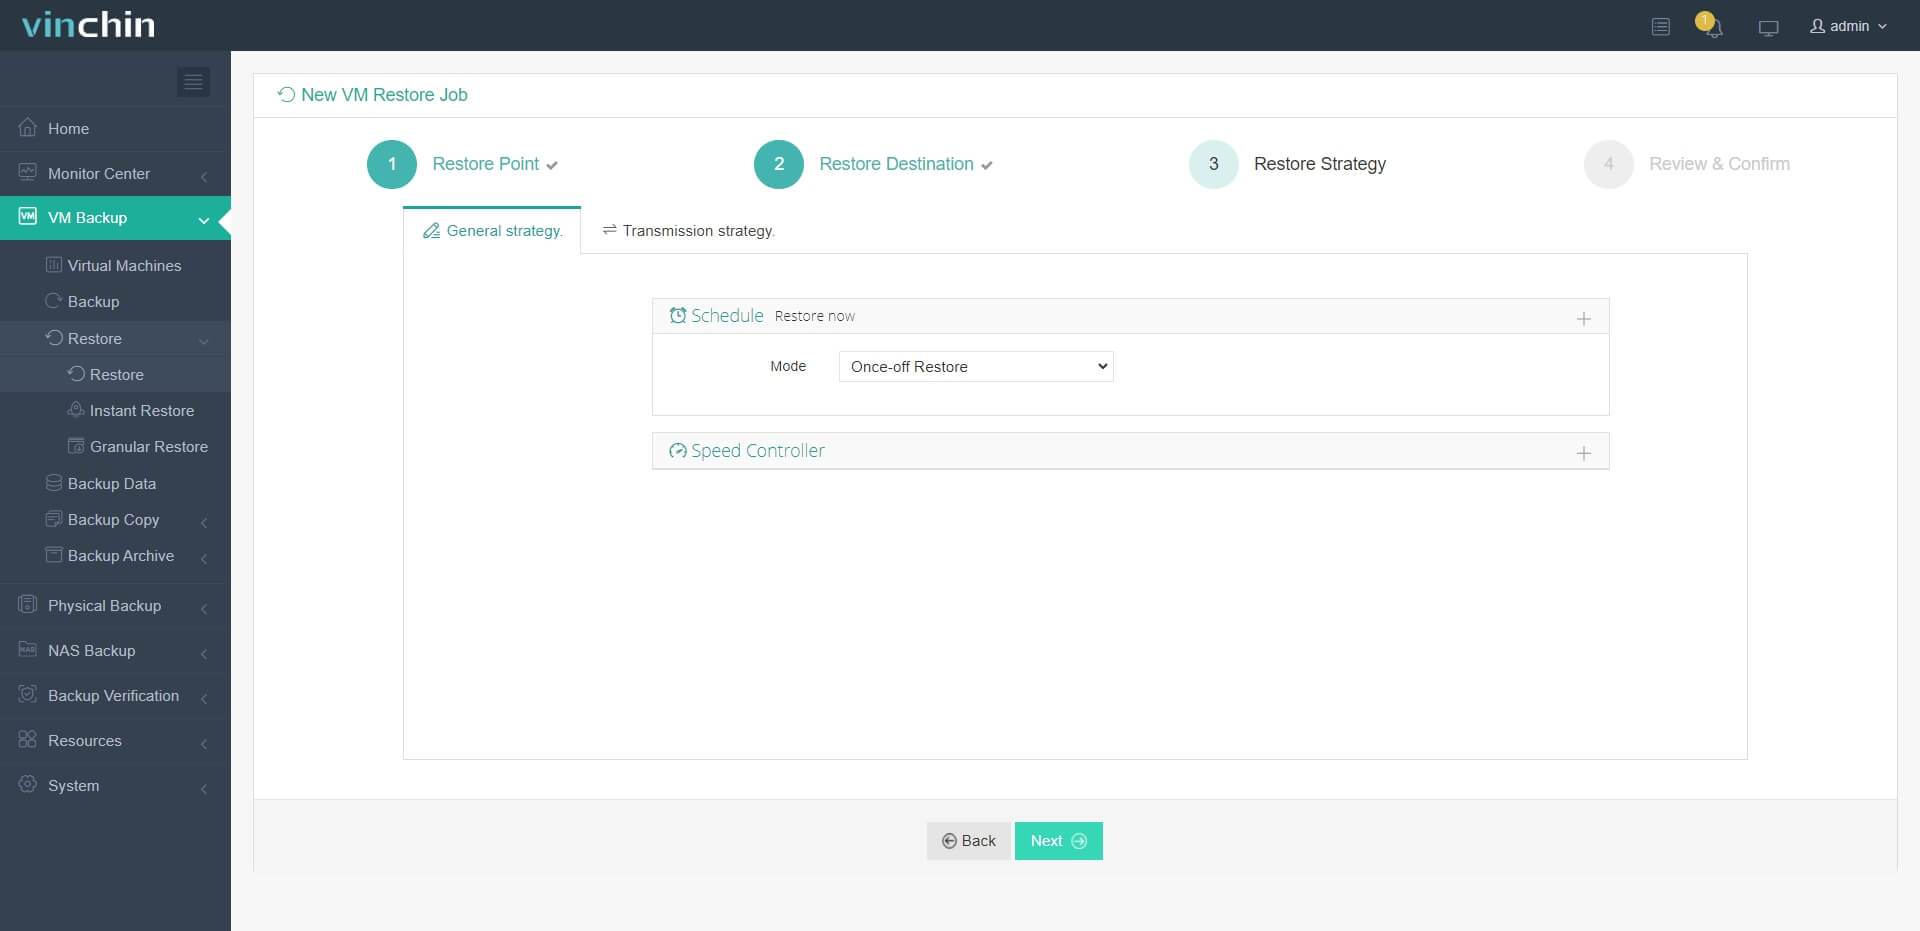
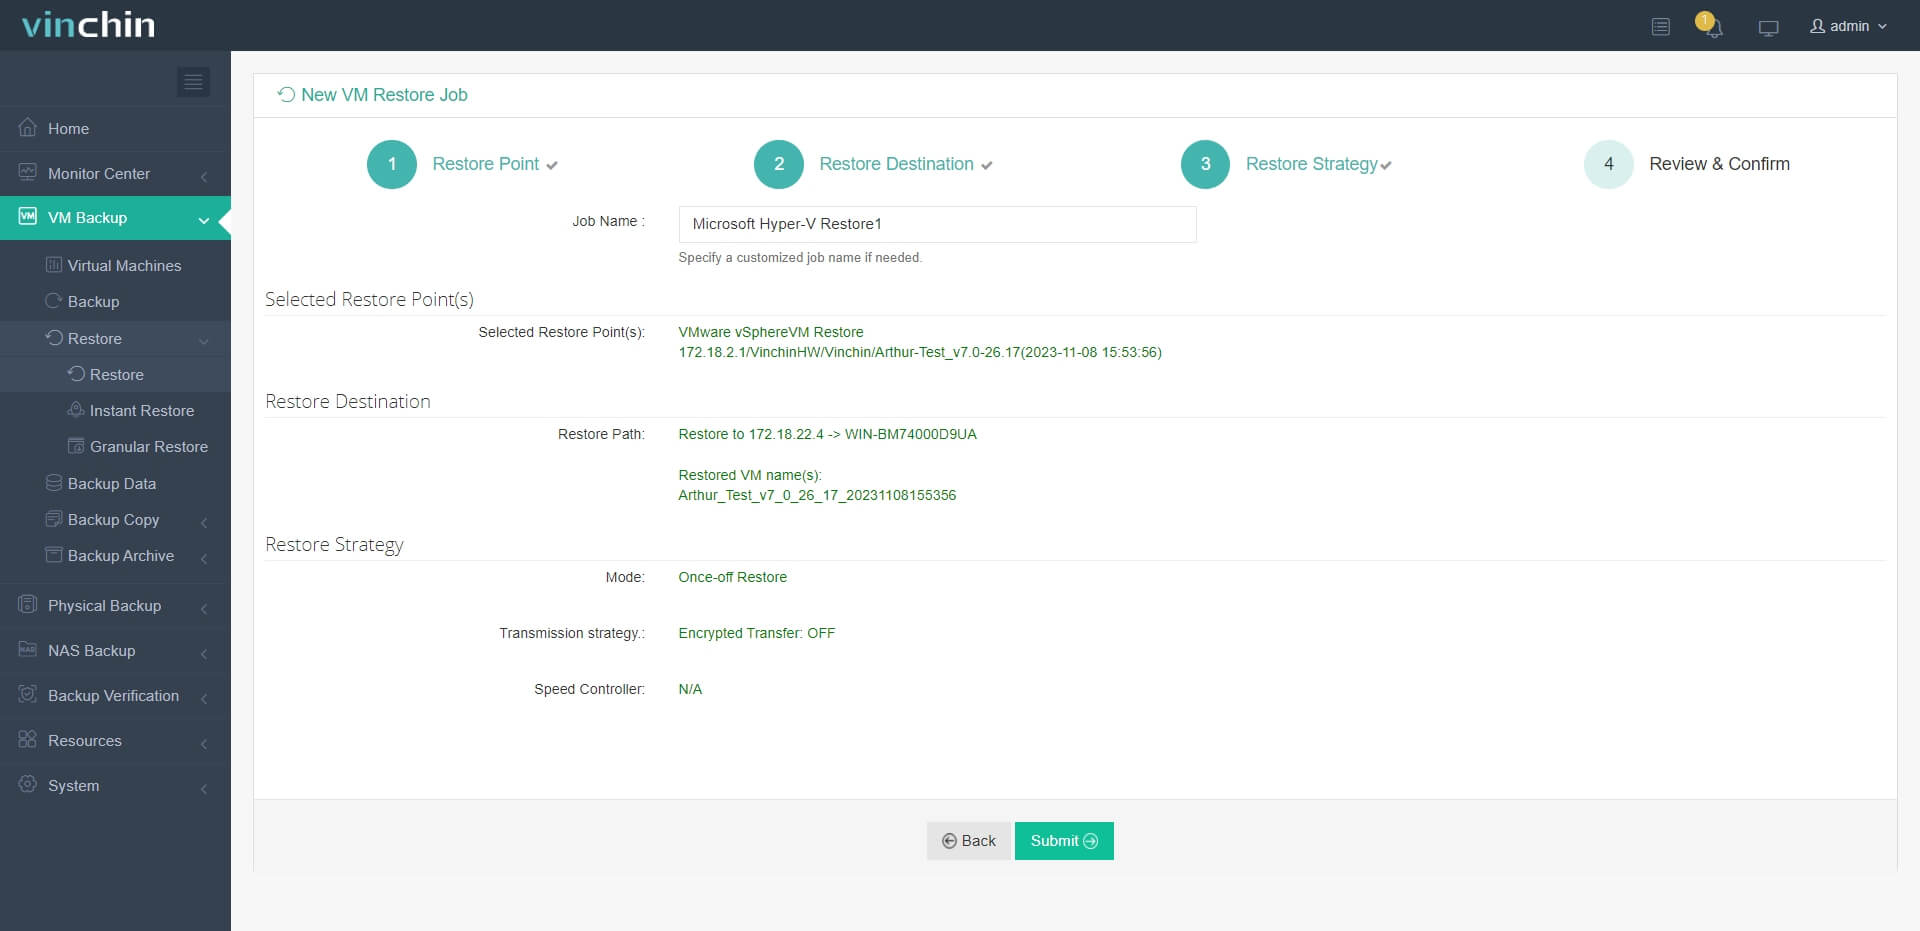
The process of VM migration is also simple. For example, if you would like to move VM from VMware to Hyper-V:
1. Just select the backup of the target VMware VM

2. Select a Hyper-V host as target host

3. Simply set up restore strategies or directly skip this step

4. Just submit the job and then the VMware VM will be quickly restored on the Hyper-V host

Vinchin Backup & Recovery has been selected by thousands of companies and you can also start a 60-day full-featured free trial here. Also, contact us, leave your requirements, and then you will receive your tailored solution. We have established partnerships with reputable companies all over the world so if you would like to do a local business, you can select a local partner here.
Migrating ESXi VM without vMotion FAQs
1. What are the requirements for manual migration?
For manual migration between ESXi hosts, there are just a few requirements. Usually, you just need to make sure the hardware and ESXi versions are similar.
2. Are there any risks in manual migration?
Without vMotion, you might leave some data during the process which could cause the VM can’t be started.
3. Does migrating without vMotion cause downtime?
Using other solutions could cause downtime but you could choose the the one which causes the downtime that you can accept.
Conclusion
vMotion is the feature in vSphere to let users perform live VM migration. Sometimes vMotion could not be used in vSphere, so the alternative solution is needed. In this passage, you have got three methods to migrate VM without vMotion, which are cold migration, export and import OVF template, and migrate with Vinchin Backup & Recovery.
All three methods are helpful. Vinchin Backup & Recovery provides easy operation and better compatibility during VM migration. Don't miss out on the free trial.
Share on:


