-
What Is a Virtual Disk?
-
Why Backup and Restore Virtual Disks?
-
Method 1: Manual File-Based Virtual Disk Backup and Restore
-
Method 2: Using Native Hypervisor Tools for Virtual Disk Backup and Restore
-
How to Backup and Restore Virtual Disks with Vinchin Backup & Recovery?
-
Backup and Restore Virtual Disk FAQs
-
Conclusion
Virtual disks are at the heart of every virtual machine environment today. Whether you manage VMware, Hyper-V, Proxmox, or other platforms, knowing how to backup and restore virtual disk files is crucial for data protection and business continuity. This guide explains what virtual disks are, why their backup matters so much, and how you can safeguard your data using both manual processes and built-in hypervisor tools—before introducing a streamlined enterprise solution from Vinchin.
What Is a Virtual Disk?
A virtual disk is a file that acts like a physical hard drive inside a virtual machine (VM). It stores everything from operating systems to applications to user data within formats such as VMDK (for VMware), VHD/VHDX (for Hyper-V), or QCOW2 (for KVM). These files make VM storage portable—you can move them between hosts or copy them for backup purposes with ease.
Why Backup and Restore Virtual Disks?
Backing up your virtual disks protects against accidental deletion, corruption from malware or software bugs, hardware failure on host servers—or even simple human error during maintenance tasks. Restoring these backups lets you recover quickly if disaster strikes so your business keeps running smoothly without major downtime or loss of critical information. Neglecting regular backups risks permanent data loss that could disrupt operations or violate compliance rules.
Method 1: Manual File-Based Virtual Disk Backup and Restore
Manual file-based methods mean working directly with the underlying disk files used by your VMs—a straightforward but hands-on approach best suited for small environments or specific recovery needs.
Shutting Down VMs Before Backup
Always power off the VM before copying its disk file(s). This ensures no changes occur during the process that could corrupt your backup copy. For VMware users: check that there are no active snapshots; consolidate any existing ones first to prevent inconsistencies in your .vmdk files. For Hyper-V users: shut down the VM through Hyper-V Manager before proceeding.
Locating Virtual Disk Files
Find where your VM’s disk files reside:
In VMware ESXi: look under
/vmfs/volumes/datastore_name/vm_folder/for.vmdkfiles.In Hyper-V: check
C:\ProgramData\Microsoft\Windows\Hyper-V\Virtual Hard Disksor wherever you store.vhdxfiles.On KVM/QEMU: search
/var/lib/libvirt/images/for.qcow2images.
Use your operating system’s file explorer or command line tools to browse these locations safely.
Copying Virtual Disk Files
To back up a disk file:
On Linux systems (e.g., ESXi shell):
cp /vmfs/volumes/datastore1/myvm/myvm.vmdk /backup/myvm.vmdk
On Windows systems:
Copy-Item "D:\VMs\MyVM\MyVM.vhdx" "E:\Backups\MyVM.vhdx"
For large files over slow networks or unreliable links, consider using rsync, robocopy, or splitting large images into smaller parts before transfer to reduce risk of incomplete copies.
Verifying Backup Integrity
After copying any large file—especially critical VM disks—it’s wise to verify integrity using checksums:
On Linux: run
sha256sum sourcefile destinationfileOn Windows PowerShell: use
Get-FileHash -Algorithm SHA256 path_to_file
Compare results; they should match exactly if the copy succeeded without corruption.
This step helps catch silent errors caused by bad sectors on drives or interrupted transfers—a must-do in professional environments!
Restoring Virtual Disks Manually
To restore a backed-up virtual disk:
1. Power off the target VM.
2. Copy the saved image back into place—overwriting any damaged version if needed.
3. If restoring onto a new VM instance instead of overwriting an old one:
Use your hypervisor’s settings menu (Add Hard Disk, then select Use an existing virtual disk) to attach it.
Double-check BIOS/UEFI settings if restoring onto different hardware profiles.
4. Boot up carefully; watch logs for errors indicating mismatched drivers or missing configuration details.
If problems arise due to differences between source/destination hardware profiles (like sector size mismatches), adjust settings accordingly before retrying bootup.
Method 2: Using Native Hypervisor Tools for Virtual Disk Backup and Restore
Most modern hypervisors provide built-in utilities designed specifically for safe backup-and-restore workflows—with features like snapshot management, selective disk protection/restoration options, automation hooks via CLI/API calls, error reporting/logging capabilities—and more robust support than pure manual copying alone offers!
Backing Up Using Graphical Interfaces
For beginners who prefer point-and-click interfaces:
In VMware vSphere Client: right-click desired VM > choose Clone > select full clone option OR use snapshot manager features under Actions menu.
In Hyper-V Manager: right-click target VM > select Export > specify export location; this creates copies of all attached disks plus config metadata together in one folder structure ready-to-import elsewhere later on demand!
These graphical tools simplify routine jobs but may lack fine-grained control over which individual disks get included/excluded unless paired with scripting approaches below…
Selective Disk Protection via Command Line Tools
Intermediate users often want more flexibility—for example backing up only OS disks while skipping bulky data volumes:
PowerShell Example
To exclude all non-system drives during scheduled backups:
Enable-AzRecoveryServicesBackupProtection -Policy $pol -Name "MyVM" -ResourceGroupName "MyResourceGroup" -ExcludeAllDataDisks -VaultId $targetVault.ID
Restore only OS drive from chosen recovery point:
Restore-AzRecoveryServicesBackupItem -RecoveryPoint $rp[0] -StorageAccountName "MyStorageAccount" -StorageAccountResourceGroupName "MyTargetResourceGroup" -TargetResourceGroupName "MyTargetResourceGroup" -VaultId $targetVault.ID -RestoreOnlyOSDisk
VMware & Hyper-V Built-In Features
In vSphere Client use Export OVF Template feature under Actions menu; import later via Deploy OVF Template wizard when needed.
In Hyper-V Manager use Import Virtual Machine wizard after exporting previously as described above—this brings back all attached drives/configurations at once!
Remember some cloud providers charge fees based on number/frequency of restores performed—review billing documentation beforehand if cost control matters!
Automating Backups With Scripts
Advanced administrators often automate recurring jobs using scripts plus schedulers:
Windows Task Scheduler + PowerShell Example
Create basic task triggering nightly execution of custom script containing above PowerShell commands targeting selected VMs/disks automatically without manual intervention each time!
Automation reduces human error risk while ensuring consistent coverage across fleets—even as infrastructure scales upward over time.
How to Backup and Restore Virtual Disks with Vinchin Backup & Recovery?
For organizations seeking an efficient enterprise-level solution compatible with most mainstream virtualization platforms—including VMware, Proxmox VE, Hyper-V, oVirt/RHV/OLVM/XCP-ng/XenServer/OpenStack/ZStack and more—Vinchin Backup & Recovery delivers comprehensive support across over fifteen environments. As a professional platform-independent tool designed specifically for virtual machine backup scenarios, Vinchin Backup & Recovery enables seamless integration into diverse IT infrastructures regardless of scale.
Among its many advanced capabilities are instant recovery, forever-incremental backup strategies, granular restore options, LAN-free backup modes on supported platforms such as VMware and Proxmox VE, as well as robust data deduplication/compression technologies. Together these features ensure rapid RTO/RPO targets while optimizing storage efficiency and minimizing network impact—all managed through unified policies tailored per workload type.
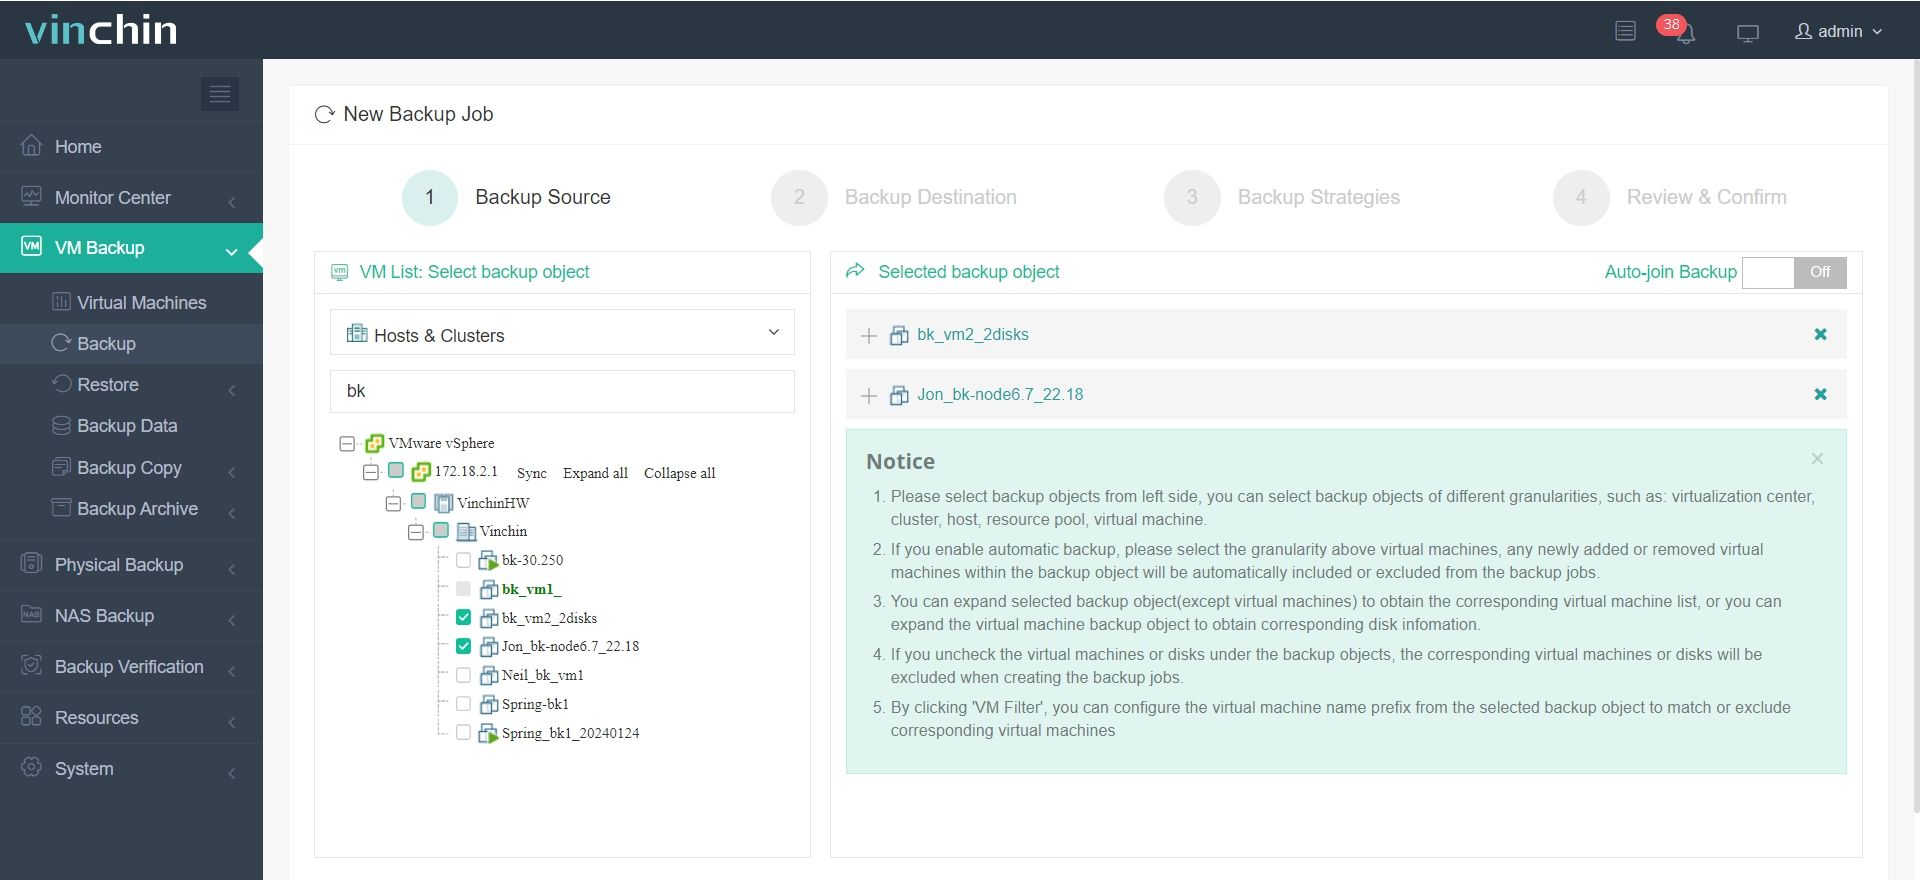
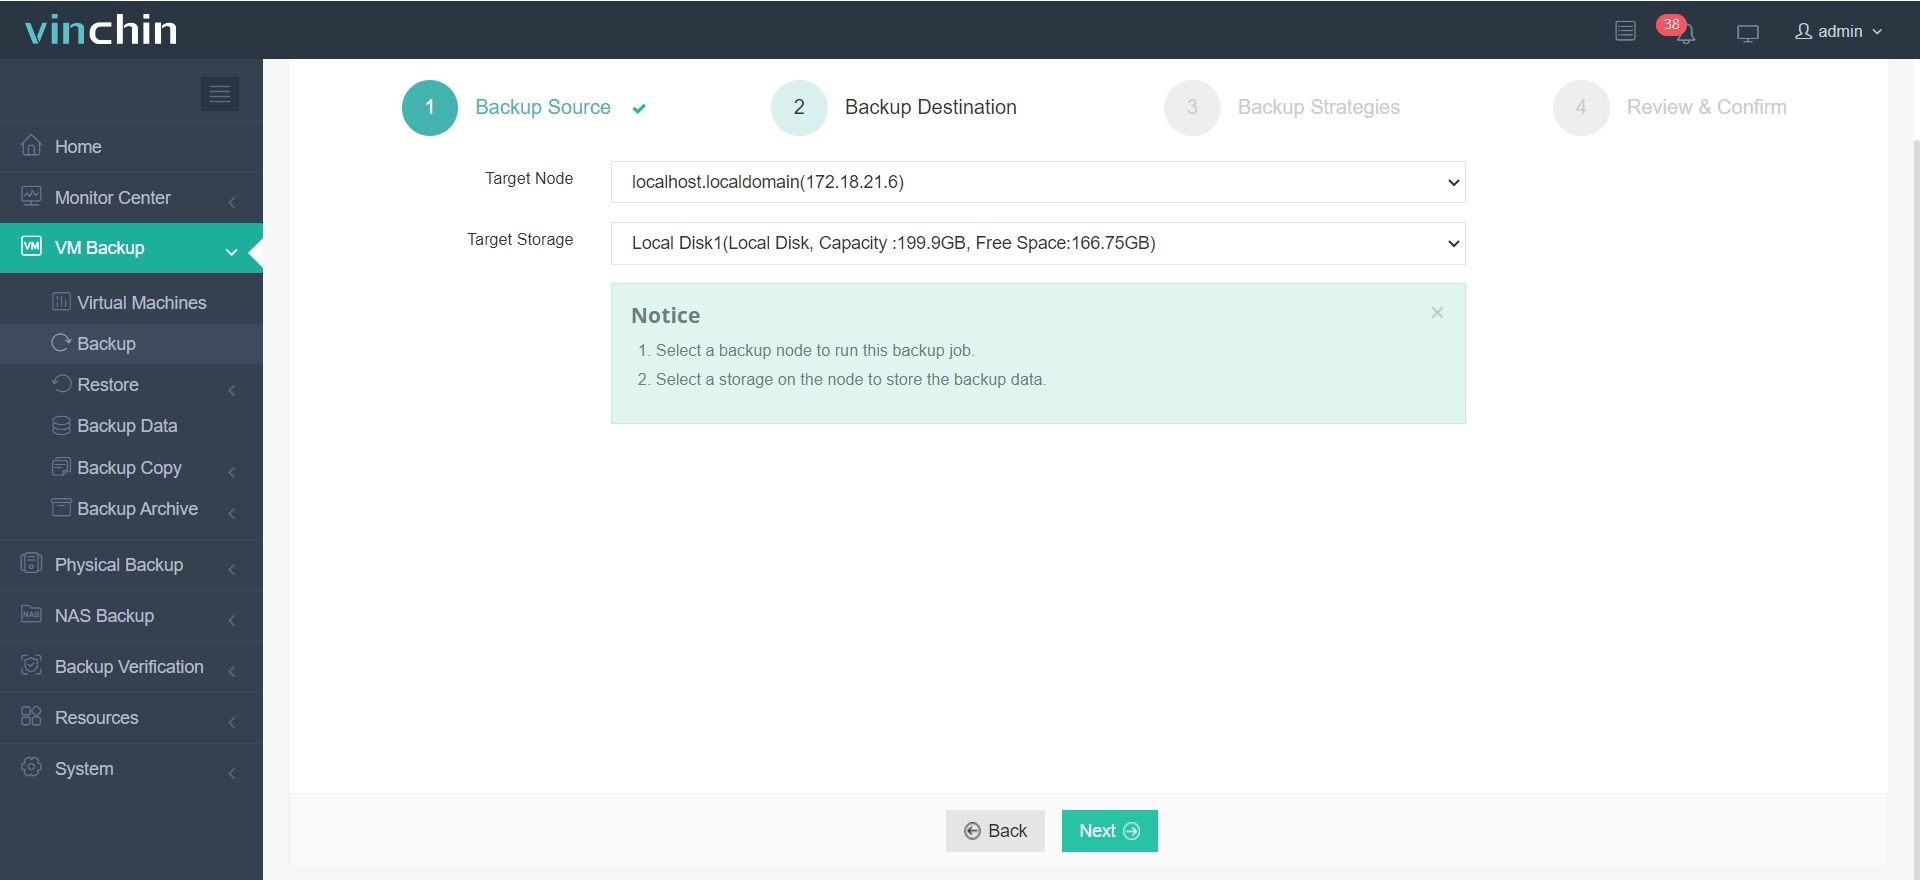
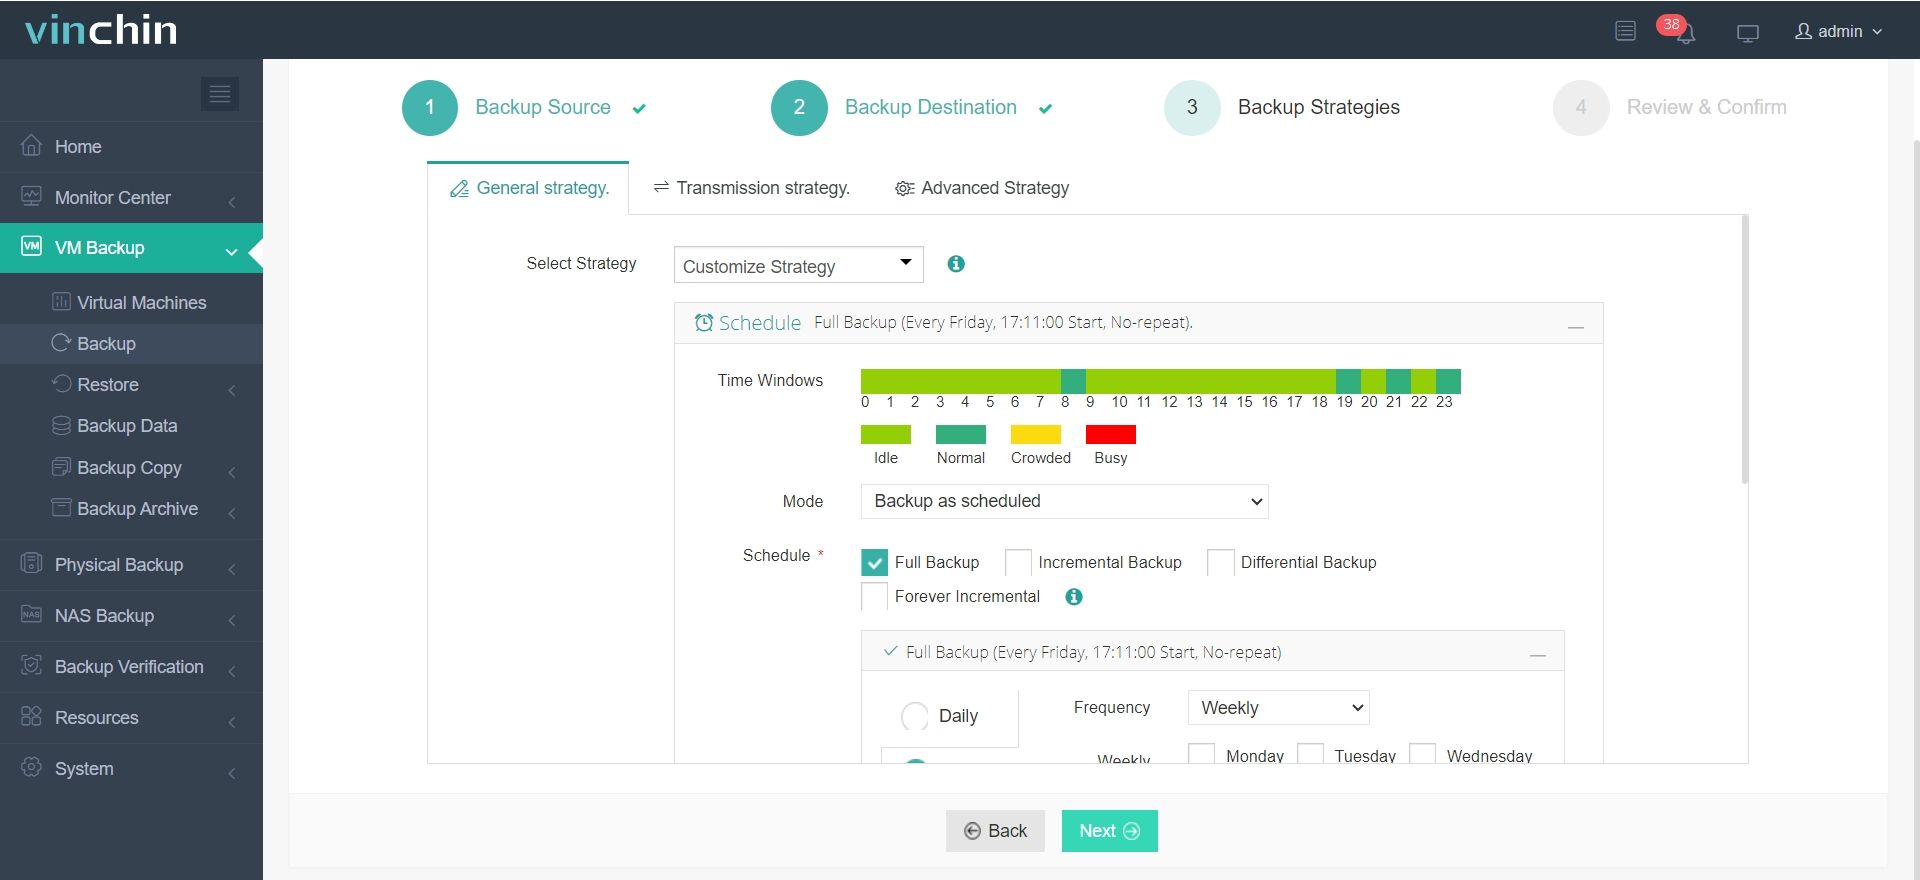
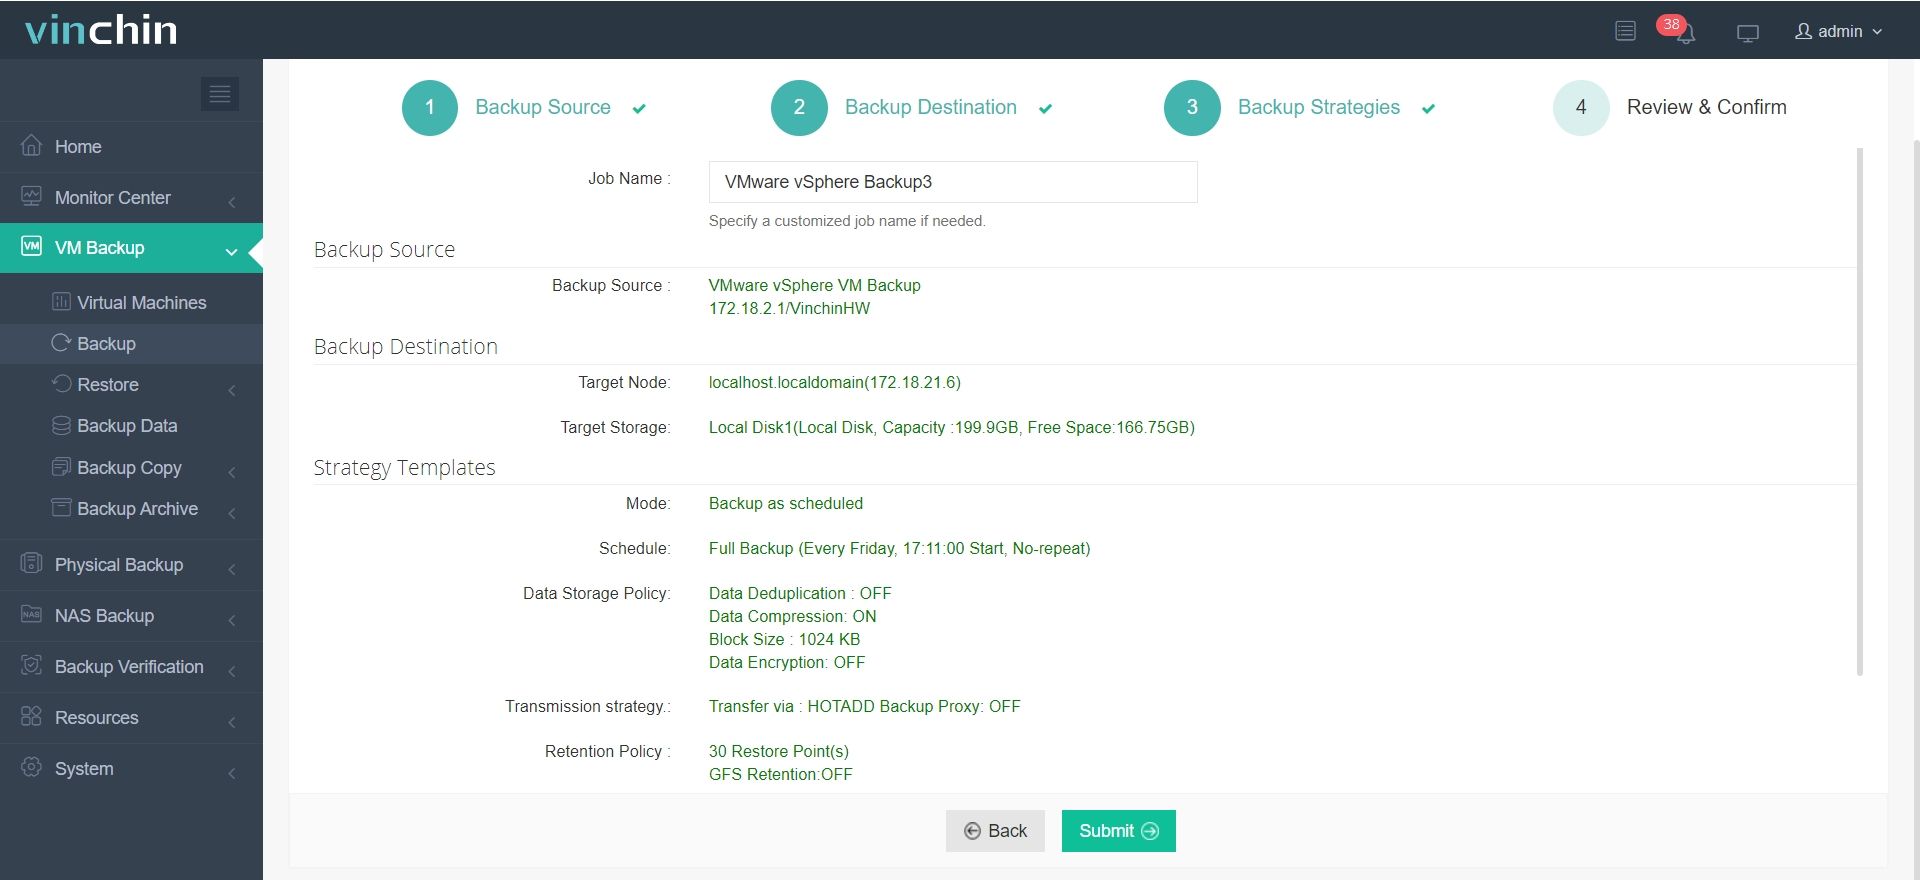
The intuitive Vinchin web console makes protecting workloads straightforward in just four steps:
Step 1. Select the VMware VM to back up

Step 2. Choose the backup storage

Step 3. Configure the backup strategy

Step 4. Submit the job

With global recognition among enterprise customers and top industry ratings worldwide, Vinchin Backup & Recovery stands out as trusted data-protection software—try its full-featured free trial for sixty days by clicking below!
Backup and Restore Virtual Disk FAQs
Q1: Can I schedule automatic backups of specific virtual disks without third-party software?
A1: Yes—use built-in scheduler tools like cron on Linux with CLI commands or Task Scheduler on Windows paired with PowerShell scripts targeting selected disks/LUNs directly.
Q2: What steps should I take if my restored virtual disk fails due to size mismatch?
A2: Confirm destination storage has enough free space/matching sector size then retry reattachment via hypervisor UI (Add Hard Disk) after correcting discrepancies found earlier.
Q3: How do I handle encrypted virtual disks during manual backups?
A3: Decrypt first using platform-native utilities before copying raw image OR rely on supported encryption-aware workflows offered by compatible enterprise solutions/hypervisors themselves.
Conclusion
Protecting business-critical workloads means mastering both basic/manual techniques AND leveraging native automation wherever possible—all while testing regularly! For unified management across diverse platforms consider trying Vinchin’s robust yet user-friendly solution today—it makes safeguarding every type of virtual infrastructure easier than ever before!
Share on:


