-
What Does Backing Up Terabytes Involve?
-
Method 1: Using Network Attached Storage
-
Method 2: Using AWS S3/Glacier for Cloud Backups
-
Method 3: Tape Drives and Offline Storage
-
Why Choose the Best Way to Backup Terabytes of Data?
-
How Vinchin Simplifies Terabyte-scale Backup & Recovery
-
Best Way to Backup Terabytes of Data FAQs
-
Conclusion
Backing up terabytes of data is a serious job. Whether you manage business archives, creative assets, or research datasets, losing even part of your data can risk revenue or compliance—and erase years of work in seconds. So what’s the best way to back up huge amounts of data? Let’s break down your options step by step.
What Does Backing Up Terabytes Involve?
When you deal with terabytes—thousands of gigabytes—backup becomes much more than just copying files from one place to another. You must consider speed, reliability, cost, security, and how quickly you can recover after a failure. Key factors include how often your data changes (the “change rate”), how fast you need it restored (Recovery Time Objective or RTO), and how much loss is acceptable (Recovery Point Objective or RPO). At this scale, simple USB drives won’t do the job. Instead, solutions like Network Attached Storage (NAS), cloud services such as Amazon S3/Glacier, and tape libraries become essential tools.
Assessing Data Criticality and Workload Types
Not all data is equal when it comes to backup planning. Start by classifying your information into categories: critical business records that change daily; important project files updated weekly; archival material rarely touched but vital for compliance or history.
For example:
Databases often require application-consistent snapshots because they change rapidly.
Media files may be large but static once finalized.
User documents might need frequent versioning due to ongoing edits.
By understanding which workloads are most sensitive—and which can tolerate longer restore times—you can tailor backup frequency and storage choices accordingly. This approach helps control costs while ensuring fast recovery where it matters most.
Method 1: Using Network Attached Storage
Network Attached Storage (NAS) offers a flexible way to back up large volumes locally or across sites. A NAS is a dedicated device connected to your network that stores files for multiple users or systems.
For beginners: Setting up a NAS means connecting it via Ethernet to your network switch or router. Use its web interface to create shared folders as backup targets for servers or workstations. Most modern NAS units support RAID arrays—if one disk fails in RAID 5 or RAID 6 mode, your data stays safe on others until you replace the bad drive.
Intermediate users can automate backups using tools like rsync—a command-line utility that synchronizes directories efficiently over networks:
rsync -avh --delete /source-dir/ user@nas2:/dest-dir/
Here -a means archive mode (preserves permissions/timestamps), -v is verbose output so you see progress messages, -h prints sizes in human-readable format like GB instead of bytes; --delete removes files from destination if deleted at source.
You might also use rdiff-backup for incremental backups with version history:
rdiff-backup /source-dir user@nas2::/dest-dir
This keeps only changed blocks each time—a big bandwidth saver when handling terabyte-scale jobs.
Advanced administrators set up offsite replication between two NAS devices at different locations for disaster recovery protection against fire/flood/theft at one site. Many enterprise NAS systems offer snapshot features so only changed blocks transfer during scheduled jobs—saving both time and bandwidth.
Method 2: Using AWS S3/Glacier for Cloud Backups
Cloud storage has changed the game for backing up massive datasets safely offsite. Amazon S3 provides reliable object storage with high durability, while Glacier offers lower-cost “cold” storage ideal for archives accessed rarely but kept long-term.
For beginners: Uploading terabytes directly over internet links can take weeks—even on fast connections! AWS solves this initial seeding problem with AWS Snowball, a rugged appliance shipped straight to you; load data onto it locally then send it back so AWS imports everything directly into S3 or Glacier buckets within days—not months over WAN links.
To start:
1. Order an AWS Snowball device using the AWS Management Console
2. Connect Snowball via Ethernet at your site
3. Use their client software (snowballEdge) to transfer files quickly
4. Ship device back; AWS imports contents into chosen bucket
Once seeded in S3/Glacier:
Set lifecycle policies so older backups move automatically from S3 (“hot”) tier down into Glacier (“cold”) tier as they age out; enable versioning so deleted/overwritten files remain recoverable; schedule regular incremental uploads using tools like AWS CLI (aws s3 sync) which copies only new/changed files each run—saving both time and money compared with full uploads every night.
Advanced users automate retention rules based on compliance needs—for example keeping daily versions seven days then monthly versions forever—or integrate cloud backup into hybrid strategies combining local snapshots plus cloud archiving for true disaster resilience across regions/countries worldwide!
Method 3: Tape Drives and Offline Storage
Tape isn’t dead—in fact it remains popular among organizations needing affordable long-term retention at scale (“cold storage”). Modern LTO tapes hold 12TB+ uncompressed per cartridge (and even more compressed depending on file type); tape libraries automate loading/unloading tapes as needed without manual intervention every night/weekend shift!
For beginners new to tape:
Install a compatible tape drive/library system attached via SAS/SCSI/Fibre Channel interface;
Use enterprise-grade backup software supporting tape operations;
Run full backups periodically then store tapes securely offsite in climate-controlled conditions away from hazards like heat/moisture/magnets;
Intermediate steps include scheduling incremental/differential jobs during weekdays—with full dumps reserved for weekends when windows are longer;
Consider using LTFS (Linear Tape File System) format—it lets tapes appear as drag-and-drop drives making restores easier even outside original environment;
Advanced tips:
Break multi-terabyte jobs into smaller sets so single errors don’t force restarting entire transfers;
Duplicate tapes—keep one set onsite ready-to-go plus another set offsite as insurance against site-wide disasters;
Regularly test restores from random tapes—never assume unread media is good until proven by real-world recovery drills!
Why Choose the Best Way to Backup Terabytes of Data?
Choosing wisely saves money—and headaches—in both daily operations and emergencies alike! Local solutions like NAS provide fast access but risk total loss if disaster hits your site unexpectedly; cloud options give geographic safety but may be slow/costly retrieving everything at once after major outages; tape offers cheap bulk storage but slower recovery times unless workflows are tuned carefully ahead-of-time!
A balanced approach follows industry-standard “3-2-1 rule”: three copies of data on two types of media with one copy always kept offsite. For most organizations managing tens/hundreds/thousands TBs:
1. Keep primary live data on production servers
2. Mirror regularly onto local NAS/tape library
3. Replicate critical sets offsite—to public cloud/object store/disaster-recovery center—for true resilience against regional events
Your best method depends on budget constraints/change rate/restore urgency/compliance requirements—and peace-of-mind knowing you’re covered no matter what happens next!
How Vinchin Simplifies Terabyte-scale Backup & Recovery
Building upon these strategies, Vinchin Backup & Recovery delivers an all-in-one solution designed specifically for complex IT environments managing vast amounts of data across diverse platforms—including over 19 virtualization environments such as VMware, Hyper-V, Proxmox, alongside physical servers, databases, and both on-premises/cloud file storage systems—addressing nearly any architectural requirement in modern enterprises.
If migration flexibility matters most, Vinchin stands out by offering seamless workload migrations between any supported virtual machines, physical hosts, or clouds—all through intuitive workflows that minimize downtime and complexity during infrastructure upgrades or transitions.
For mission-critical workloads running virtually or physically, Vinchin ensures robust protection through real-time backup and replication, providing additional recovery points plus automated failover capabilities that dramatically reduce both RPO (Recovery Point Objective) and RTO (Recovery Time Objective).
To guarantee reliable recoveries every time, Vinchin supports automatic integrity checks after each backup job—including isolated environment validation—to ensure not just file presence but actual recoverability whenever needed most.
Vinchin also empowers organizations to build highly resilient DR architectures by enabling retention policies, easy archiving/backups-to-cloud integration, remote replicas creation, and DR center deployment—all ensuring rapid restoration following any disruption.
With its simple browser-based console featuring wizard-driven workflows—even new admins can effortlessly create comprehensive backup/recovery tasks within minutes:
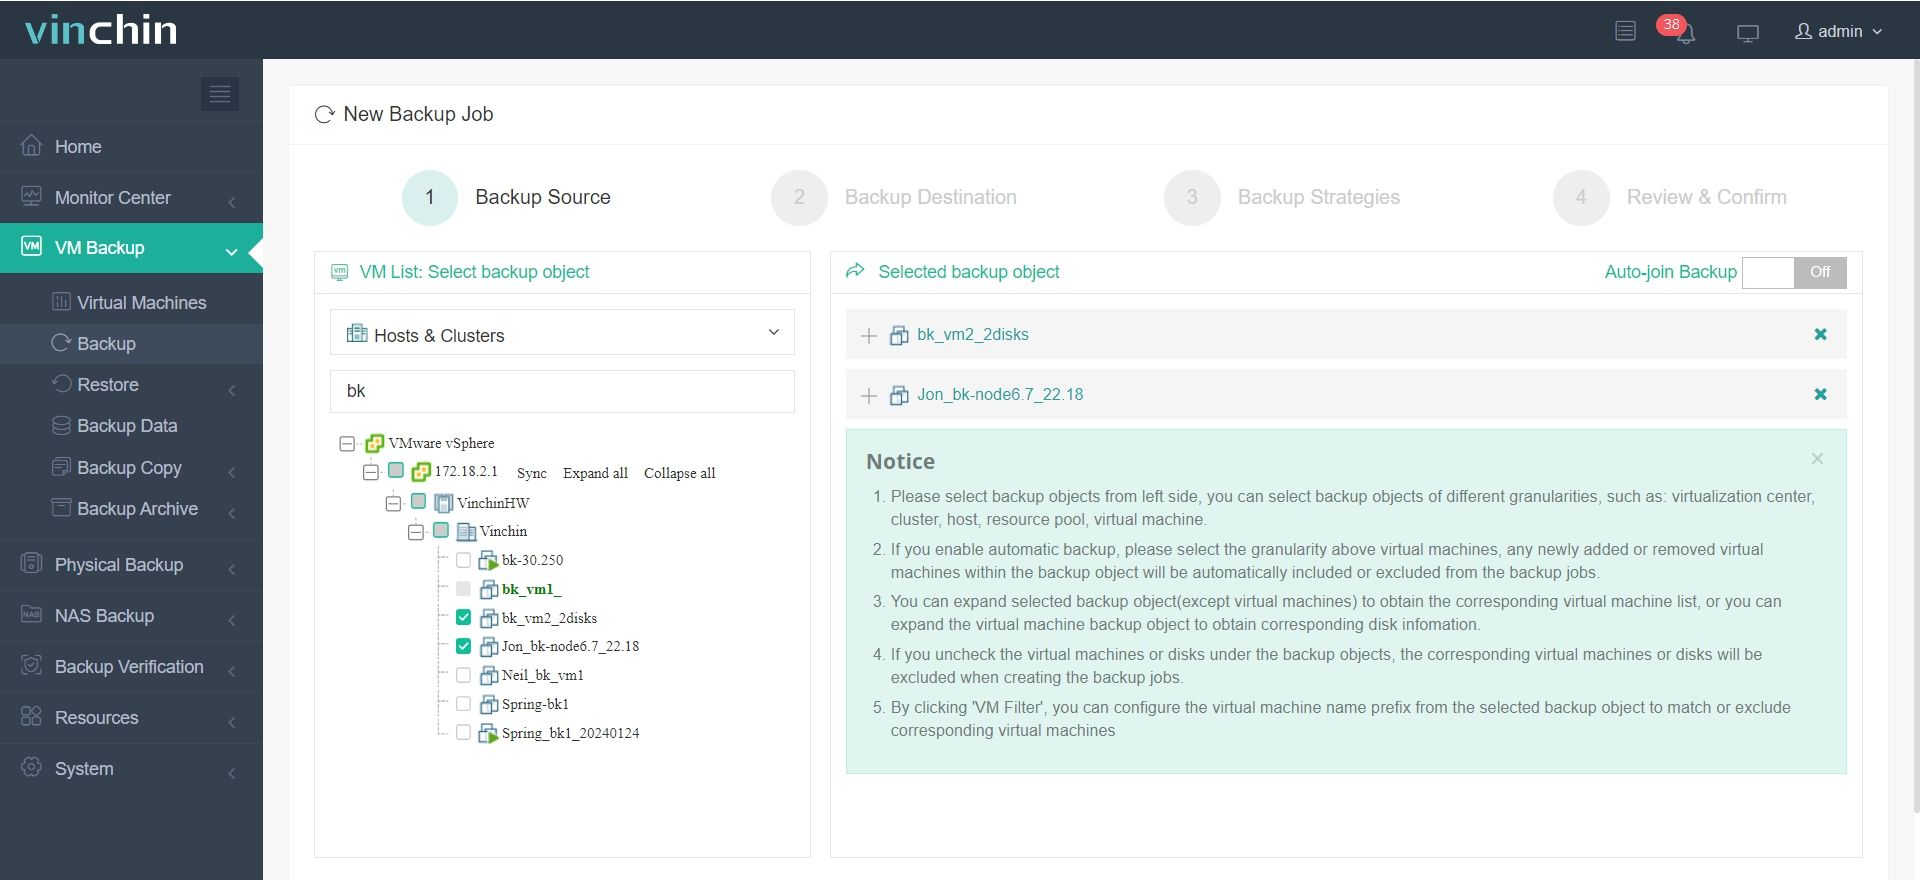
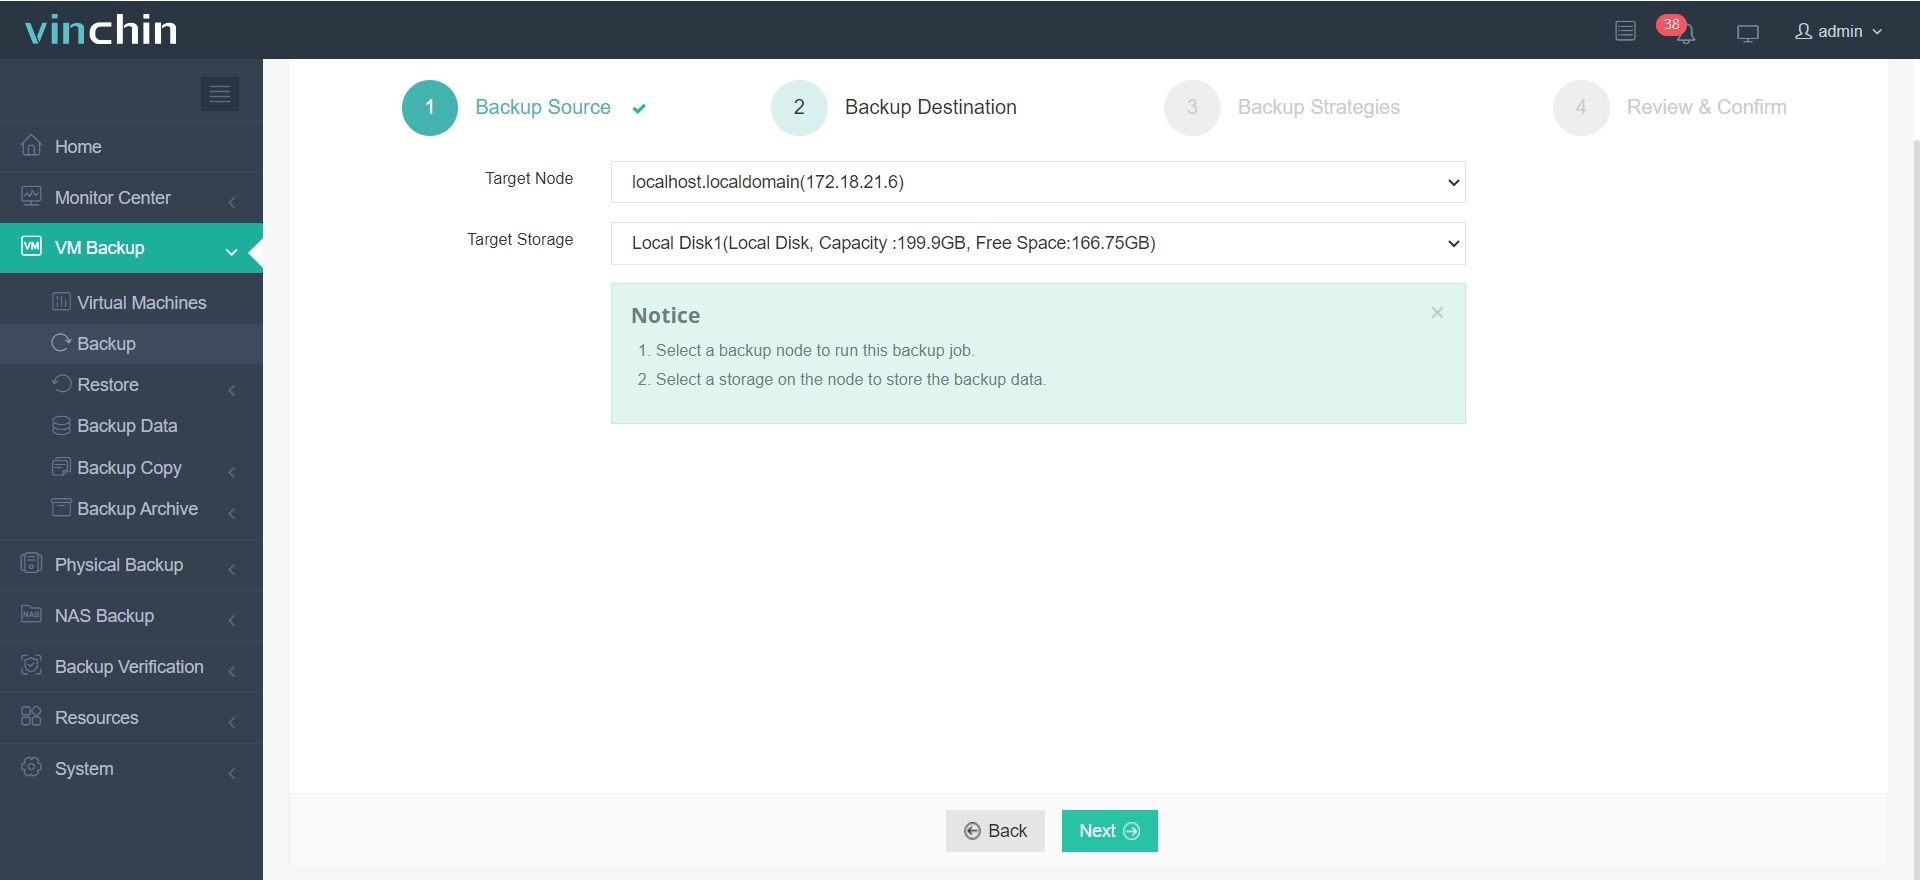
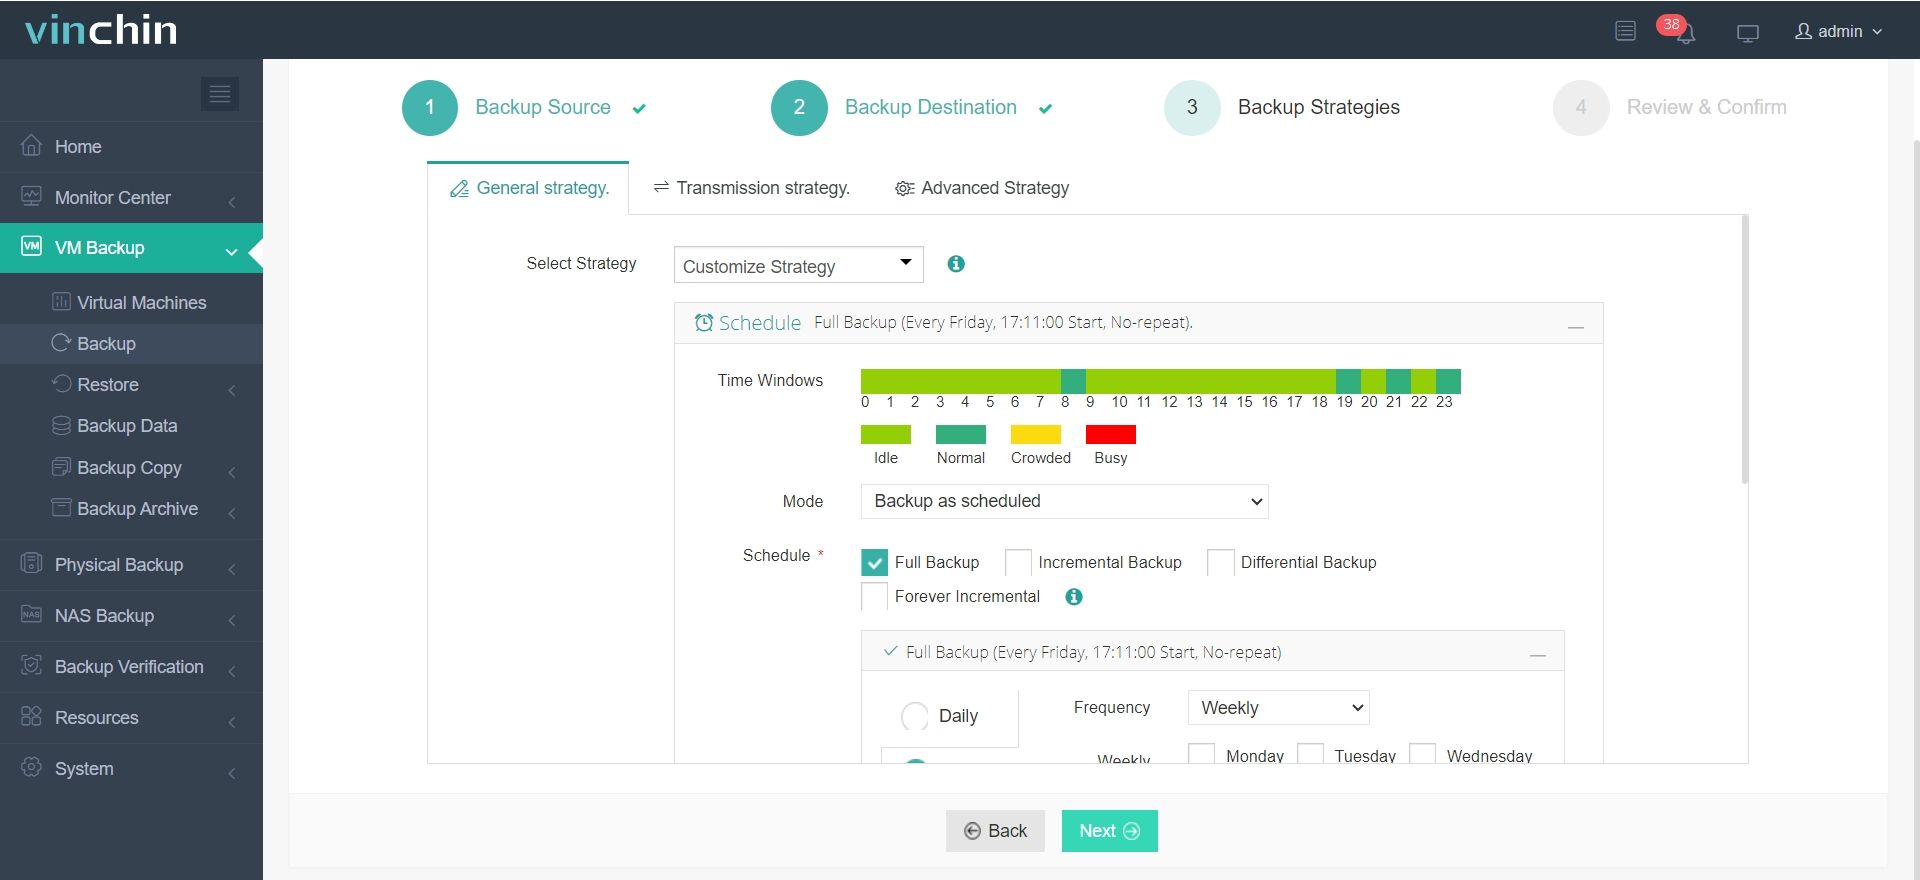
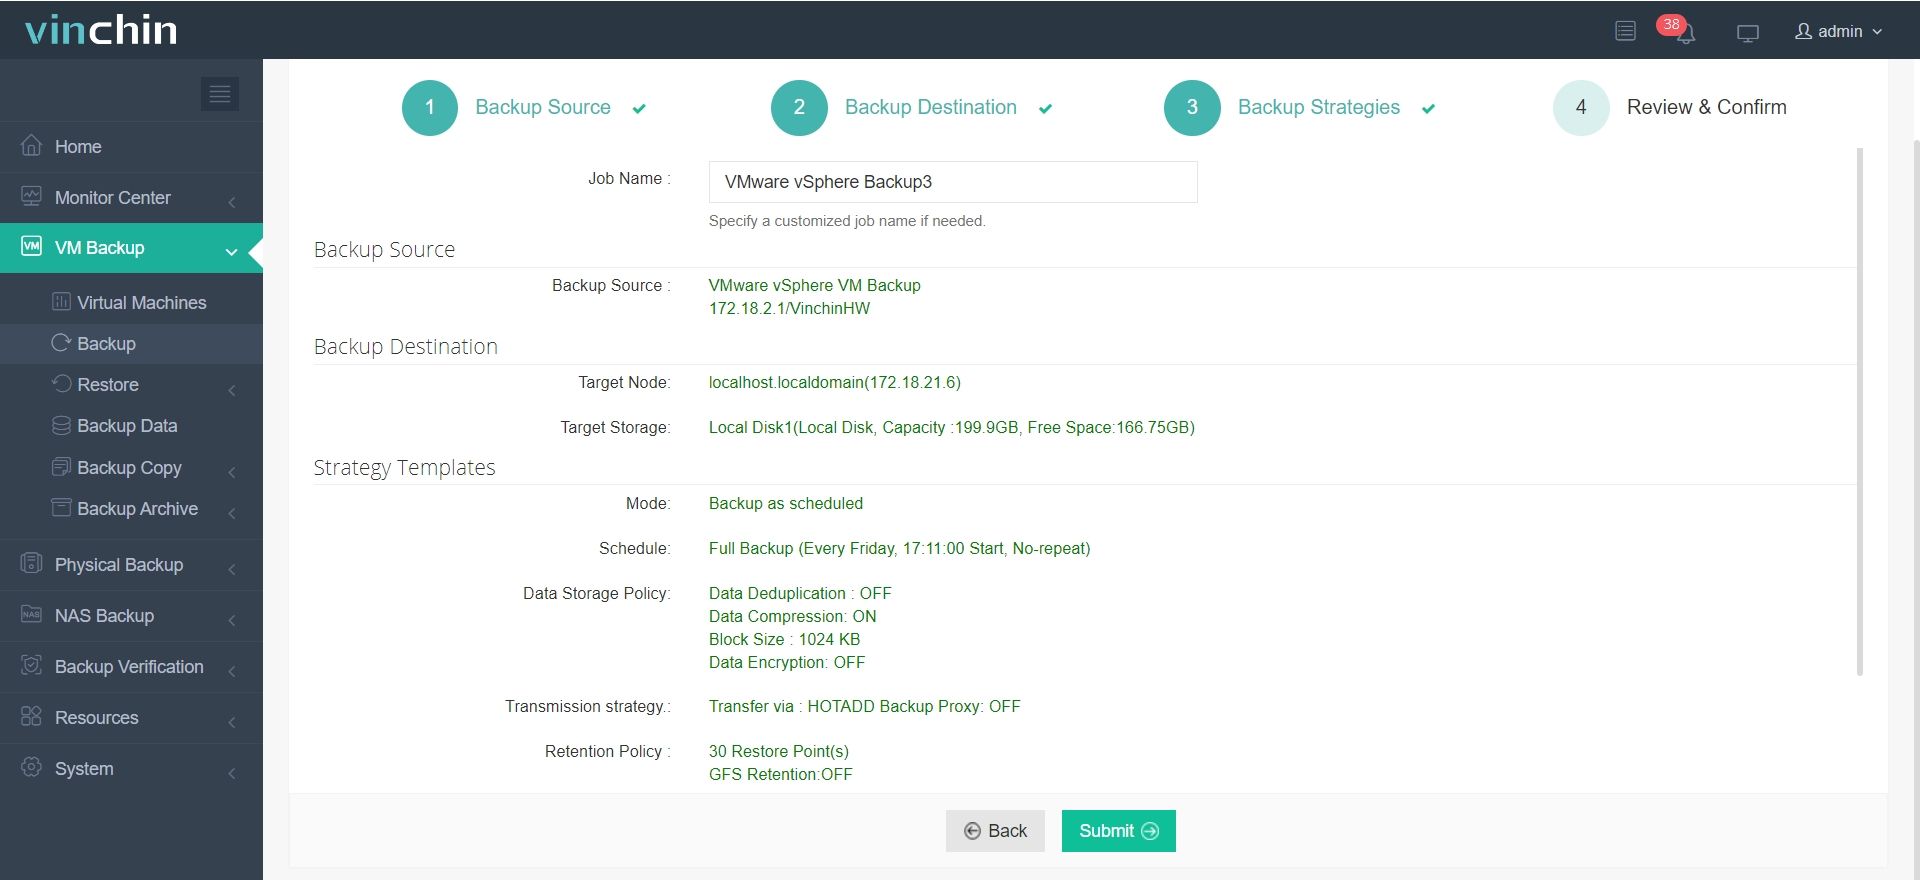
Let’s take VMware VM backup as an example:
Step 1. Select Backup Source

Step 2. Select Backup Destination

Step 3. Select Backup Strategies

Step 4. Review and submit the job

Vinchin Backup & Recovery comes with a generous 60-day free trial, detailed documentation resources, and responsive support engineers who help streamline deployment regardless of scale—so protecting terabytes has never been easier nor more reliable.
Best Way to Backup Terabytes of Data FAQs
Q1: How do I seed my first multi-terabyte cloud backup without waiting months?
A1: Order an AWS Snowball, connect via Ethernet locally using their client tool COPY DATA > SHIP DEVICE BACK > AWS imports directly into S3/Glacier buckets within days—not weeks/months online transfers would require.
Q2: Can I use rsync between two NAS devices at different sites?
A2: Yes—set SSH keys between devices > run rsync -avh --progress --delete /src user@remote:/dst > schedule regular syncs > check logs after each run > secure SSH keys properly especially across WAN links.
Q3: How often should I test restoring from tape?
A3: At least quarterly—pick random tapes > LOAD INTO DRIVE > RESTORE SAMPLE FILES > VERIFY INTEGRITY before returning them offsite again.
Conclusion
Backing up terabytes demands careful planning—a mix of speed, security, cost control, and future-proofing against disasters big or small matters most today! Combine local performance with true offsite protection using proven methods like NAS replication/cloud seeding/imports/tape libraries—or simplify everything with Vinchin Backup & Recovery offering enterprise-grade protection no matter how much data needs securing!
Share on:


