-
Why you import qcow2 image to Proxmox?
-
How to import qcow2 to Proxmox?
-
How to protect and backup your Proxmox VM with Vinchin?
-
Import qcow2 Proxmox FAQs
-
Conclusion
QCOW2 (QEMU Copy-On-Write 2) is a widely-adopted virtual machine image format known for its excellent compression performance and fast cloning. This image format efficiently stores the disk image of a virtual machine and performs incremental writes when needed. It effectively reduces storage space consumption and data replication time, providing significant advantages for improving VM performance and reducing resource consumption.
In Proxmox VE, users can easily import qcow2 Proxmox in a few simple steps, which not only makes VM management more convenient, but also fully utilizes the rich features and performance advantages of the Proxmox platform.
Why you import qcow2 image to Proxmox?
The advantage of importing qcow2 Proxmox is the smooth migration of virtual machines to the Proxmox virtualization platform, enabling easy management and operation on the platform. Below are some of the significance and benefits of importing qcow2 to Proxmox:
Cross-Platform Migration: QCOW2 is a common virtual machine image format that is supported by many virtualization platforms. By Proxmox qcow2 import, you can achieve cross-platform flexibility and easily migrate VM images from one platform to another.
Performance Optimization: Proxmox provides optimizations for KVM virtualization that provide better performance. By importing qcow2 to Proxmox, you can take advantage of Proxmox's performance optimization and tuning features to ensure that your VMs get the best performance on the platform.
Resource Efficiency: Importing qcow2 into Proxmox enables efficient resource utilization. The qcow2 format's copy-on-write mechanism reduces storage space usage and minimizes data duplication, optimizing resource allocation within Proxmox.
Flexible Deployment: Proxmox qcow2 import provides flexibility in deploying virtual machines. You can easily create new VM instances or allocate the imported qcow2 images to existing VMs, allowing for efficient utilization of resources and streamlined management.
How to import qcow2 to Proxmox?
Importing qcow2 to Proxmox is an easy process that can be accomplished by following the simple steps below:
Step 1 - Create a VM without an operating system
First, when creating a Proxmox virtual machine, please note the following three key points:
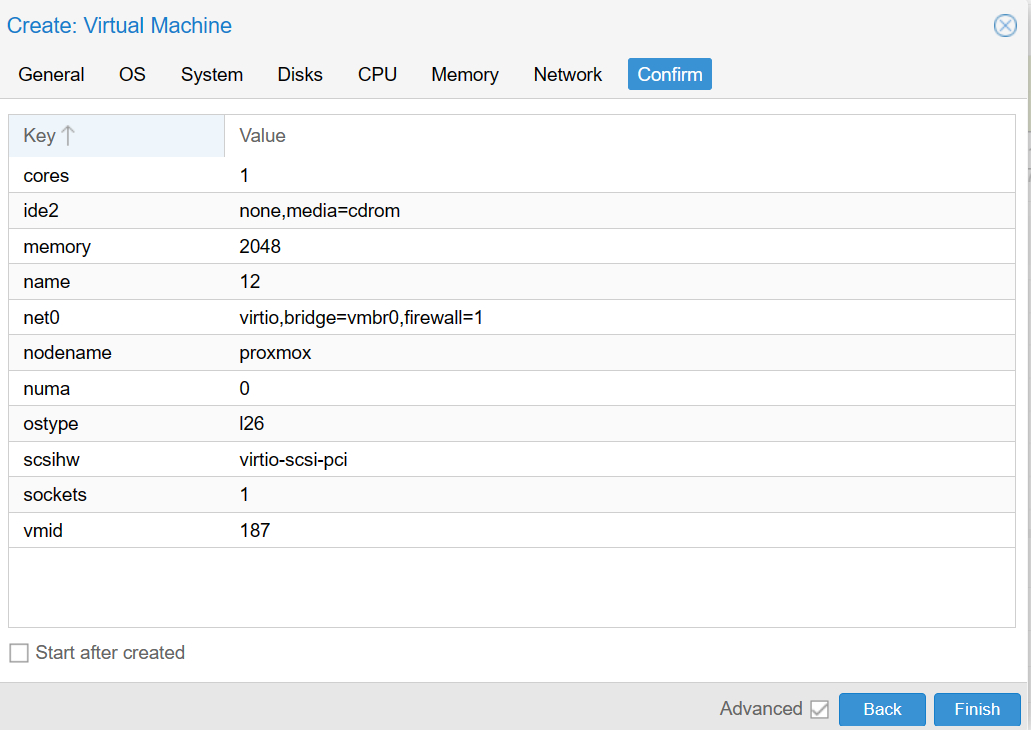
1. Virtual Machine ID (VM ID): When creating a virtual machine, assign a unique VM ID. Keep this ID in mind as it will be used later. VM ID 187 is used in the image.
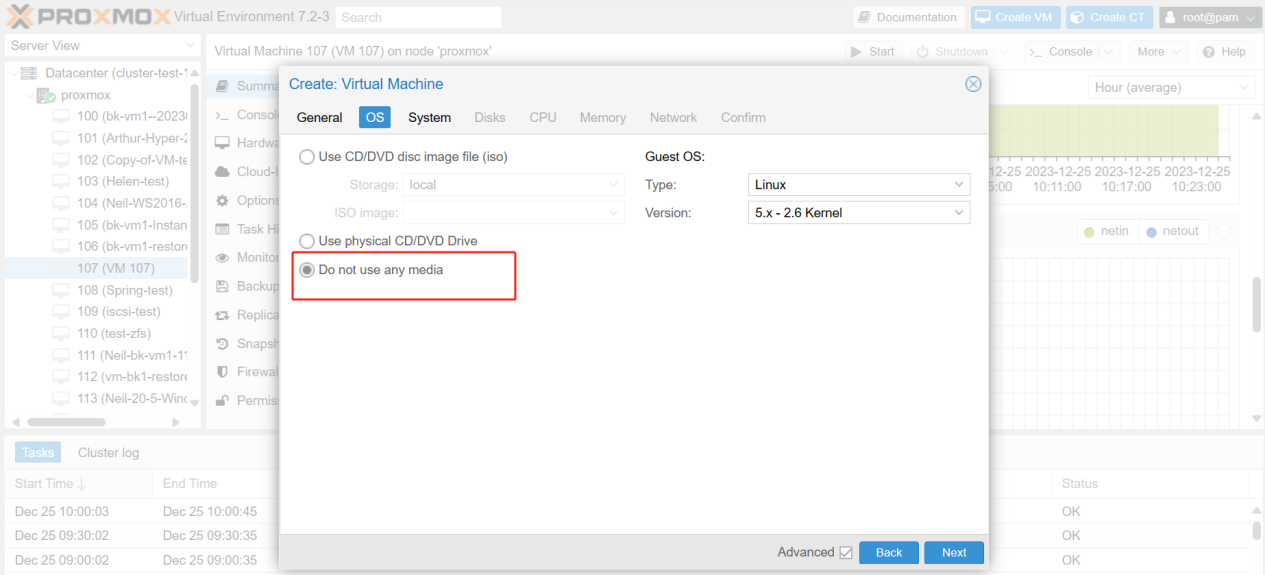
2. The operating system selects "Do Not Use Any Media": This means that the virtual machine will not boot from any media such as a CD-ROM or ISO file. This is because a qcow2 image will be imported later as the virtual hard disk.
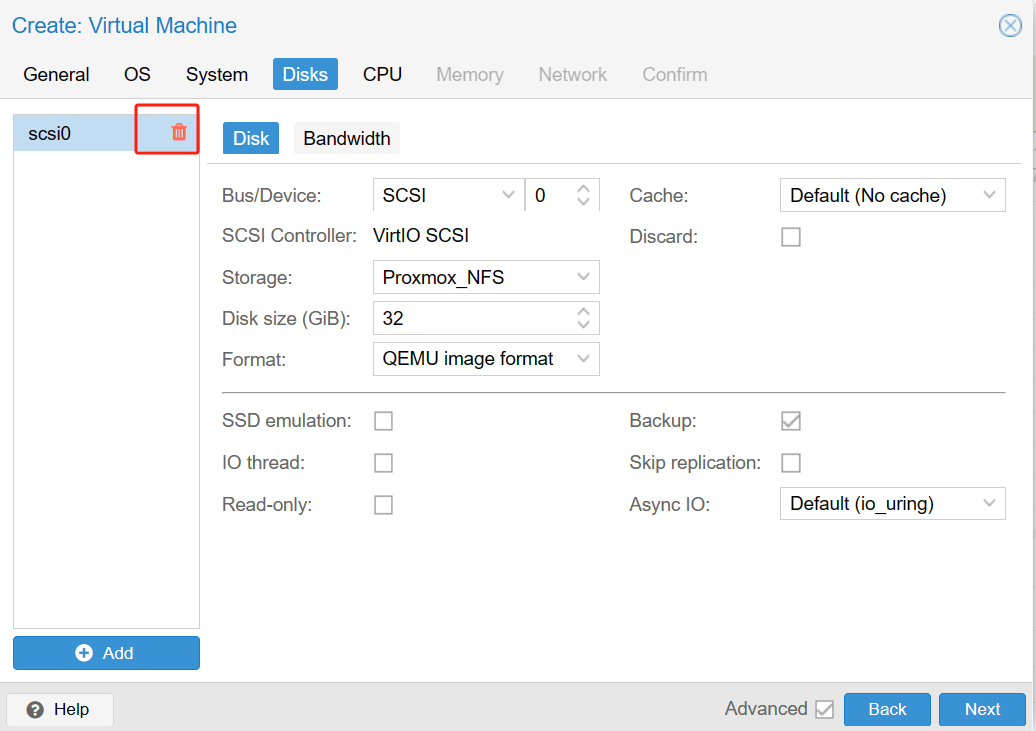
3. Disk: You need to delete the default disk (click on the trash icon in the picture)
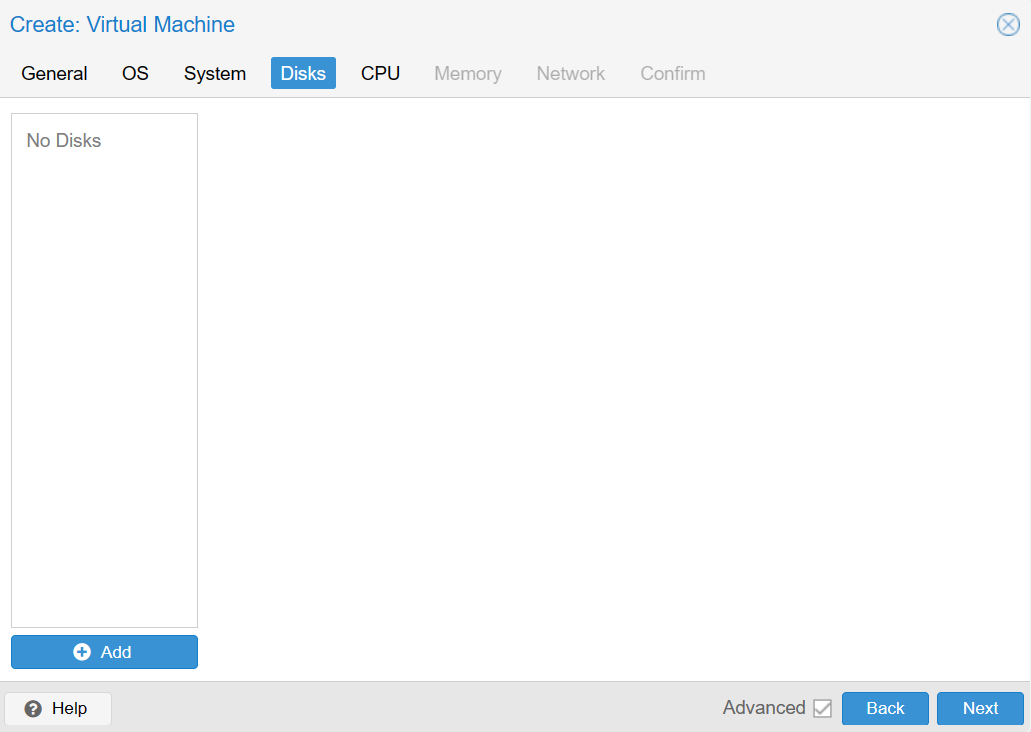
The interface after deletion is shown below
The rest is configured according to the needs of the VM operating system, the following is a general overview of the 187 VM. Then click Finish.
Step 2 - Create a directory to store qcow2 images
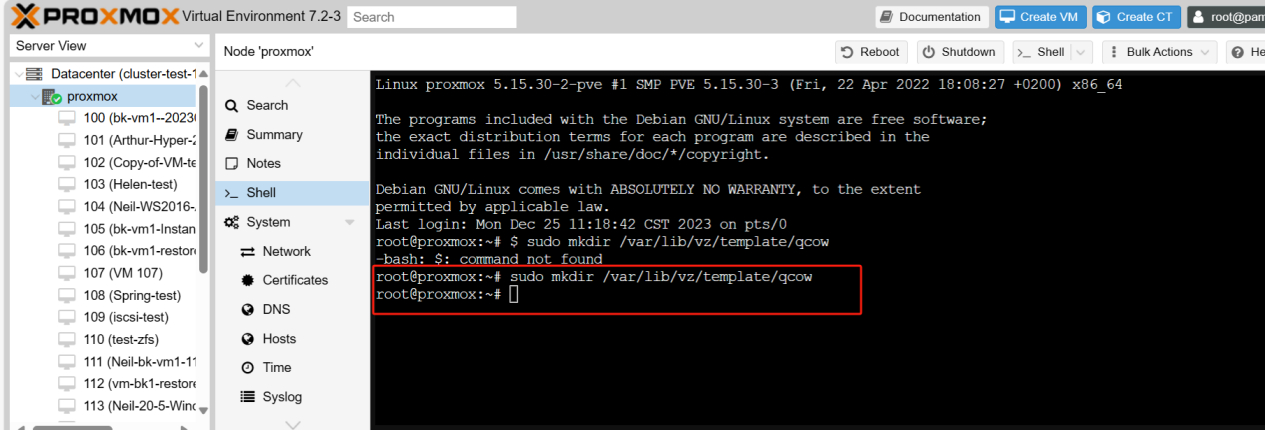
Create a directory for storing qcow2 images, the following is an example of creating a directory named "qcow" in the Proxmox default storage directory:
1. Click host > hit Shell > type the following command:
sudo mkdir <directory_path>
sudo mkdir /var/lib/vz/template/qcow
Step 3 - Copy qcow2 mirror
Copy the qcow2 image to the created "qcow" directory,type the following script:
sudo cp <source_path> <destination_path>
sudo cp /mnt/pve/Proxmox_NFS/images/33333/vm-33333-disk-0.qcow2
/var/lib/vz/template/qcow/
You can use the following command to check if the files have been successfully copied to the target directory:
ls -l <directory_path>
ls -l /var/lib/vz/template/qcow/

Step 4 - Import a qcow2 image into a VM in Proxmox
1. Switch to the qcow2 image directory
Use the cd command to switch to the qcow2 image directory based on the path to the directory you created earlier.
cd <directory_path>
cd /var/lib/vz/template/qcow/

2. Import the qcow2 image
To import the qcow2 image into the VM, we use the qm following command:
qm importdisk <VM ID> <qcow2 image> <storage name>
qm importdisk 187 /var/lib/vz/template/qcow/vm-33333-disk-0.qcow2 local-lvm

Step 5 - Attache a qcow2 virtual disk to a VM
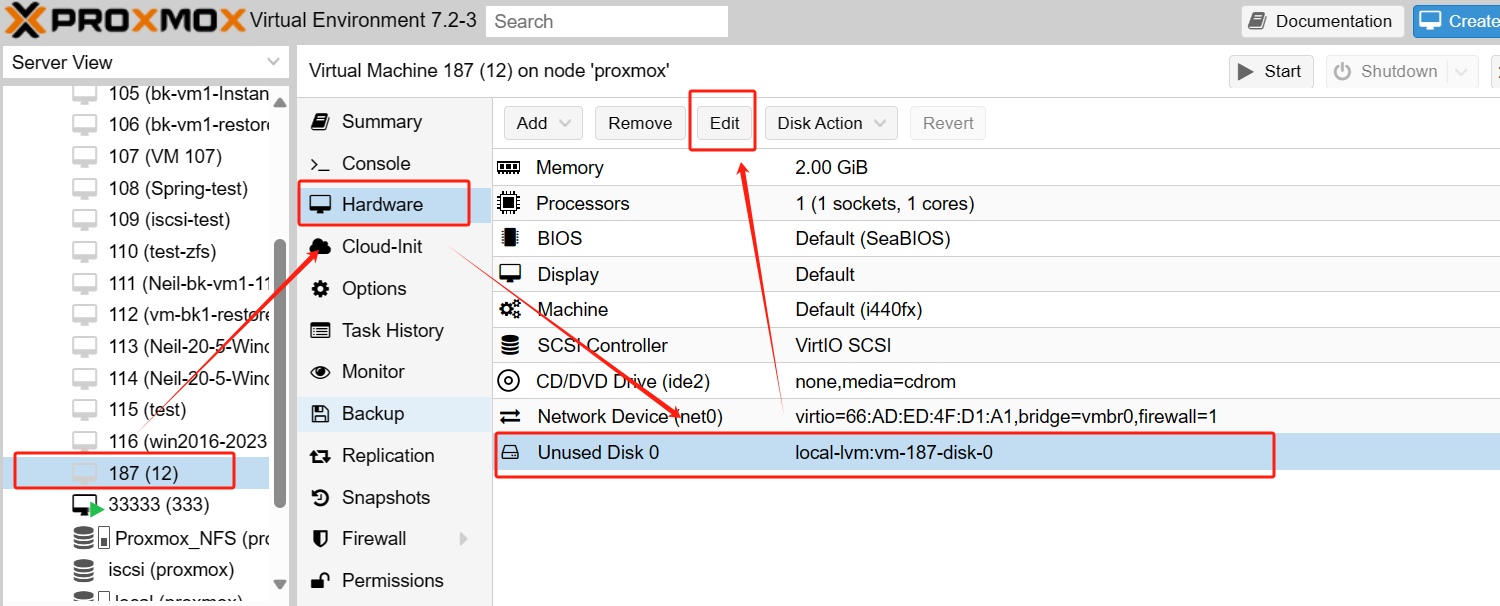
1. Click on the 187 VM created in step 1 > select the Hardware 2. On the right side, the newly imported qcow2 disk is presented as an unused disk. Select the Unused disk > click the Edit
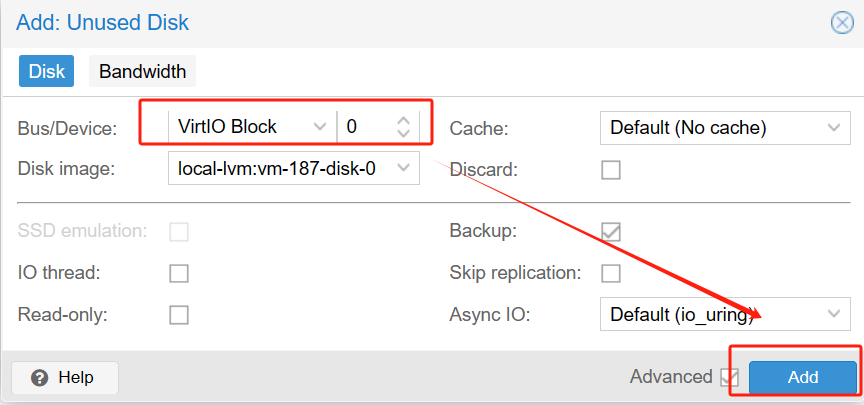
3. Select the bus type VirtIO Block > click Add
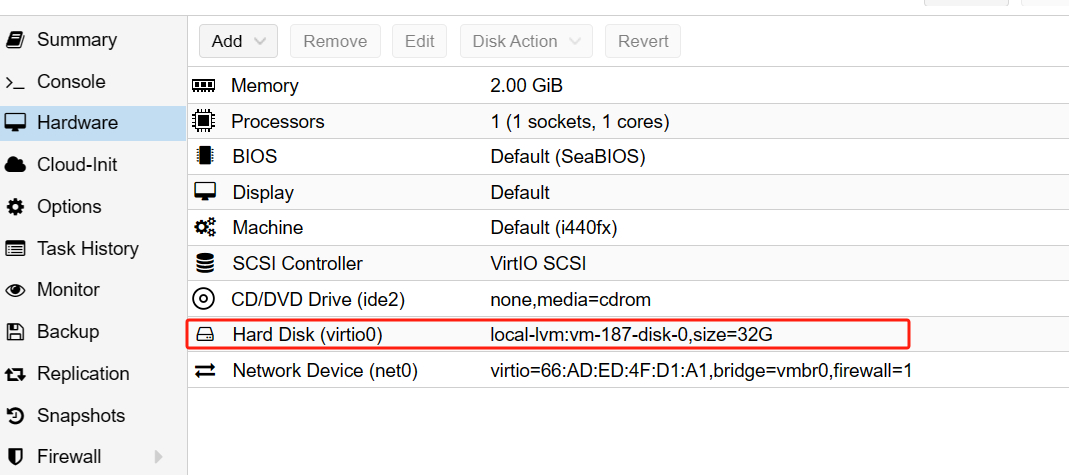
You will now see a new disk with bus type VirtIO attached to the VM.
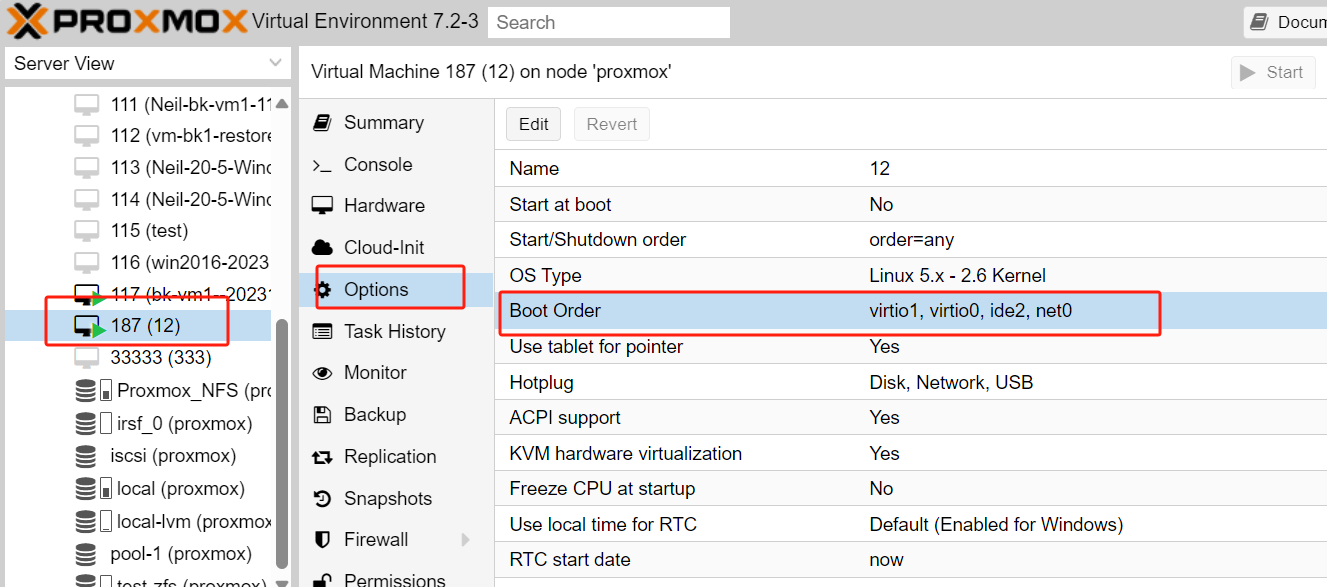
Step 6 - Change the Boot Order
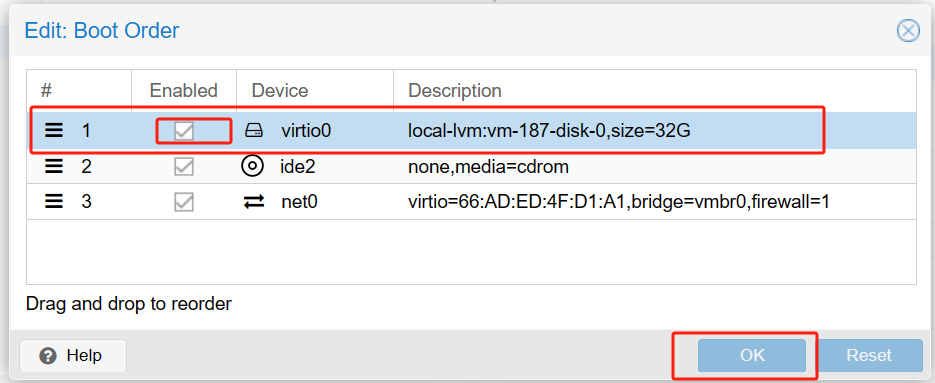
1. In order for the virtual machine to boot from the newly added disk, the boot order must be changed.
Choose VM > hit Options > double - click Boot Order
2. To boot from a new disk, the new disk must be at the top of the boot order window.
Drag the newly added VirtIO disk to the top > select the checkbox > click OK
Step 7 - Start the Virtual Machine
Just choose VM > click Console < hit Start Now
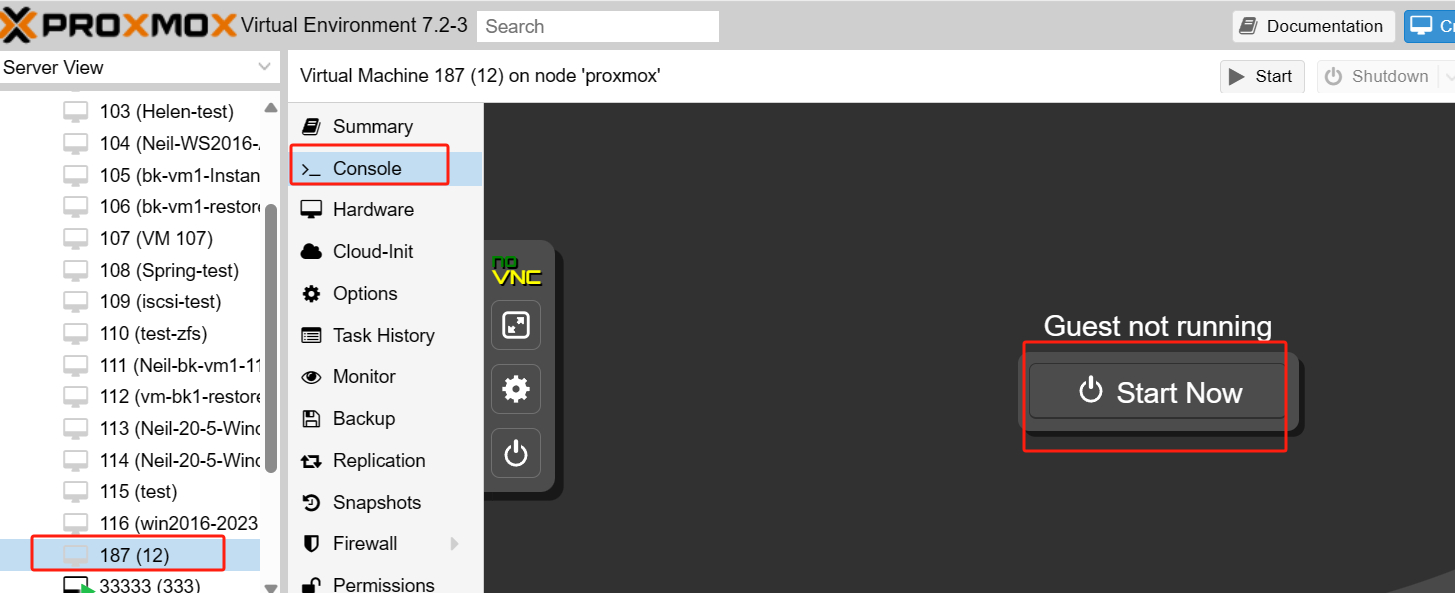
In this way, you can successfully import the qcow2 image into a virtual machine in Proxmox.
How to protect and backup your Proxmox VM with Vinchin?
After successfully importing qcow2 on Proxmox, it is critical to ensure the security and integrity of your virtual machines. To effectively protect your virtual environment, it is highly recommended to perform regular backups of your virtual machines to minimize the risk of potential data loss.
Vinchin Backup & Recovery is a versatile backup solution tailored for virtual machines on a variety of platforms, including Proxmox, VMware, Hyper-V, XenServer, XCP-ng, oVirt, RHV and more.
The solution offers a wide range of powerful features for VM backup and recovery, including agentless backup, instant recovery and V2V migration. These features are carefully designed to ensure the safe and efficient management of critical data in virtualized environments. Whether you are using Proxmox or another leading virtualization platform, Vinchin Backup & Recovery offers a comprehensive set of features to meet your backup and recovery needs.
Vinchin Backup & Recovery's operation is very simple, just a few simple steps.
1. Just select VMs on the host
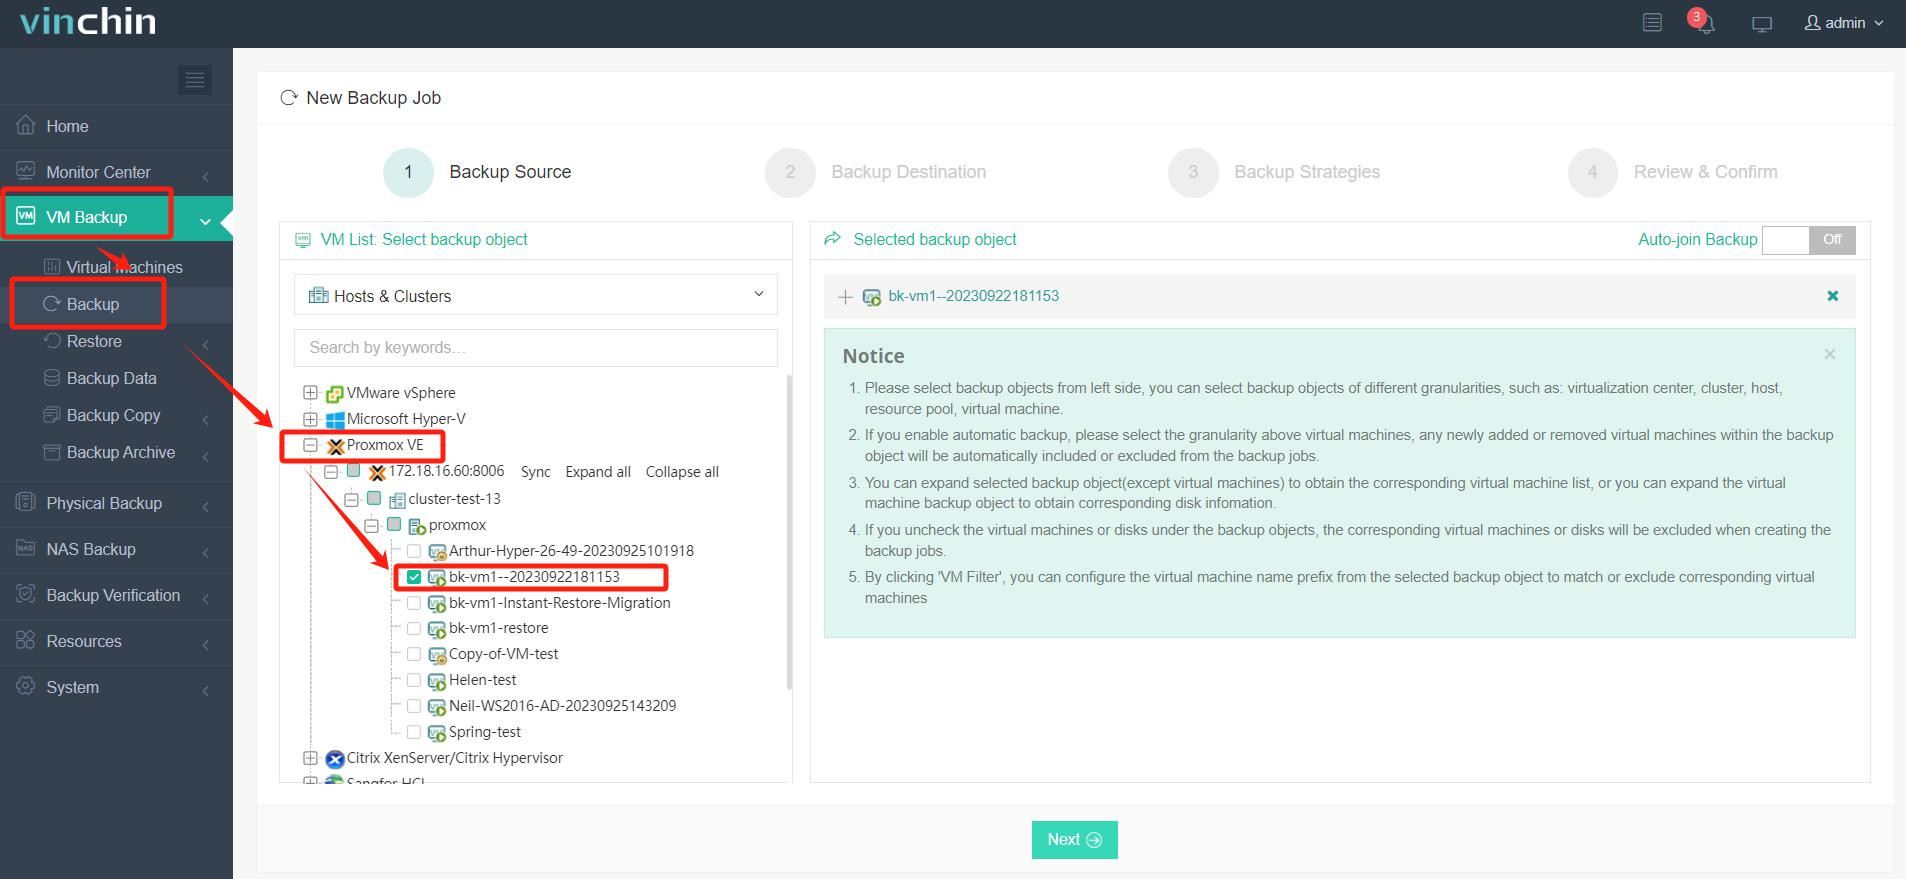
2. Then select backup destination
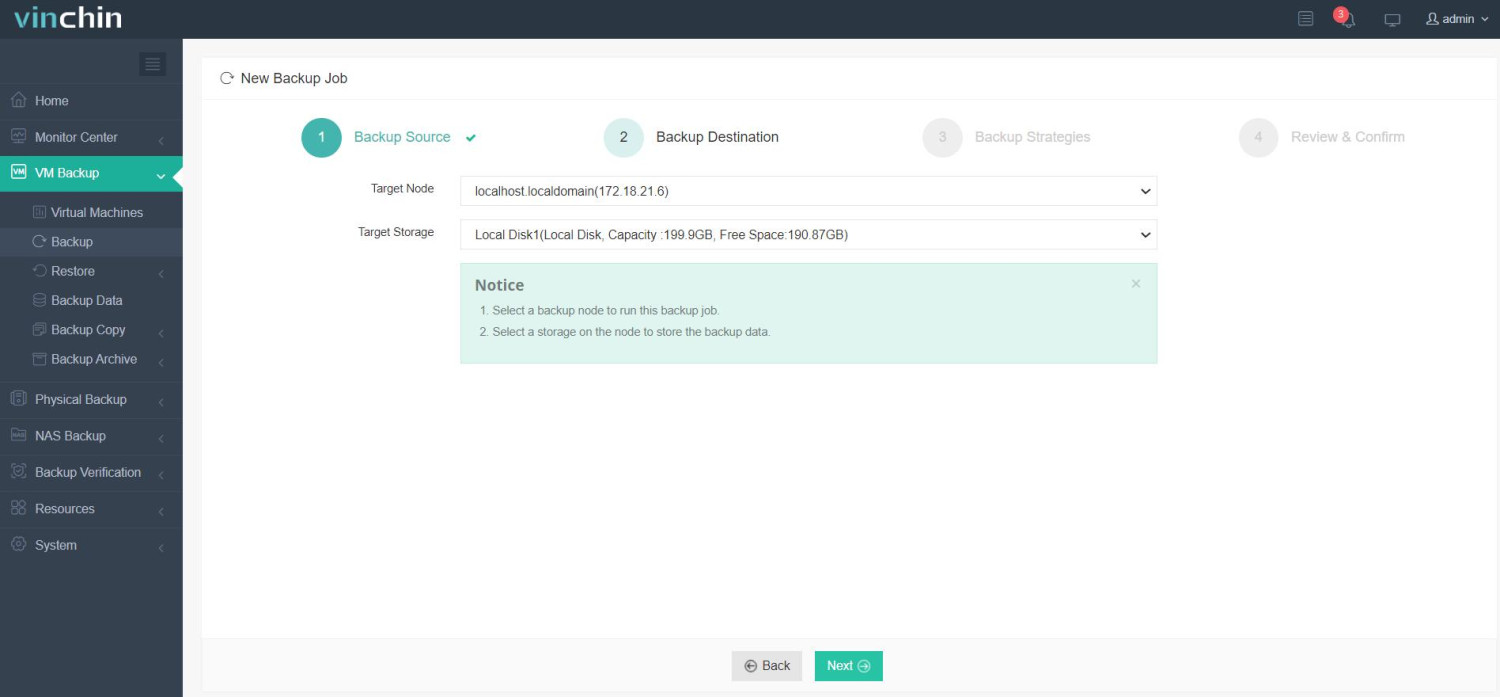
3. Select strategies
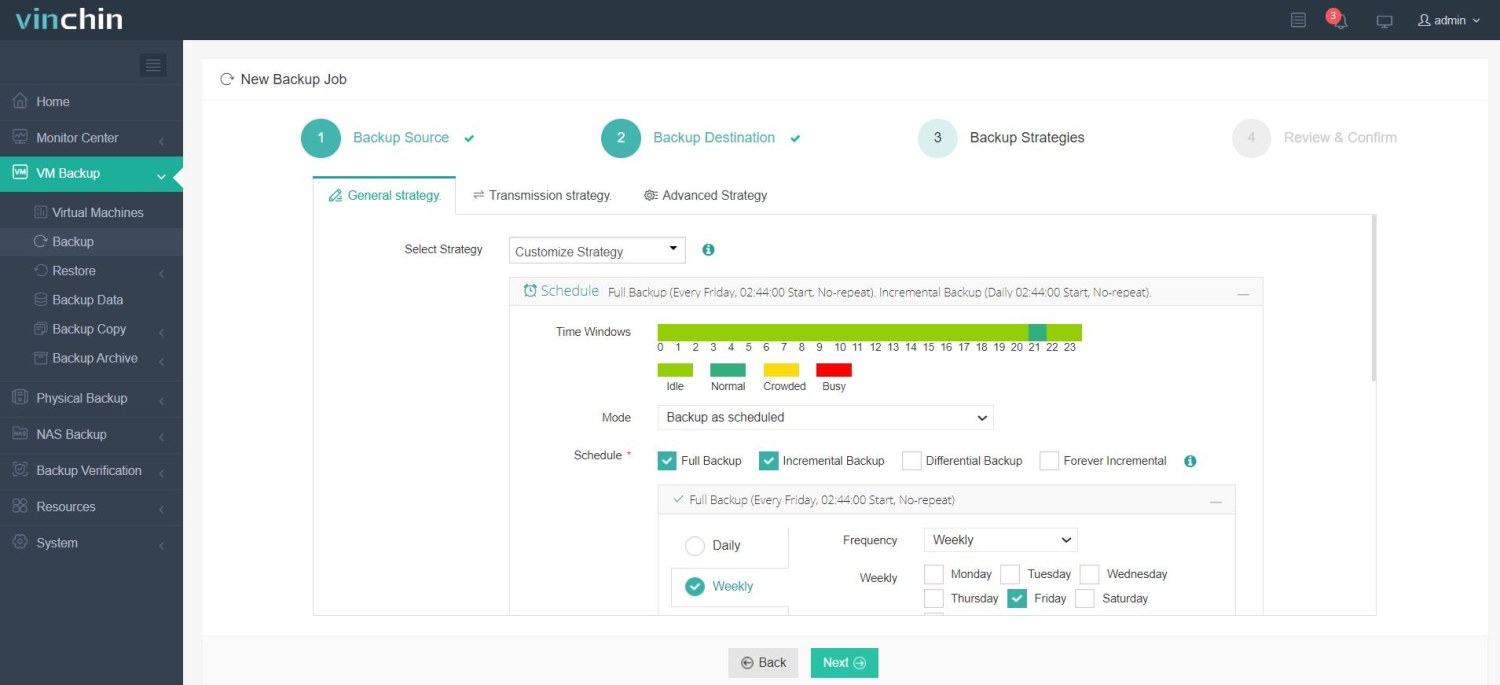
4. Finally submit the job
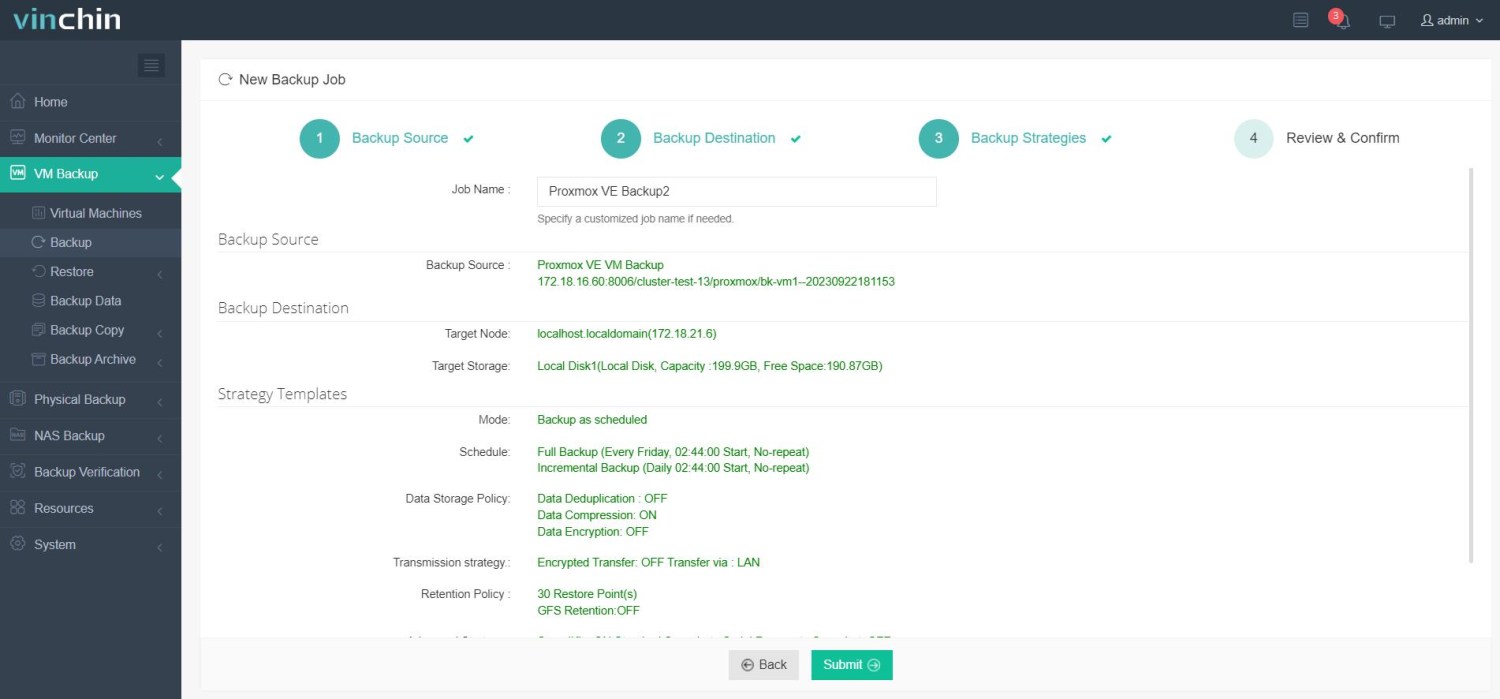
Vinchin provides a free 60-day trial, allowing users to explore the functionality in a real-world setting. For additional details, please reach out to Vinchin directly or get in touch with our local partners.
Import qcow2 Proxmox FAQs
Q1: Can you convert other disk image formats to qcow2 format for use in Proxmox?
A: Yes, you can use tools such as QEMU's qemu-img utility to convert other disk image formats to qcow2 format. After conversion, you can refer to this article to import qcow2 image into Proxmox easily.
Q2: Are there any size limitations for qcow2 images in Proxmox?
A: Proxmox itself does not impose strict size limitations on qcow2 images. However, it's essential to consider the storage capabilities of your chosen storage backend and ensure you have enough space to accommodate the imported qcow2 images.
Conclusion
In short, importing qcow2 into Proxmox improves the flexibility, performance and resource efficiency of VMs. Through a simple process, users can seamlessly integrate qcow2 images and benefit from Proxmox's optimization capabilities. In addition, the combination of Proxmox and Vinchin ensures a secure and efficient virtualized environment and allows users to experience its capabilities through simple operation and a free 60-day trial.
Share on:


