-
What is ESXi 7.0 U2?
-
New Features in ESXi 7.0 U2
-
System Requirements for ESXi 7.0 U2
-
How to Install ESXi 7.0 U2?
-
How to Upgrade to ESXi 7.0 U2?
-
How to Backup & Restore ESXi Virtual Machines with Vinchin Backup & Recovery?
-
FAQ about Using ESXi 7.0 U2
-
Conclusion
VMware ESXi 7.0 U2 is a significant update for virtualization administrators everywhere. It brings new features that improve security, hardware compatibility, and operational efficiency across enterprise environments. Whether you are installing from scratch or upgrading an existing host, understanding ESXi 7.0 U2 helps you get the most from your infrastructure—and keep it safe from data loss or downtime.
What is ESXi 7.0 U2?
ESXi 7.0 U2 is the second major update to VMware’s flagship hypervisor in the vSphere suite (build number 17630552). Released in March 2021, this version delivers enhanced support for modern hardware platforms while tightening security controls for virtualized workloads. As part of vSphere’s ongoing evolution, ESXi remains a core tool for running multiple virtual machines on physical servers efficiently.
New Features in ESXi 7.0 U2
This release introduces several improvements designed to help operations teams manage complex environments more easily:
vSphere Fault Tolerance now supports VM encryption, so you can combine high availability with strong data protection.
NVIDIA Ampere GPU support opens doors for AI and machine learning workloads.
Quick Boot support extends to more server models—cutting reboot times during patching.
Performance boosts on AMD Zen CPUs can deliver up to a 30% workload increase.
Encrypted Fault Tolerance log traffic further secures FT-protected VMs.
vSphere Virtual Volumes statistics make troubleshooting storage faster.
Some configuration files are now read-only; changes must go through command-line tools like ESXCLI.
Removal of SHA-1 from SSH strengthens remote access security.
These updates reflect VMware’s focus on both innovation and risk reduction—a balance every administrator appreciates.
System Requirements for ESXi 7.0 U2
Before deploying or upgrading to esxi 7.0 u2, check that your hardware meets all requirements:
You need a supported x86_64 processor with at least two cores; enable NX/XD bit in BIOS settings if available (this is mandatory). Minimum RAM is 4 GB but plan on at least 8 GB for production workloads—more if you run many VMs or resource-heavy applications.
Storage must be high-endurance SSD or NVMe drives; avoid USB sticks or SD cards except perhaps in test labs because these devices wear out quickly under heavy I/O loads [VMware KB83063]. For best results choose drives rated with higher TBW (Terabytes Written).
Network adapters should appear on the official VMware Compatibility Guide—unsupported NICs may cause installation failures or network drops after upgrades.
If you plan GPU acceleration (for AI/ML), confirm that your NVIDIA Ampere cards are certified by VMware for esxi 7.0 u2 hosts.
Always verify server model compatibility before starting any deployment project—you don’t want surprises mid-installation!
How to Install ESXi 7.0 U2?
A clean install gives you maximum stability but erases everything on the target disk—so back up important data first! Here’s how most admins approach it:
1. First download the latest esxi 7.0 u2 ISO image from VMware’s portal or your server vendor’s site (some vendors bundle drivers specific to their hardware). Use software like Rufus to create a bootable USB drive—or mount the ISO using your server's remote management tool such as iLO or iDRAC if available.
2. Boot from this media then select Install ESXi-7.0U2 Standard Installer when prompted onscreen.
3. Accept the End User License Agreement by pressing F11, then pick your target disk—choose an SSD/NVMe drive rather than legacy spinning disks whenever possible since performance matters here!
4. Set keyboard layout preferences next; assign a secure root password when asked (don’t skip this step).
5. Confirm installation by pressing F11 again—the installer copies files automatically then prompts you to remove media before rebooting into Direct Console User Interface (DCUI).
6. After reboot configure basic management network settings using DCUI—for example set static IP addresses so hosts don’t change unexpectedly after DHCP lease renewals!
7. Finally open any browser on another computer; enter your host's IP address into the address bar to reach its web interface where further setup continues (like licensing or joining vCenter).
For older servers lacking built-in drivers consider creating custom ISOs using VMware's Custom ISO Creator utility—it lets you inject needed drivers ahead of time so installs succeed smoothly even on non-standard hardware platforms.
How to Upgrade to ESXi 7.0 U2?
Upgrading preserves existing VMs along with most configurations—but always back up both host config files and critical VM data first! Here’s what experienced admins do:
1. Start by checking that current hardware appears on VMware’s Compatibility Guide for esxi 7.0 u2—and confirm your present version supports direct upgrade paths (for example: some older releases require stepping through intermediate versions).
2. Disable High Availability features temporarily within vCenter if enabled; also check there are no active snapshots since these can block upgrades or slow them down considerably!
3. Download the offline bundle ZIP file containing esxi 7.0 u2 updates from VMware's website then upload it onto any datastore visible by your host(s).
4. Enable SSH via web interface (Host > Actions > Services > Enable Secure Shell) so you can connect remotely using tools like PuTTY.
From an SSH session run:
esxcli software profile update -d /vmfs/volumes/datastore1/VMware-ESXi-7.0U2-depot.zip -p ESXi-7.0U2-standard
5. If upgrading unsupported hardware add --no-hardware-warning at end—but note this voids support agreements!
6. Monitor output closely; resolve any errors shown before proceeding further then reboot host when finished (reboot command works fine here).
7. After restart verify upgrade success either via web interface (Host > Summary) or by typing vmware -v over SSH which prints build/version info directly.
8. If managing multiple hosts use vCenter's built-in Lifecycle Manager—it automates patch rollouts across clusters saving time especially during maintenance windows.
Always test upgrades first in lab environments—not production—to catch driver issues early!
How to Backup & Restore ESXi Virtual Machines with Vinchin Backup & Recovery?
To ensure robust protection of virtual machines running on esxi, Vinchin Backup & Recovery stands out as an enterprise-level solution supporting over fifteen mainstream virtualization platforms—including comprehensive integration with VMware environments alongside Hyper-V, Proxmox VE, oVirt/OLVM/RHV/XCP-ng/XenServer/OpenStack/ZStack and more. Vinchin Backup & Recovery offers advanced backup technologies tailored specifically for enterprise needs: quiesced snapshot ensures application-consistent backups; CBT accelerates incremental jobs by tracking changed blocks efficiently; LAN-free backup reduces production network load during backup operations; instant recovery enables rapid restoration of VMs directly from backup storage; and forever-incremental backup minimizes storage consumption while maintaining reliable restore points—all contributing toward streamlined protection and business continuity.
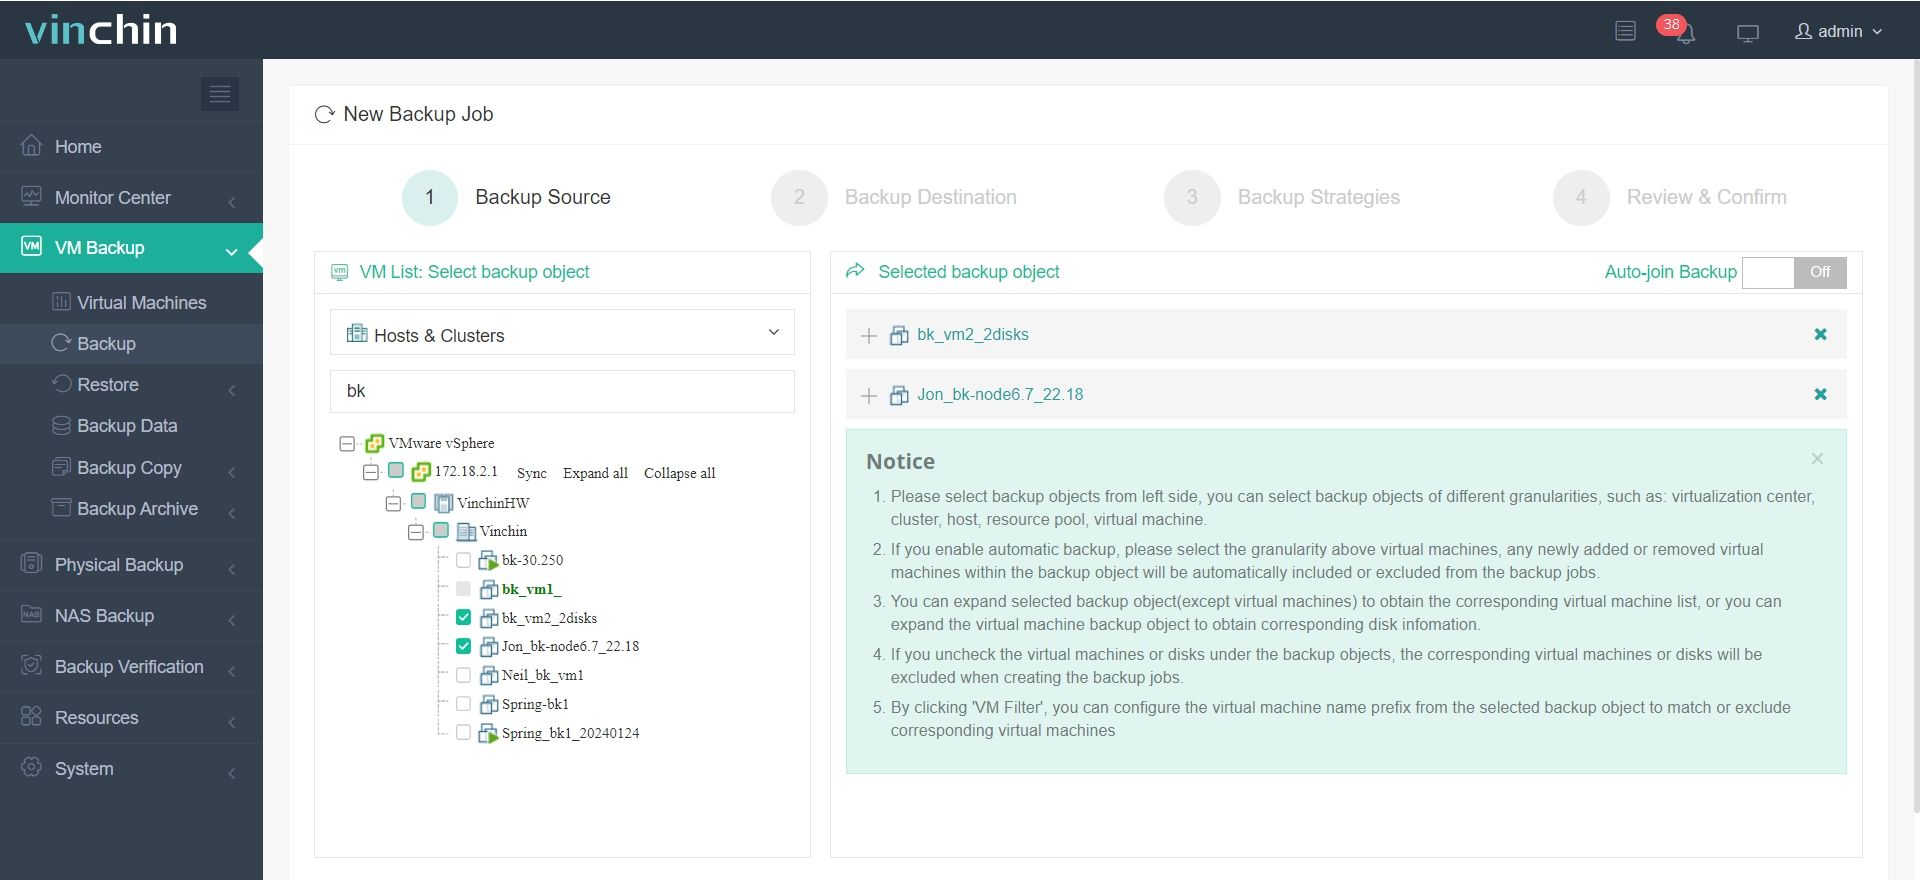
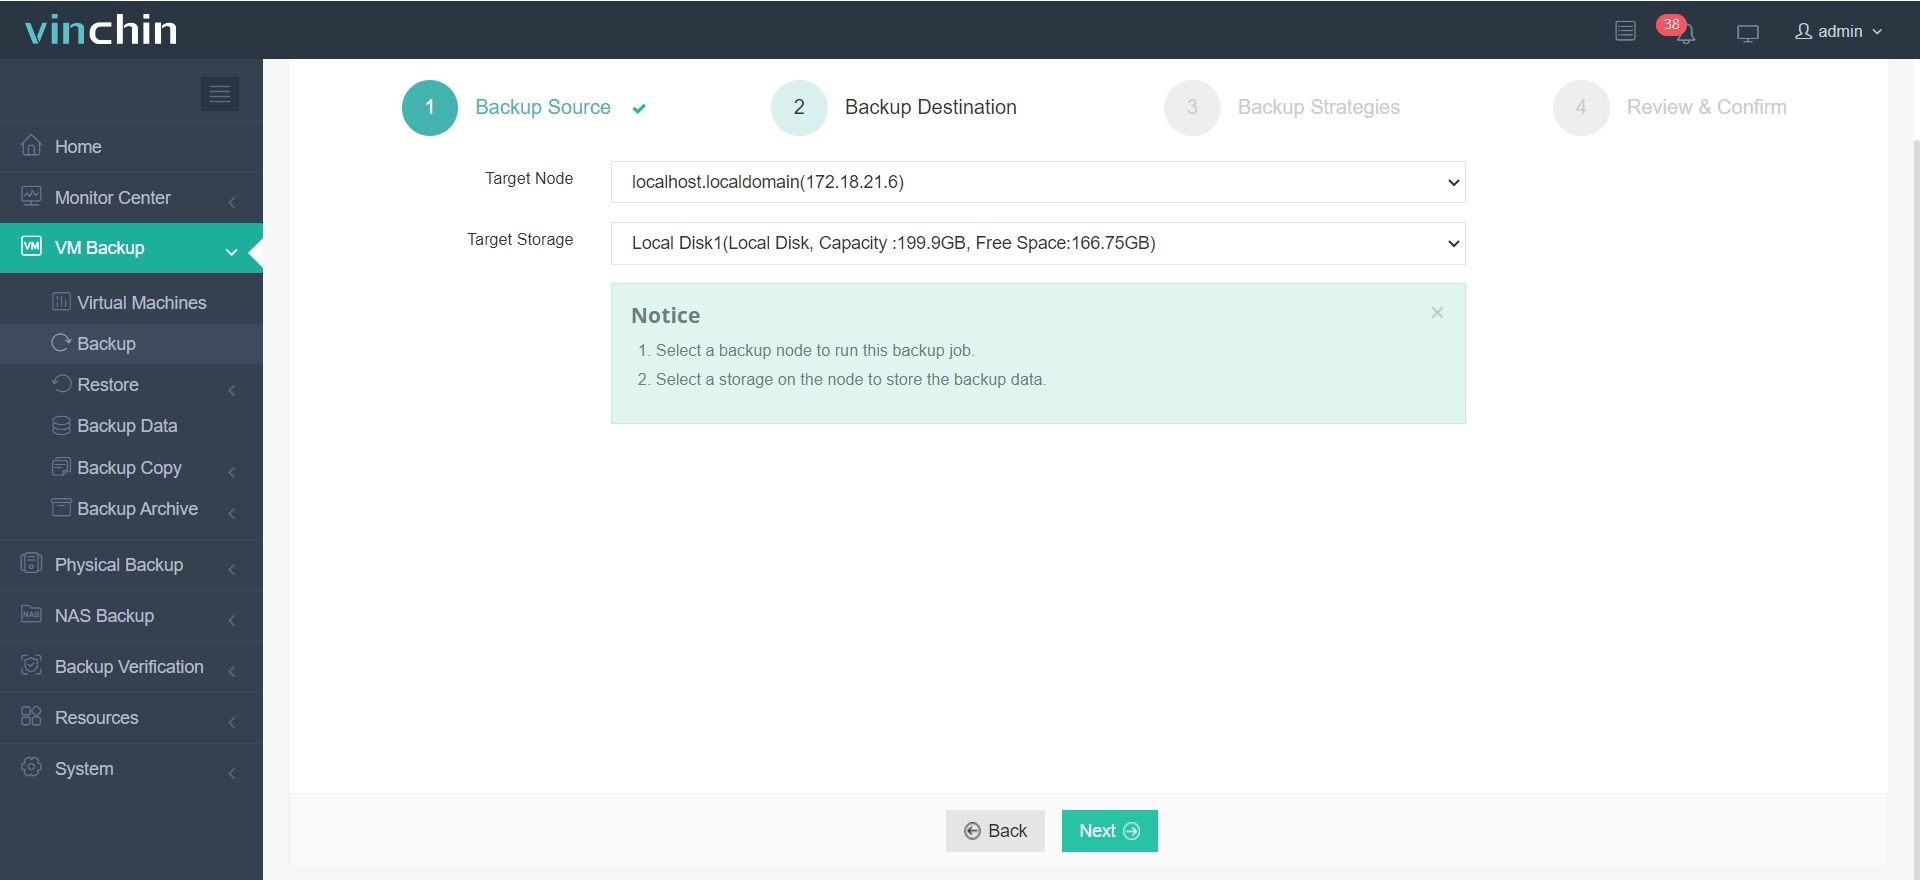
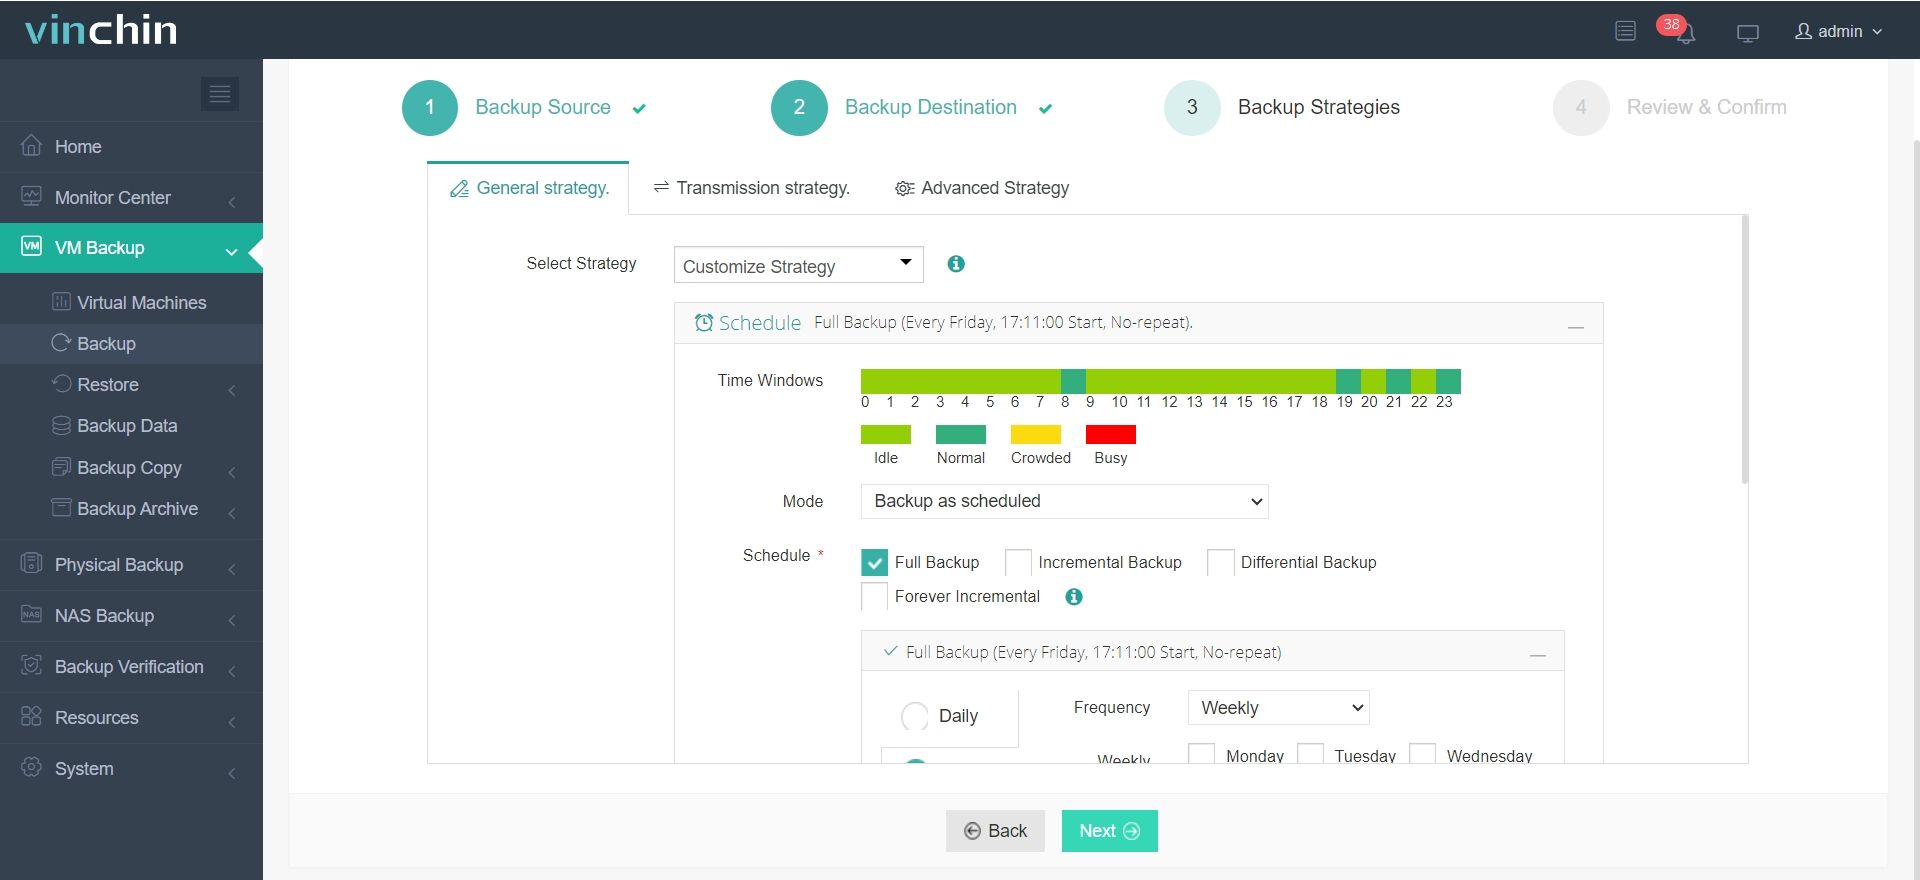
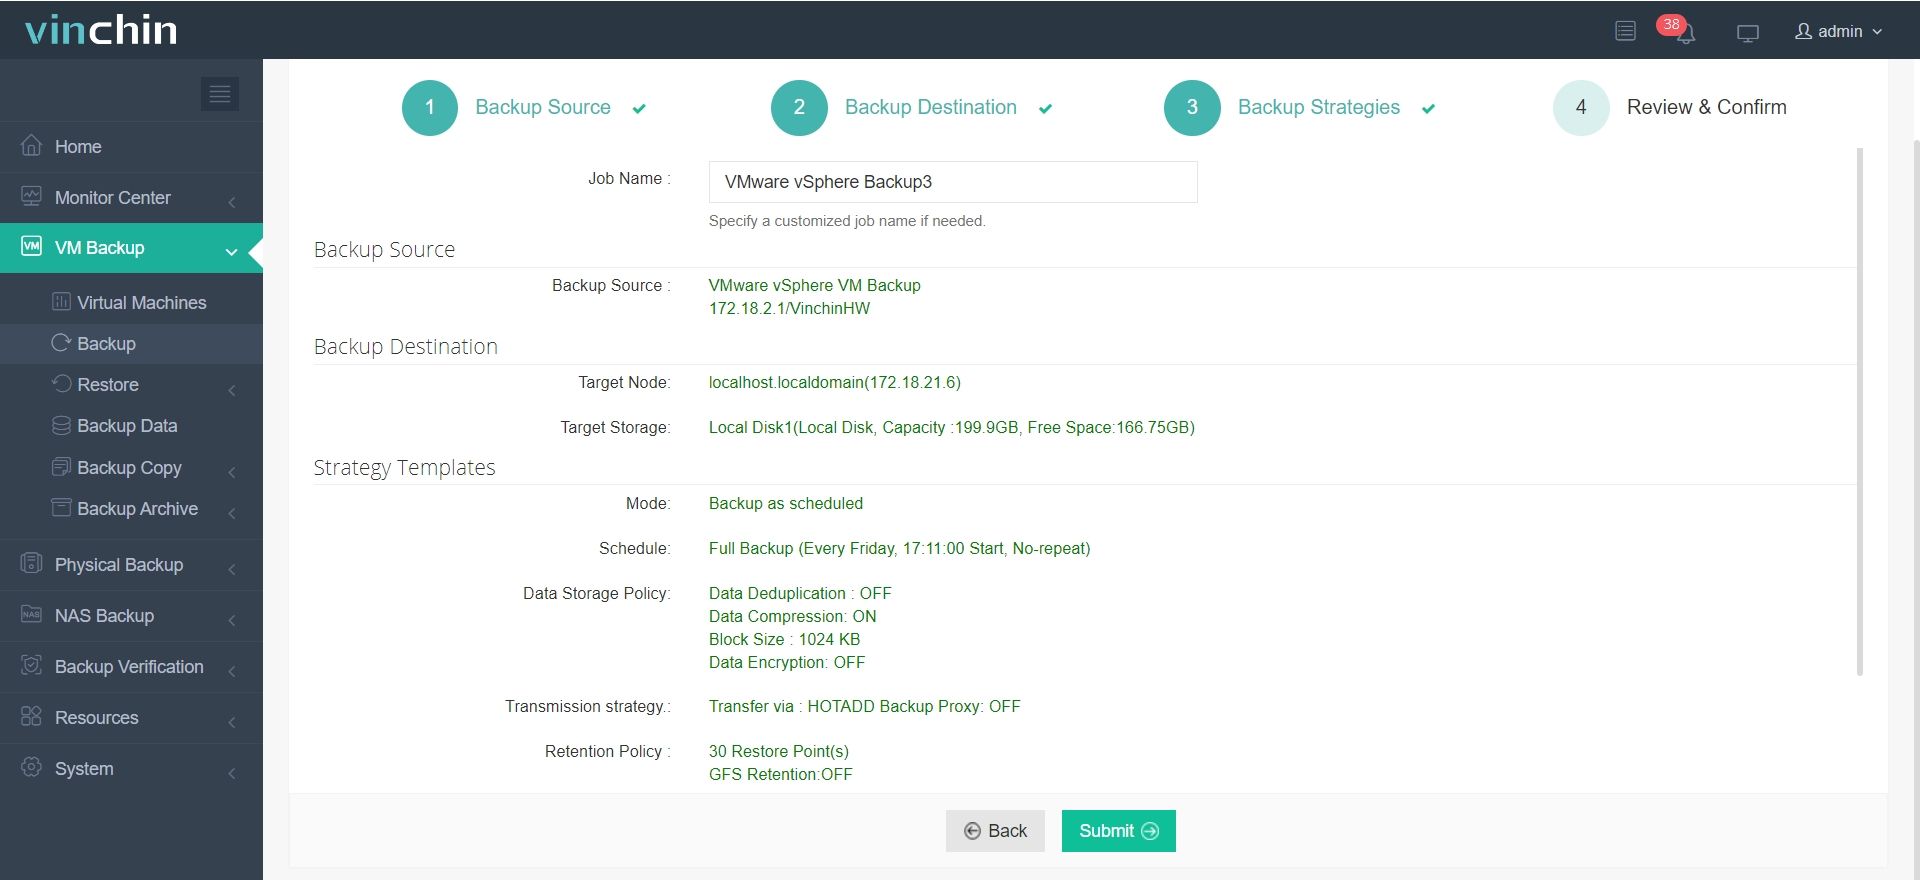
The intuitive Vinchin Backup & Recovery web console makes safeguarding your environment straightforward:
Step 1: Select the VMware VM to back up

Step 2: Choose the backup storage

Step 3: Configure the backup strategy

Step 4: Submit the job

Trusted globally by thousands of enterprises and highly rated among IT professionals, Vinchin Backup & Recovery offers a fully featured free trial valid for sixty days—click below to experience industry-leading data protection firsthand!
FAQ about Using ESXi 7.0 U2
Q1: Can I monitor real-time performance metrics natively?
A1: Yes—use built-in tools like “Monitor” tab within web interface or run esxtop over SSH for live stats covering CPU/memory/storage/network activity instantly.
Q2: Is rolling back an upgrade possible if something breaks?
A2: No direct rollback exists—instead restore previously saved configuration backups/redeploy original version manually if needed so always test thoroughly beforehand!
Q3: How do I recover lost root passwords without reinstalling?
A3: Reboot into single-user mode via console access then reset password locally following official VMware KB instructions carefully step-by-step.
Conclusion
ESXi 7.0 U2 offers robust new features alongside improved reliability—but successful deployments depend upon careful planning plus solid backup strategies throughout lifecycle management efforts! With Vinchin safeguarding every virtual machine administrators gain peace-of-mind knowing recovery remains quick/easy no matter what challenges arise tomorrow.
Share on:


