-
What is Hyper-V Failover Cluster?
-
Advantages of Hyper-V Failover Cluster
-
Preliminary preparation
-
Configurations
-
Step 1. Installing the Hyper-V Role
-
Step 2. Installing Failover Cluster Feature
-
Step3. Connecting iSCSI Storage
-
Step 4. Creating a Hyper-V Failover Cluster
-
Protect Hyper-V environment with a professional solution
-
Conclusion
To meet the pursuit of continuous availability and reduce annual downtime due to failures, major system, network, and storage vendors have introduced the concept of "clusters." Clusters achieve their purpose by running multiple hardware components simultaneously. In the event of a failure, the cluster facilitates seamless and automated switching of the faulty server, ensuring uninterrupted business operations.
Unlike traditional hardware or network failures that require manual troubleshooting, cluster technology operates without human intervention, enabling fully automated functionality. By swiftly transferring the faulty node when a failure occurs, it significantly enhances the ability to maintain business continuity.
What is Hyper-V Failover Cluster?
A Hyper-V failover cluster is a set of independent Hyper-V servers/nodes that work together to enhance the availability and scalability of clustered roles connected by physical cables and software.
When a cluster node or multiple nodes fail, other nodes start to fill in. And if you want to add a second server to the system, it can be added to the cluster quickly and on the fly with the aid of a system wizard without the need for any lengthy re-configurations or downtime.
It also offers Cluster Shared Volume (CSV) to access shared storage from all Hyper-V nodes with a consistent and distributed namespace.
Advantages of Hyper-V Failover Cluster
Adapting to scheduled downtime maintenance. Using failover clusters allows for planned maintenance of a subset of servers within the cluster within a designated time frame while ensuring business continuity. With failover clusters, maintenance tasks can be performed during the daytime without the need for overtime work during late hours.
Reducing unplanned downtime. Failover clusters automatically take over services from unexpectedly offline servers using proprietary algorithmic mechanisms. This minimizes the impact of hardware or software failures on business continuity and maintains a high level of system availability.
Preliminary preparation
These are the servers and corresponding configurations used in this article. You can make appropriate modifications based on the actual situation.
Server: This Hyper-V cluster consists of six nodes, all of which are Dell R710 rack-mounted servers, equipped with 128GB of memory and two 8-core CPUs. There are only two 600GB * 15000K hard drives configured in RAID 1 on each server since there is no intention to allocate a significant amount of local storage for virtual machines.
Storage: An EqualLogic PS6100 storage array is deployed, configured in RAID 10, specifically for storing virtual machines.
Networking: Two Dell 5548 switches are utilized as storage switches in this setup.
Important considerations:
1. Hardware and system consistency must be maintained across all nodes participating in the cluster.
2. Storage configuration should be optimized for maximum performance. For detailed storage settings and other configurations, it is recommended to consult the manufacturer's official website or contact their technical support.
3. It is crucial to keep the networks for storage and workload management separate to avoid significant performance impacts in the future.
Configurations
Server Configuration:
1. Install the latest firmware version.
2. Install the Windows Server 2012 R2 Datacenter operating system.
3. Enable CPU virtualization and hyper-threading features.
4. Configure four gigabit network cards for the working network and four gigabit network cards for the storage switch.
Storage Configuration:
1. Install the latest firmware version on the storage device, which can be obtained through vendor technical support.
2. Configure the storage network to connect to the storage switch.
3. Install and configure the necessary storage disk consolidation and volume partitioning.
Network Configuration:
1. Isolate the working network and the storage network to avoid interference with the storage network.
2. Configure flow control and rapid spanning tree protocol on the storage switch.
Step 1. Installing the Hyper-V Role
1. Open Server Manager.
2. Click on "Manage" and select "Add Roles and Features."
3. Review the important notes before starting and click "Next."
4. Select "Role-based or feature-based installation" and click "Next."
5. Choose the server where you want to install this role (Starting from Server 2012, you can use Server Manager to remotely install roles or features on other servers).
6. In the role selection, choose "Hyper-V."
7. In the pop-up dialog, check "Include management tools (if applicable)," click "Add Features," and proceed by clicking "Next" until completion.
8. Verify the successful installation of the Hyper-V role by opening Server Manager, selecting "Tools," and finding Hyper-V Manager, which confirms that the Hyper-V role has been installed.
Step 2. Installing Failover Cluster Feature
1. Open Server Manager.
2. Click on "Manage" and select "Add Roles and Features."
3. Review the important notes and the introduction to this wizard that appears.
4. Select "Role-based or feature-based installation" and click "Next."
5. Choose the server where you want to install this feature, then click "Next."
6. In the feature selection page, check "Failover Clustering."
7. Click "Add Features" in the pop-up page.
8. In the confirmation installation page, you can choose "Automatically restart the destination server if required." This allows the server to restart itself at the appropriate time during the installation process.
9. Verify the successful installation of the Failover Cluster feature by opening Server Manager, accessing the tools, and finding the Failover Cluster Manager. This confirms that the feature has been installed correctly.
Step3. Connecting iSCSI Storage
The configuration for each storage solution may vary. Here are the steps to connect storage on a Windows system:
1. Open the Server Manager page.
2. In the Server Manager page, click on "Tools" and select "iSCSI Initiator."
3. In the opened iSCSI Initiator Properties page, select "Discovery."
4. In the Discovery page, select "Discover Portal."
5. In the opened Discover Target Portal page, enter the storage's IP address in the box below the IP address or DNS name. Keep the port as default unless there are specific requirements.
6. Then go back to the "Targets" tab.
7. In the Discovered Targets box, select the discovered target and click "Connect."
8. In the opened “Connect To Target” page, check "Add this connection to the list of favorite targets (automatically reconnect this target when the server restarts)" and enable "Enable multi-path (requires installation of the MPIO feature to enable multi-path functionality to the storage)."
9. Open the Server Manager page again and select "Computer Management" from the tools to verify if the storage is successfully connected.
10. In the opened Computer Management page, select "Disk Management."
11. At this point, you will see a new offline disk, which has the same size as the virtual machine volume created on the storage. Right-click on the disk and select "Connect."
12. After the disk is successfully connected, right-click on the disk and select "Create Simple Volume."
13. Now the storage setup is complete. The computer will have a new partition, and you can test the storage by placing large data into the partition.
Step 4. Creating a Hyper-V Failover Cluster
1. In the Server Manager, click on “Tools” and select “Failover Cluster Manager.”
2. In the opened Failover Cluster Manager page, right-click on “Failover Cluster Manager” on the left side and choose “Create Cluster.”
3. In the Create Cluster Wizard page, simply proceed to the next step without hesitation.
4. Select the servers to be part of this cluster by adding them, and you can use the “Browse” option to search and add servers in bulk.
5. Validation Warning: This step requires a simple test for your cluster. You can choose to skip it, but it is strongly recommended to perform the validation. Choose “Yes” and click “Next”.
6. Start testing the cluster environment. Choose “Run all tests (recommended)” and click “Next.”
7. Confirm the parameters for the test validation and click “Next.”
8. Proceed with the validation process, which may take a few minutes. Please be patient.
9. Validation complete. If there are any errors or warnings, they will be displayed here, and you can click “View Report” to check for any configuration issues.
10. Begin creating the cluster by providing a cluster name and selecting the address used for cluster management and DNS resolution. Typically, we choose the production network here.
11. Confirm the information displayed, including the cluster name, names of the included node servers, and the management address.
12. Start creating the cluster and wait patiently for a few minutes.
13. Cluster creation completed. At this point, a report will also be generated, and you can click “View Report” to check for any errors.
14. Once finished, you can see the cluster you just created in the Failover Cluster Manager.
Now you have finished the creation of Hyper-V failover cluster.
Protect Hyper-V environment with a professional solution
Hyper-V Failover Cluster provides high availability and fault tolerance for virtualized workloads, allowing organizations to minimize downtime and ensure business continuity. However, to guarantee constant data protection and uninterrupted business performance, it is recommended to backup your critical data and virtual machines with a professional backup and recovery solution.
Vinchin Backup & Recovery is a professional solution which supports data backup of VM like VMware vSphere, Hyper-V, XenServer, XCP-ng, oVirt, RHV, OpenStack, etc. and other data like database, NAS, file server, Linux & Windows Server, etc.
Vinchin Backup & Recovery performs robust Hyper-V backup and recovery functionality including agentless incremental backup, effective data reduction, backup node expansion, offsite backup copy and more, to comprehensively secure Hyper-V environments.
Besides, Vinchin Backup & Recovery can migrate VMs across 10+ virtual platforms including VMware, XenServer, and most KVM-based hypervisors. You can easily switch your critical modern IT workloads from one to another to build your own highly flexible IT infrastructure.
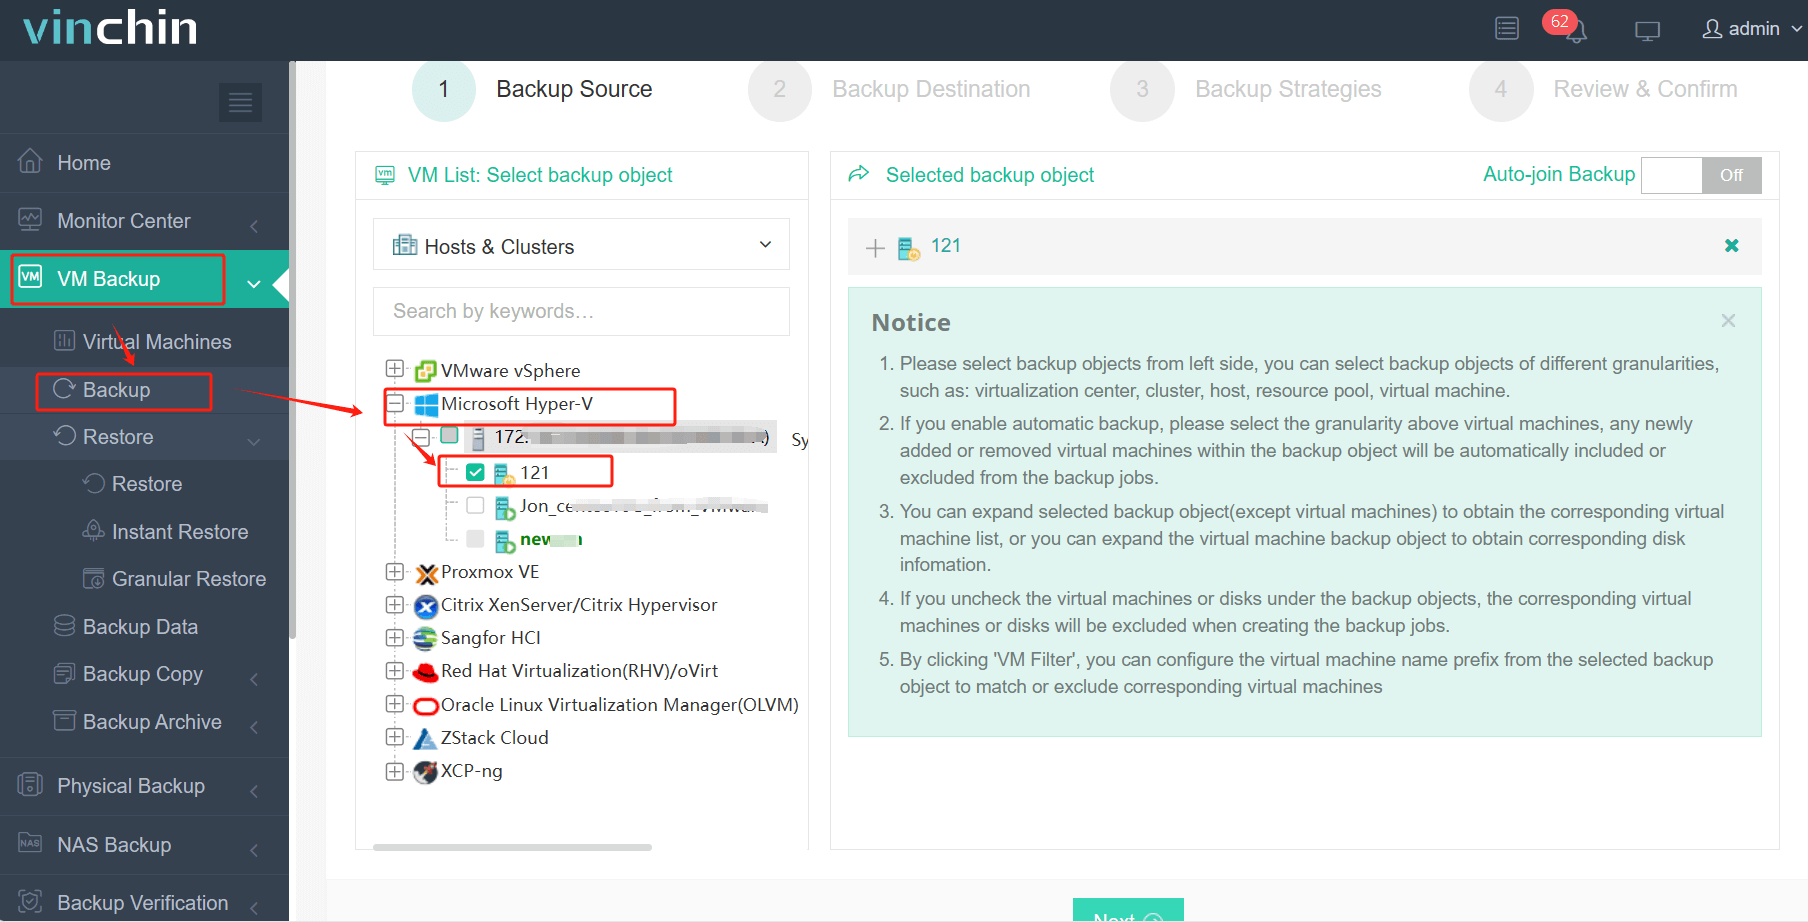
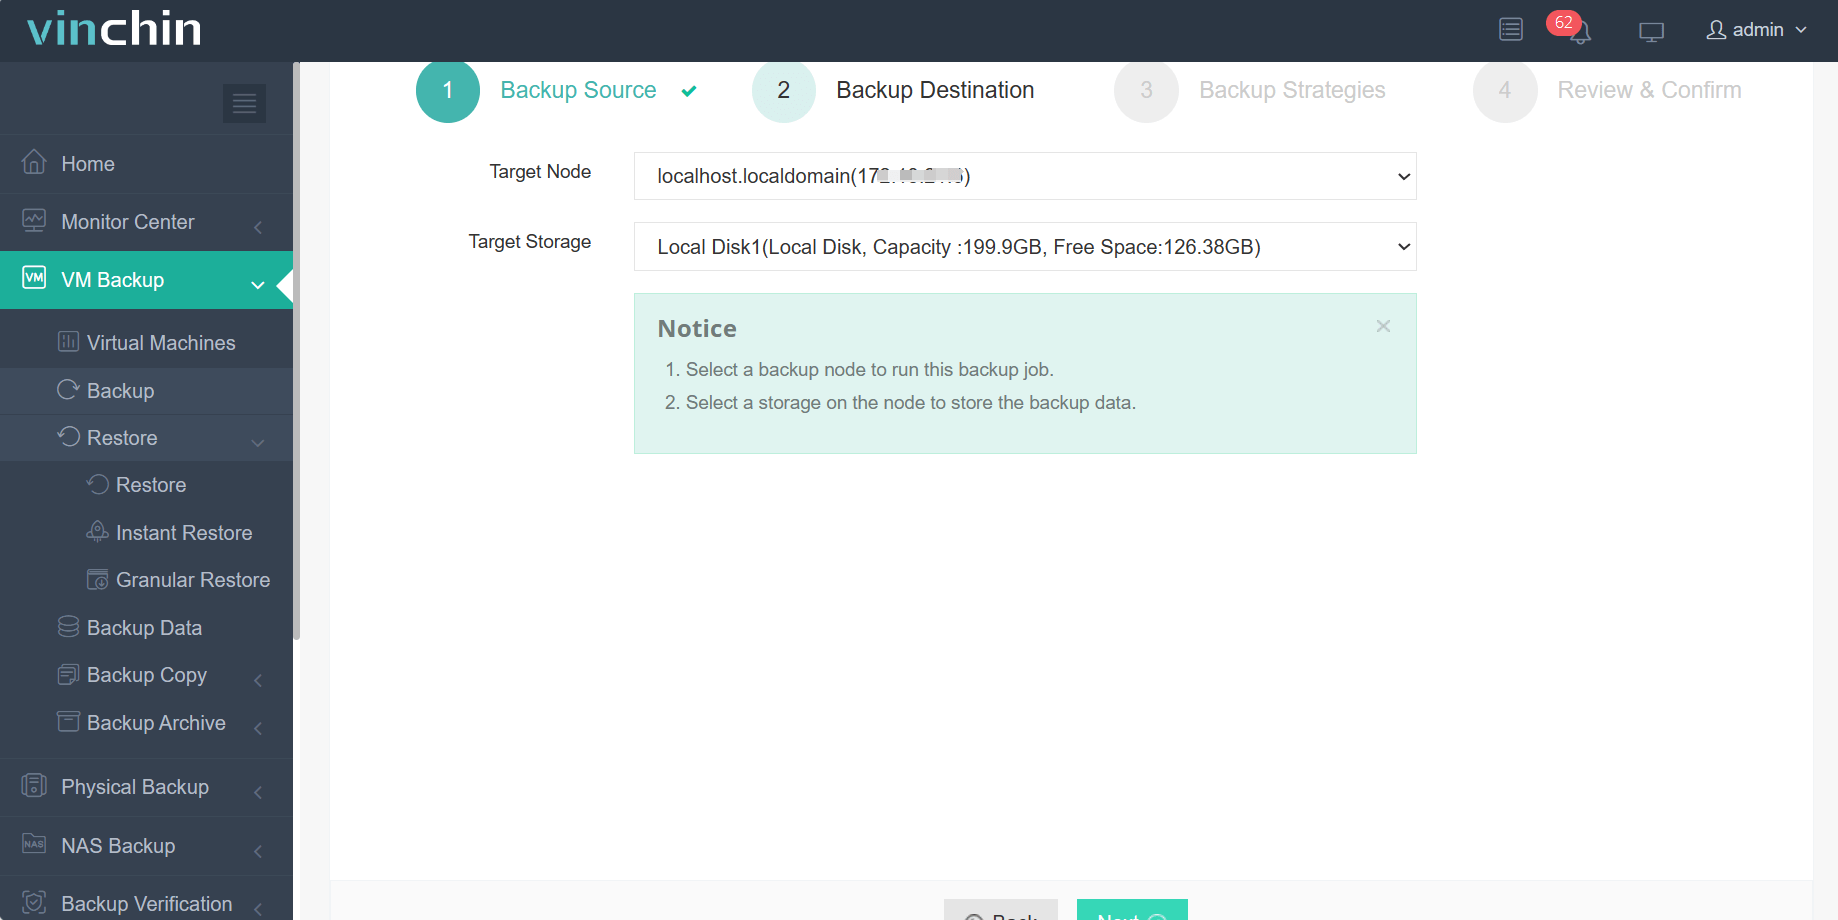
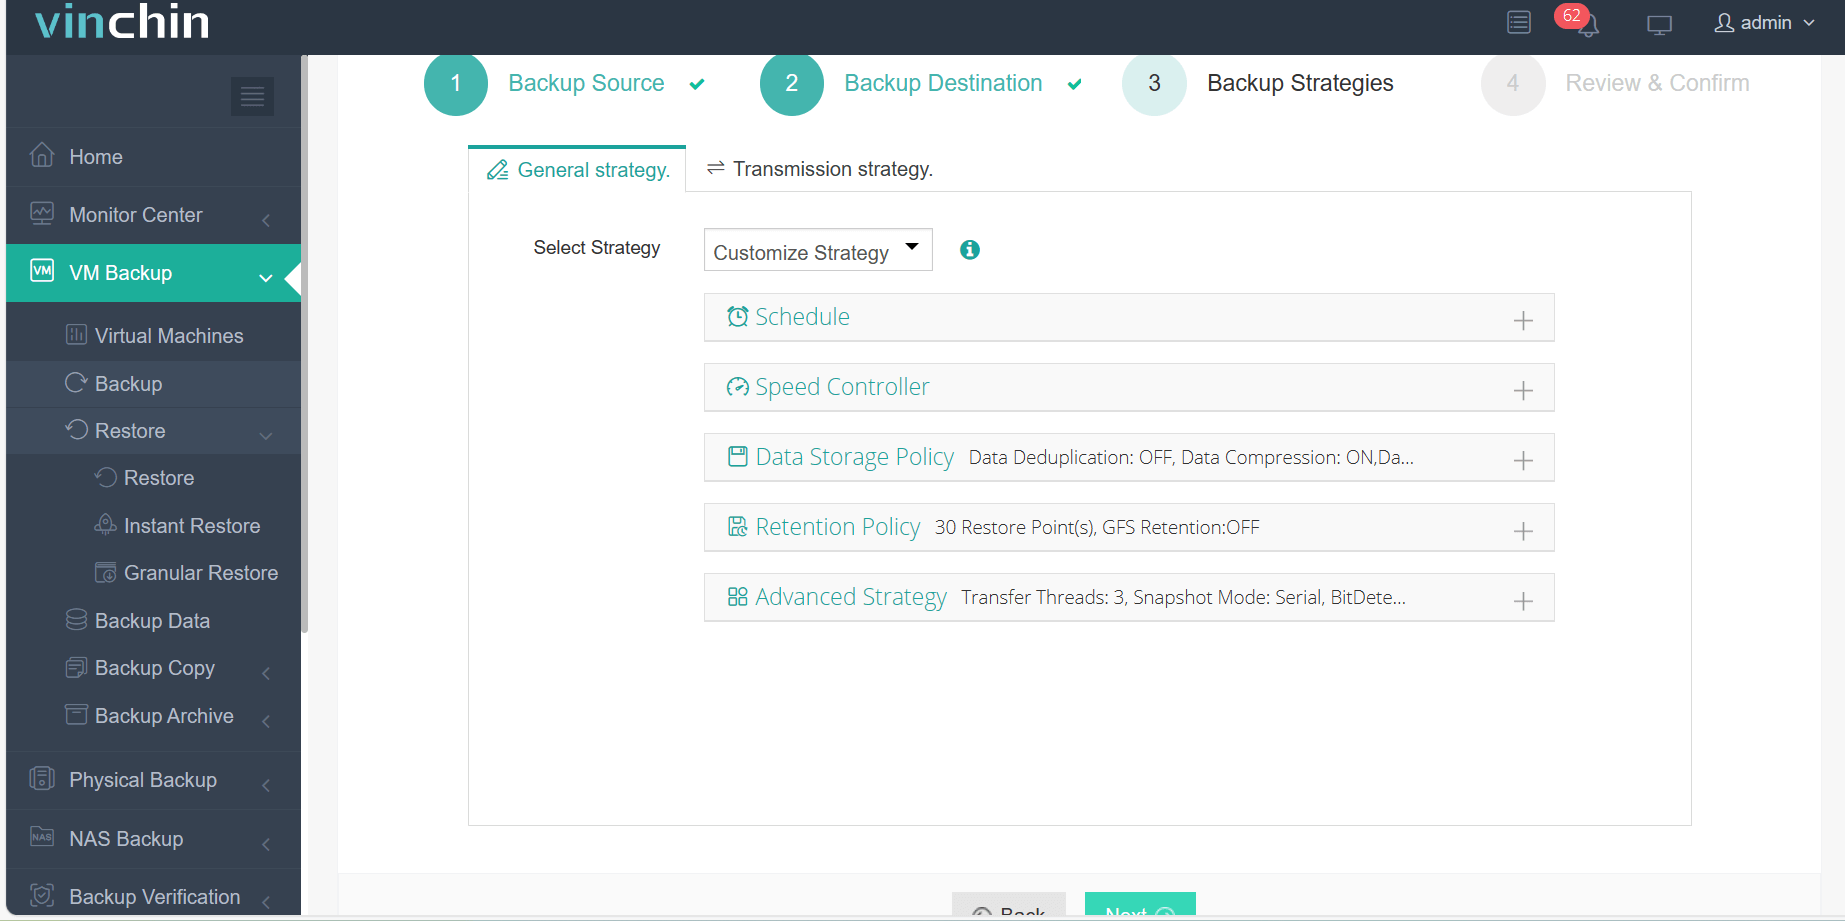
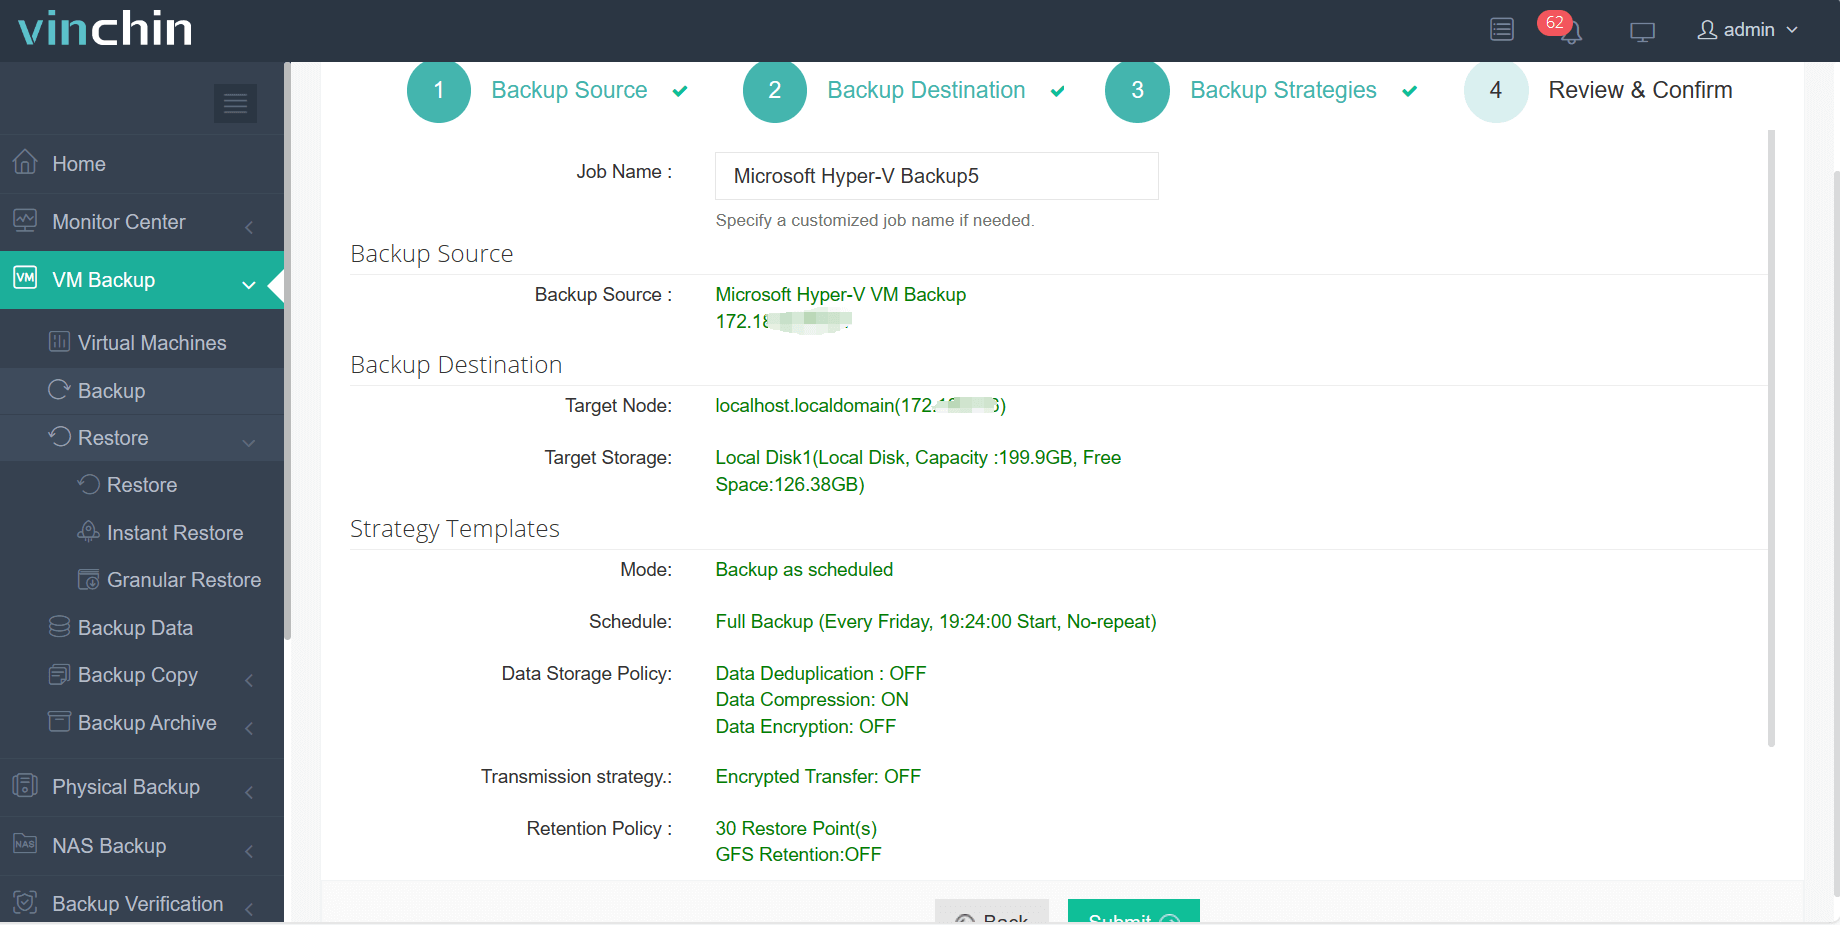
To backup Hyper-V VM, you just need to:
1. Select Hyper-V VM

2. Select backup storage

3. Select backup strategies

4. Submit the job

Vinchin Backup & Recovery has been selected by thousands of companies and you can also start to use this powerful system with a 60-day full-featured trial! Also, contact us and leave your needs, and then you will receive a solution according to your IT environment.
Conclusion
Hyper-V Failover Cluster is a feature in Microsoft Windows Server that allows you to create a high-availability cluster of Hyper-V virtual machines. It provides automatic failover capabilities, ensuring that virtual machines continue to run even if a physical server or Hyper-V host fails.
To efficiently protect Hyper-V environment, you can choose Vinchin Backup & Recovery to easily backup and recover your VMs. Don’t miss the free trial.
Share on:


