-
What Is XenServer SR-IOV?
-
Why Use SR-IOV With XenServer?
-
Prerequisites for Enabling XenServer SR-IOV
-
How Does XenServer SR-IOV Work?
-
How to Enable SR-IOV on XenServer Hosts?
-
How to Assign Virtual Functions to Virtual Machines?
-
How to Back Up XenServer Virtual Machines With Vinchin Backup & Recovery
-
FAQs About XenServer SR‑IOV
-
Conclusion
Virtualization powers today’s data centers, but network speed can still limit performance. If you run demanding workloads on XenServer, you may need more bandwidth and lower latency than standard virtual switches provide. That’s where xenserver sr iov comes into play. This guide explores what SR-IOV is, why it matters for XenServer users, how to set it up step by step—and how to troubleshoot common issues along the way.
What Is XenServer SR-IOV?
SR-IOV stands for Single Root I/O Virtualization—a technology that allows one physical PCI device (like a network card) to present itself as multiple separate devices called virtual functions (VFs). In xenserver sr iov environments, these VFs can be assigned directly to virtual machines (VMs). This direct assignment lets VMs bypass much of the hypervisor’s software networking stack. As a result, you get lower CPU usage and higher network throughput compared to traditional virtual NICs.
Why Use SR-IOV With XenServer?
SR-IOV offers clear advantages when your applications need fast networking or low latency communication between VMs or external systems. By giving each VM its own slice of hardware through xenserver sr iov features:
You reduce CPU overhead by up to 30% compared to emulated NICs.
Network latency drops by as much as 50%, which is critical for high-frequency trading platforms or scientific computing clusters.
Bandwidth per VM increases significantly because traffic flows straight from hardware into the guest OS without extra processing steps.
However, there are trade-offs: some management features like live migration do not work with VMs using SR-IOV VFs. Also, not every workload benefits equally—SR-IOV shines most when raw network performance is your top priority.
Prerequisites for Enabling XenServer SR-IOV
Before configuring xenserver sr iov in your environment, check that all requirements are met:
First, your server must have a compatible network interface card (NIC) supporting SR-IOV—common models include Intel X520/X540 series or Mellanox ConnectX adapters. Next, make sure your system BIOS has virtualization options enabled: look specifically for Intel VT-d or AMD-Vi settings under Advanced > Virtualization Technology menus—these must be turned ON.
Your operating system kernel should load drivers that support SR-IOV; you can confirm this by running ethtool -i <nic_name> on the host shell—the driver name should match those listed in your NIC documentation as “SR-IOV capable.” Finally, update firmware on both motherboard and NIC if required by vendor guidance; outdated firmware often causes VF allocation failures later in setup.
How Does XenServer SR-IOV Work?
At its core, xenserver sr iov splits one physical network port into many logical interfaces called virtual functions (VFs). Each VF acts like an independent PCI device from the perspective of a guest VM but shares resources with other VFs on the same card. When you assign a VF to a VM in XenServer:
1. The hypervisor maps that VF directly into the VM’s address space.
2. Network packets flow straight between hardware and guest OS without passing through dom0’s software switch.
3. This reduces context switching overhead inside dom0 and improves packet delivery times inside each VM.
This model works best when security isolation between tenants is enforced at both hardware level (by IOMMU) and software level (by proper firewall rules).
How to Enable SR-IOV on XenServer Hosts?
Enabling xenserver sr iov requires careful attention to both hardware setup and software configuration steps:
Method 1: Using XenCenter GUI
Start by logging into XenCenter as an administrator:
1. Select your target host or pool from the left pane.
2. Click on the Networking tab at top center.
3. Choose Add Network, then select SR-IOV Network from available types.
4. Enter a descriptive name such as “10GbE-SR_IOV” so it’s easy to identify later.
5. Pick which physical NIC should provide VFs—only cards supporting SR-IOV will appear here.
6. Click through prompts until finished; if warned about rebooting hosts or reducing available ports for standard networks, accept these changes if appropriate for your design.
7. After creation completes successfully—and only if prompted—reboot affected hosts so new VF devices become visible under their respective NICs tabs.
You can verify successful creation by checking that new entries appear under each host’s list of available networks labeled “SR_IOV.”
Method 2: Using xe CLI Commands
For those who prefer command-line tools:
1. Create an empty network object:
xe network-create name-label=SR_IOV
2. List all physical interfaces attached to hosts:
xe pif-list
3. Identify correct PIF UUID matching your chosen NIC; then enable SR-IOV using:
xe network-sriov-create network-uuid=<network_uuid> pif-uuid=<pif_uuid>
4. Check status of created VFs—including total number available—with:
xe network-sriov-param-list uuid=<sriov_network_uuid>
If using legacy drivers requiring manual configuration of VF counts:
1. Edit /etc/modprobe.d/<driver_name>.conf file,
2. Add line such as options ixgbe max_vfs=8 (replace driver name/number),
3. Save changes,
4. Reboot host so kernel loads correct number of VFs at boot time.
Always consult official documentation before making persistent kernel module changes!
How to Assign Virtual Functions to Virtual Machines?
Once you’ve enabled xenserver sr iov at host level:
Assigning via XenCenter
1. Select desired VM within XenCenter tree view,
2. Go to its Networking tab,
3. Click Add Interface, then pick newly created “SR_IOV” type network,
4. Confirm addition,
5 . Shut down VM completely—not just reboot—to allow safe mapping of PCI devices,
6 . Power up again; guest OS should now detect new high-performance interface automatically if drivers are present inside guest image.
Assigning via xe CLI
1 . List current interfaces attached to target VM using:
xe vm-vif-list vm="VM Name"
2 . Attach new interface mapped against specific VF MAC address/network UUID/vm UUID combination:
xe vif-create device=<device_index> mac=<vf_mac_address> network-uuid=<sriov_network_uuid> vm-uuid=<vm_uuid>
Note that MAC addresses are usually auto-assigned unless specified otherwise during creation process; always double-check assignments before powering up production workloads!
Important Limitations
Keep these constraints in mind when working with xenserver sr iov:
Hot-plugging/removal of VFs isn’t supported—you must shut down affected VMs first;
Live migration/suspend/checkpoint operations won’t work while any assigned interface uses an active VF;
VLAN tagging/bonding require additional setup beyond default wizard steps;
Imported older-version VMs may need manual reassignment via CLI rather than GUI tools due to metadata differences across releases.
How to Back Up XenServer Virtual Machines With Vinchin Backup & Recovery
To ensure reliable protection for high-performance workloads running on XenServer with SR‑IOV enabled, consider Vinchin Backup & Recovery—a professional enterprise-level solution supporting over 15 mainstream virtualization platforms including VMware, Hyper-V, Proxmox, oVirt, OLVM, RHV, XCP-ng, OpenStack, ZStack and especially Citrix XenServer environments.
With Vinchin Backup & Recovery you benefit from powerful features such as forever-incremental backup for efficient storage use; deduplication and compression minimizing backup size; granular restore allowing precise recovery at file level; scheduled backup automation ensuring regular protection without manual intervention; and secure data encryption safeguarding sensitive information throughout backup cycles—all designed for robust data protection and operational efficiency across diverse infrastructures.
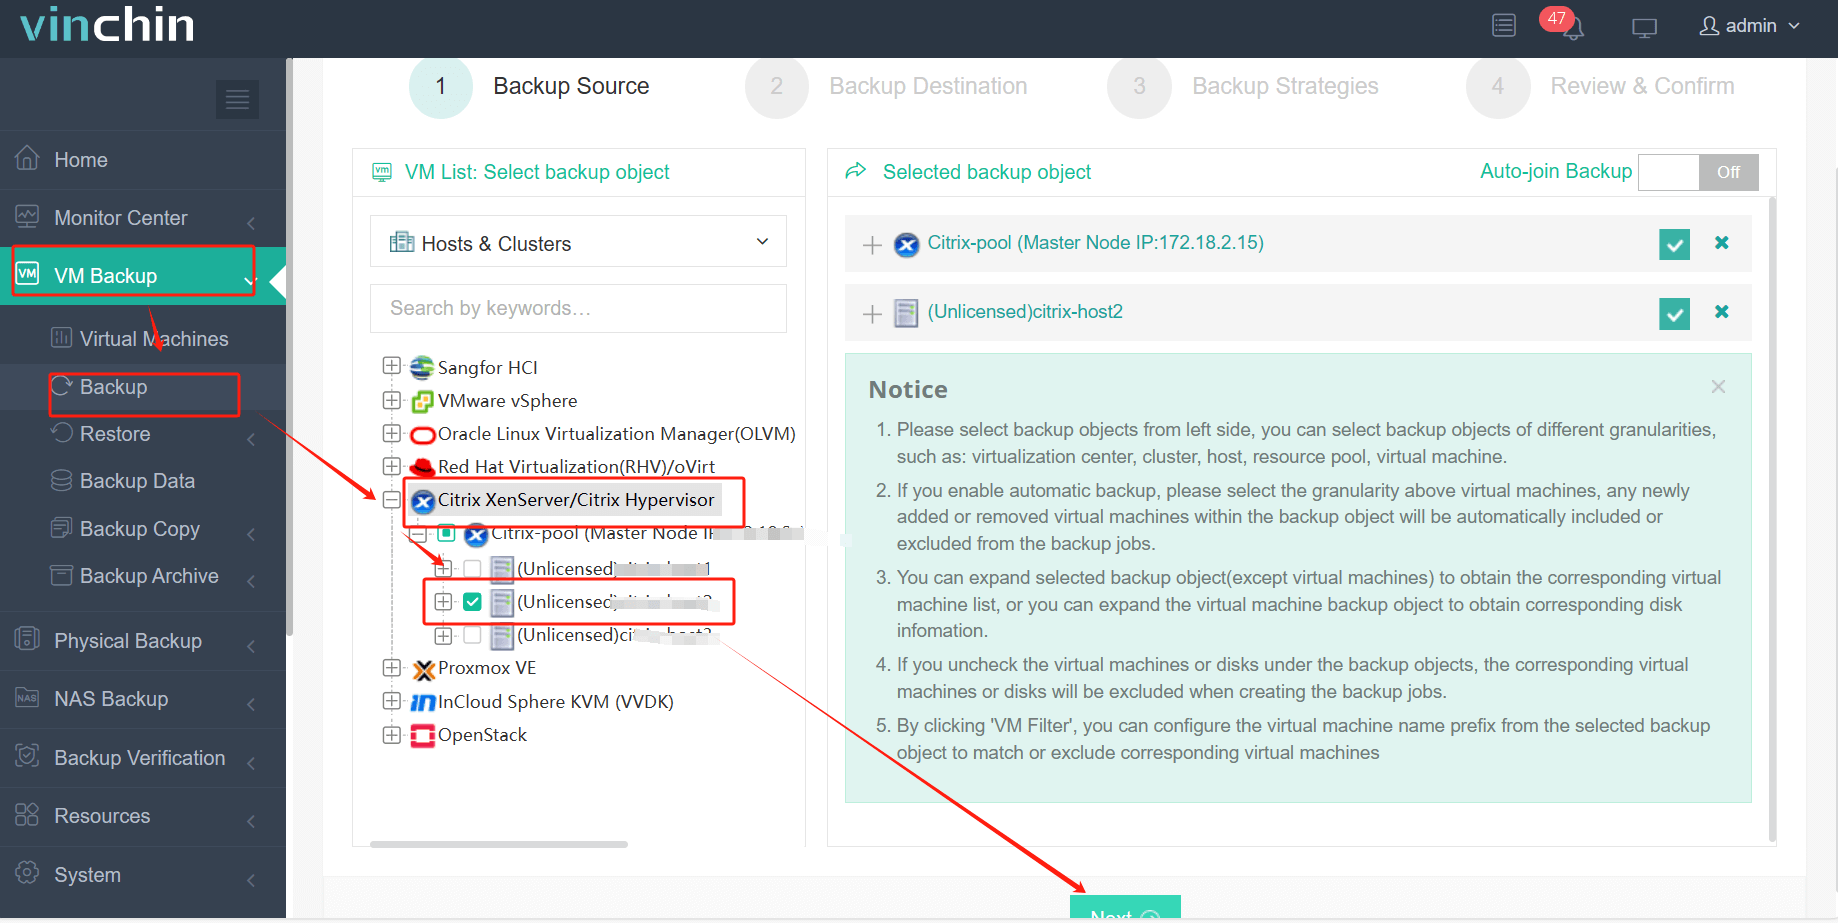
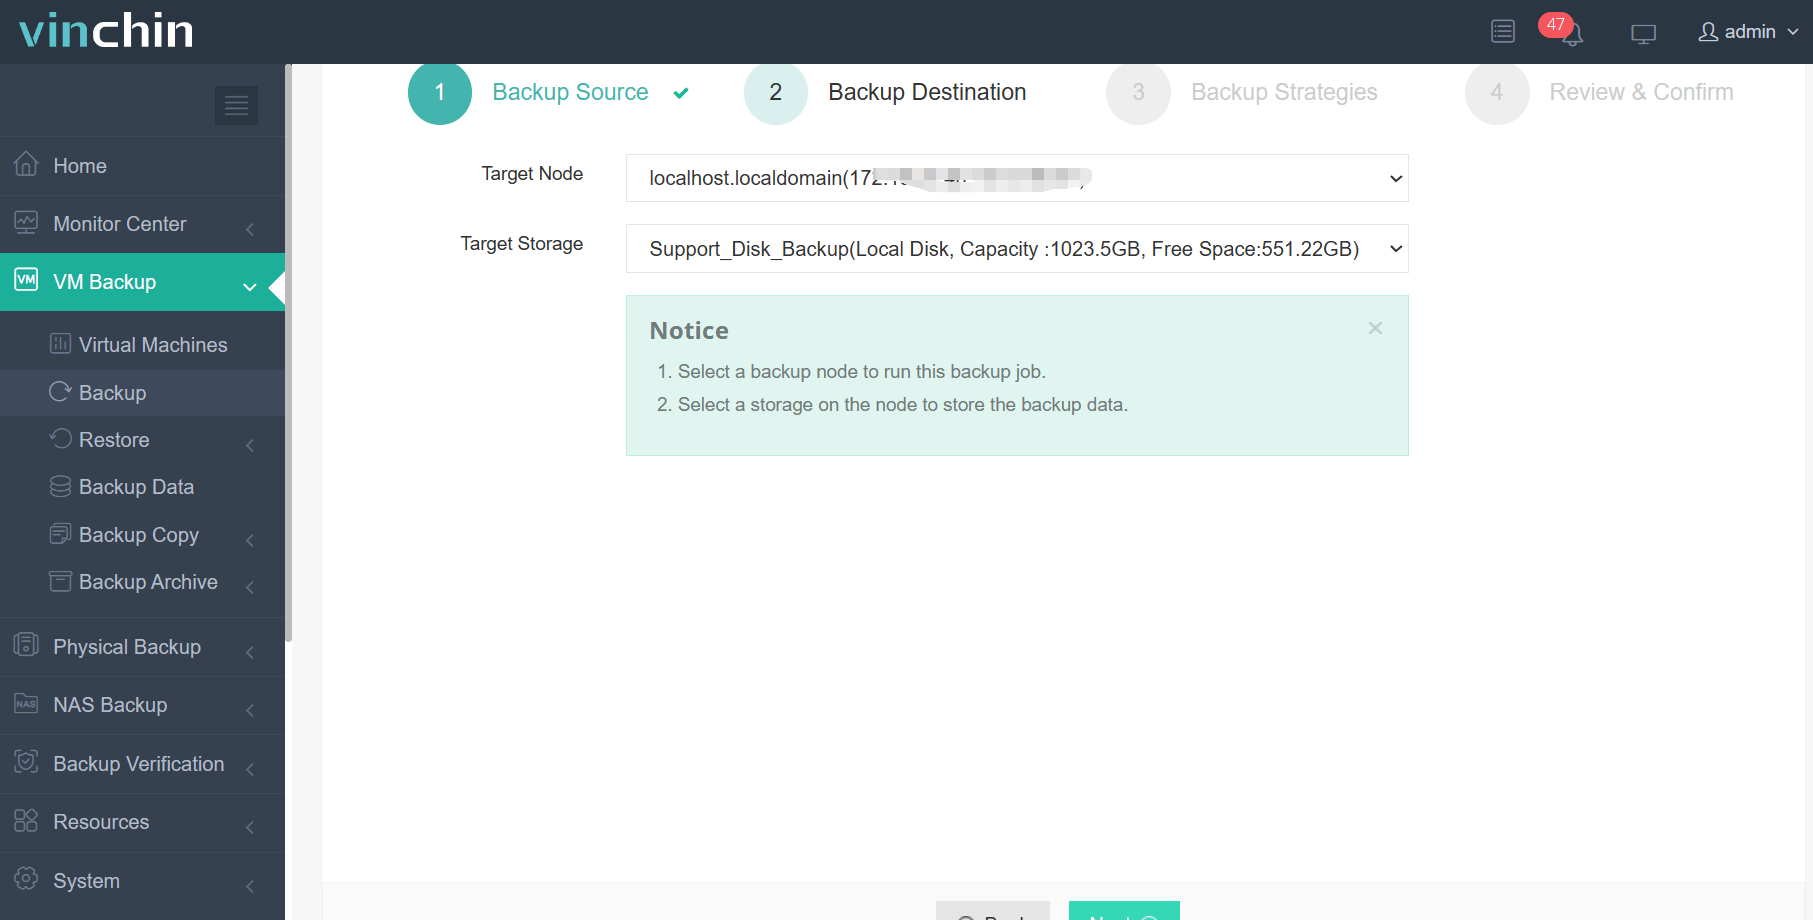
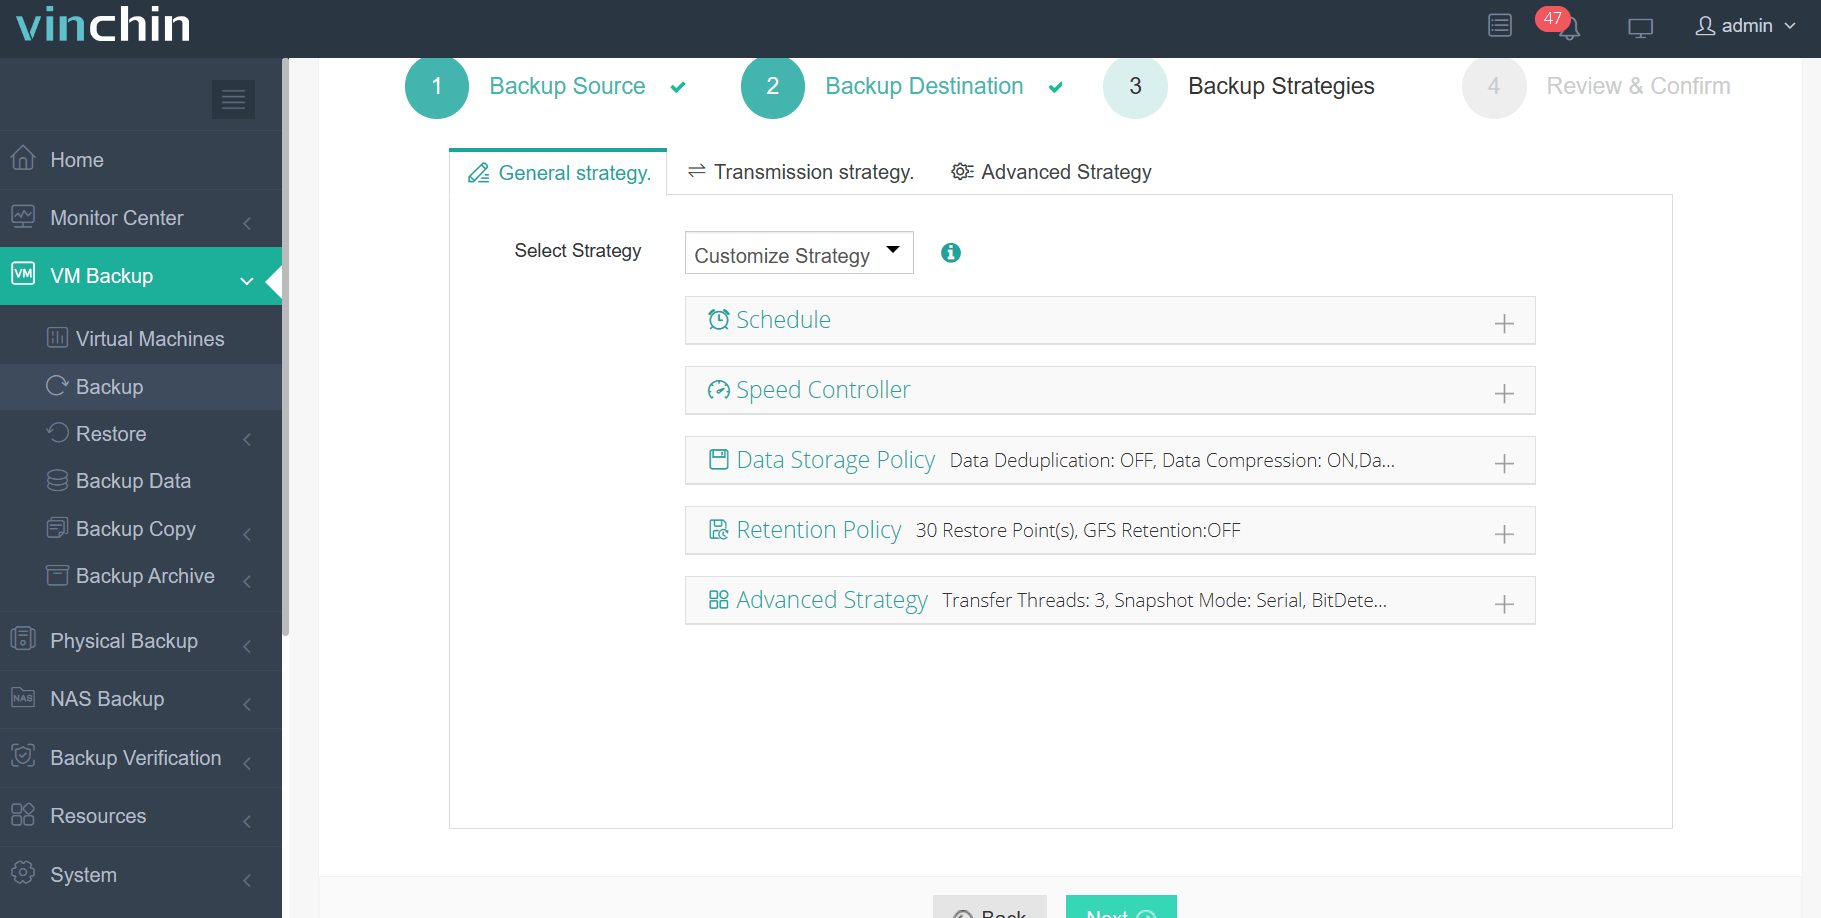
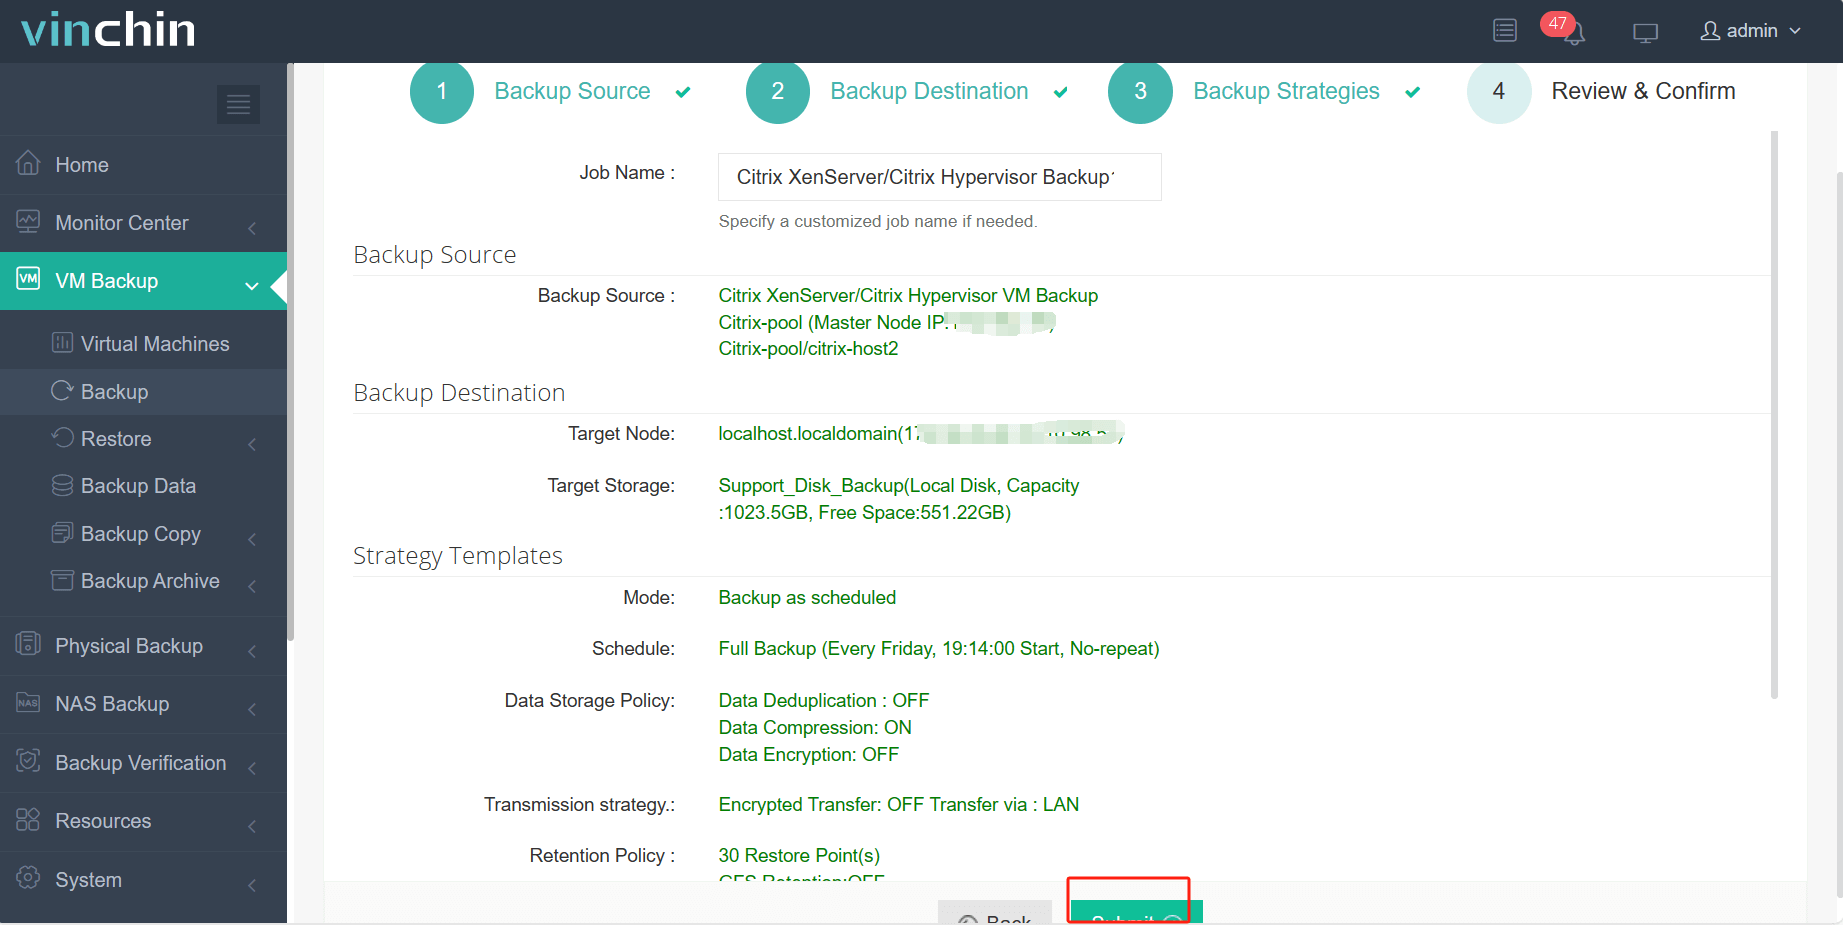
The intuitive web console makes backing up a Citrix XenServer VM straightforward in four steps:
Step 1: Select the Citrix Hypervisor/XenServer VM(s) you want to protect;

Step 2: Choose your preferred backup storage location;

Step 3: Configure a suitable backup strategy based on organizational needs;

Step 4: Submit the job with a single click.

Trusted globally by thousands of enterprises with top ratings for reliability and support—try Vinchin Backup & Recovery risk-free today with a full-featured 60-day free trial! Click below to download now.
FAQs About XenServer SR‑IOV
Q1: Can I combine GPU passthrough with xenserver sr iov networking in one VM?
A1: Yes—but only if enough PCIe resources/IOMMU groups exist per host; check platform documentation carefully before combining multiple passthrough devices per guest.
Q2: How do I reclaim unused virtual functions after deleting old VMs?
A2: Remove associated interfaces via GUI/CLI then reboot host—or reload driver module—to return freed-up slots back pool available assignments.
Q3: Will enabling xenserver sr iov affect bonding/VLAN configurations already present?
A3: Yes—default wizard disables bonding/VLAN tagging unless manually configured afterward following advanced guides provided by Citrix/hardware vendor sites.
Conclusion
XenServer SR‑IOV delivers powerful gains for performance-sensitive workloads but demands precise planning/configuration at every stage—from BIOS tweaks through ongoing monitoring/tuning efforts over time! For reliable backups/migrations protecting even fastest-moving environments try out Vinchin today—it just works!
Share on:


