-
What Are XenServer Guest Tools?
-
Why Install XenServer Guest Tools
-
How to Download XenServer Guest Tools ISO?
-
How to Back Up Your XenServer Virtual Machine with Vinchin Backup & Recovery?
-
Xenserver Guest Tools ISO Download FAQs
-
Conclusion
If you run virtual machines on XenServer, you need every advantage for speed and control. That’s where XenServer Guest Tools come in—they boost performance and unlock advanced features inside your VMs. But since version 8.2, finding the right ISO file has become less obvious because it’s no longer bundled with the main installer. This guide explains what these tools do, why you need them, how to complete a xenserver guest tools iso download safely—and how to install them step by step.
What Are XenServer Guest Tools?
XenServer Guest Tools are a package of drivers and utilities that help your VM talk directly with the hypervisor instead of using slow emulation methods. For Windows VMs, this includes special paravirtualized (PV) drivers plus a service called XenAgent that manages communication between your VM and host system. On Linux VMs, similar PV drivers work alongside management scripts known as xen-tools.
These components replace generic device emulation with optimized pathways for disk access, networking, memory ballooning, time sync, shutdown commands—even live migration support. With these installed inside your VM’s operating system (OS), everything runs smoother and faster.
Why Install XenServer Guest Tools
Installing these tools is not just a suggestion—it’s essential for any production workload running on XenServer or XCP-ng hosts:
You get much better disk read/write speeds thanks to PV drivers.
Network throughput improves dramatically.
You can shut down or reboot VMs cleanly from your management console.
Live migration works reliably.
Snapshots capture consistent states.
Monitoring data becomes accurate—so you always know what’s happening inside each VM.
Advanced features like memory ballooning become available for resource efficiency.
Without guest tools installed—or if they’re outdated—you risk poor performance or even failed migrations during maintenance windows. Why take that chance?
How to Download XenServer Guest Tools ISO?
Since version 8.2 of Citrix Hypervisor (formerly called XenServer), the guest-tools.iso file is no longer included in the base installation media; you must now download it separately for both Windows and Linux guests.
There are two main ways to perform a xenserver guest tools iso download:
1. Direct download from Citrix’s official portal (recommended).
2. Extracting it from an existing host server (useful if internet access is limited).
Let’s walk through both methods—but first let’s cover some important prerequisites so you don’t hit roadblocks later.
Prerequisites for Installation
Before downloading or installing anything:
Make sure your VM OS is supported by current guest tool versions—for example:
Windows Server 2016/2019/2022
Ubuntu 18+, CentOS/RHEL 7+, Debian 10+
Check official compatibility lists if unsure
Confirm network connectivity if you plan to fetch files directly from Citrix
For Linux installs: Ensure kernel headers are present (
yum install kernel-develorapt-get install linux-headers-generic)Have administrator/root credentials ready inside each VM
If using Method 1 below: Create a free Citrix account ahead of time—you may be prompted at download
Method 1: Direct Download from Citrix Portal
This method ensures you always get the latest supported version—a must for production environments where security matters most.
Here’s how to complete a safe xenserver guest tools iso download:
1. Go to the Citrix Hypervisor Downloads page in your browser.
2. Log in with your Citrix account when prompted; registration is free if needed.
3. Find sections labeled XenServer VM Tools for Windows or XenServer VM Tools for Linux depending on your target OS.
4a (Windows): Click Download XenServer VM Tools for Windows—this gives you either an .iso, .msi, or zipped installer package depending on release version.
4b (Linux): Click Download XenServer VM Tools for Linux—you’ll receive either an .iso image or compressed archive (tar.gz).
5a (Windows): Save file locally; unzip if necessary so you have access to installer files inside.
5b (Linux): If given a .tar.gz, extract contents using tar -xzf filename.tar.gz.
6a: Always verify SHA256 checksum provided by Citrix before proceeding—this guards against corrupted downloads.
7a: In your management console (like XenCenter), select target VM > click DVD Drive > choose Insert Disk Image > browse to downloaded ISO/image file > select it > confirm mount action completes successfully inside guest OS.
8a: Inside Windows VMs—open File Explorer > double-click DVD drive icon > run setup program (setup.exe or .msi) as Administrator; follow prompts until finished; reboot when asked.
8b: Inside Linux VMs—mount DVD/CD-ROM device (mount /dev/cdrom /mnt); change directory into /mnt; run install script as root user (./install.sh); watch output closely; reboot only if instructed by script output.
This approach guarantees up-to-date drivers matched exactly to current host software versions—a key factor in avoiding compatibility headaches later!
Method 2: Extracting ISO from Existing Installation
If direct internet access isn’t possible—or if working within isolated networks—you can often find pre-existing copies of guest-tools ISOs stored locally on older hosts:
1. SSH into any running XenServer/XCP-ng host using terminal client of choice
2a: For classic Citrix hosts—the path is usually /opt/xensource/packages/iso/guest-tools.iso
2b: On XCP-ng systems—it may appear as /opt/xensource/packages/iso/xcp-ng-tools.iso
3: Use scp, WinSCP or another secure copy utility to transfer this ISO onto your workstation/laptop
4: In management console (e.g., XenCenter), select target VM > click DVD Drive > choose Insert Disk Image > point at newly copied ISO file
5a (Windows): Open DVD drive within guest OS; launch setup executable manually; proceed through wizard screens as above
5b (Linux): Mount CD/DVD device (mount /dev/cdrom /mnt); execute included shell script (./install.sh) under root privileges
Important note! These local ISOs might be older than what’s available online—they match whatever version shipped with that specific host build date/version number! Always check which version matches your running hypervisor before deploying widely across multiple servers.
How to Back Up Your XenServer Virtual Machine with Vinchin Backup & Recovery?
After ensuring all VMs have updated guest tools installed and optimal performance achieved, safeguarding those workloads becomes crucial. Vinchin Backup & Recovery stands out as an enterprise-level solution supporting over fifteen mainstream virtualization platforms—including XCP-ng/XenServer first and foremost—as well as VMware vSphere/ESXi clusters, Proxmox VE, oVirt, OLVM, RHV, Hyper-V, OpenStack, ZStack and more via one unified web interface.
Vinchin Backup & Recovery delivers robust protection tailored specifically toward modern datacenter needs by offering forever incremental backup strategies that save storage space while maintaining full recoverability at any restore point; built-in deduplication and compression reduce storage costs significantly; cross-platform migration enables seamless movement between different hypervisors; granular restore allows single-file/app-level recovery without restoring entire disks; scheduled jobs combined with data encryption ensure automated protection and compliance—all managed through an intuitive dashboard.
The Vinchin Backup & Recovery web console makes backup operations straightforward:
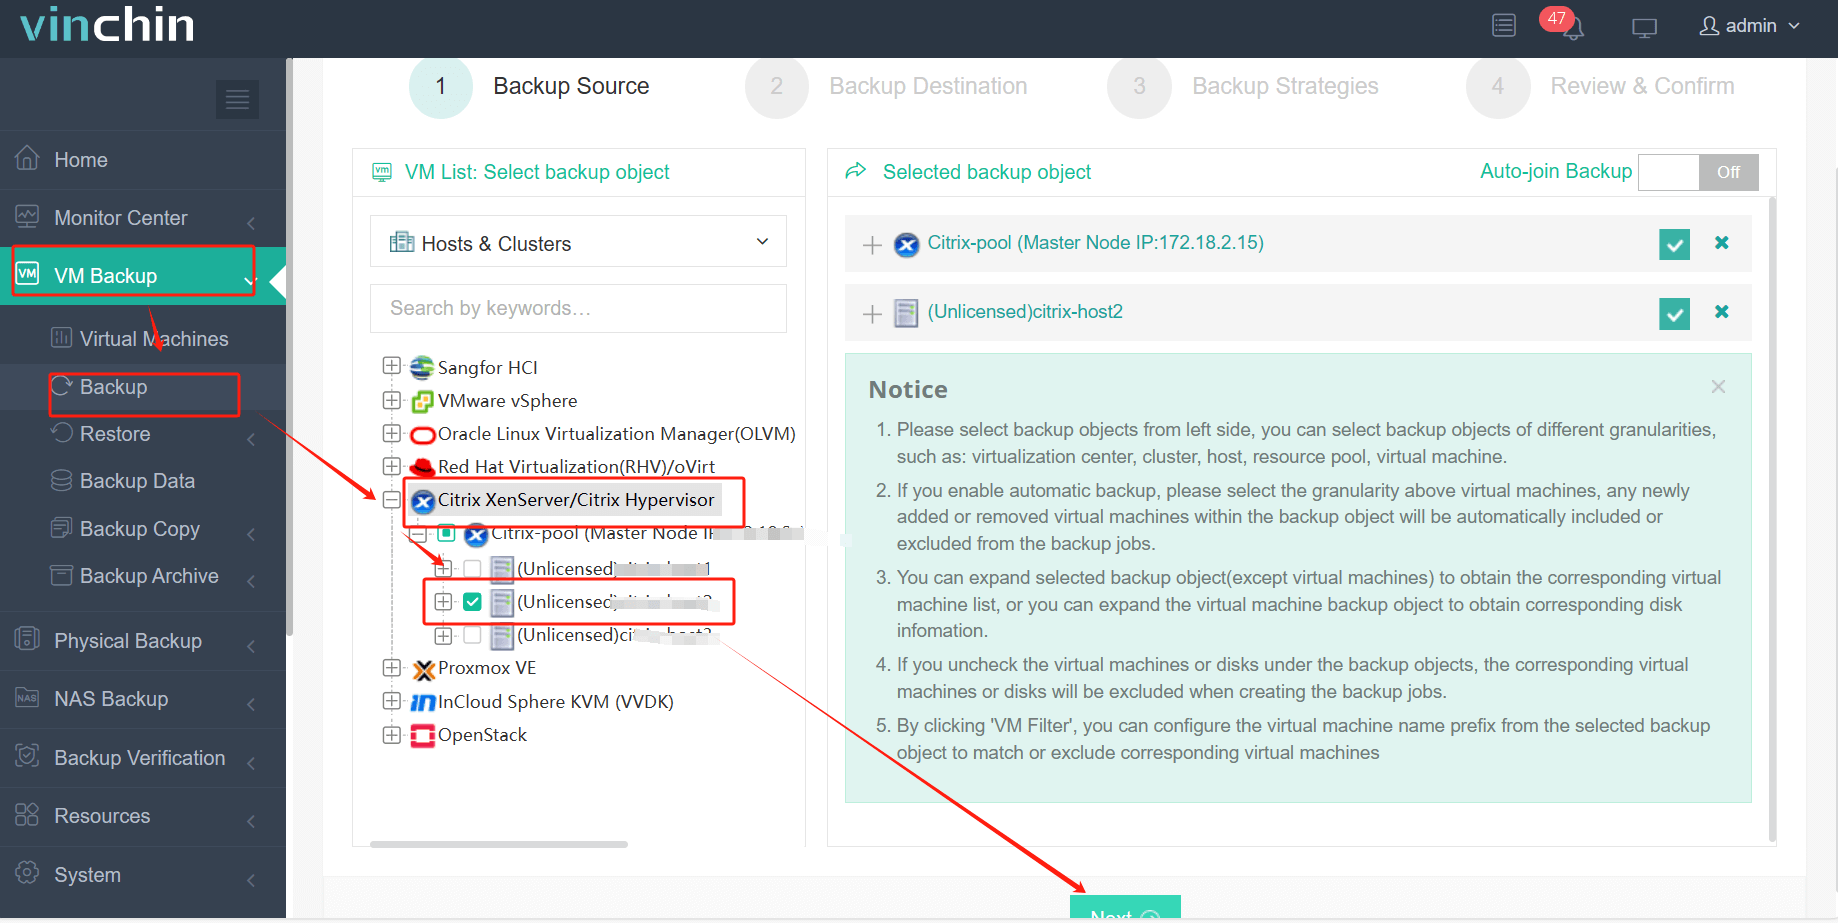
Step 1: Select the XCP-ng/XenServer VM to back up

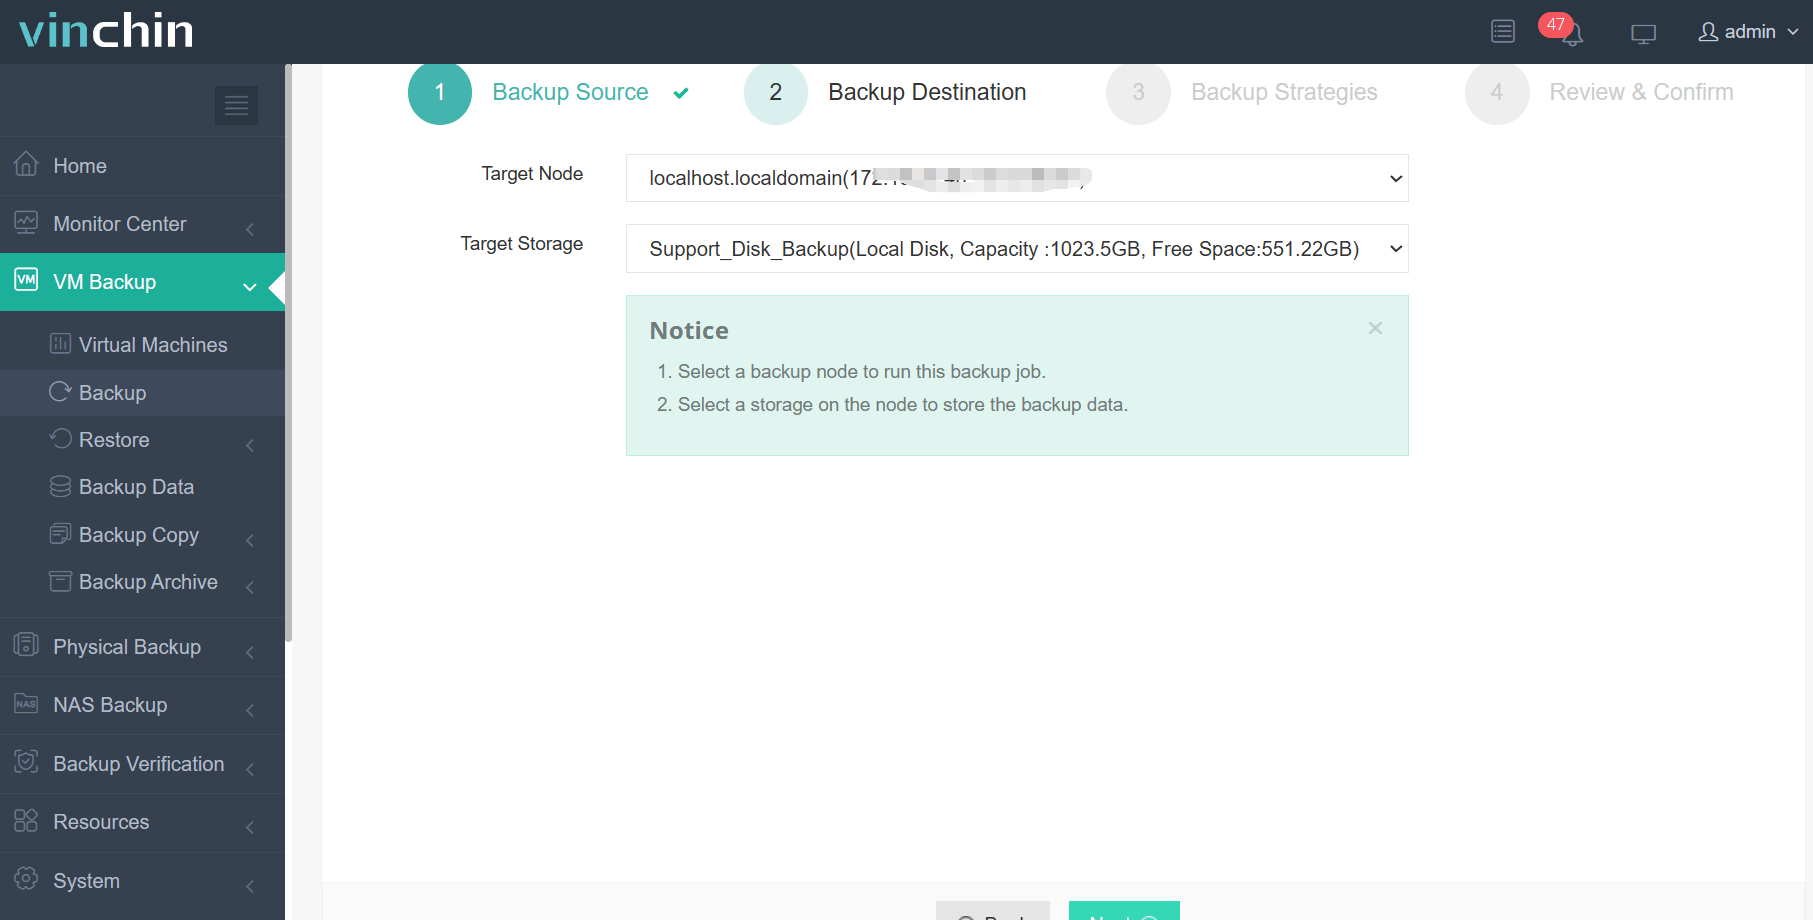
Step 2: Choose the backup storage

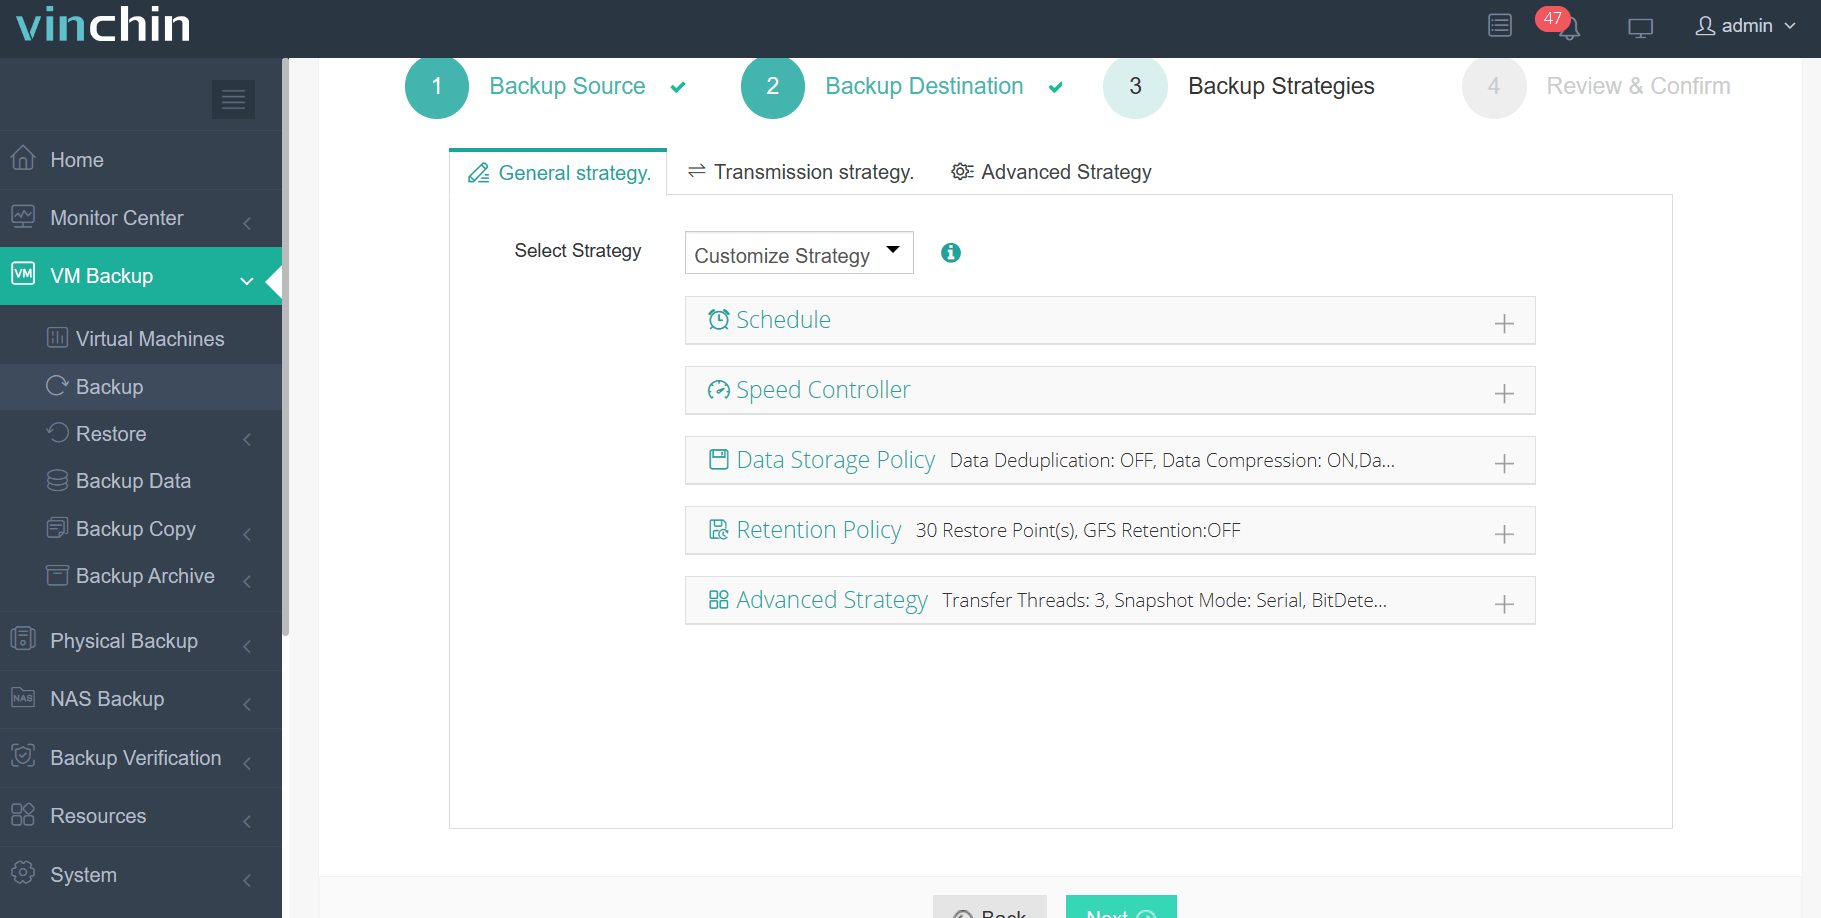
Step 3: Configure the backup strategy

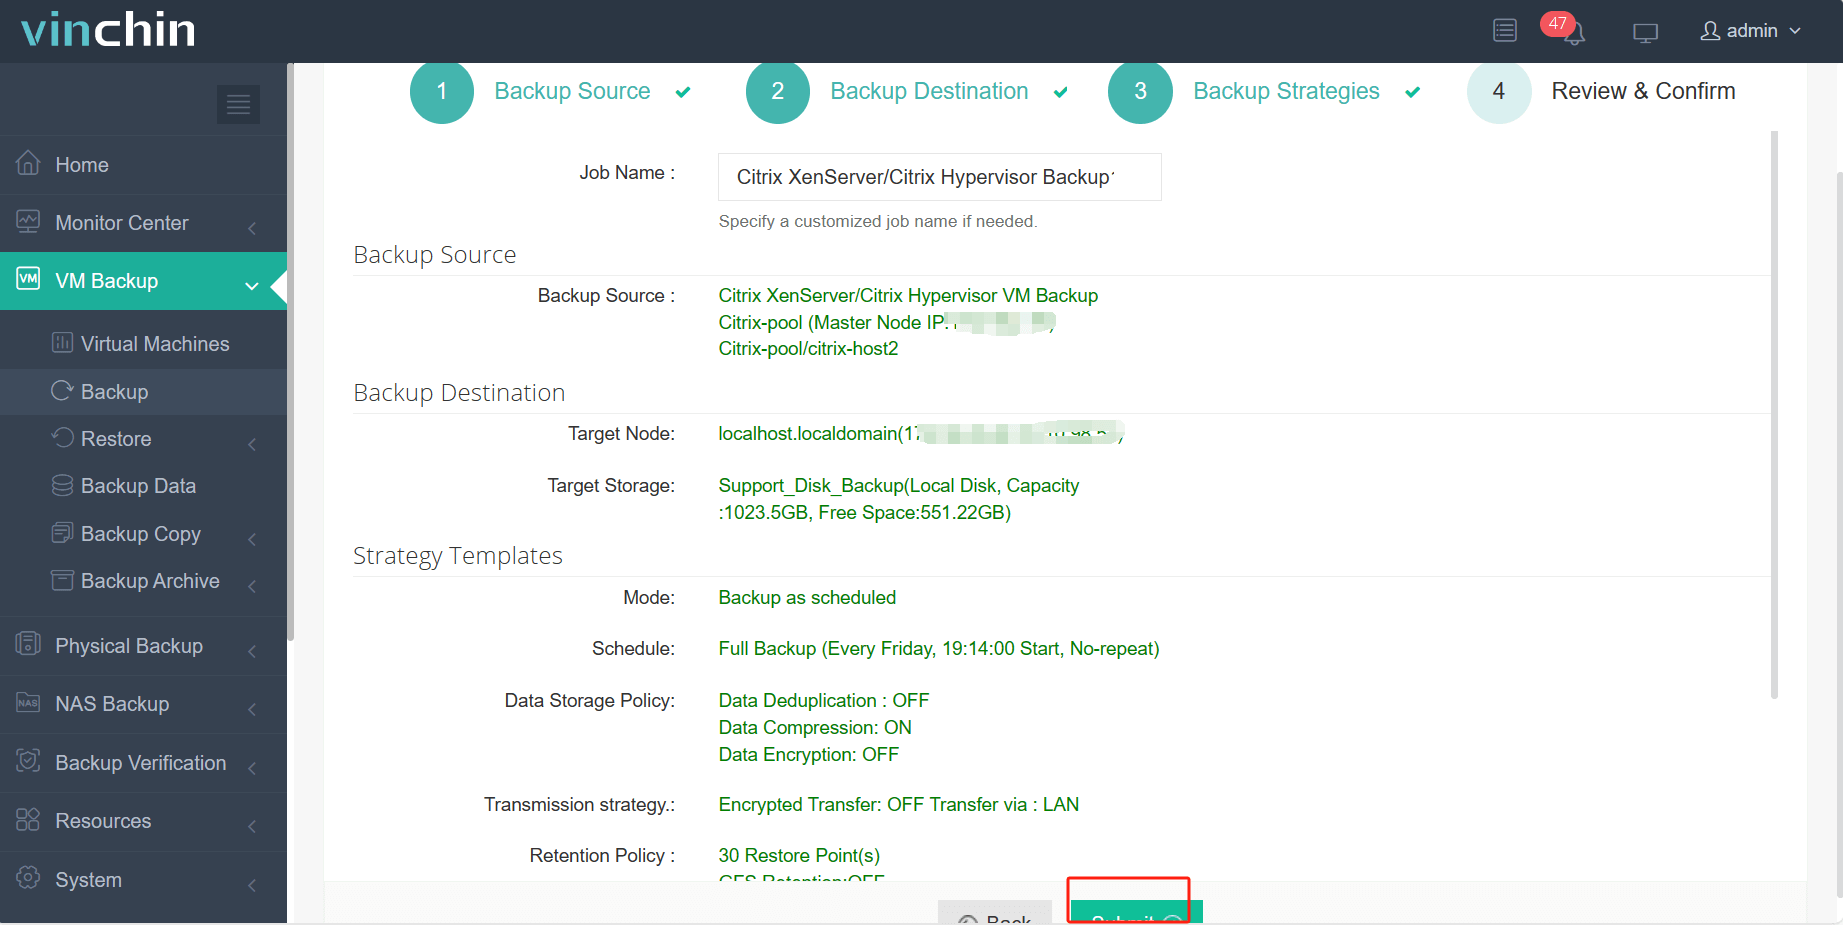
Step 4: Submit the job

With just these four steps in Vinchin Backup & Recovery's user-friendly interface, your critical workloads gain reliable protection against ransomware attacks, hardware failures, accidental deletions, and data corruption events—with minimal daily effort required.
Thousands worldwide trust Vinchin Backup & Recovery thanks to its global reputation and top customer ratings—try all features free for 60 days by clicking below!
Xenserver Guest Tools ISO Download FAQs
Q1: Can I automate future updates of guest tools across many VMs?
A1: Yes—with scripting via PowerShell/bash combined with configuration management platforms like Ansible/SCCM—but always test updates carefully first!
Q2: What should I do if my downloaded ISO fails checksum verification?
A2: Delete corrupted file immediately then repeat official download process until hash matches published value exactly—it protects against malware/tampering risks!
Q3: Is there risk installing mismatched tool versions between host/server?
A3: Yes—incompatible combinations can cause crashes/network loss/unexpected behavior so always match tool release number precisely with underlying hypervisor build shown in About/System Info screens!
Conclusion
Keeping up-to-date with xenserver guest tools iso download ensures peak performance plus smooth operations across all virtual machines hosted on modern infrastructure platforms today—and protects those investments long-term when paired alongside reliable solutions like Vinchin backup software! Try us now risk-free…
Share on:


