-
What Is ESXi on Hyper-V?
-
Understanding Nested Virtualization Limitations
-
Prerequisites for Installation
-
Method 1. Installing ESXi on Hyper-V Using Hyper-V Manager
-
Method 2. Installing ESXi on Hyper-V Using PowerShell
-
How to Migrate Virtual Machines With Vinchin?
-
Install ESXi on Hyper‑V FAQs
-
Conclusion
Running VMware ESXi inside a Microsoft Hyper-V virtual machine is a classic example of nested virtualization. This setup is not supported for production environments but serves as a valuable tool for labs, testing, and training. If you want to experiment with ESXi but only have access to Hyper-V infrastructure, this guide will walk you through each step.
What Is ESXi on Hyper-V?
ESXi on Hyper-V means installing VMware’s ESXi hypervisor as a guest virtual machine within a Hyper-V host. This process uses nested virtualization technology. It allows you to run ESXi—and its own virtual machines—without needing dedicated physical hardware for each layer. However, there are important limitations with network drivers and performance that you must consider before starting. Most users set up this environment for learning or proof-of-concept purposes rather than real workloads.
Understanding Nested Virtualization Limitations
Before diving into installation, it’s important to understand what makes running ESXi inside Hyper-V unique—and challenging.
Nested virtualization introduces several constraints:
No 64-bit Guest VMs: Due to how Hyper-V exposes hardware features like second-level address translation (SLAT), only 32-bit operating systems can run as guests inside your nested ESXi VM. Even if your processor supports 64-bit virtualization extensions (Intel VT-x/EPT or AMD-V/RVI), these features do not fully pass through from Hyper-V to the nested layer.
Performance Overhead: Each layer adds CPU and memory overhead. Expect slower response times compared to bare-metal installations because resources are shared between multiple hypervisors.
Limited Hardware Support: Generation 1 VMs in Hyper-V offer only legacy devices such as IDE disks and legacy network adapters. Modern paravirtualized drivers like VMXNET3 or PVSCSI are unavailable in this configuration.
Unsupported by Vendors: Neither Microsoft nor VMware officially supports running ESXi as a guest under another hypervisor like Hyper-V. Use this setup strictly for non-production scenarios such as labs or training environments.
Network Driver Challenges: Only specific network drivers—such as net-tulip—work reliably with the legacy adapter provided by Generation 1 VMs in Hyper-V. Newer versions of ESXi lack compatible drivers out of the box.
Understanding these limitations helps set realistic expectations about what you can achieve when you install esxi on hyper v.
Prerequisites for Installation
Before starting, confirm that your environment meets these requirements:
You need a Windows Server or Windows 10/11 system with Hyper-V enabled; an Intel processor with VT-x and EPT support—or an AMD processor with AMD-V and RVI (Rapid Virtualization Indexing) support; at least 4 GB RAM available just for the VM; enough disk space (30 GB minimum); access to an official ESXi ISO image; PowerShell installed; VMware PowerCLI tools; plus the net-tulip network driver package.
Only ESXi 6.0 is known to work reliably in this scenario because later versions lack compatible network drivers for use with Hyper-V’s legacy adapter. Attempting newer versions may result in missing network connectivity unless you find experimental community solutions—which often cause instability.
Pro tip: Always allocate physical CPU cores instead of threads when possible, since nested virtualization increases resource demands at every level.
Method 1. Installing ESXi on Hyper-V Using Hyper-V Manager
The most common way to install esxi on hyper v is through the graphical interface provided by Hyper-V Manager. This method is straightforward but requires careful attention during VM creation and driver integration.
First, customize your ESXi ISO image by injecting the net-tulip driver—otherwise, ESXi will not detect any usable network adapter during installation.
1. Prepare Your Customized ISO
Download both the ESXi-Customizer-PS script and net-tulip driver files from trusted sources.
Open PowerShell as Administrator and set execution policy using
Set-ExecutionPolicy -Scope Process -ExecutionPolicy Bypass
Run
.\ESXi-Customizer-PS-v2.6.0.ps1 -sip -vft -load net-tulip
When prompted, select your official ESXi 6.0 ISO image profile.
2. Create a New Virtual Machine
Open Hyper-V Manager, then click Action > New > Virtual Machine.
Name your VM (for example: "ESXi6-0") and choose where it will be stored.
Select Generation 1 so you can use legacy networking options required by older drivers.
Assign at least 4 GB memory—and make sure you disable Dynamic Memory here! Why? Because dynamic allocation conflicts with how ESXi manages its own memory internally.
Configure networking now using default settings—you’ll adjust them later if needed.
Create a new virtual hard disk of at least 30 GB capacity.
Under Installation Options, select Install an operating system from a bootable CD/DVD-ROM, then browse for your customized ISO file containing net-tulip support.
Review all settings carefully before clicking Finish.
3. Adjust VM Settings
Right-click your new VM entry in Hyper-V Manager, then choose Settings…
Under Processor settings, assign at least two virtual processors for better performance during lab work.
Remove any default network adapters listed under Network Adapter—they won’t work!
Click on Add Hardware, pick "Legacy Network Adapter," then click "Add."
Attach this adapter to whichever virtual switch matches your intended test environment setup.
4. Enable Nested Virtualization
Open PowerShell again:
Set-VMProcessor -VMName "ESXi6-0" -ExposeVirtualizationExtensions $true
5. Install ESXi
Start up your new VM via console view in Hyper-V Manager:
Click "Start," wait until you see the blue boot screen,
Press "TAB" quickly,
Append ignoreHeadless=TRUE at boot options,
Then press "Enter."
Follow prompts: press "Enter" at welcome screen,
Press "F11 Accept License Agreement,"
Choose target disk,
Set root password,
Press "F11 Install,"
After completion press "Enter Reboot Now."
6. Before reboot completes:
Press "Shift+O" at boot loader prompt again;
Append ignoreHeadless=TRUE once more;
Continue normal startup sequence into initial configuration screens;
7. To Make Boot Option Permanent
Once logged into direct console user interface:
Press "F2 Customize System/View Logs,"
Enable both "Troubleshooting Mode Options > Enable SSH" AND "Enable ESXI Shell,"
Switch consoles using "Alt+F1,"
Enter shell command:
esxcfg-advcfg –k TRUE ignoreHeadless
Return using "Alt+F2."
8. Configure Networking
Use menu option labeled "Configure Management Network" if static IP addressing is needed;
9 Access Host Client
From another computer open browser window;
Navigate directly via http://[your-esxi-ip];
Log in using root credentials set earlier;
This method gives you full control over each step while ensuring compatibility throughout installation—even though some manual intervention is required along the way!
Method 2. Installing ESXi on Hyper-V Using PowerShell
If automation appeals more than point-and-click interfaces—or if repeatability matters—PowerShell provides another way to install esxi on hyper v efficiently:
First ensure all prerequisites are ready—including PowerCLI tools plus customized ISO built previously using net-tulip injection steps above (no need to repeat those).
1) Create Your Virtual Machine via Scripted Commands
New-VM –Name "ESXi6-0" –MemoryStartupBytes 4GB –Generation 1 –NewVHDPath "C:\VMs\ESXi6_0\disk.vhdx" –NewVHDSizeBytes 30GB –Path "C:\VMs\ESXI6_0"
Immediately disable Dynamic Memory—it interferes with how nested hypervisors manage resources:
Set–VMMemory –VMName "ESXI6–0" –DynamicMemoryEnabled $false
2) Add Legacy Network Adapter & Set Processors
Add–VMNetworkAdapter –VMName "ESXI6–0" –SwitchName "External" –IsLegacy $true
Set–VMProcessor –VMName "ESXI6–0" –Count 2
3) Mount Custom ISO Image
Set–VMDvdDrive –VMName "ESXI6–0" –Path "C:\Path\To\esxi60_custom.iso"
4) Enable Nested Virtualization Extensions
Set–VMProcessor –VMName "ESXI6–0" –ExposeVirtualizationExtensions $true
5) Start Installation Process & Complete Setup Steps As Above
Use "Start–VM", connect via console viewer just like GUI method;
Remember: always append "ignoreHeadless=TRUE" during initial boots!
Once installed follow same procedure described earlier for making headless mode permanent (esxcfg-advcfg) plus configuring management networking details per lab needs;
This approach saves time when deploying multiple test environments—or scripting entire lab setups from scratch!
How to Migrate Virtual Machines With Vinchin?
For organizations seeking efficient cross-platform migration solutions without disrupting production systems, leveraging advanced backup software becomes essential. Vinchin Backup & Recovery stands out as an enterprise-grade backup solution offering agentless virtual machine migration capabilities that help businesses seamlessly transition workloads between different environments while minimizing downtime or operational impact.
Vinchin Backup & Recovery supports migrating various types of virtual machines across leading platforms including VMware, Hyper‑V, Proxmox VE, oVirt, OLVM (Oracle Linux Virtualization Manager), RHV (Red Hat Virtualization), XCP-ng, XenServer, and OpenStack—with additional compatibility extending beyond those listed here depending on specific business needs or less common platforms involved.
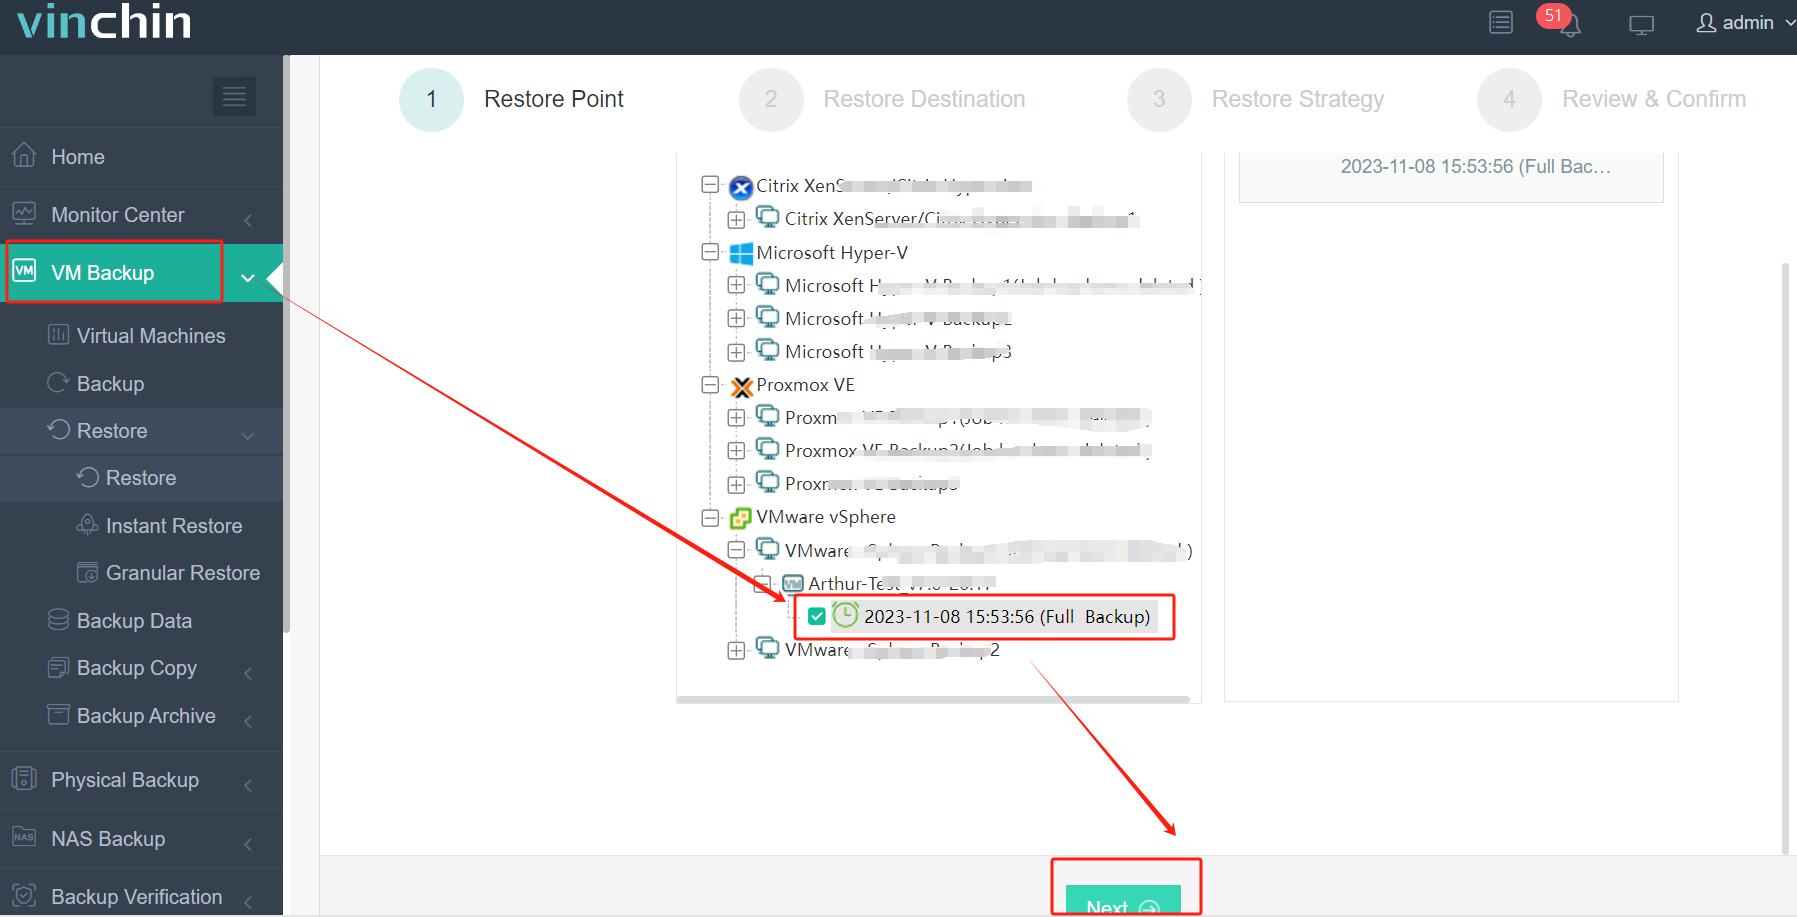
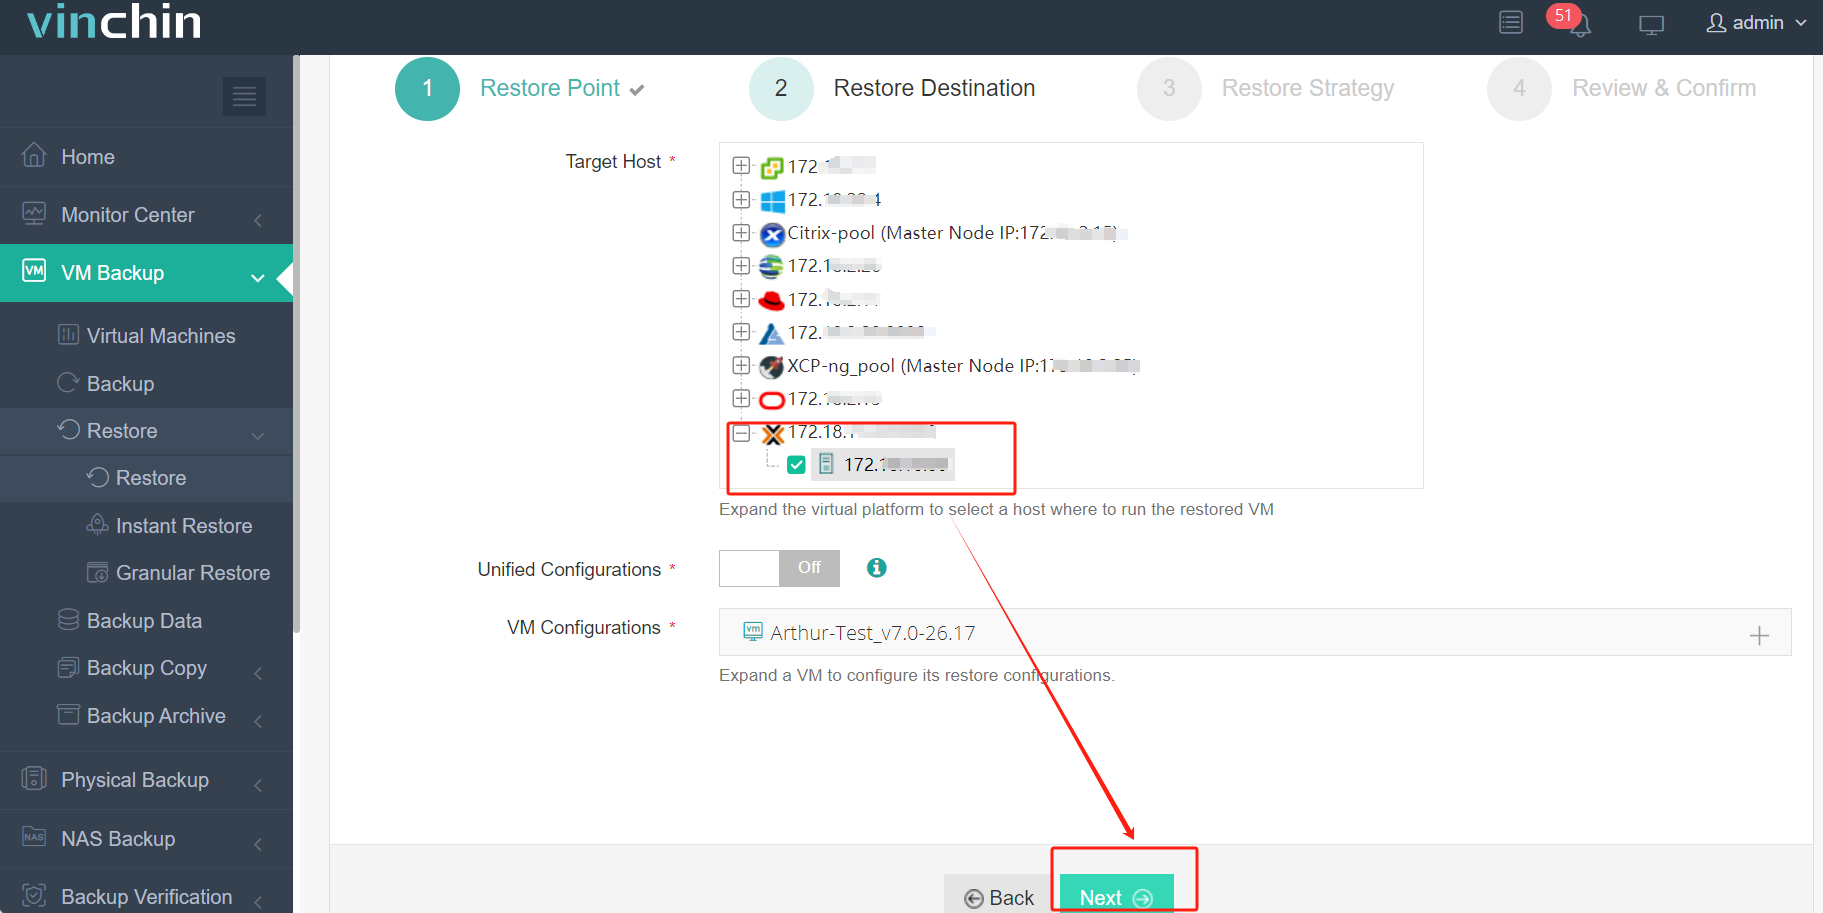
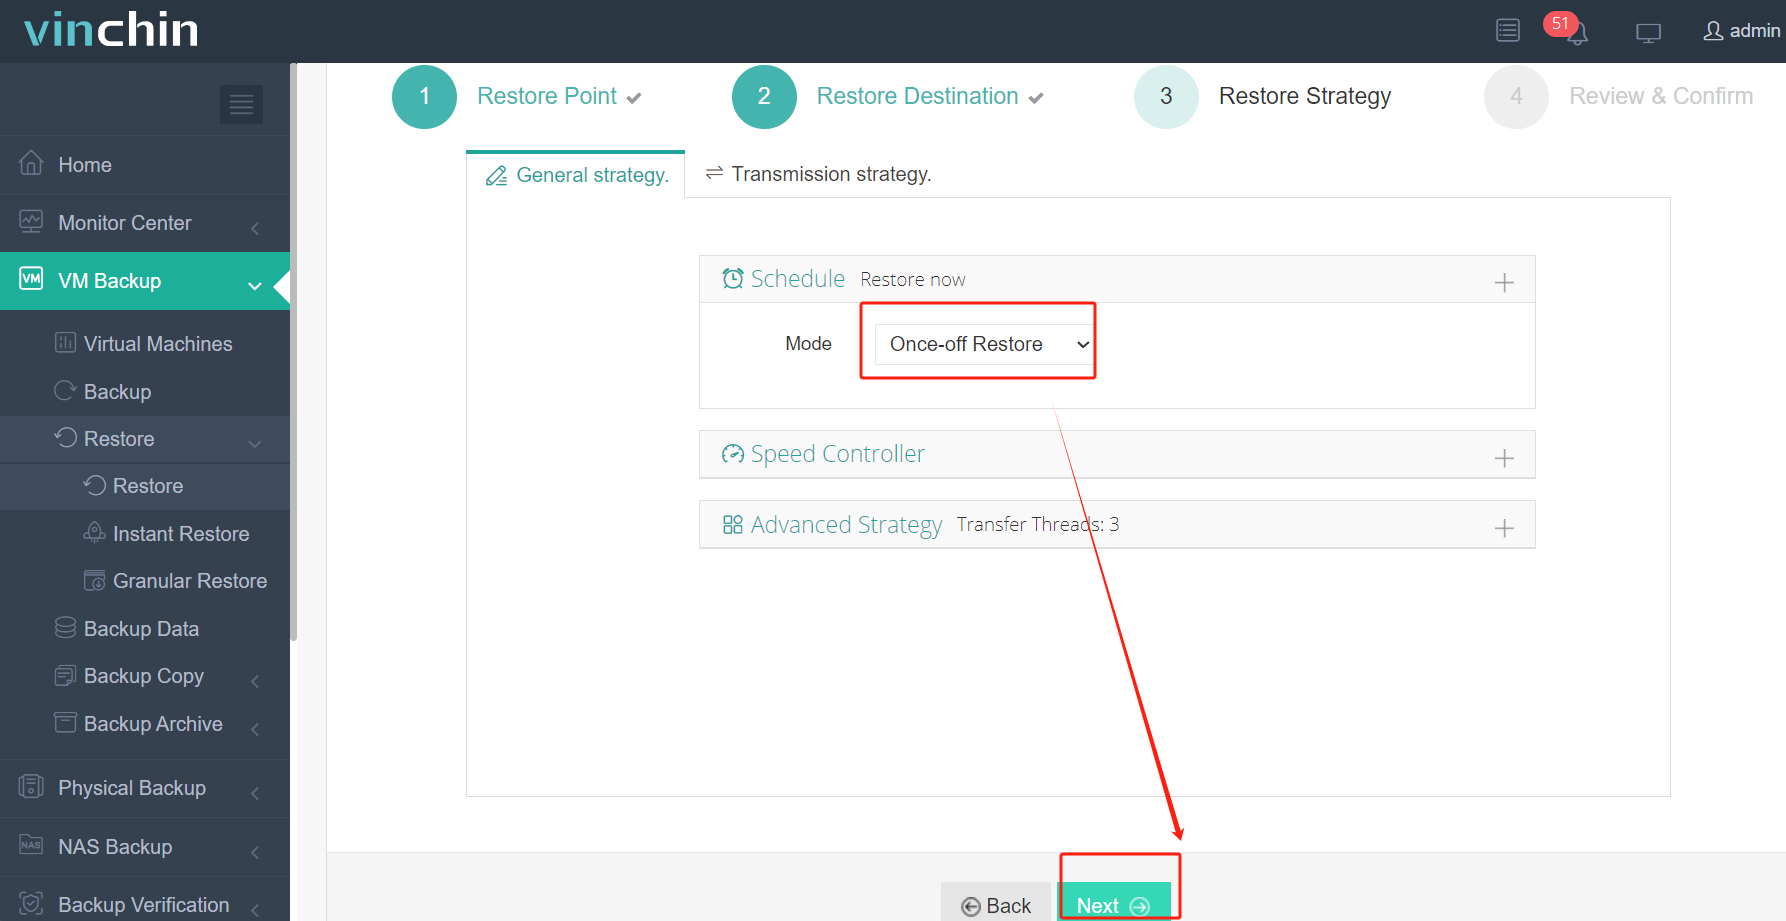
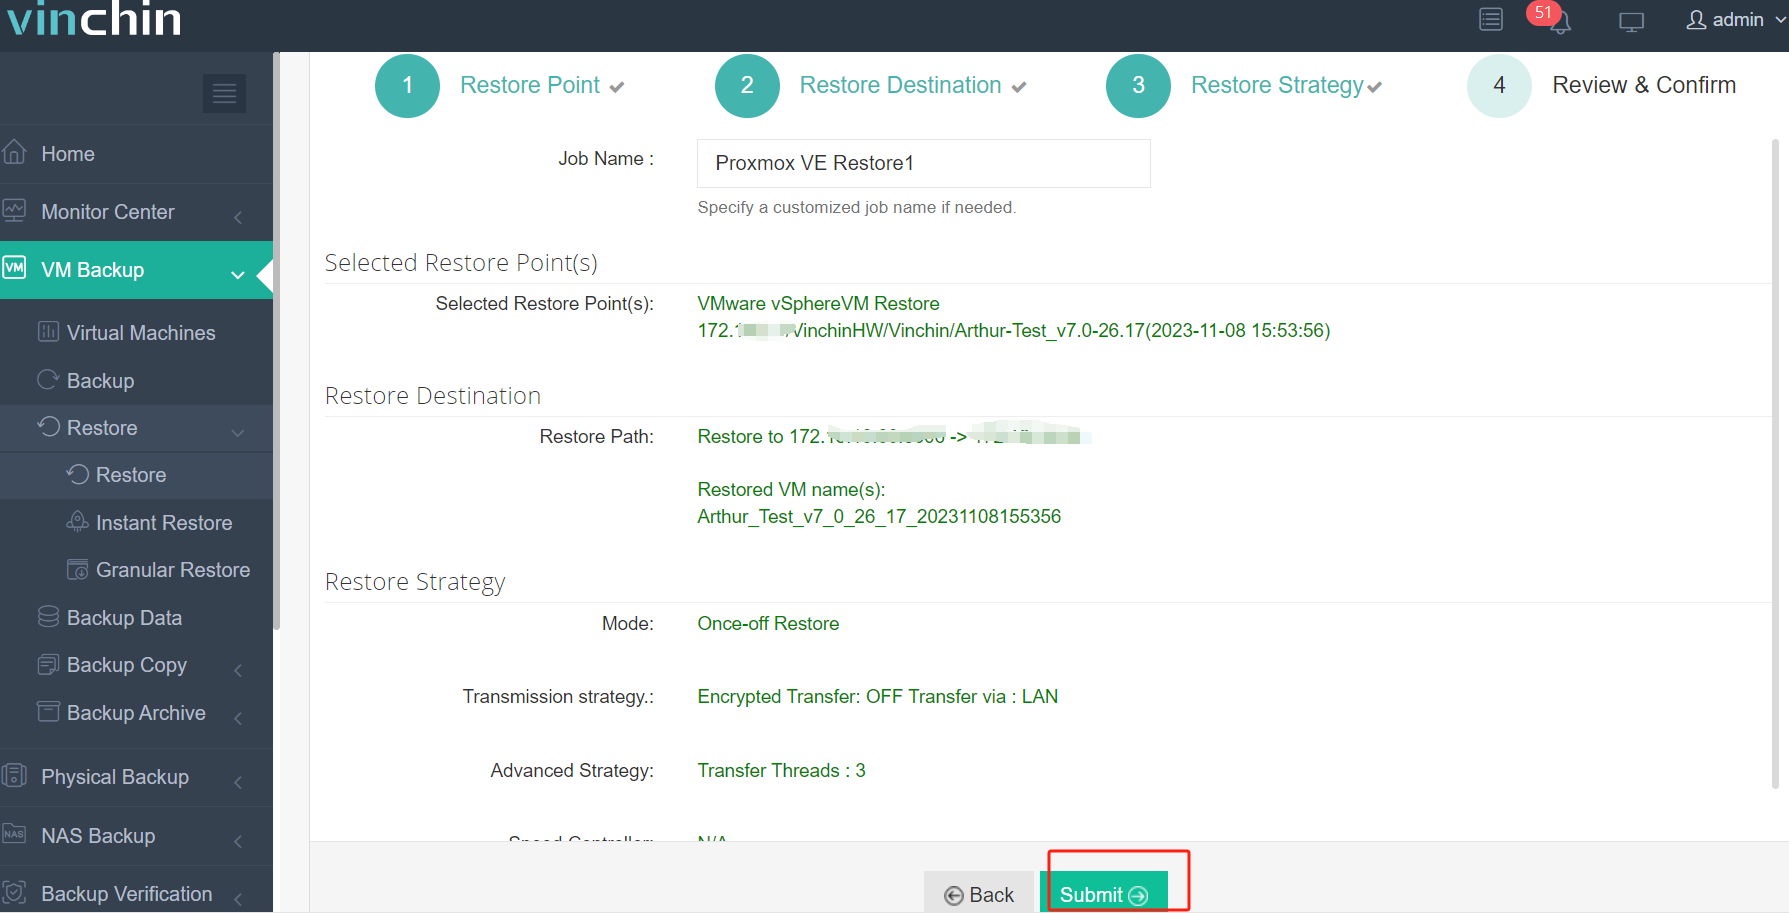
The migration process using Vinchin Backup & Recovery is extremely straightforward: simply back up the source VM first and restore it onto the desired target host where it can be powered on immediately after recovery completes—all managed easily through Vinchin Backup & Recovery’s intuitive web-based console interface:
1.Select the backed-up virtual machine (e.g., from VMware).

2.Select the target host platform such as Proxmox VE).

3.Select migration strategies appropriate for workload requirements or scheduling preferences.

4.Submit job for automated execution by Vinchin Backup & Recovery engine.

Trusted globally by thousands of customers who rate it highly for reliability and simplicity, Vinchin Backup & Recovery offers a full-featured free trial valid for sixty days. Download the installer with one click and deploy in minutes for your own labor test migration project.
Install ESXi on Hyper‑V FAQs
Q1: Can I run 64-bit guest VMs inside my nested ESXi instance?
A1: No—you’re limited strictly thirty-two bit operating systems due incomplete hardware feature exposure from parent host downwards;
Q2: What should I check if no network adapters appear during install?
A2: Confirm Generation 1 type selected; Legacy Network Adapter present; Net-Tulip injected successfully into custom installer media used;
Q3: How do I make ignoreHeadless=TRUE setting permanent after first boot?
A3: Enable shell access via F2 menu > ALT+F1 > enter command ‘esxcfg-advcfg ‑k TRUE ignoreHeadless’ > ALT+F2 exit shell view;
Conclusion
Installing esxi on hyper v offers great value for labs but comes with strict limitations around performance and compatibility—it’s never suitable production workloads. For seamless cross-platform migrations, Vinchin delivers robust agentless solutions supporting many leading virtualization stacks. Try their free trial today!
Share on:


