-
What Is Hyper-V?
-
Why Enable Hyper-V?
-
Method 1: Enable Hyper V via Control Panel
-
Method 2: Enable Hyper V Using PowerShell
-
Method 3: Enable Hyper V Using Command Prompt (DISM)
-
How to Backup Hyper‑V Virtual Machines with Vinchin Backup & Recovery
-
Enable Hyper V FAQs
-
Conclusion
Virtualization has become essential in modern IT operations. If you want to run virtual machines on your Windows system, you must enable Hyper-V first. This guide explains what Hyper-V is, why it matters for your work, how to enable it using three different methods, how to verify your setup, troubleshoot issues, explore advanced scenarios like nested virtualization or automation—and finally how to protect your virtual machines with reliable backup solutions.
What Is Hyper-V?
Microsoft Hyper-V is Microsoft's built-in Type-1 hypervisor for Windows platforms. It allows you to create and manage virtual machines (VMs) directly on your hardware without needing extra software layers. Each VM runs its own operating system isolated from others—ideal for testing updates safely or running legacy applications alongside modern workloads.
Hyper-V integrates tightly with Windows management tools such as System Center Virtual Machine Manager (SCVMM) and supports features like live migration and resource control out of the box. For many organizations, enabling Hyper-V means getting enterprise-grade virtualization at no extra cost if they already use supported editions of Windows.
Why Enable Hyper-V?
Enabling Hyper-V unlocks powerful capabilities that matter every day in IT operations:
You can stage updates or patches inside isolated environments before rolling them out.
Developers can build infrastructure-as-code templates using real VMs.
Security teams can test malware samples without risking production systems.
Training labs become easy to set up by spinning up multiple OS versions side by side.
Features like checkpoints (snapshots), dynamic memory allocation, secure boot support—even nested virtualization—are all available once you enable Hyper V on supported hardware.
For most admins running Windows Pro/Enterprise/Education editions on modern CPUs with enough RAM (at least 4 GB), enabling Hyper-V is often just a few clicks away—but knowing which method fits your scenario saves time down the road.
Method 1: Enable Hyper V via Control Panel
The Control Panel provides a simple graphical way to enable Hyper V—perfect if you prefer not to use command-line tools or are new to virtualization management on Windows desktops or laptops.
Start by opening the Control Panel from your Start menu search bar. Click into Programs, then select Programs and Features followed by clicking Turn Windows features on or off in the left pane. In the pop-up window labeled Windows Features, scroll until you find Hyper-V near the bottom of the list.
Expand this entry so both sub-options (Hyper-V Management Tools and Hyper-V Platform) appear—make sure both boxes are checked before clicking OK at the bottom right corner of this window. Windows now applies changes; wait while files install (this may take several minutes). If prompted afterward to restart your computer do so immediately—a reboot completes activation of all required services behind-the-scenes.
Once back at your desktop search again from Start for “Hyper-V Manager.” If it launches successfully—you’ve enabled Hyper V!
Method 2: Enable Hyper V Using PowerShell
PowerShell offers a fast way for experienced administrators who want automation or need remote/bulk deployments across many systems at once—a common task in larger organizations or server farms.
Right-click your Start button then choose Windows PowerShell (Admin) from its context menu so you have full privileges needed for system changes. At the prompt type:
Enable-WindowsOptionalFeature -Online -FeatureName Microsoft-Hyper-V -All
Press Enter—the -All parameter ensures any required dependencies are installed automatically along with core components. If asked whether you wish to restart now type Y then press Enter again; otherwise manually reboot after installation finishes so changes take effect fully across all services involved with enabling hyper v support under-the-hood.
After rebooting open Start > search “Hyper-V Manager”—if present everything worked as expected!
Tip: To see which optional features are available before enabling anything try:
Get-WindowsOptionalFeature -Online | Where-Object {$_.FeatureName -like "*hyper*"}This lists all related options including parent dependencies that might need toggling too depending upon custom setups or group policies enforced within enterprise domains.
Method 3: Enable Hyper V Using Command Prompt (DISM)
For advanced users—or when working with minimal installations such as Server Core where GUI access isn’t possible—the Deployment Image Servicing & Management tool (DISM) provides another robust way forward via command prompt interface alone:
Open Start > type “cmd” > right-click result labeled “Command Prompt” > pick “Run as administrator.” At elevated prompt enter:
DISM /Online /Enable-Feature /All /FeatureName:Microsoft-Hyper-V
Here /All ensures any necessary parent features get enabled together avoiding dependency errors. Wait while DISM processes request—it may take several minutes depending upon hardware speed/storage performance factors involved during feature addition steps internally handled by Windows servicing stack itself!
If prompted afterward always restart machine promptly so kernel-level changes apply cleanly across reboots ensuring stability/security compliance going forward.
How to Backup Hyper‑V Virtual Machines with Vinchin Backup & Recovery
After successfully enabling hyper v, safeguarding those virtual machines becomes crucial for business continuity and data integrity. Vinchin Backup & Recovery is an enterprise-level solution designed specifically for professional VM backup needs, supporting over fifteen mainstream virtualization platforms—including full compatibility with Microsoft Hyper‑V, VMware, Proxmox, oVirt, OLVM, RHV, XCP-ng, XenServer, OpenStack, ZStack and more—all managed through a unified web-based console ideal for complex hybrid environments.
Among its extensive capabilities tailored for enterprise demands are incremental backup strategies that optimize storage usage; granular restore functions allowing precise recovery down to file level; and robust data deduplication/compression technologies reducing overall storage costs—all contributing toward efficient protection and rapid disaster recovery readiness across diverse infrastructures.
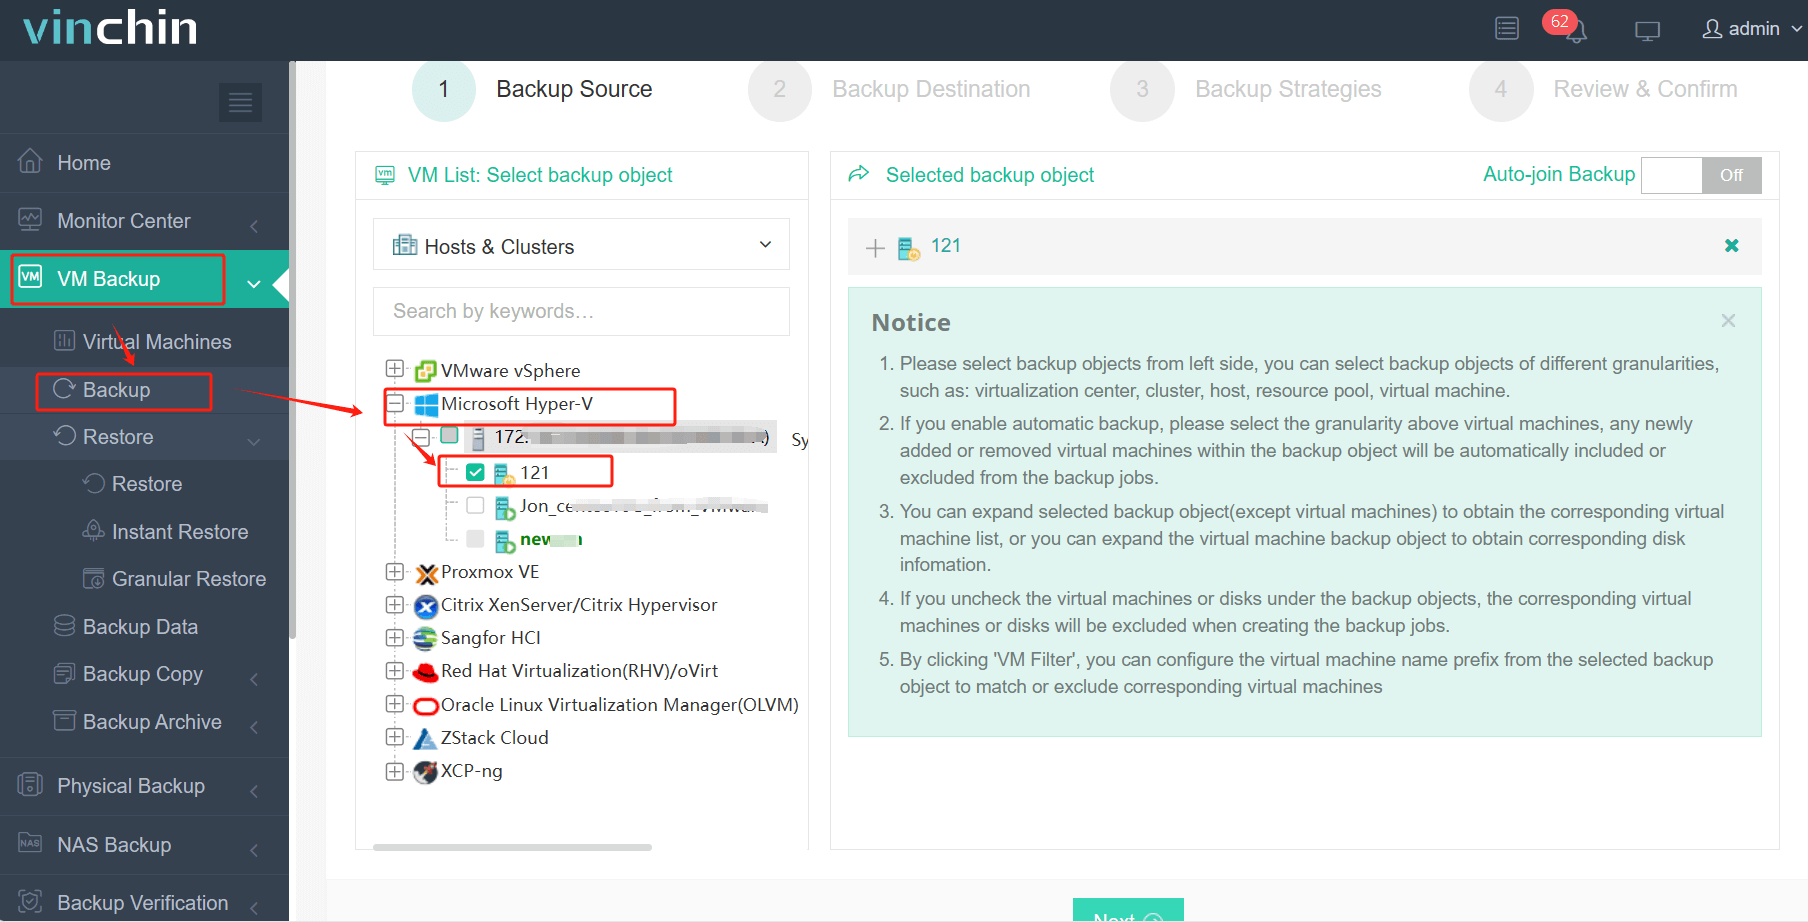
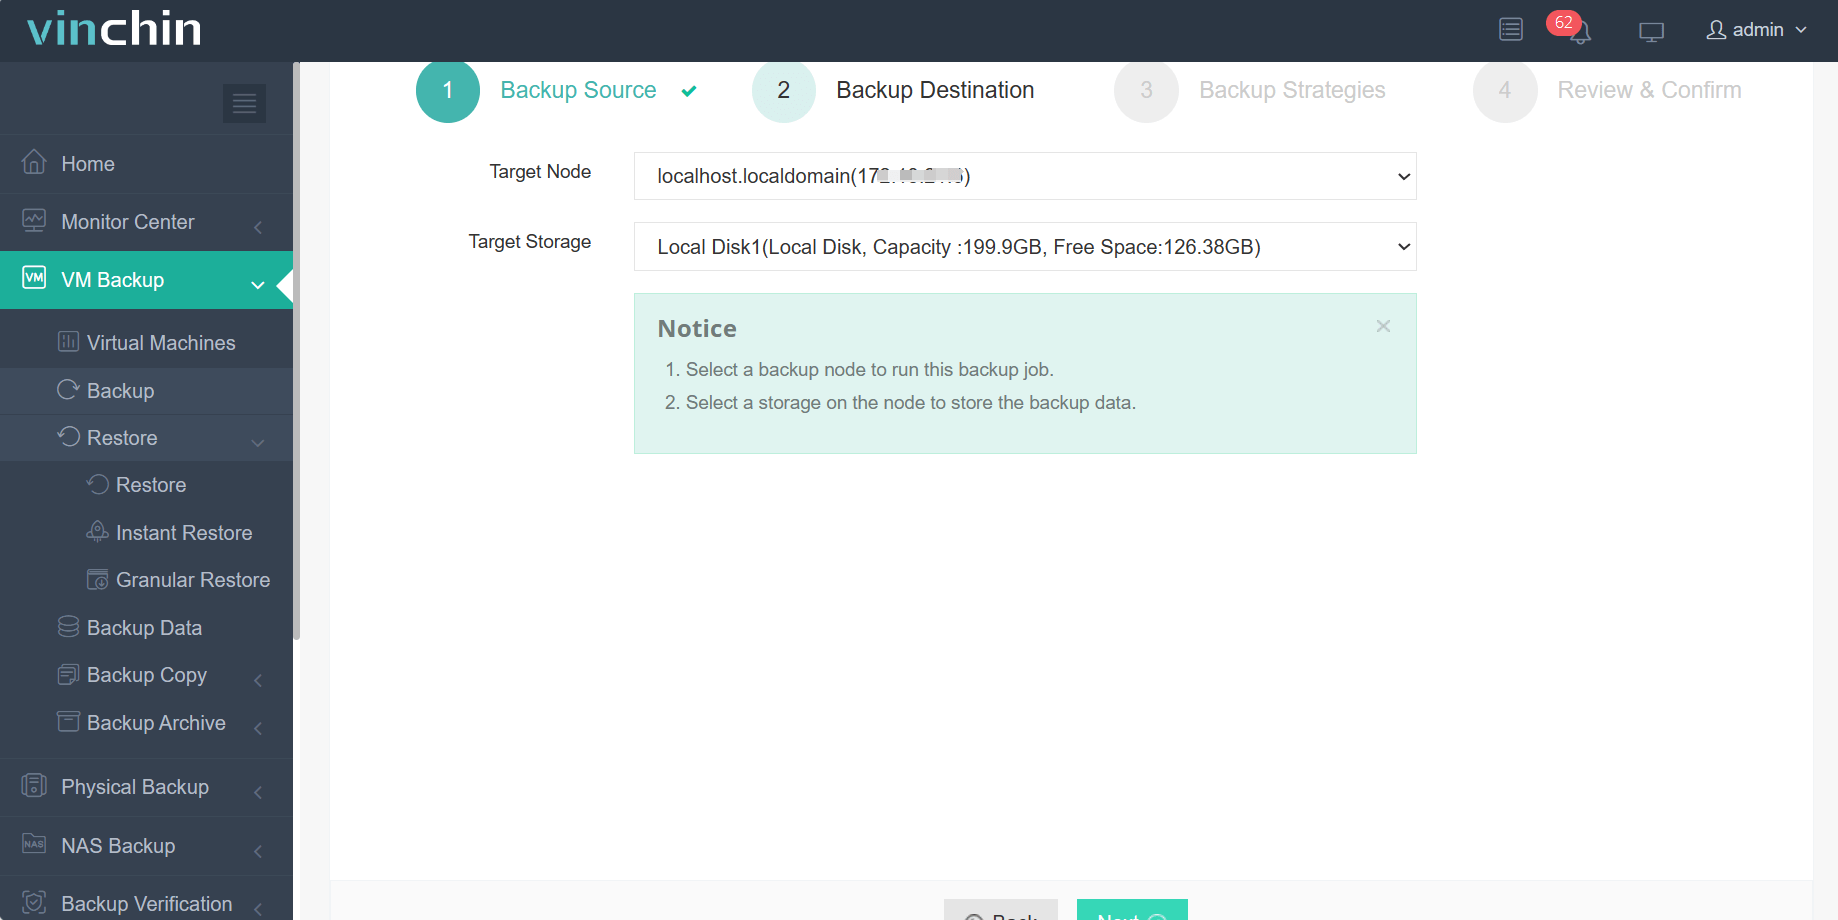
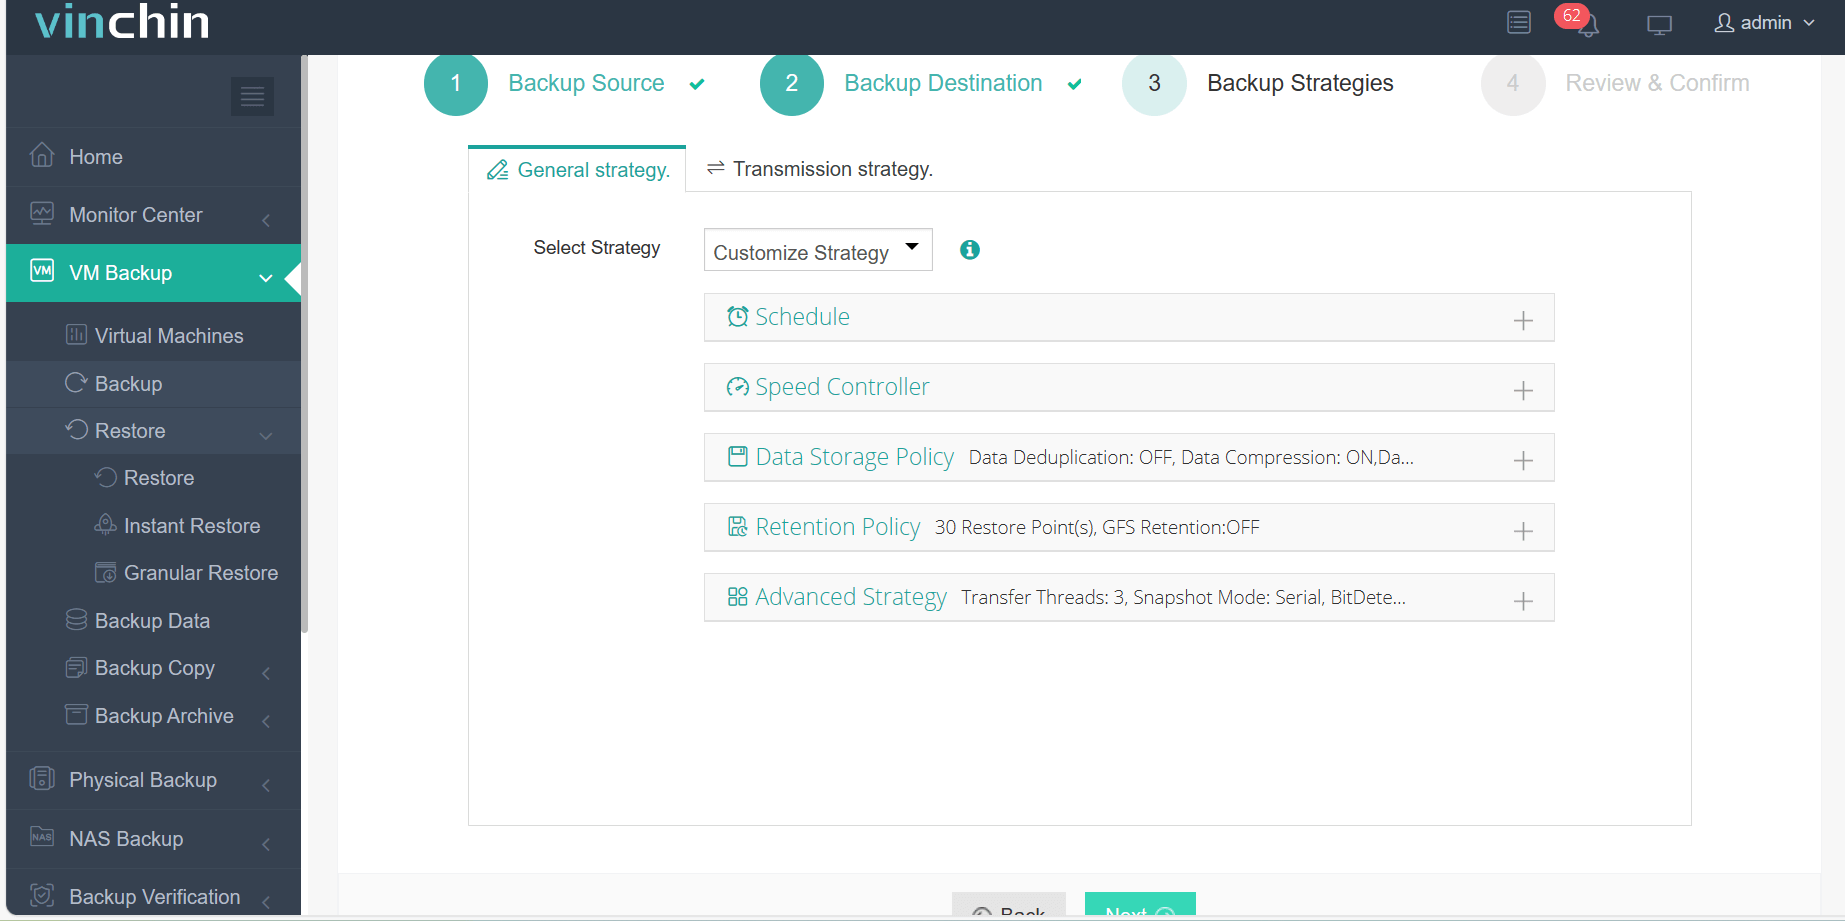
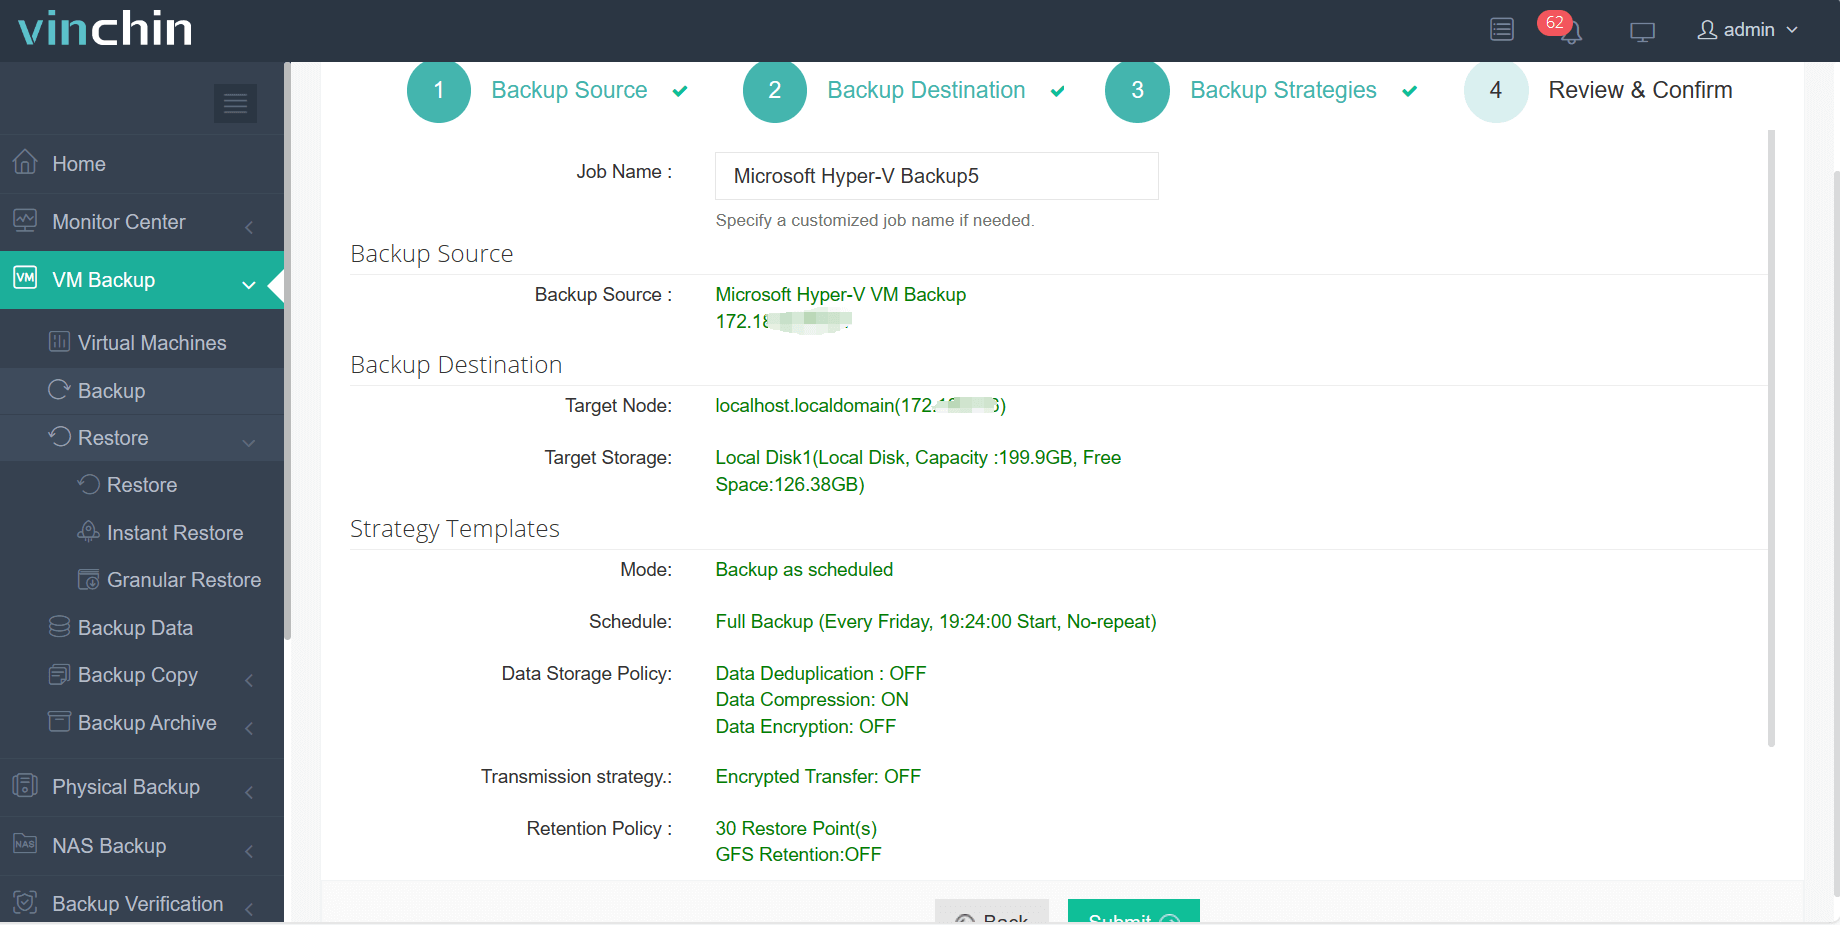
Backing up a single VM using Vinchin Backup & Recovery is straightforward thanks to its intuitive web console:
Step 1: Select the Hyper-V VM to back up.

Step 2: Choose the backup storage.

Step 3: Configure the backup strategy.

Step 4: Submit the job.

Recognized globally with top ratings and trusted by thousands of organizations worldwide, Vinchin Backup & Recovery offers a 60-day full-featured free trial—click below to experience comprehensive enterprise data protection firsthand!
Enable Hyper V FAQs
Q1: Can I enable hyper v remotely across multiple computers?
Yes—with PowerShell remoting enabled send Enable-WindowsOptionalFeature commands directly over network targeting each endpoint securely/authenticated per domain policy rulesets in place.
Q2: Why does my PC slow down after enabling hyper v?
Enabling adds Type‑1 layer beneath main OS introducing minor overhead mostly noticeable only during heavy disk/network loads—not typical office/dev tasks though high-end audio/video apps may see slight latency increases occasionally reported online forums/MS docs alike!
Q3: How do I disable Device Guard/Credential Guard blocking my attempt?
Open Group Policy Editor set relevant policies OFF under Computer Configuration → Administrative Templates → System → Device Guard/Credential Guard then reboot system retry enabling process again afterwards.
Conclusion
Enabling hyper v gives IT administrators flexible tools needed for safe testing training development—and more—all natively within supported versions of Windows! Whether using Control Panel scripting interfaces or advanced deployment techniques there’s always an efficient path forward here… For robust backup protection trust Vinchin’s proven solution built specifically around modern hybrid infrastructures everywhere today!
Share on:


