-
What Is Hyper-V Nested Virtualization?
-
Why Use Nested Virtualization in Hyper-V?
-
Requirements for Hyper-V Nested Virtualization
-
Method 1: Enable Nested Virtualization via PowerShell
-
Method 2: Enable Nested Virtualization via GUI
-
How to Backup Hyper V Nested Virtual Machines with Vinchin Backup & Recovery
-
Hyper V Nested Virtualization FAQs
-
Conclusion
Have you ever needed to run a virtual machine inside another virtual machine? With hyper-v nested virtualization, you can do just that. This feature lets IT professionals build complex test labs or DevOps pipelines without extra hardware. It’s also useful for sandboxed security testing or training environments where flexibility matters most. If you want to experiment safely or simulate multi-layered networks on one server, nested virtualization is your answer.
What Is Hyper-V Nested Virtualization?
Hyper-V nested virtualization allows you to run the Hyper-V role inside a virtual machine that itself runs on a physical Hyper-V host. In simple terms, it means creating virtual machines within other virtual machines—all managed through Microsoft’s built-in hypervisor technology. This opens up many possibilities for development teams who need isolated sandboxes or administrators who want to replicate production-like environments without buying more servers.
Nested virtualization first appeared in Windows Server 2016 and Windows 10 for Intel CPUs. Support has since expanded to newer versions of Windows Server and Windows 11 for AMD processors as well.
Why Use Nested Virtualization in Hyper-V?
Nested virtualization changes how IT teams approach testing and deployment tasks. It lets you build multi-tier application stacks all within one physical host—no need for racks of hardware anymore! Developers can spin up entire clusters inside a single VM for integration tests or continuous delivery pipelines. Trainers can set up hands-on labs where students create their own virtual networks without risk to core infrastructure.
Administrators benefit too—they can try out configuration changes or software updates in an isolated environment before rolling them into production systems. Have you ever wished you could clone your data center setup at home? With hyper v nested virtualization, that dream becomes reality.
Requirements for Hyper-V Nested Virtualization
Before enabling nested virtualization, check that your environment meets Microsoft’s strict requirements. First, make sure your physical server has the latest version of Windows Server (2016 or later) or Windows 10/11 installed with all updates applied.
For Intel CPUs:
You need Intel VT-x support (with Extended Page Tables).
Your guest VM must have configuration version 8.0 or higher.
Supported OS includes Windows Server 2016+ or Windows 10+.
For AMD CPUs:
You need AMD-V support.
Guest VM requires configuration version 9.3+.
Supported OS includes Windows Server 2022+ or Windows 11+.
Hyper-V must already be installed on the host system before proceeding; this feature does not come enabled by default even if your hardware supports it. Also remember—the VM must be powered off completely (not just paused) before making these changes.
Networking adds another layer: if your nested VMs require external access, plan ahead by configuring MAC address spoofing or NAT networking options after enabling nested virtualization.
Method 1: Enable Nested Virtualization via PowerShell
PowerShell offers precise control when setting up hyper-v nested virtualization—and works across all supported versions of Windows Server and client editions alike.
First things first: shut down the target VM completely from either Hyper-V Manager (Turn Off) or by running Stop-VM -Name 'YourVMName' from an elevated PowerShell prompt on your host server.
Next step involves exposing processor extensions required by guest-level hypervisors:
Set-VMProcessor -VMName 'YourVMName' -ExposeVirtualizationExtensions $true
This command tells the parent VM’s processor settings to pass through necessary features so its guest OS can install roles like Hyper-V itself later on. Want to double-check if it worked? Run:
Get-VMProcessor -VMName 'YourVMName' | Select ExposeVirtualizationExtensions
If you ever need to turn off nesting again—for example during troubleshooting—just repeat the original command but swap $true for $false.
Once done, power up your VM again from either PowerShell (Start-VM) or right-clicking its name in Hyper-V Manager (Start). Now log into this guest OS as usual; install the full Hyper-V role there using standard methods such as Server Manager (Add Roles & Features) if desired.
Planning network access between layers? Enable MAC address spoofing so inner guests can communicate externally:
Get-VMNetworkAdapter -VMName 'YourVMName' | Set-VMNetworkAdapter -MacAddressSpoofing On
For more advanced setups needing internet access from deeply-nested guests—or isolation between test environments—set up internal switches plus NAT routing rules within each layer accordingly.
Method 2: Enable Nested Virtualization via GUI
While most core settings require PowerShell commands today, some related tasks are easier through graphical tools like Hyper-V Manager—especially when managing multiple hosts at once!
To begin:
1. Open Hyper-V Manager, locate your target VM under its assigned host node,
2. Right-click its name then choose Turn Off if not already powered down,
3. After running required PowerShell commands above (since actual nesting toggle isn’t exposed here), return back into GUI mode,
4. Right-click same VM again > select Settings, then drill down into its assigned network adapter properties,
5. Under advanced features tick box labeled Enable MAC address spoofing, click OK,
From here onward use familiar wizards within either guest operating system—or parent—to add further roles/features including additional switches needed by deeper levels of nesting! Remember though: any change involving processor extension exposure always needs PowerShell intervention first.
How to Backup Hyper V Nested Virtual Machines with Vinchin Backup & Recovery
To ensure reliable protection of Hyper‑V nested virtual machines, organizations turn to Vinchin Backup & Recovery—a professional enterprise-level solution supporting over fifteen mainstream platforms including VMware, Proxmox, oVirt, OLVM, RHV, XCP-ng, XenServer, OpenStack, ZStack, and more—with robust capabilities tailored specifically for Hyper‑V environments as well as others listed above.
Vinchin Backup & Recovery delivers essential features such as forever incremental backup, data deduplication and compression, granular restore capabilities, scheduled backup policies, and cloud/tape archive options—all designed to maximize storage efficiency while minimizing management complexity and ensuring rapid recovery across diverse infrastructures.
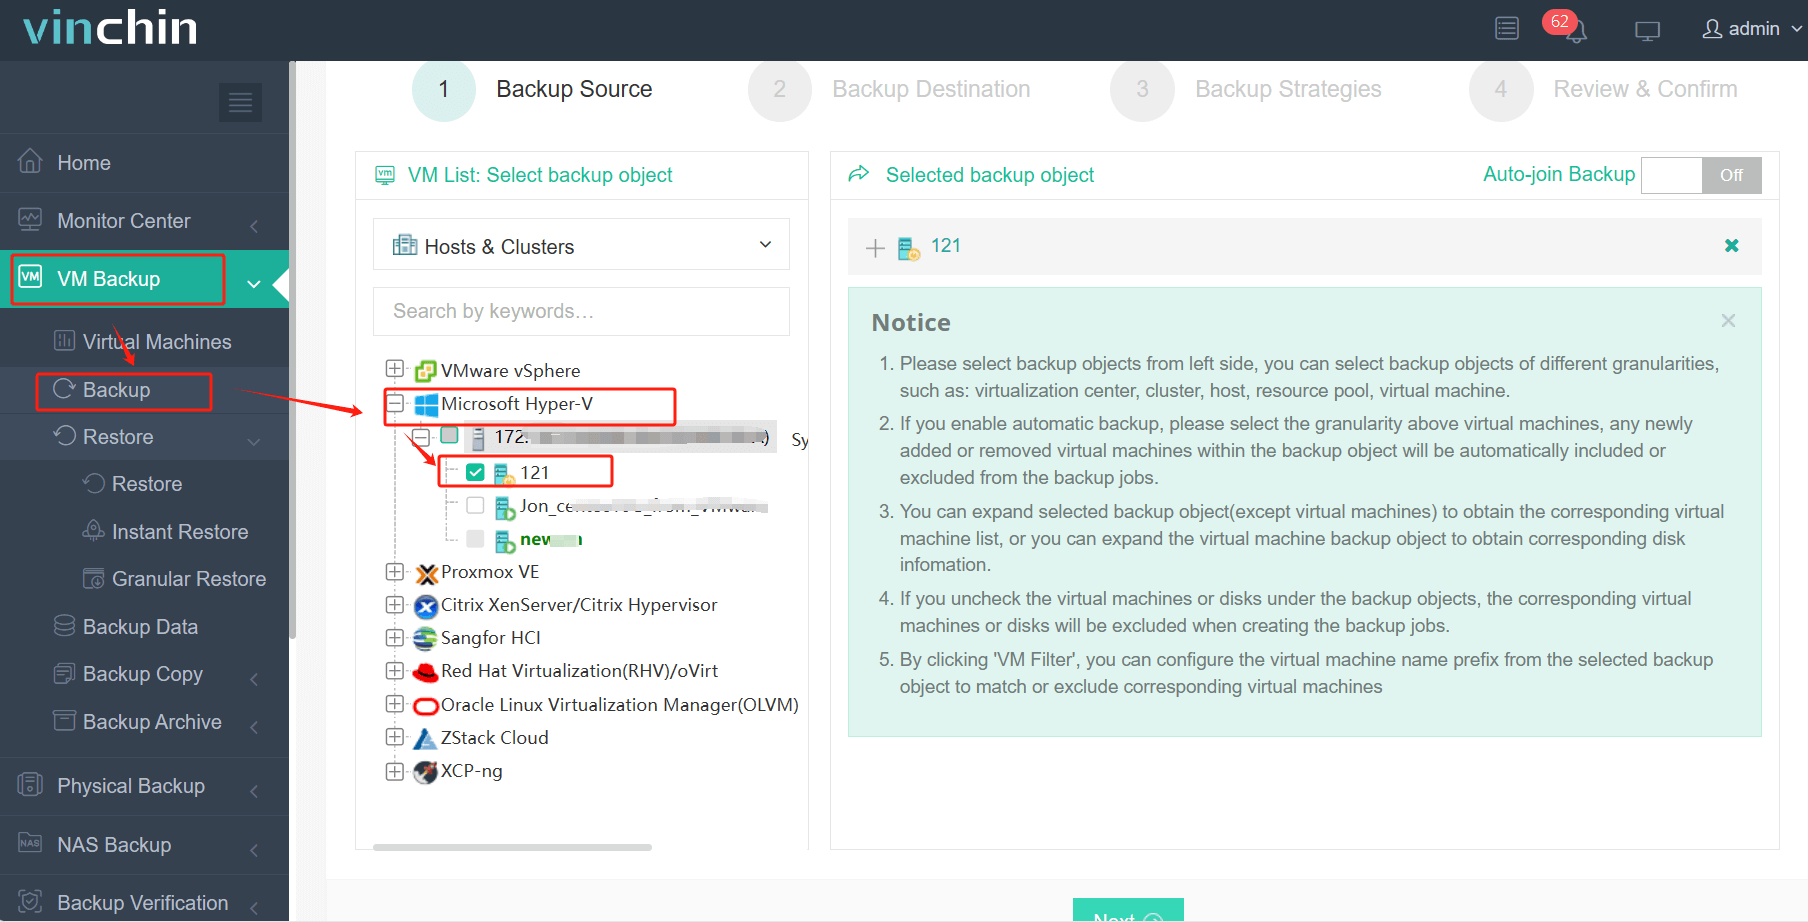
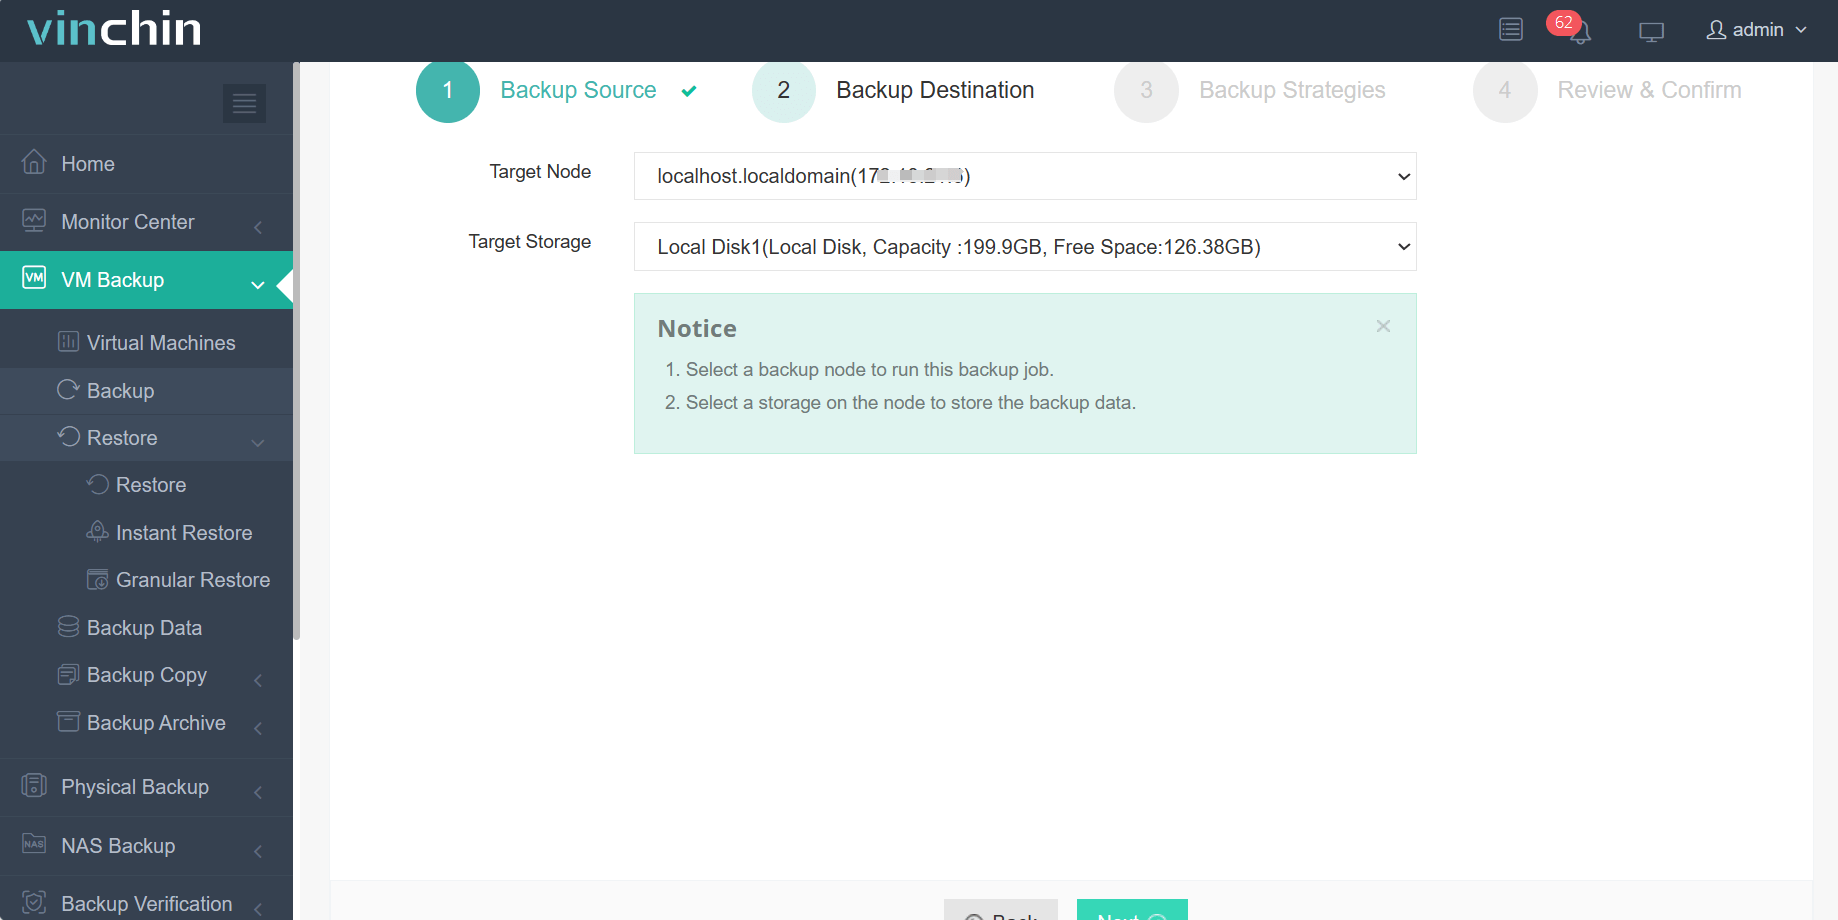
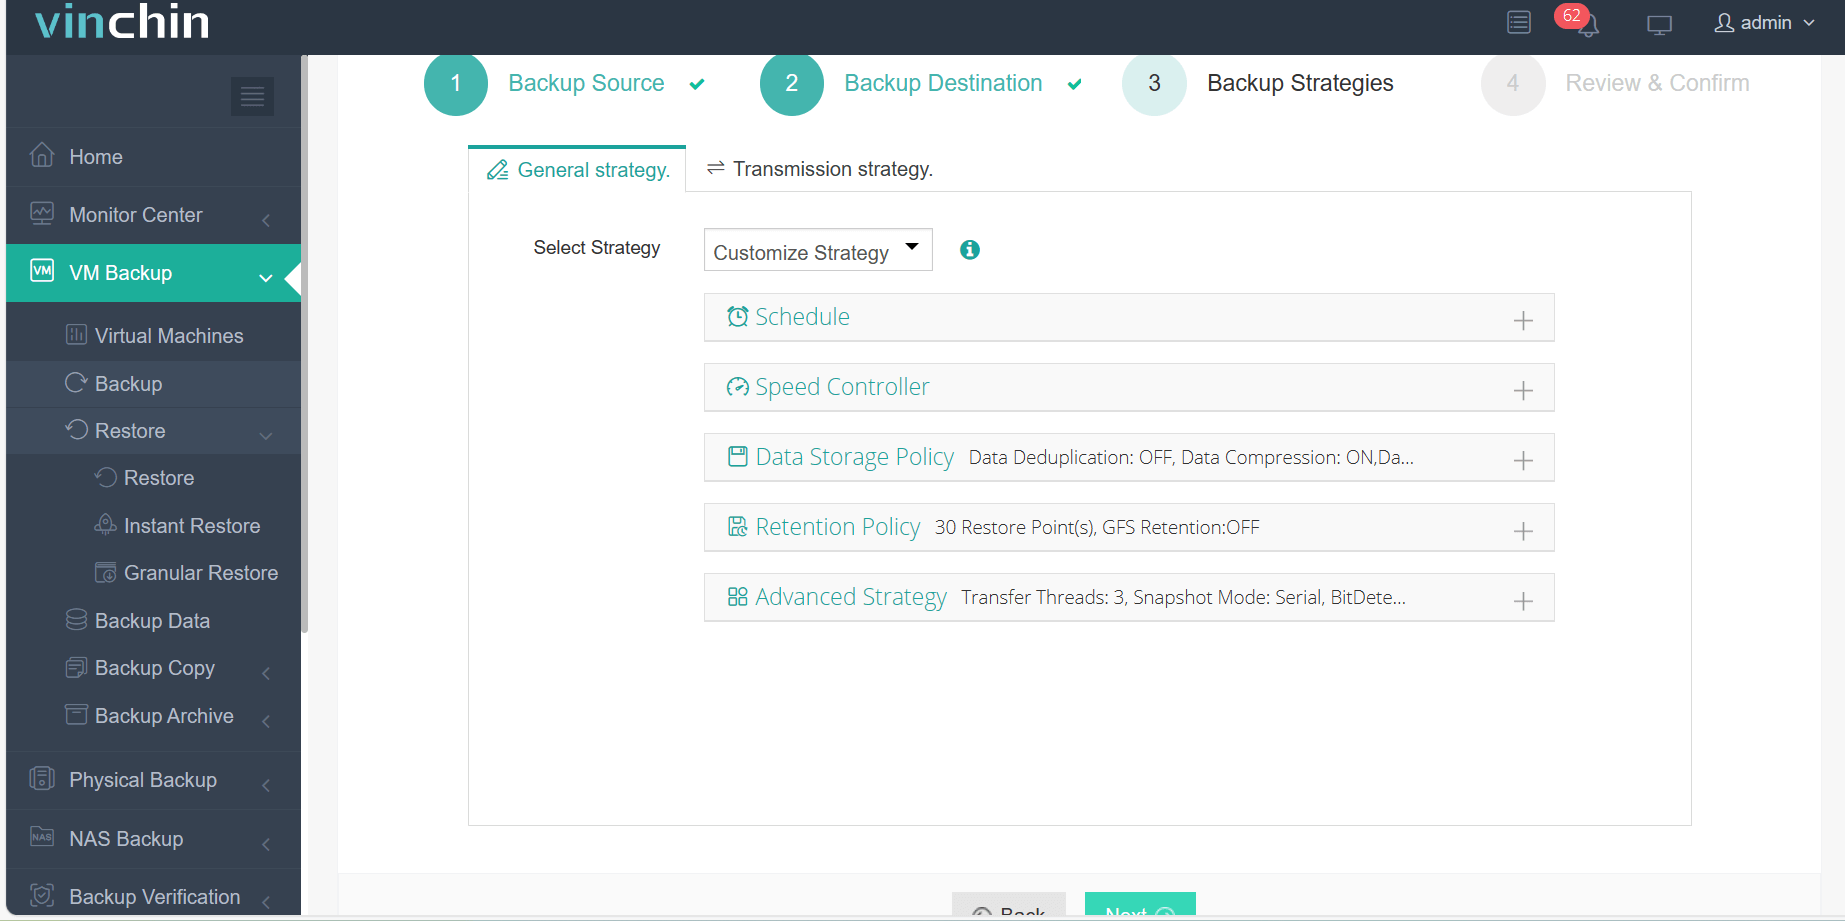
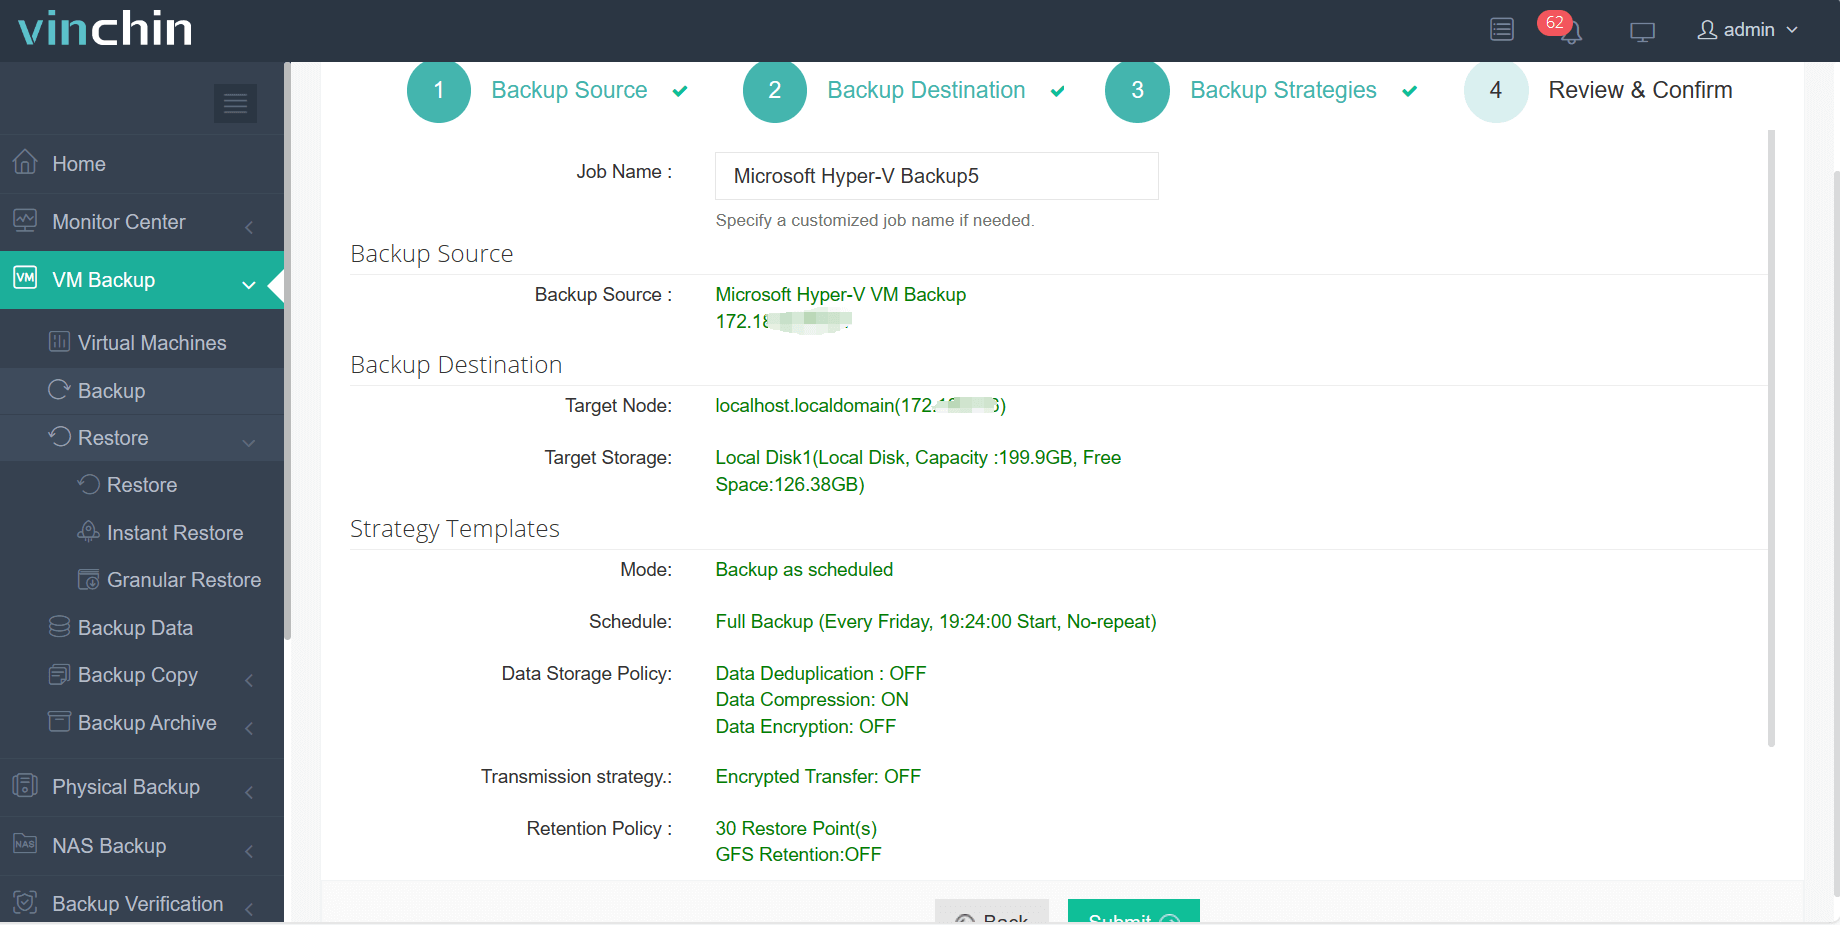
The intuitive Vinchin Backup & Recovery web console makes protecting Hyper‑V VMs straightforward:
Step 1: Select the Hyper-V VM to back up.

Step 2: Choose the backup storage.

Step 3: Configure the backup strategy.

Step 4: Submit the job.

Recognized globally with top ratings among enterprise users worldwide—and trusted by thousands—Vinchin Backup & Recovery offers a fully featured free trial valid for sixty days; click below to start safeguarding your environment today!
Hyper V Nested Virtualization FAQs
Q1: Can I live-migrate a running guest that uses nested virtualization?
No—you cannot live-migrate parent-level hosts while their guests have active nesting enabled due technical restrictions imposed by Microsoft today (see official docs).
Q2: How do I monitor resource usage across multiple layers?
Use built-in tools like HYPER-V MANAGER plus PowerShell cmdlets such as GET-VM combined with GET-PERFORMANCECOUNTERDATA inside both parent AND child operating systems simultaneously!
Q3: What should I do if my inner-most guest loses network connectivity suddenly?
Check that MAC ADDRESS SPOOFING remains enabled everywhere needed > review firewall/NAT rules > restart affected adapters/services if necessary.
Conclusion
With hyper v nested virtualization you gain powerful flexibility building secure labs/training spaces—all without extra hardware investment! Setup takes minutes once prerequisites met—and ongoing management stays simple thanks modern tools provided natively plus robust third-party solutions like Vinchin which streamline backups even further while reducing risk overall!
Share on:


