Virtualization has revolutionized IT infrastructure. VMware is the leading virtualization solution and vCenter Server stands at the heart of managing it. Whether you're a seasoned administrator or new to virtualization, this guide walks you through everything you need to know about vCenter Server, from its core features to installation, backup, and troubleshooting. Let’s dive in.
What is VMware vCenter Server?
VMware vCenter Server is the centralized management hub for VMware vSphere environments. It allows administrators to efficiently manage multiple ESXi hosts, clusters, and thousands of virtual machines (VMs) from a single interface. Think of it as the "control panel" for your virtual infrastructure.
Key Features:
Centralized Management: Control ESXi hosts, VMs, networks, and storage across your environment.
Resource Optimization: Pool compute, storage, and network resources for dynamic allocation.
High Availability: Automatically restart VMs on healthy hosts during failures.
vMotion: Migrate running VMs between hosts without downtime.
Lifecycle Management: Streamline patching and upgrades with vSphere Lifecycle Manager.
Enhanced Security: Integrate with Active Directory and enforce role-based access control.
It provides comprehensive features that other virtualization solutions don’t provide simultaneously, like workload balancing, disaster recovery, and automated provisioning, makes it indispensable for enterprises aiming to maximize efficiency and minimize downtime. Tha’t one of the reasons why companies often choose it.
Preparation Before Installation
Before deploying vCenter Server, ensure your environment meets these requirements:
Hardware Requirements
| Environment Size | Hosts/VMs | vCPUs | Memory | Storage (Default) |
|---|
| Tiny | ≤10/≤100 | 2 | 14 GB | 579 GB |
| Small | ≤100/≤1k | 4 | 21 GB | 694 GB |
| Medium | ≤400/≤4k | 8 | 30 GB | 908 GB |
| Large | ≤1k/≤10k | 16 | 39 GB | 1358 GB |
| X-Large | ≤2k/≤35k | 24 | 58 GB | 2283 GB |
Software & Network Prerequisites:
ESXi Host: Version 6.7 or later.
DNS: Forward/reverse records for the vCenter FQDN.
NTP Synchronization: Ensure all hosts and vCenter use the same time source.
Ports: Open required ports (e.g., 443 for HTTPS, 902 for host management).
Pro Tip: Use static IP addresses for vCenter to avoid DNS issues post-installation.
Usually, vCenter Server is installed on an ESXi VM, and there are two ways to install it, using he GUI or using CLI.
How to install VMware vCenter Server via GUI?
The GUI installation method is the most common way to deploy VMware vCenter Server. It uses the vCenter Server Appliance (VCSA) installer to deploy and initialize vCenter through a simple step-by-step wizard, making it suitable for most VMware environments.
Stage 1: Deploy the vCenter Appliance
1. Download VMware vCenter Server Appliance ISO from Broadcom Support
2. Mount the ISO and open the vcsa-ui-installer folder.
3. Run Installer.exe and click Install.
4. Read the EULA and configure the VM name and root password.
5. Select deployment size and datastore.
6. Configure network settings (IP, subnet mask, gateway, FQDN).
7. Review the settings and click Finish to deploy the OVA.
Stage 2: Initialize vCenter
1. Click Continue after deployment completes.
2. Configure NTP time synchronization.
3. Create the SSO domain and password.
4. Disable or enable CEIP based on preference.
5. Click Finish to complete the installation.
After installation, access the vSphere Client:
https://vcenter.example.com/ui
How to install VMware vCenter Server via CLI?
This method lets you deploy vCenter Server using command-line instructions instead of the GUI, providing faster, repeatable, and scriptable installation and is ideal for automated or large-scale VMware environments. Installing vCenter via CLI is more automatic, but you should make sure the configuration is right.
1. Copy the template from the ISO
cp /mnt/vcsa/vcsa-cli-installer/templates/install/embedded_vCSA_on_ESXi.json ~/config.json
2. Edit config.json with your details
{
  "new_vcsa": {
    "esxi": {
      "hostname": "192.168.1.50",
      "username": "root",
      "password": "ESXi-Password",
      "datastore": "datastore1"
    },
    "appliance": {
      "deployment_option": "small",
      "name": "vCenter-CLI"
    },
    "network": {
      "ip_family": "ipv4",
      "mode": "static",
      "ip": "192.168.1.101",
      "prefix": "24",
      "gateway": "192.168.1.1",
      "dns_servers": ["8.8.8.8"]
    },
    "os": {
      "password": "Root-Password",
      "ntp_servers": ["pool.ntp.org"]
    },
    "sso": {
      "password": "Admin@123",
      "domain_name": "vsphere.local"
    }
  }
}
3. Run the CLI Installer
cd /mnt/vcsa/vcsa-cli-installer/lin64
./vcsa-deploy install ~/config.json --accept-eula --acknowledge-ceip
4. Log in to vSphere Client in a brower at https://vcenter.example.com/ui with username administrator@vsphere.local and password
5. Go to Menu > Hosts and Clusters > right-click Datacenter > add Host
6. Enter the ESXi host’s IP, root username, and password > click Next to complete.
How to backup and restore vCenter Server?
Although some IT admins don’t think it is necessary, continuous and stable data backup ensures business continuity and quick restore critical production data in case of failures. If you want to backup vCenter, the following steps:
1. Navigate to https://<vCenter-IP>:5480
2. Select Backup
3. Schedule backups to FTP/SFTP/NFS with encryption
4. Include "Stats, Events, Tasks" for comprehensive recovery
When it is needed to recovery it, you can try the steps bellow,
1. Deploy a new vCenter appliance using the installer’s Restore option.
2. Point to the backup location and validate SSO credentials.
How to protect VMware virtual machine in vCenter?
Exporting VMs directly from vCenter can provide basic data protection for small labs or testing environments, but production workloads in large-scale environments usually require a more reliable and centralized backup solution.
Vinchin Backup & Recovery is an enterprise backup solution designed for virtual environments such as VMware, Hyper-V, Proxmox, oVirt, OLVM, XCP-ng, and XenServer, etc. It provides agentless VM backup, freeing you from complicated deployment. Moreover, it includes various advanced features to meet your personalized VM protection needs.
Features like instant recovery, LAN-free backup, DR testing, and cross-platform migration help organizations simplify backup management and improve disaster recovery efficiency.
Let’s see how to create a job for VMware backup in 4 steps:
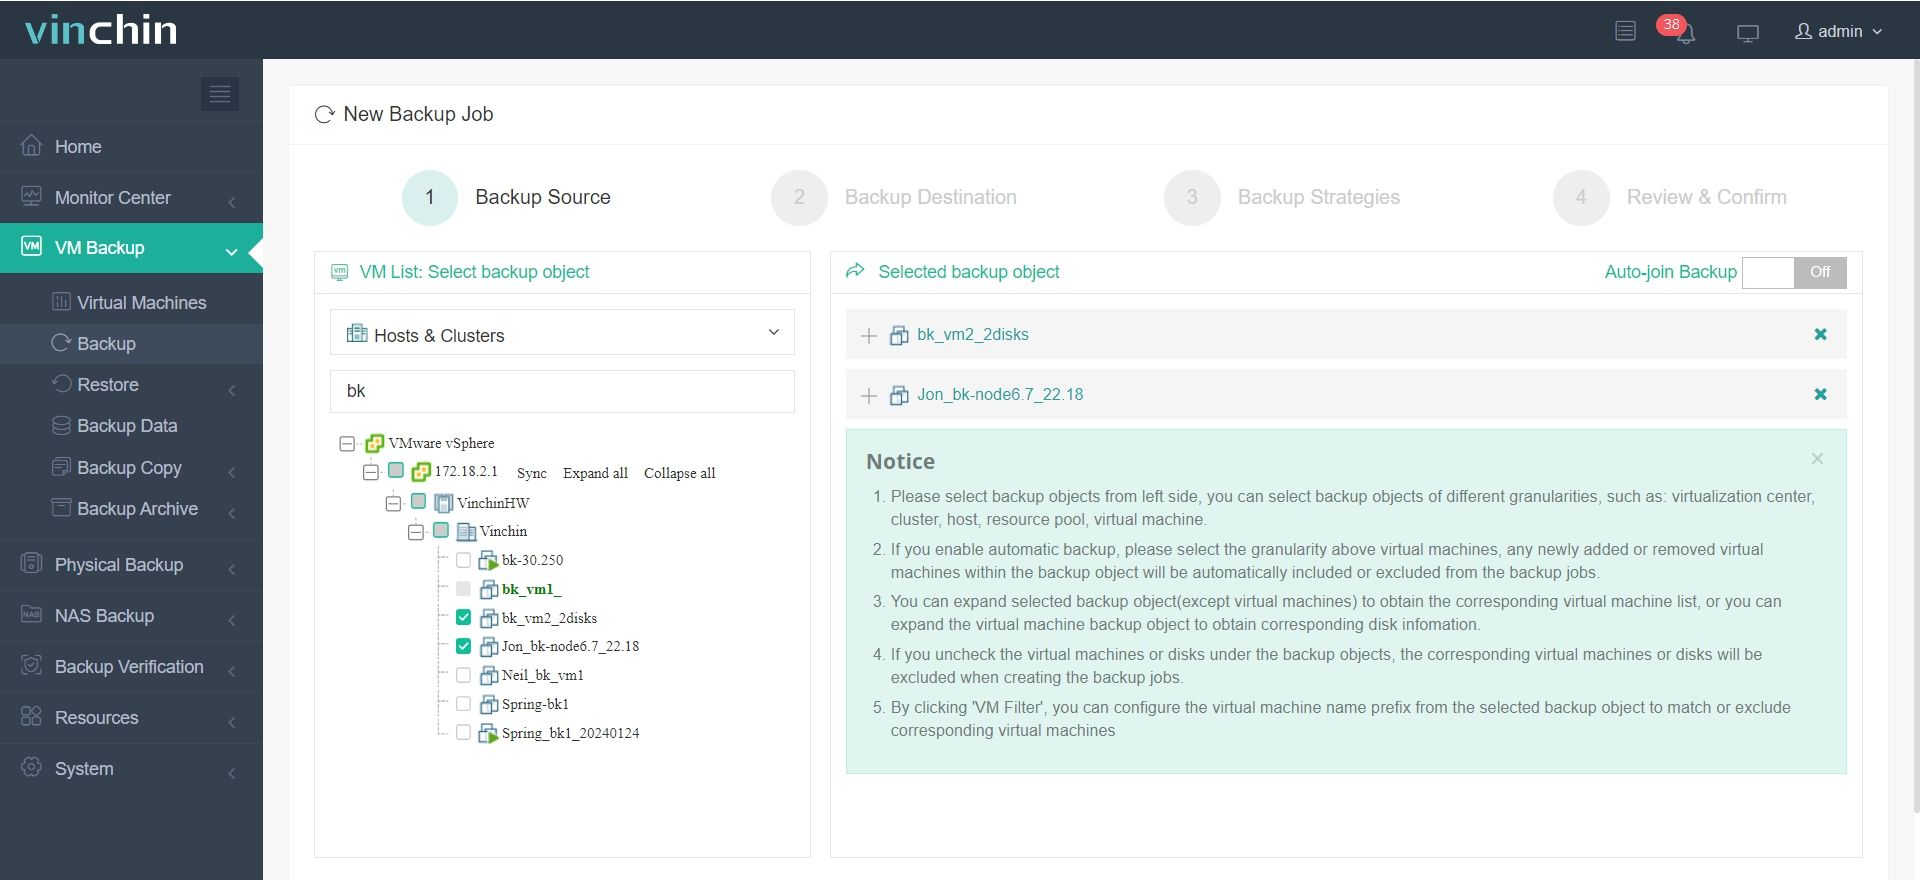
1. Expand VM Backup > Backup and choose the VMware VM you want to backup from the inventory tree.
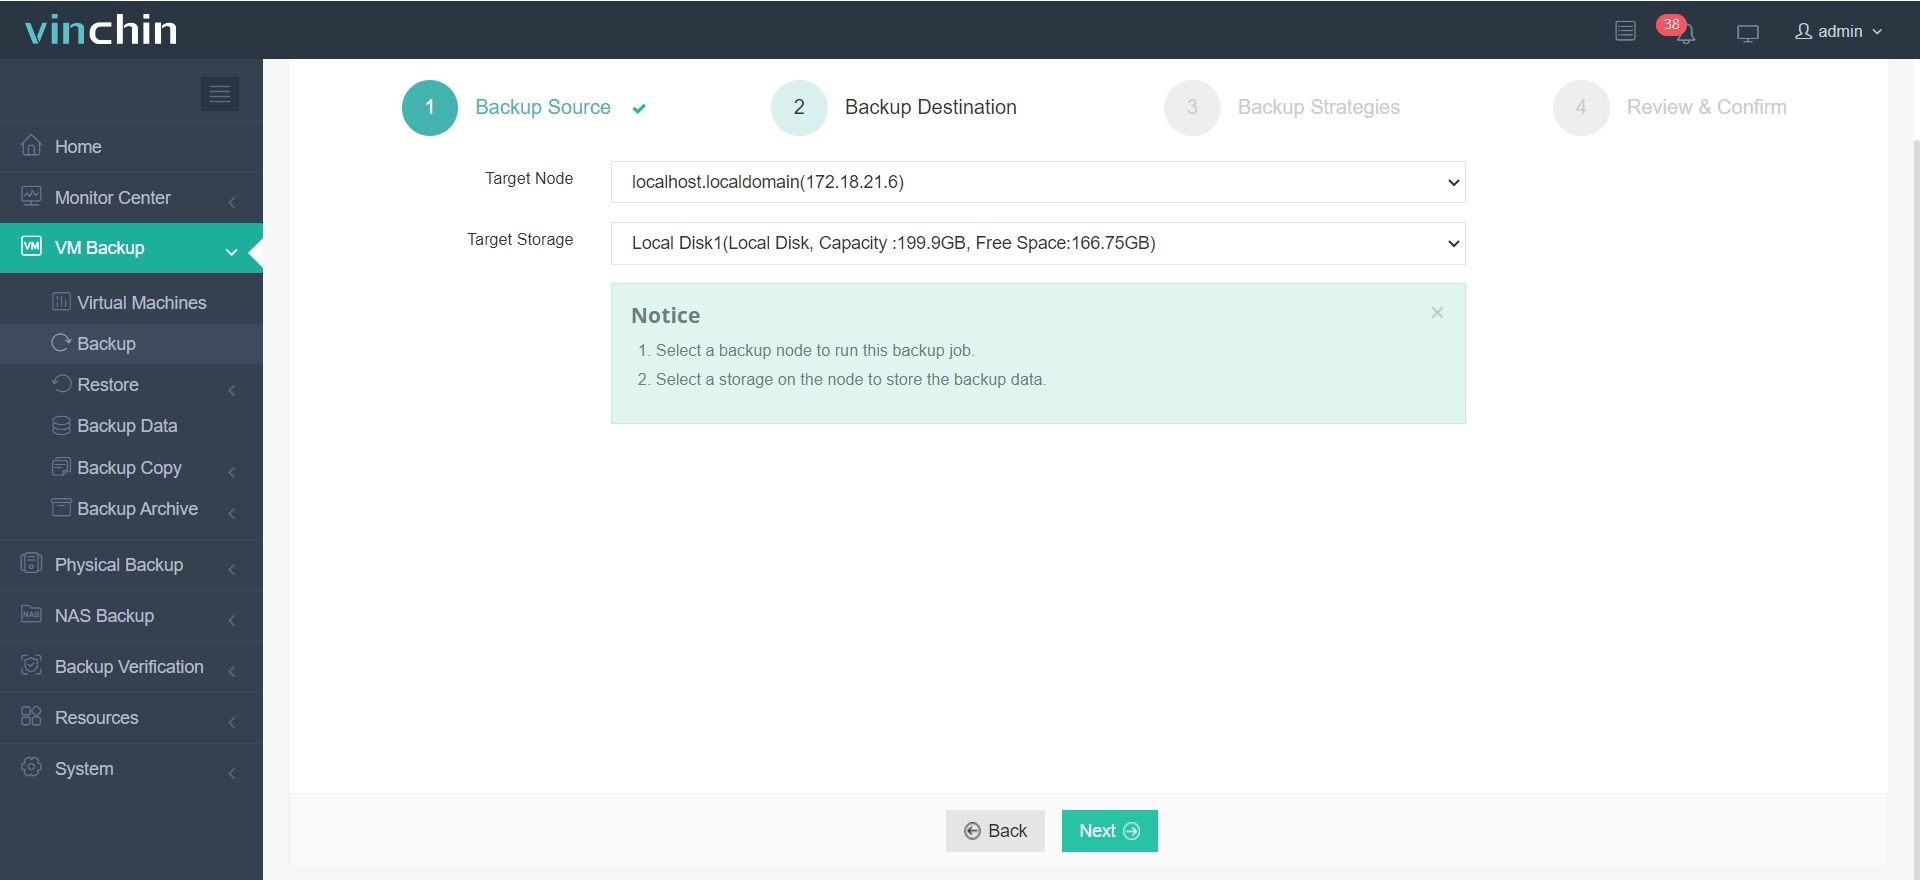
2. Select a backup node to run the job and a storage device to store the backup data.
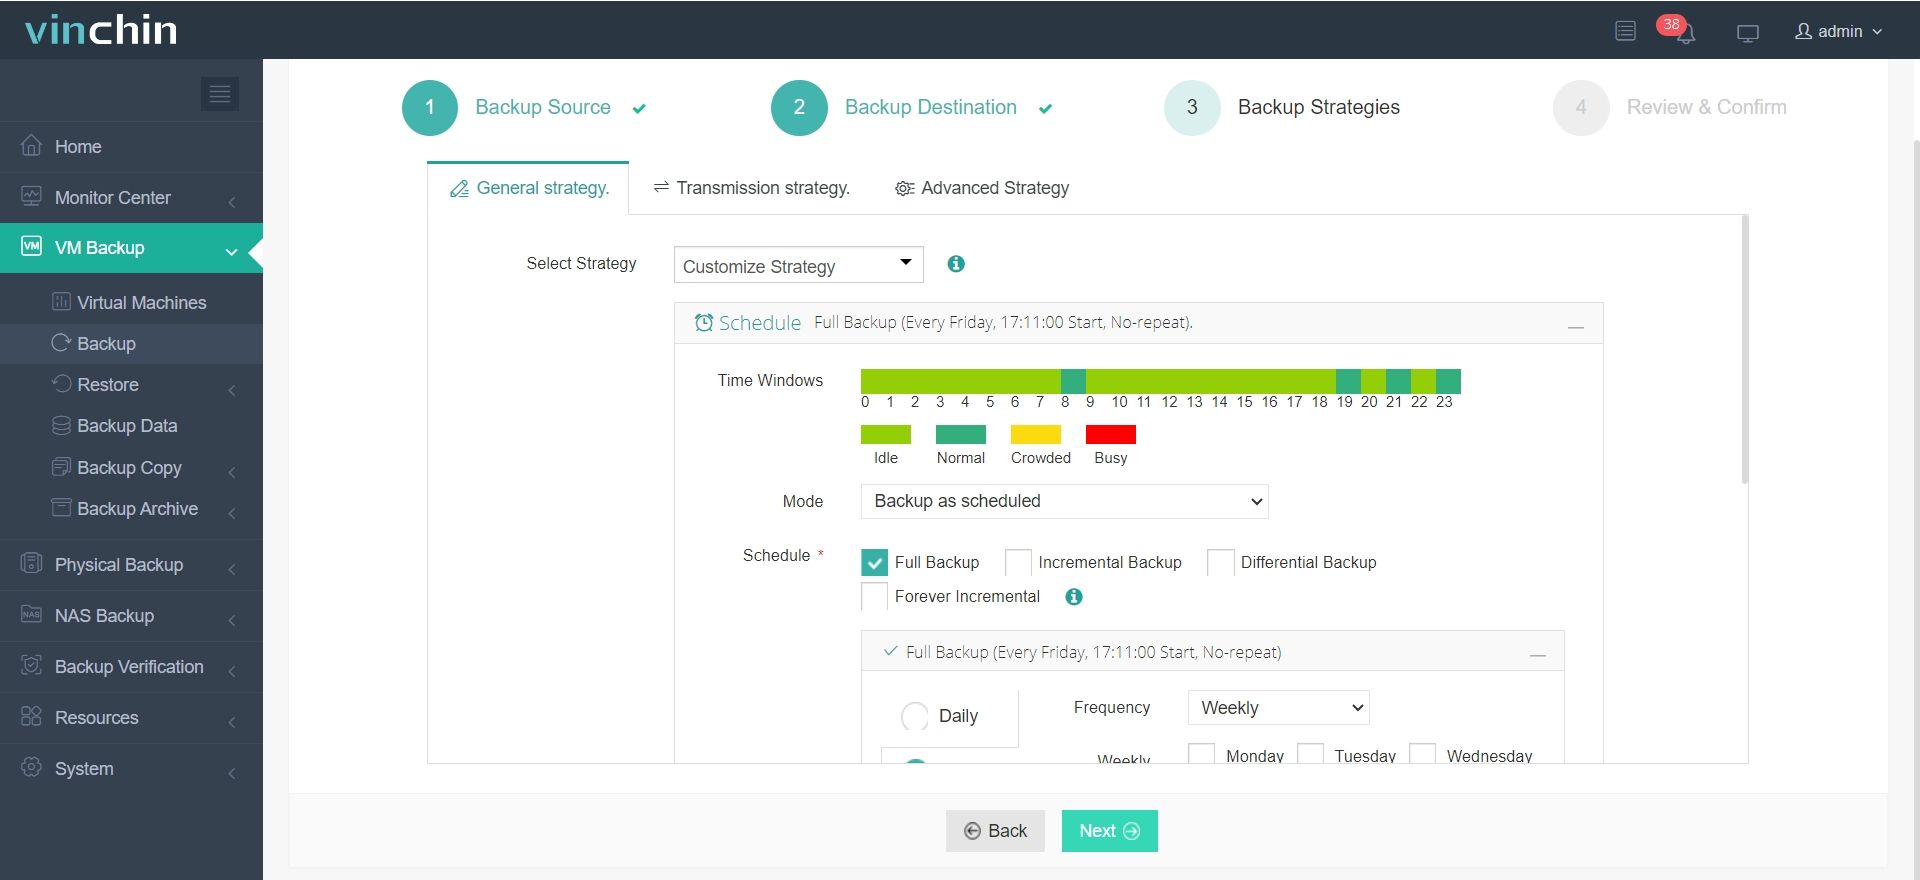
3. Then customize the backup strategy; set time windows, mode, and schedule plan tailored to your requirements.
4. Review the backup details and click Submit to initiate the backup task.
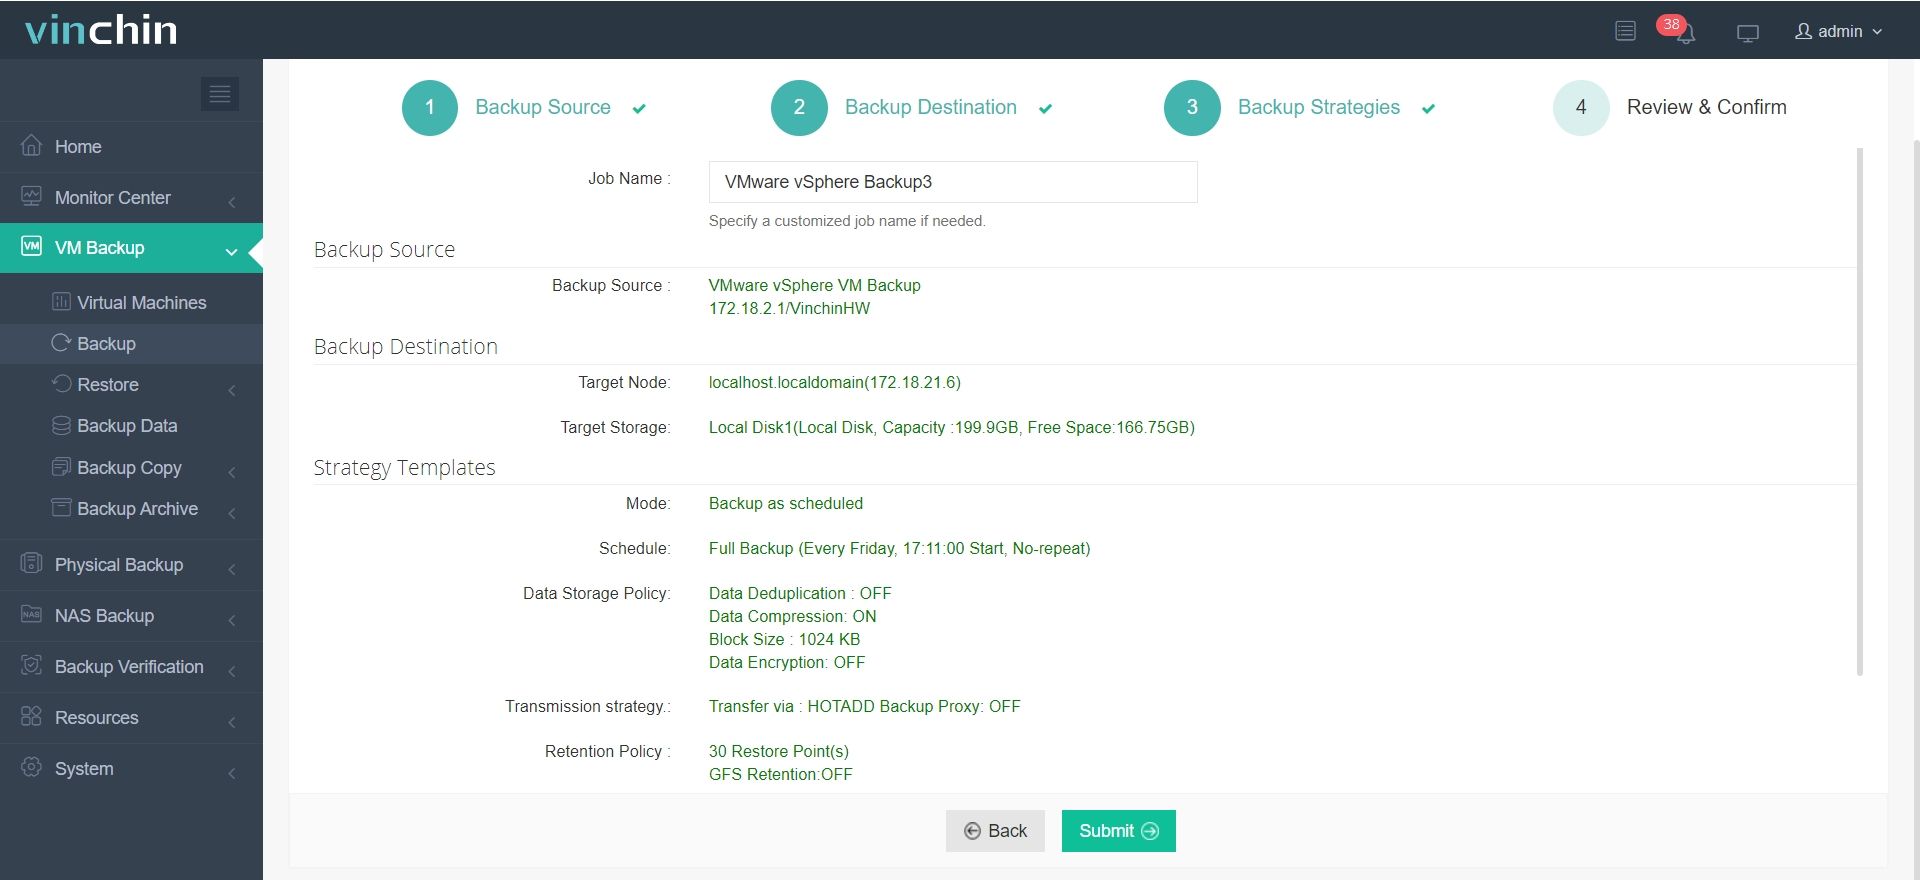
Vinchin has been in the field of VM backup for 10 years, and gained reputations from all over the world. You can also try this professional software with a 60-day full-featured free trial. Just click the button bellow to get the installation package.
vCenter deployment FAQs
1. What to do if the installation fails with Certificate validation error?
This issue is usually caused by untrusted or expired SSL certificates on ESXi hosts. Verify the host certificates first, or temporarily bypass certificate validation during CLI installation by using the --no-ssl-certificate-verification parameter.
2. What if vCenter services won’t start after restore?
Check whether the restored vCenter Server is using the same IP address, hostname, and DNS configuration as the original backup. Network mismatches can prevent vCenter services from starting properly.
3. How to solve DNS resolution failures?
Make sure DNS records for both vCenter Server and ESXi hosts are correctly configured. If DNS is temporarily unavailable, you can add the required hostname and IP mappings to the /etc/hosts file as a temporary workaround.
Conclusion
VMware vCenter Server is the backbone of efficient virtualization management. By following best practices for installation, backup, and troubleshooting, you ensure a resilient and scalable environment. Whether automating deployments via CLI or leveraging HA for uptime, vCenter empowers IT teams to focus on innovation; not infrastructure chaos.